The MSactivator™ provides support for high availability, based on "Docker Engine Swarm" mode.
Overview
The MSactivator™ provides support for high availability, based on "Docker Engine Swarm" mode.

Manager nodes handle cluster management tasks such as:
-
maintaining cluster state
-
scheduling services
-
serving swarm mode HTTP API endpoints
⇒ A swarm with 3 managers will tolerates a maximum loss of 1 manager
⇒ Adding more managers does NOT mean increased scalability or higher performance. In general, the opposite is true.
Worker nodes are also instances of Docker Engine but their sole purpose is to execute containers. Worker nodes don’t participate in the Raft distributed state, make scheduling decisions, or serve the swarm mode HTTP API.
Configure manager nodes for fault tolerance
Based on docker documentation, it’s better to maintain an odd number of managers in the swarm to support manager node failure.
-
Smarm size : number of manager nodes in your HA setup
-
Majority : minimum number of manager nodes required for the stability of HA platform (quorum)
-
Fault tolerance: number of manager nodes you can lose and still have a stable setup
| Swarm Size | Majority | Fault Tolerance |
|---|---|---|
1 |
1 |
0 |
2 |
2 |
0 |
3 |
2 |
1 |
4 |
3 |
1 |
5 |
3 |
2 |
6 |
4 |
2 |
Roles of each container
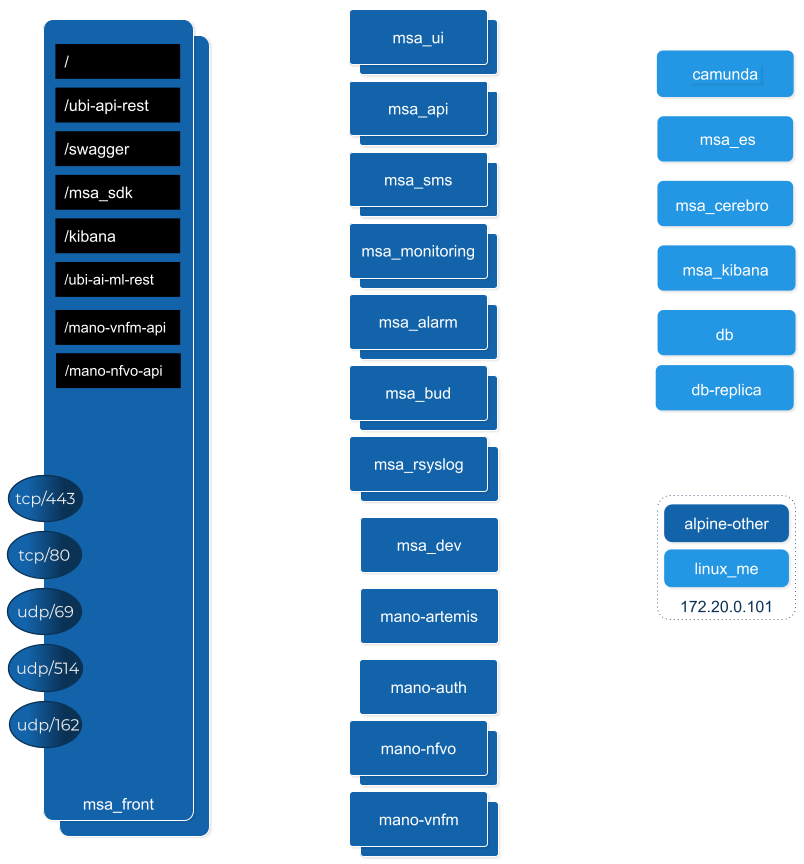
Refer to the architecture overview to see the list of the containers and their roles.
Prerequisites
MSactivator™ High Availability is based on Docker Engine Swarm mode, and requires:
Swarm nodes
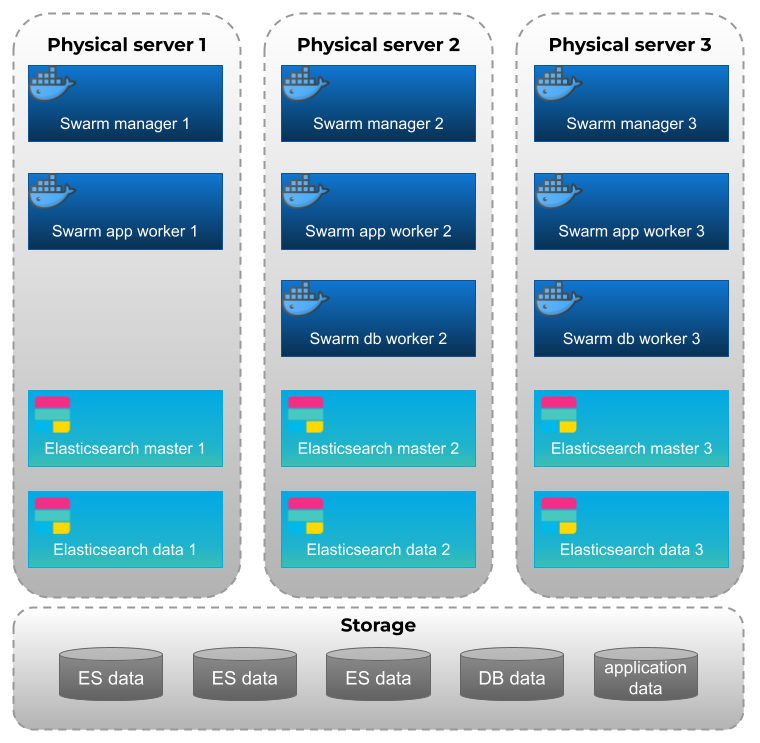
To provide proper availability the swarm nodes (VM) should be distributed over 3 physical server
A minimum of 8 VMs deployed and distributed over the physical servers.
-
3 Docker Swarm manager
-
3 Docker Swarm worker for application containers
-
2 Docker Swarm worker for database containers (primary and replica)
Volumes
A shared mount point (from a NAS or Global File System):
Mount point on all VMs is /mnt/NASVolume. Those directories must be created manually to have HA platform working correctly
On Linux, you can use this bash command to create the directories
sudo mkdir -p /mnt/NASVolume/msa_db  \
/mnt/NASVolume/msa_es  \
/mnt/NASVolume/msa_entities  \
/mnt/NASVolume/msa_ai_ml_db  \
/mnt/NASVolume/msa_dev  \
/mnt/NASVolume/mano_db  \
/mnt/NASVolume/mano_vnfm  \
/mnt/NASVolume/mano_nfvo  \
/mnt/NASVolume/msa_dev  \
/mnt/NASVolume/msa_repository  \
/mnt/NASVolume/rrd_repository  \
/mnt/NASVolume/msa_svn  \
/mnt/NASVolume/msa_svn_ws  \
/mnt/NASVolume/msa_api_keystore \
/mnt/NASVolume/msa_api  \
/mnt/NASVolume/msa_sms_logs/snmp \
/mnt/NASVolume/msa_front_conf \
/mnt/NASVolume/kafka_data \
/mnt/NASVolume/mano_artemis \
/mnt/NASVolume/msa_api_logs
Set owner to the PostgreSQL service
sudo chown 70 /mnt/NASVolume/msa_db
sudo chown 70 /mnt/NASVolume/mano_db
Set owner the other services
sudo chown 1000.1000 /mnt/NASVolume/msa_dev \
/mnt/NASVolume/msa_es \
/mnt/NASVolume/msa_entities \
/mnt/NASVolume/msa_ai_ml_db \
/mnt/NASVolume/msa_repository \
/mnt/NASVolume/mano_db  \
/mnt/NASVolume/mano_vnfm  \
/mnt/NASVolume/mano_nfvo  \
/mnt/NASVolume/msa_api  \
/mnt/NASVolume/msa_svn_ws  \
/mnt/NASVolume/rrd_repository \
/mnt/NASVolume/msa_api_keystore \
/mnt/NASVolume/msa_svn \
/mnt/NASVolume/msa_front_conf \
/mnt/NASVolume/msa_api_logs
sudo chown -R 1001.0 /mnt/NASVolume/kafka_data
sudo chown -R 1001.1001 /mnt/NASVolume/mano_artemis
Networking
The IP addresses of the manager machine must be assigned to a network interface available to the host operating system. All nodes in the swarm need to connect to the manager at the IP address.
The other nodes contact the manager nodes on their IP addresses therefore you should use a fixed IP address.
Firewall
The following ports must be available on Manager node (see below configure the firewall on how to configure this on CentOS 7):
-
TCP port 2377 for cluster management communications
-
TCP and UDP port 7946 for communication among nodes
-
UDP port 4789 for overlay network traffic
| If you plan on creating an overlay network with encryption (--opt encrypted), you also need to ensure ip protocol 50 (ESP) traffic is allowed. |
More information about Docker Engine Swarm available here: swarm tutorial.
Elasticsearch nodes
To provide proper availability the elasticsearch nodes (VM) should be distributed over 3 physical server
A minimum of 6 VMs deployed and distributed over the physical servers.
-
3 Elasticsearch master nodes
-
3 Elasticsearch data nodes
Installing the application in HA mode
Enable Docker swarm mode
To enable swarm mode on the "Docker Swarm Manager" machine:
$ sudo docker swarm init --advertise-addr <SWARM MANAGER IP>Replace SWARM MANAGER IP with your Swarm Manager IP address.
Normal output contains "docker swarm join" command:
Swarm initialized: current node (efkok8n0eiy4f6xu48zaro3x8) is now a manager.

To add a worker to this swarm, run the following command:

    docker swarm join --token SWMTKN-1-4okdpjkrwzocwgqor1o9r5ck0xah646emhtgf9d3t4f4n11jgn-5a9ms5okxyxzjmcbz09pc9ujq <SWARM MANAGER IP>:2377

To add a manager to this swarm, run 'docker swarm join-token manager' and follow the instructions.
To enable swarm mode on Workers:
$ sudo docker swarm join --token SWMTKN-1-4okdpjkrwzocwgqor1o9r5ck0xah646emhtgf9d3t4f4n11jgn-5a9ms5okxyxzjmcbz09pc9ujq <SWARM MANAGER IP>:2377Normally you should see:
This node joined a swarm as a worker.| In case of any error like: Error response from daemon: rpc error: code = Unavailable desc = all SubConns are in TransientFailure, latest connection error: connection error: desc = "transport: Error while dialing dial tcp 10.31.1.172:2377: connect: no route to host" Check for Iptables rules on the manager node. |
To disable the swarm mode $ sudo docker swarm leave --force
|
Starting MSA from the "Docker Swarm Manager" machine
The quickstart project provides a sample docker compose file to help you getting started with MSactivator™ on Docker Swarm
-
$ sudo docker node lsto check if all nodes are connected and active. -
$ git clone https://github.com/ubiqube/quickstart.gitclone git repository. -
$ cd ./quickstart/to change directory. -
$ sudo docker stack deploy --with-registry-auth -c docker-compose.ha.yml msato run installation. -
Verify:
$ sudo docker stack services msa
ID                  NAME                MODE                REPLICAS            IMAGE
7c5x50tjvmmj        msa_msa_ui          replicated          1/1                 ubiqube/msa2-ui:45b85fa03ade5a070f8df3a08c3ab64e315e38c9
ac3mb7fhhivu        msa_camunda         replicated          1/1                 camunda/camunda-bpm-platform:latest
e0rxtyv10lzi        msa_msa_front       replicated          1/1                 ubiqube/msa2-front:0576df6db6445ac10dd5e4503c3867e216db4302
elx9q04c9jb8        msa_msa_linux       replicated          1/1                 efeubiqube/linuxe2e:latest
qmrw49j2ejto        msa_msa_api         replicated          3/3                 ubiqube/msa-api:642242a9cc03553cd31436635853bd739fff420e
s72z7aux2jox        msa_msa_bud         replicated          1/1                 ubiqube/msa2-bud:42951df0800592a00a651717ab4a13573562e63c
tz6qsmts59z4        msa_db              replicated          1/1                 ubiqube/msa2-db:a04c9cf8ac13fe28e2d02cc2a37d1552ee6bdb44
widazn0p3smq msa_msa_sms replicated 1/1 ubiqube/msa2-sms:3e32150a5202db71211d2bd453af883894c52513| on CentOS 7 you need to configure the firewall to allow Docker Swarm. |
OpenMSA library
To have predefined Device Adapters, Microservices and Workflows from https://github.com/openmsa, on the node where msa_dev is running, execute this command
docker exec $(docker ps -q -f name=msa_dev) /usr/bin/install_libraries.sh
Once done, restart msa_api and msa_sms services
docker service update --force devmsaha_msa_api
docker service update --force devmsaha_msa_sms
Fix swarm route
In order to fix routes on swarm, after installation, upgrades or restart:
$ ./scripts/swarm-fix-all-nodes.sh
Backup
How to backup the swarm environment:
In order to perform a backup please refer to backup the swarm which will give you the information you need.
Commands and tips
docker swarm init --advertise-addr 10.31.1.172
docker stack deploy --with-registry-auth -c docker-compose.simple.ha.yml ha
(Token retrieve after executing swarn init on the manager)
docker swarm join --token SWMTKN-1-5s84r5gaj2vh6t3duf1ed5vrh7paj6vacmdihtnmxzyzojvp75-aepejepsfgw8ffz38ajentpia 10.31.1.172:2377
(Token retrieve after executing swarm join-token manager on the manager)
docker swarm join --token SWMTKN-1-5s84r5gaj2vh6t3duf1ed5vrh7paj6vacmdihtnmxzyzojvp75-aepejepsfgw8ffz38ajentpia 10.31.1.172:2377
# docker node ls
ID                            HOSTNAME            STATUS              AVAILABILITY        MANAGER STATUS      ENGINE VERSION
1s9p18pjsl7og0xw5xw5yqpbh *   QA-UBI-HADKR-MAN1   Ready               Active              Leader              19.03.12
3v5r08jy7hvktdgl59bco75vl     QA-UBI-HADKR-MAN2   Ready               Active              Reachable           19.03.12
mmq5197bflac56ry8dpsl6hef     QA-UBI-HADKR-MAN3   Ready               Active              Reachable           19.03.12
# docker service ls
ID                  NAME                MODE                REPLICAS               IMAGE                                                            PORTS
qyse3efoadw6        ha_camunda          replicated          1/1 (max 1 per node)   camunda/camunda-bpm-platform:latest
vdjii0atvfmr        ha_db               replicated          1/1                    ubiqube/msa2-db:2b7c486764c882abe1a720094ec5159d3bd75389
whb2cd6aepnt        ha_msa_api          replicated          1/1 (max 1 per node)   ubiqube/msa-api:01c2449225961e288c0d0e47795193b97da28a8c
ikoxzkf15hdc        ha_msa_bud          replicated          1/1                    ubiqube/msa2-bud:26cf8835dadb548dd8c23edc8b7d671c1489d10b
prl9sferl4fm        ha_msa_cerebro      replicated          1/1 (max 1 per node)   lmenezes/cerebro:latest                                          *:9000->9000/tcp
nesi7prjk38a        ha_msa_dev          replicated          1/1                    ubiqube/msa2-linuxdev:f1da0641d2dc5af04d98559c7540cdbac7393a33
e008xt6hirr4        ha_msa_es           replicated          1/1 (max 1 per node)   ubiqube/msa2-es:037a2067826b36e646b45e5a148431346f62f3a6
bpipa8eiljjq        ha_msa_front        replicated          1/1 (max 1 per node)   ubiqube/msa2-front:d0285edfb9d59047b006da091a28b7ea7c1ead2e
q4286mbi47j6        ha_msa_linux        replicated          1/1                    efeubiqube/linuxe2e:latest
xi0m7pmk6pwn        ha_msa_sms          replicated          1/1 (max 1 per node)   ubiqube/msa2-sms:feefa4f1f72a0c28d8f01aaa455ec2f834becbed
a4te8kezivvu        ha_msa_ui           replicated          1/1 (max 1 per node)   ubiqube/msa2-ui:4ab34eda0af7540a3c19ccc657b0ec2e3fd3d57
docker swarm leave --force
# To scale msa_api to 3 instances
docker swarm scale ha_msa_api=3
Change the docker-compose file alter the "replicas" number and run docker stack deploy --with-registry-auth -c docker-compose.simple.ha.yml ha
Firewall configuration
Firewalld is the default firewall application on CentOS 7, but on a new CentOS 7 server, it is disabled out of the box. So let’s enable it and add the network ports necessary for Docker Swarm to function.
use yum install firewalld to Firewalld if it’s not installed yet.
|
Before starting, verify its status (use sudo if you don’t have root privileges):
systemctl status firewalld
Start firewalld:
systemctl start firewalld
Then enable it so that it starts on boot:
systemctl enable firewalld
On the node that will be a Swarm manager, use the following commands to open the necessary ports:
firewall-cmd --add-port=2376/tcp --permanent
firewall-cmd --add-port=2377/tcp --permanent
firewall-cmd --add-port=7946/tcp --permanent
firewall-cmd --add-port=7946/udp --permanent
firewall-cmd --add-port=4789/udp --permanent
Note: If you make a mistake and need to remove an entry, type: firewall-cmd --remove-port=port-number/tcp -permanent.
|
Afterwards, reload the firewall:
firewall-cmd --reload
Then restart Docker.
systemctl restart docker
Then on each node that will function as a Swarm worker, execute the following commands:
firewall-cmd --add-port=2376/tcp --permanent
firewall-cmd --add-port=7946/tcp --permanent
firewall-cmd --add-port=7946/udp --permanent
firewall-cmd --add-port=4789/udp --permanent
Afterwards, reload the firewall:
firewall-cmd --reload
Restart Docker.
systemctl restart docker
Ouside network access
If you’ll be testing applications on the cluster that require outside network access, be sure to open the necessary ports.
For example, if you’ll be testing a Web application that requires access on port 80, add a rule that grants access to that port using the following command on all the nodes (managers and workers) in the cluster:
firewall-cmd --add-port=80/tcp --permanent
Remember to reload the firewall when you make this change.
