The microservice editor is a web based UI tool for designing, developing, testing and releasing microservices.
Microservice editor
Overview
From the developer portal, click on "Create Microservice" to create the microservice.
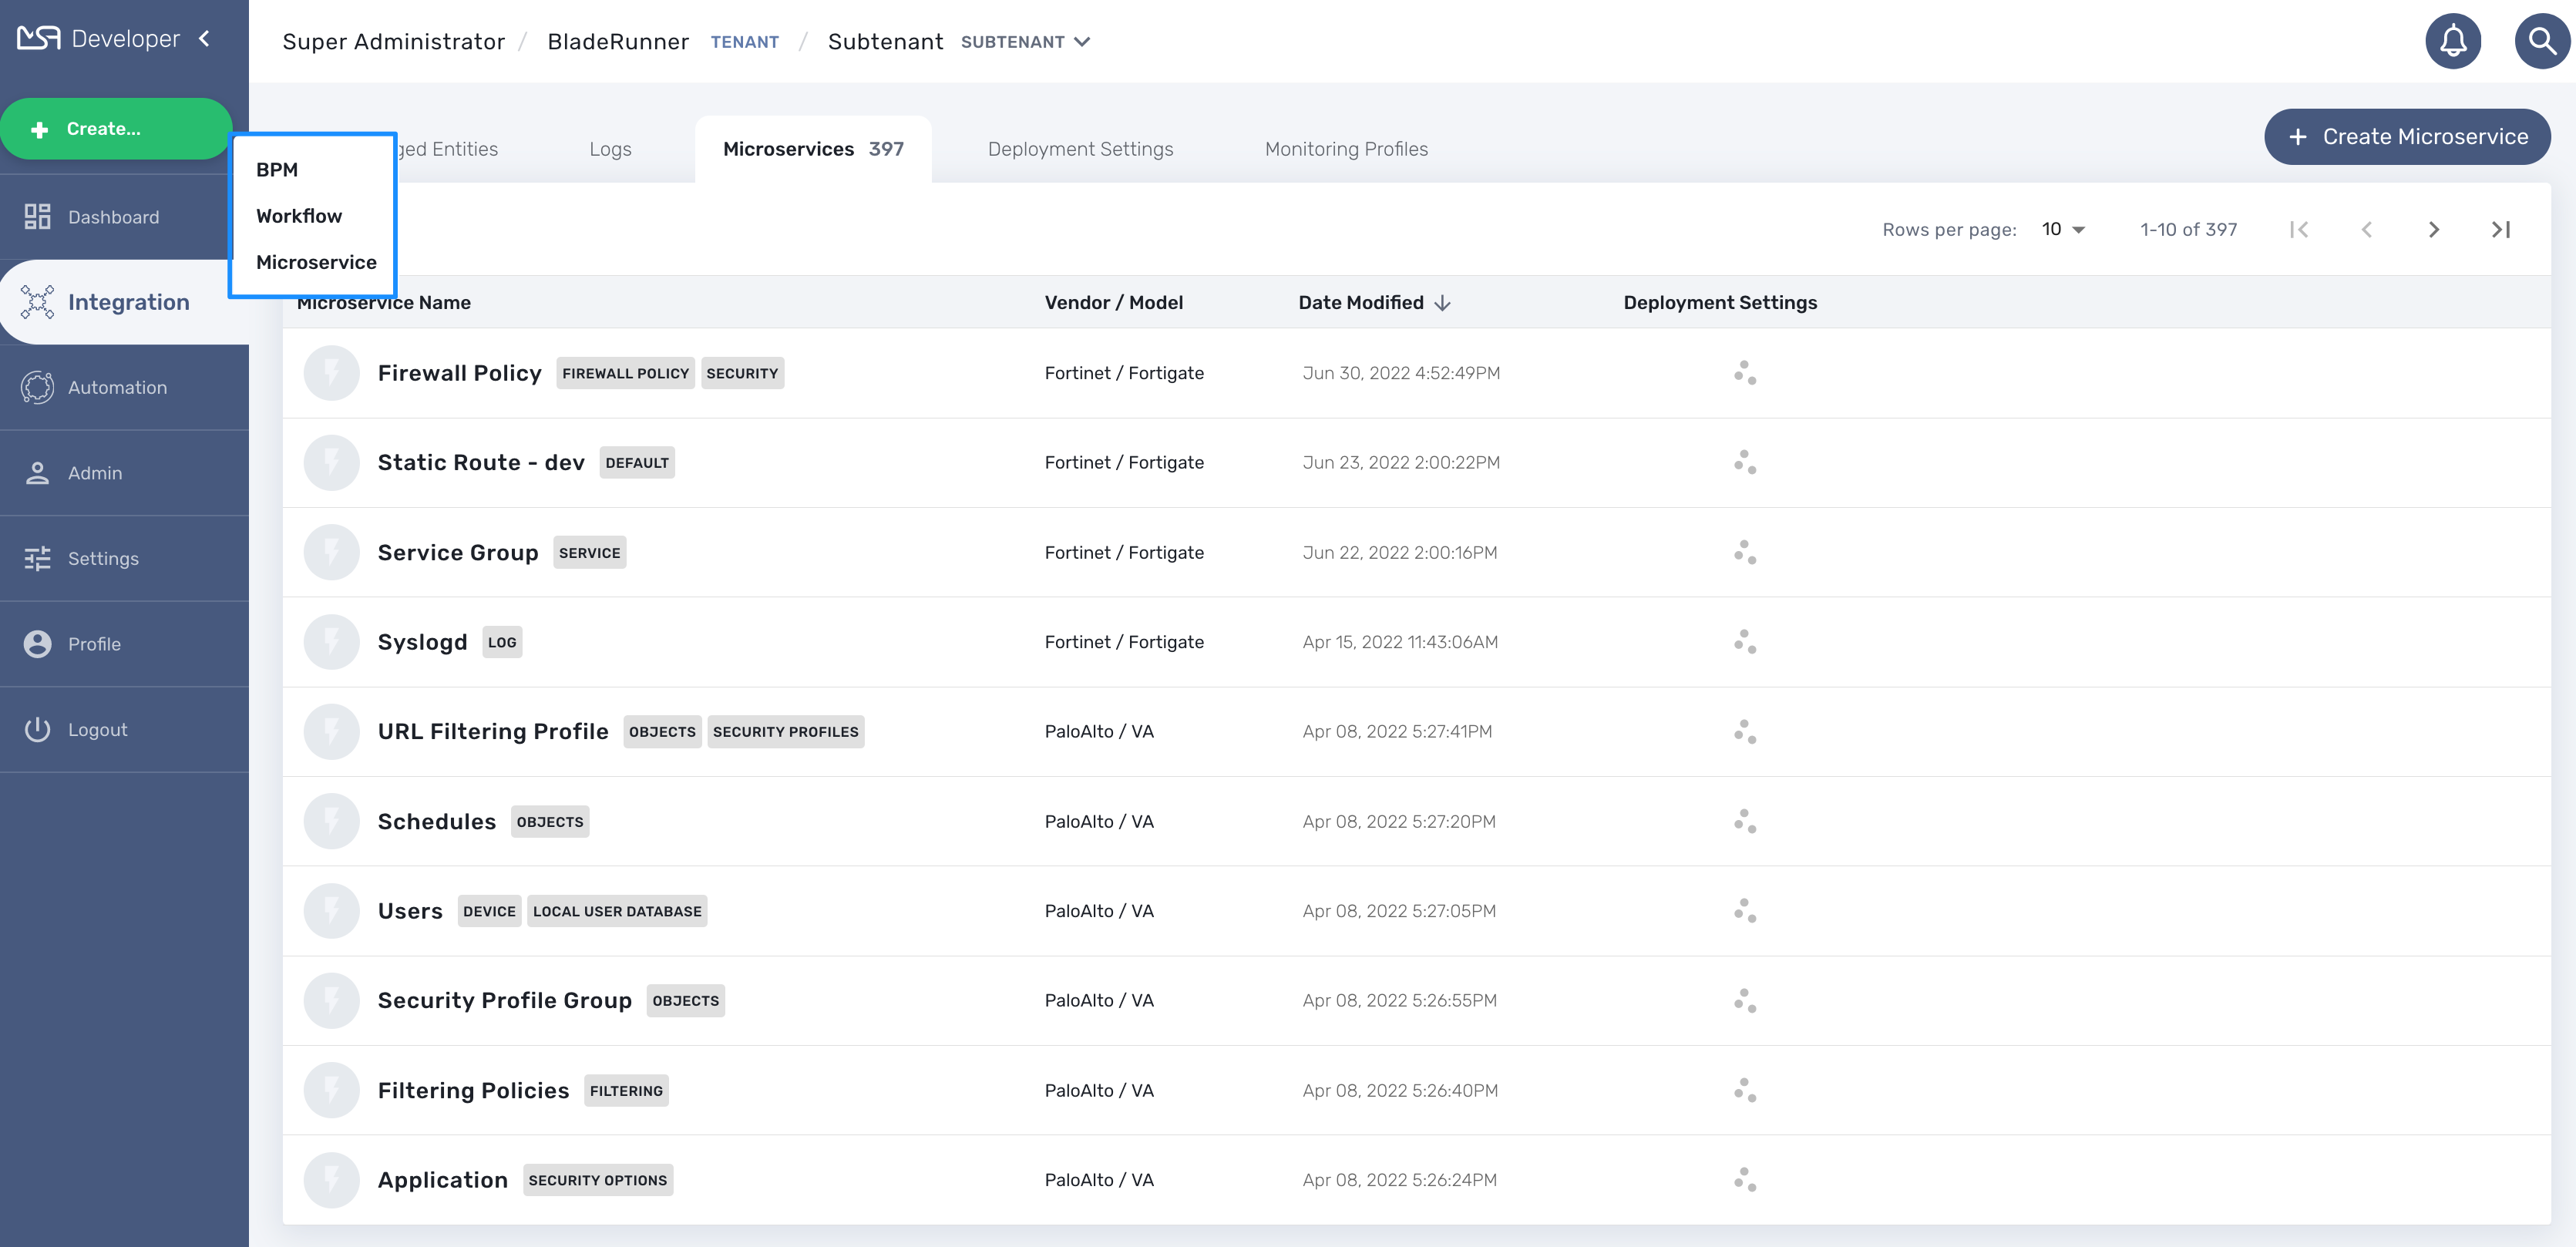
The microservice console is composed of a vertical menu on the left and a main screen
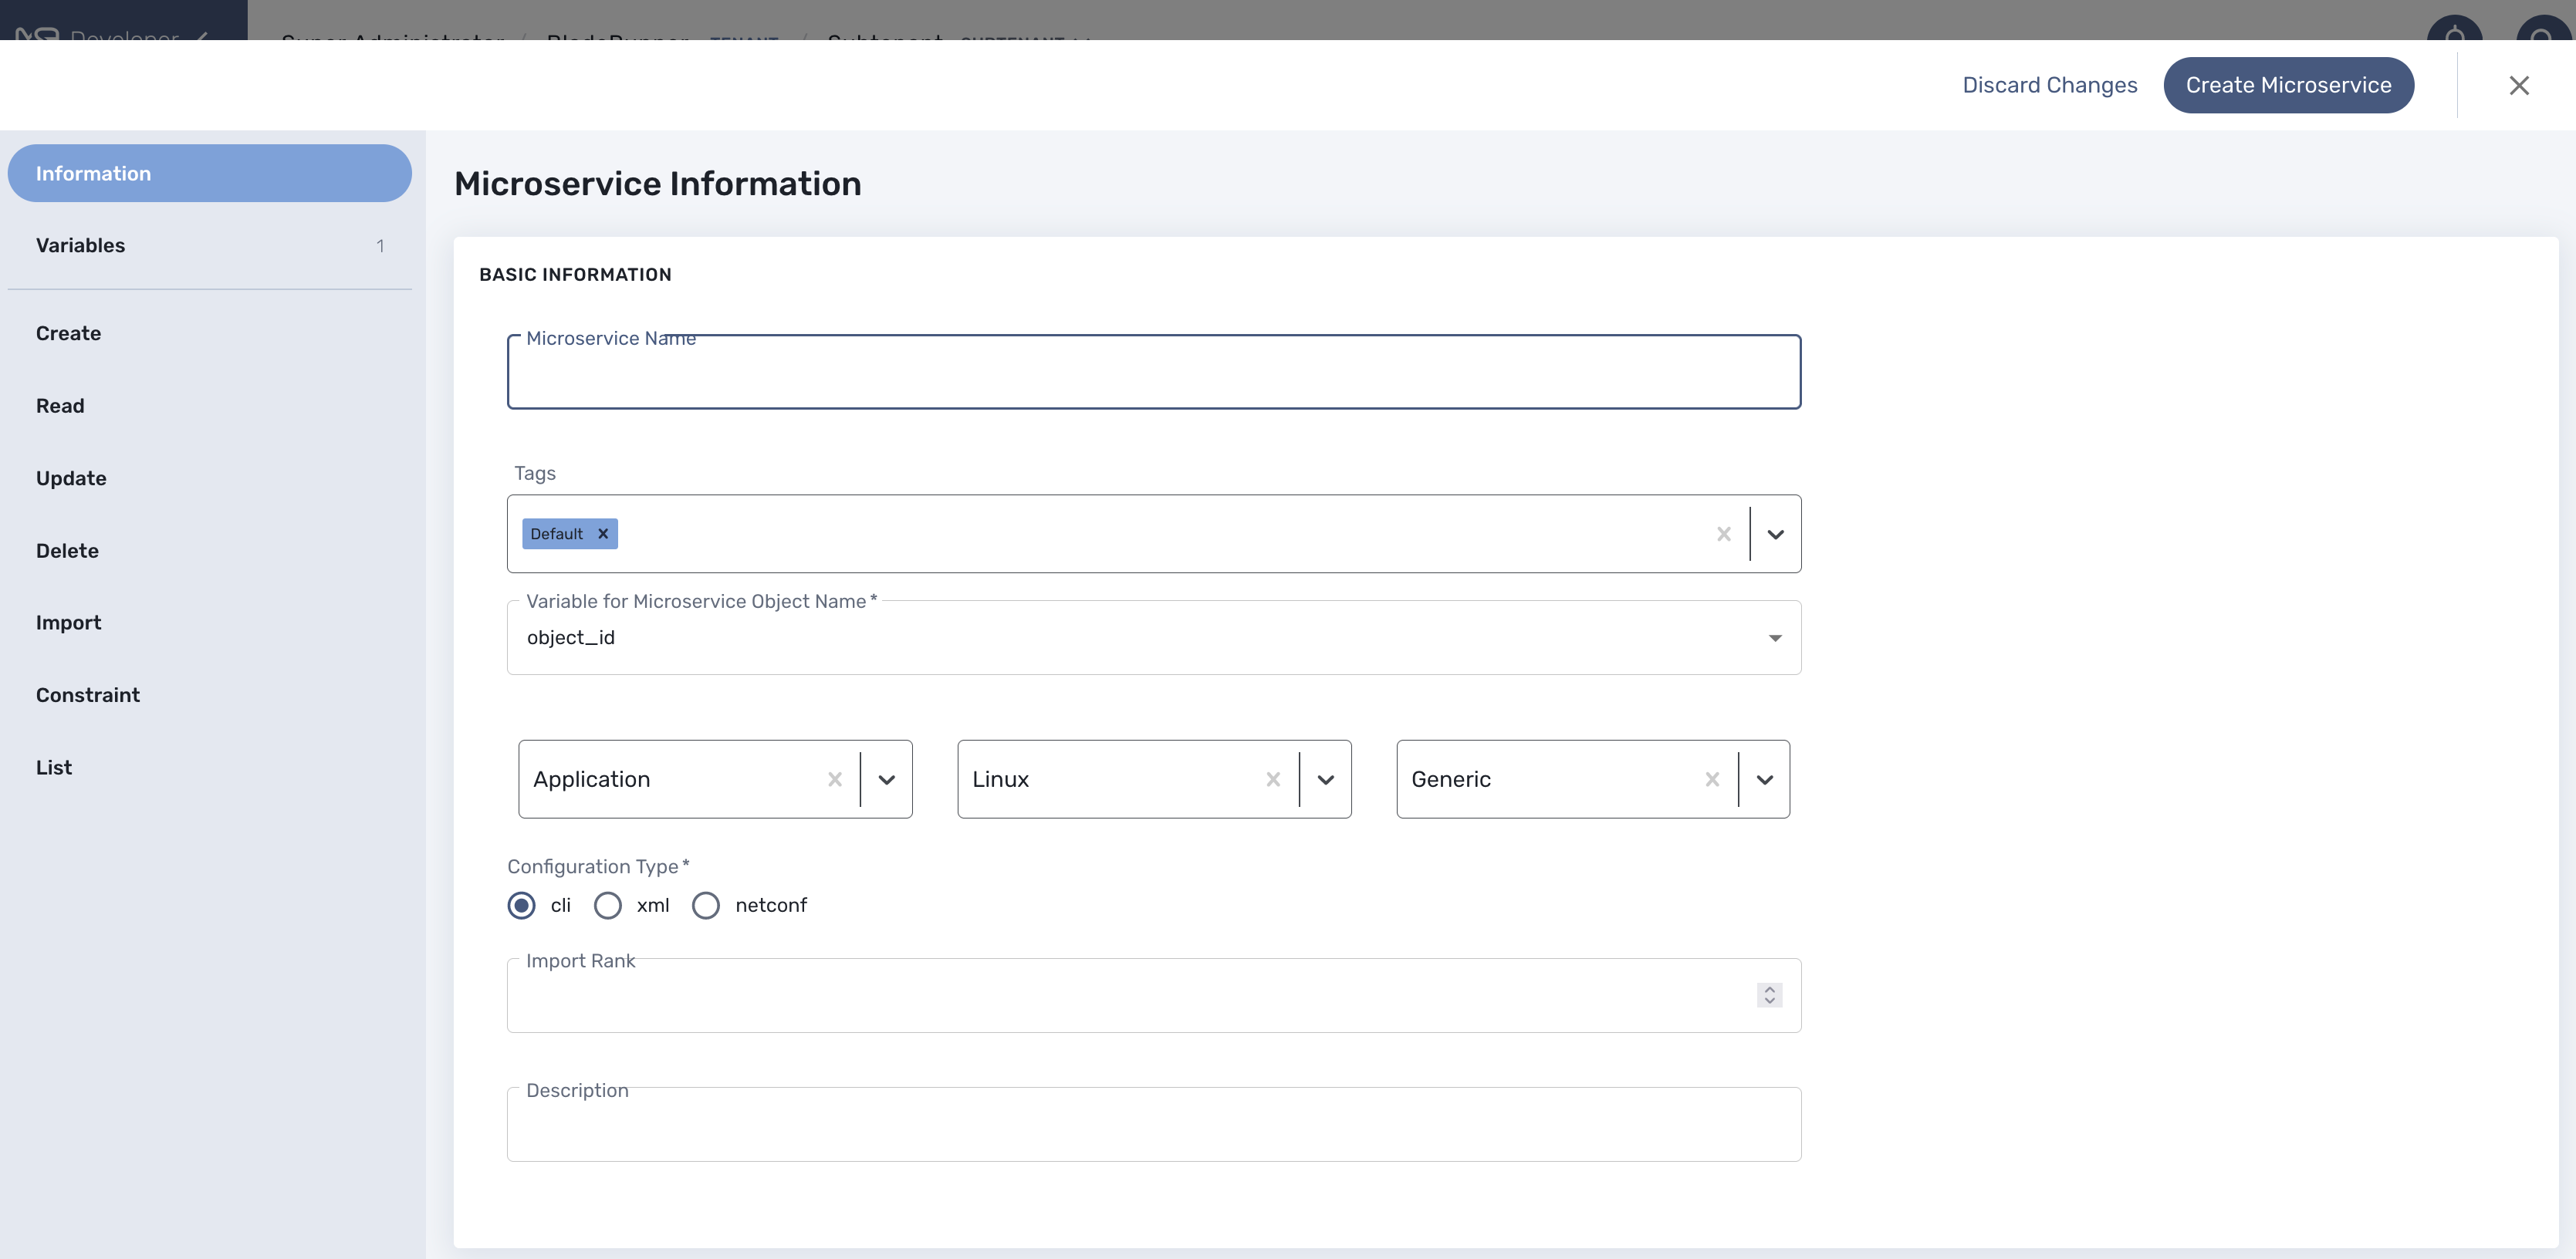
Information
Microservices are vendor specific, the implementations of the functions to create, update, delete or import a managed entity configuration will depend on the managed entity, the type of remote management interface, the format of the configuration, how it is structured,…
Vendor and model
Select the correct vendor/model information. This will be used by the deployment settings to filter the microservice that are eligible for selection.
Configuration Type
It is also important to select the proper configuration type:
-
cli: for managed entities such as Linux, Cisco IOS, Fortigate,…
-
xml: for managed entities with a REST management API (both XML and JSON API are supported)
-
netconf: for managed entities that support Netconf as the management API
The editor UI will adjust based on the configuration type and this setting cannot be changed once the microservice is created.
Import rank
The import rank is needed to control in which order the execution of the import functions of your microservices will be executed when you click on "Synchronize with Managed Entity" from the managed entity tab "configure".
Setting correct import rank is important when you have dependencies between your microservices. Microservice dependencies are created by leveraging the variable type "Microservice Reference" (see documentation about microservice variables).
Once created, you can search for your microservice in the list and attach it to a deployment setting, you can also edit it or delete it.
| The easiest way to design a microservice is to use a managed entity dedicated to testing and follow in a code-test-fix development cycle. This documentation uses the Linux Managed Entity provided by the mini lab. |
Variables
Variable are usually defined to hold the parameters to be passed to the microservice. For instance, the port and IP to block for a firewall policy. Variables can also be used to display user information that is not meant to be used for configuring the managed entity.
Setting variables is done from the section "Variables" on the microservice editor screen.
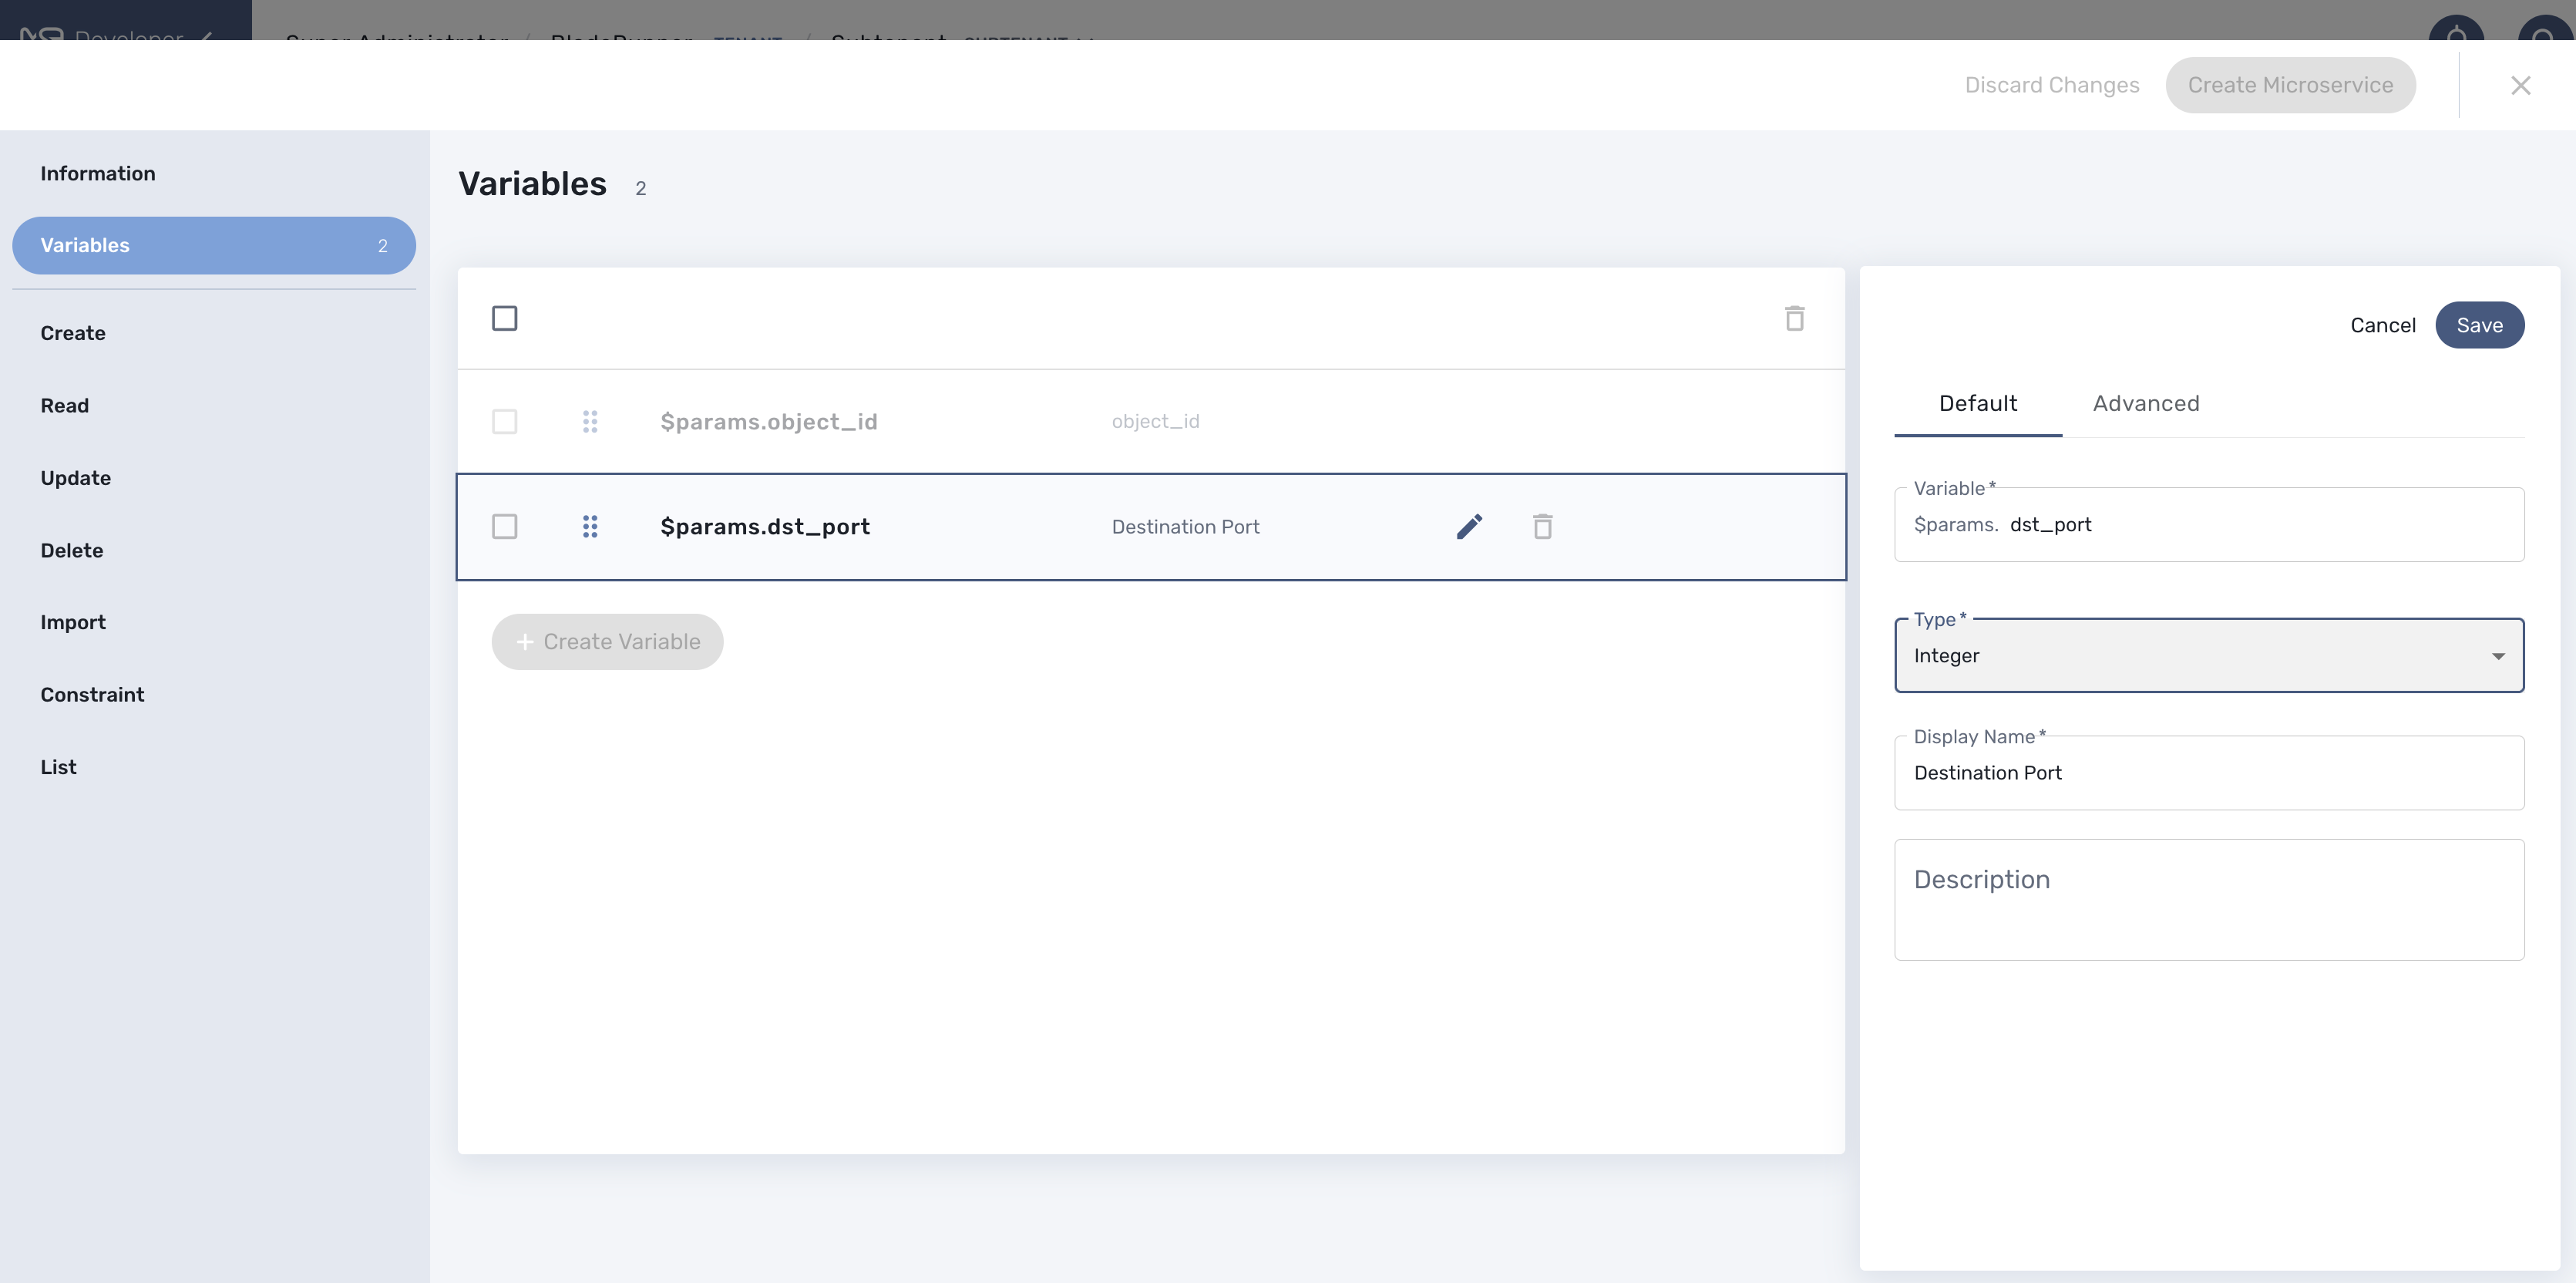
When you create a new microservice, the variable object_id, which is mandatory, will be set and cannot be deleted. It can be edited to set it’s type and other advanced properties.
All variables are referenced with the prefix $param which is automatically set in the variable editor screen and when a variable has to be referenced in one of the microservice function, you need to use the syntax {$param.your_variable} (see below for more examples)
By default the type of a variable is String but other types are supported such as Integer, Boolean, Password, IpAddress, ObjectRef,…
Usage of the {$object_id} variable
The {$object_id} is a reserved variable used to reference objects into the database and used as variable name in Smarty in the template resolution.
When the parameters are passed to the engine you give:
{"interface":{"Interface-Service-engine0/0":{"ip_address":"1.2.3.4"}}}
The variables values are:
{$object_id} => "Interface-Service-engine0/0"
{$params.ip_address} => "1.2.3.4"
Functions
From the left menu of the microservice editor there is a list of functions to implement. While none of the functions are mandatory, at least one of 'Create', 'Update', 'Delete' or 'Import' has to be implemented in oder to have a microservice that can actually do something.
In order to provide a full lifecycle management of a service on a managed entity, the 4 functions above have to be implemented.
The function 'Read', 'List' are optional and while it’s possible to implement them, you’ll have to rely on the REST API to execute them.
The function 'Constraint' allow the implementation of custom constraints to be verified before the managed entity is actually configured.
Create
The Create function takes care of configuring a new service in the managed entity. For example, a new static route if the managed entity is a router.
This functions is implemented either in PHP Smarty template language for CLI microservice (see "Microservice Template with PHP Smarty" for more details) or as a REST API call for XML microservice.
When this function is implemented, a button "+ Add Row" will appear in the tab "Configure" of the managed entity that uses this microservice.
Example
This example is a Samrty template that will take the parameters entered in the user form and generate a configuration.
config router static
edit {$params.object_id}
set dst {$params.ip_dest} {$params.mask}
set gateway {$params.gw}
set device {$params.interface}
{if empty($params.comment)}
unset comment
{else}
set comment "{$params.comment}"
{/if}
next
end
Update
The Update function takes care of updating an existing service in the managed entity.
Delete
The Delete function takes care of deleting an existing service in the managed entity.
Example
This example generate a conf based on the instance parameters as store in the database.
config router static
delete "{$routing.$object_id.object_id}"
end
Import
The role of the Import function is to import the actual configuration of the managed entity into the MSactivator™ database.
The implementation of the Import is either based on a set of regular expressions or a set of XPath expressions that build a parser that will extract the values of the variables.
The Import is made of 3 parts:
-
the command to run on the device for CLI command based device or the REST API to call.
-
the configuration parser, implemented with a set of regular expressions or XPath expressions. Only the microservice identifier extractor is mandatory.
-
a set of optional post import operations implemented in Smarty language (https://www.smarty.net/).
Post-import
This example shows how to use the post import section of a microservice in order to fulfill one of it’s variable with data coming from other microservice instances already imported in MSactivator™ database.
This example is based on Fortigate configuration example, more precisely on the web filtering configuration sub-part.
This first relies on the ability to define an import rank in the microservice definition. In our example the microservice Web_Filter(.xml) will need the instances of the microservice URL_Filter(.xml) to be imported first in order to have relevant information. So Web_Filter microservice as an import rand higher than URL_Filter, so that during the import import/synchronize process, URL_Filter microservice will be imported first in MSactivator™ database so they can be read during the post import of Web_Filter microservice in order to enrich the instance with detailed values/info.

Instead of displaying/proposing to enter meaningless numbers as identifier of URL filtering rules, the post import , the Web filtering microservice will display the URL filter details gathered during the post import. In order to read the MS instance, the syntax is simply based on the microservice definition file name.
In the below Web_Filter post import example, by using the foreach loop on the variable $URL_Filter, we can seek MSactivator™ microservice database instance.
{foreach $URL_Filter as $filter}
	{if isset($params.filter_id) && $params.filter_id == $filter.object_id}
		{assign_object_variable var="filter_id" value=$filter.object_id}
 		{assign_object_variable var="filter_name" value=$filter.filter_name}
		{if !empty($filter.urls)}
		  {foreach $filter.urls as  $index => $url}
			  {assign_object_variable var="urlfilter.{$index}.url_id" value=$url.url_id}
			  {assign_object_variable var="urlfilter.{$index}.url" value=$url.url}
			  {assign_object_variable var="urlfilter.{$index}.action" value=$url.action}
			  {assign_object_variable var="urlfilter.{$index}.type" value=$url.type}
    		  {/foreach}
		{/if}
		{break}
	{/if}
{/foreach}
Read
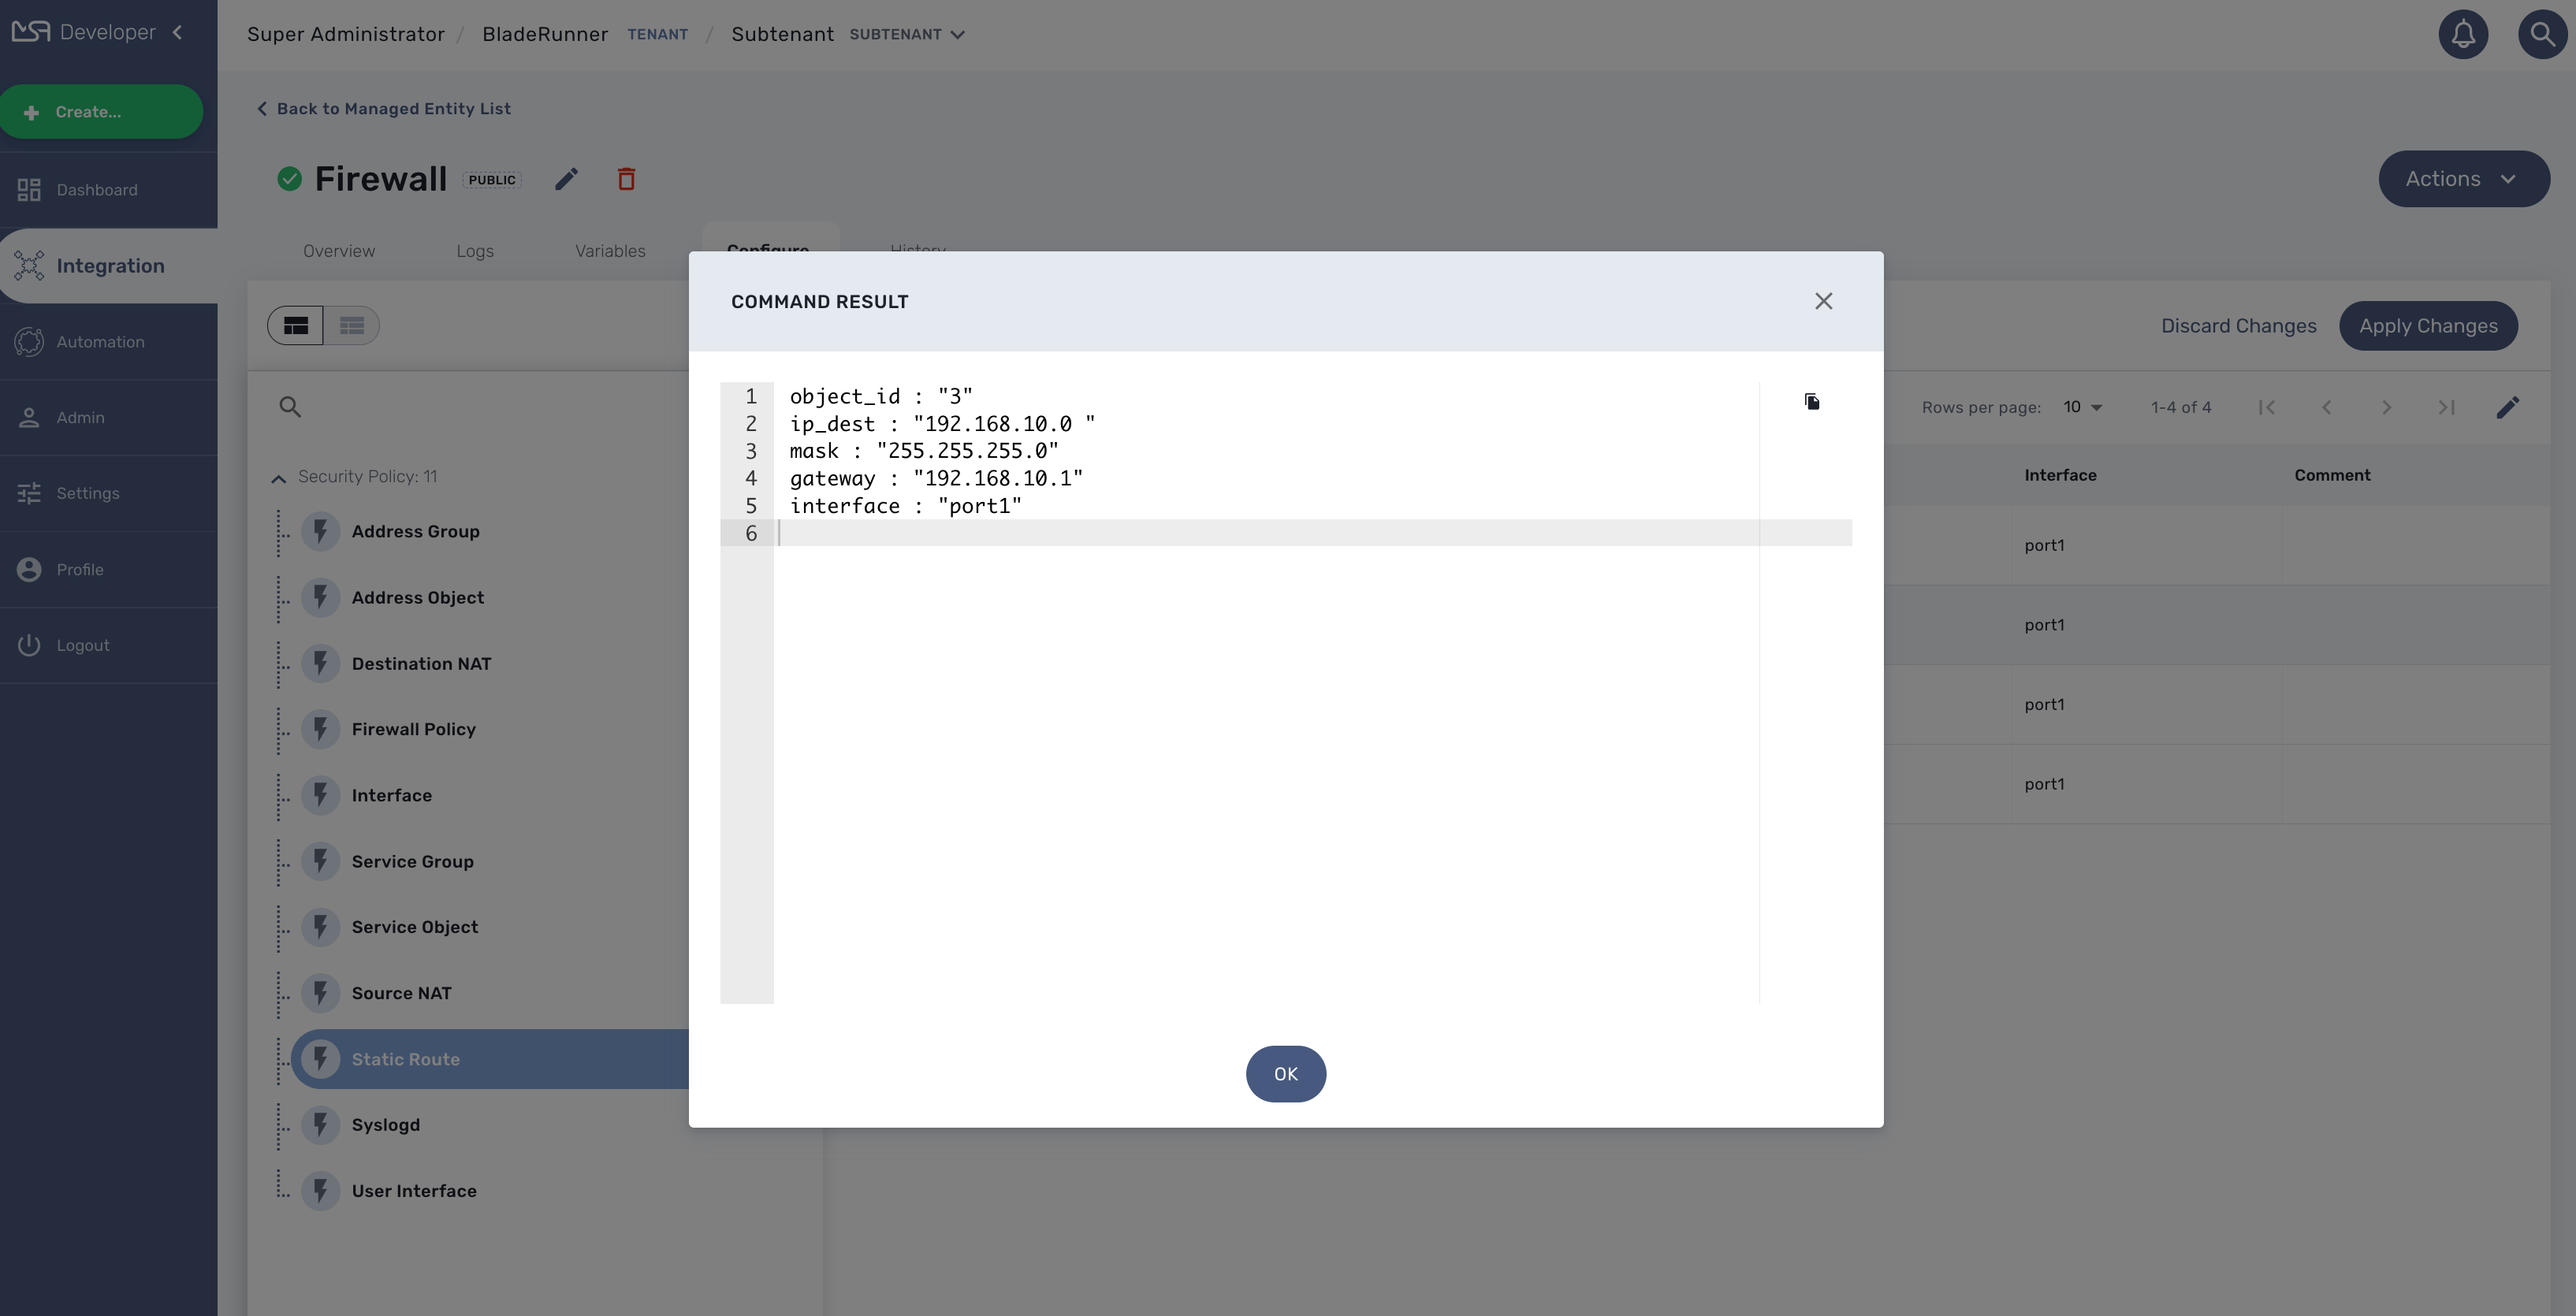
The Read function can be implemented to allow the user or the API to generate a text file based on a Smarty template and the microservice instance variables store in the database.
Example
This example generate a text based on a template and the microservice instance variables values as stored in the database
config router static
edit {$routing.$object_id.object_id}
set dst {$routing.$object_id.ip_dest} {$params.mask}
set gateway {$routing.$object_id.gw}
set device {$routing.$object_id.interface}
{if empty($routing.$object_id.comment)}
unset comment
{else}
set comment "{$routing.$object_id.comment}"
{/if}
next
end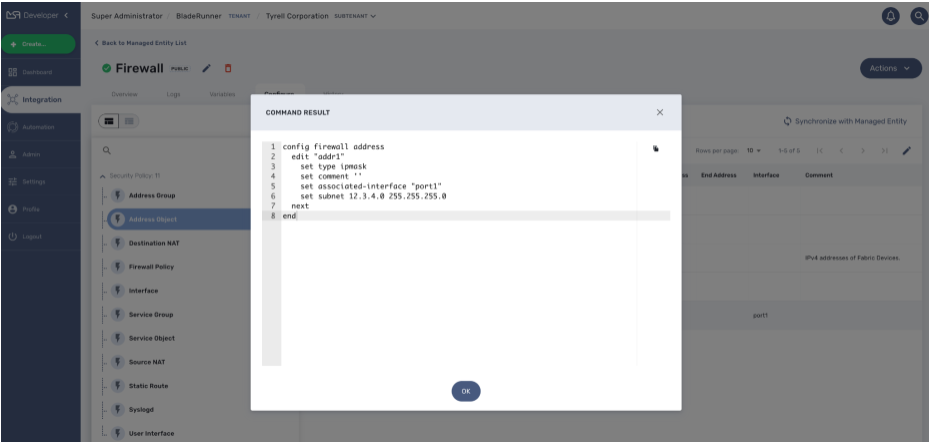
Another template could be:
 object_id : "{$routing.$object_id.object_id}"
 ip_dest : "{$routing.$object_id.ip_dest} "
 mask : "{$params.mask}"
 gateway : "{$routing.$object_id.gw}"
 interface : "{$routing.$object_id.interface}"
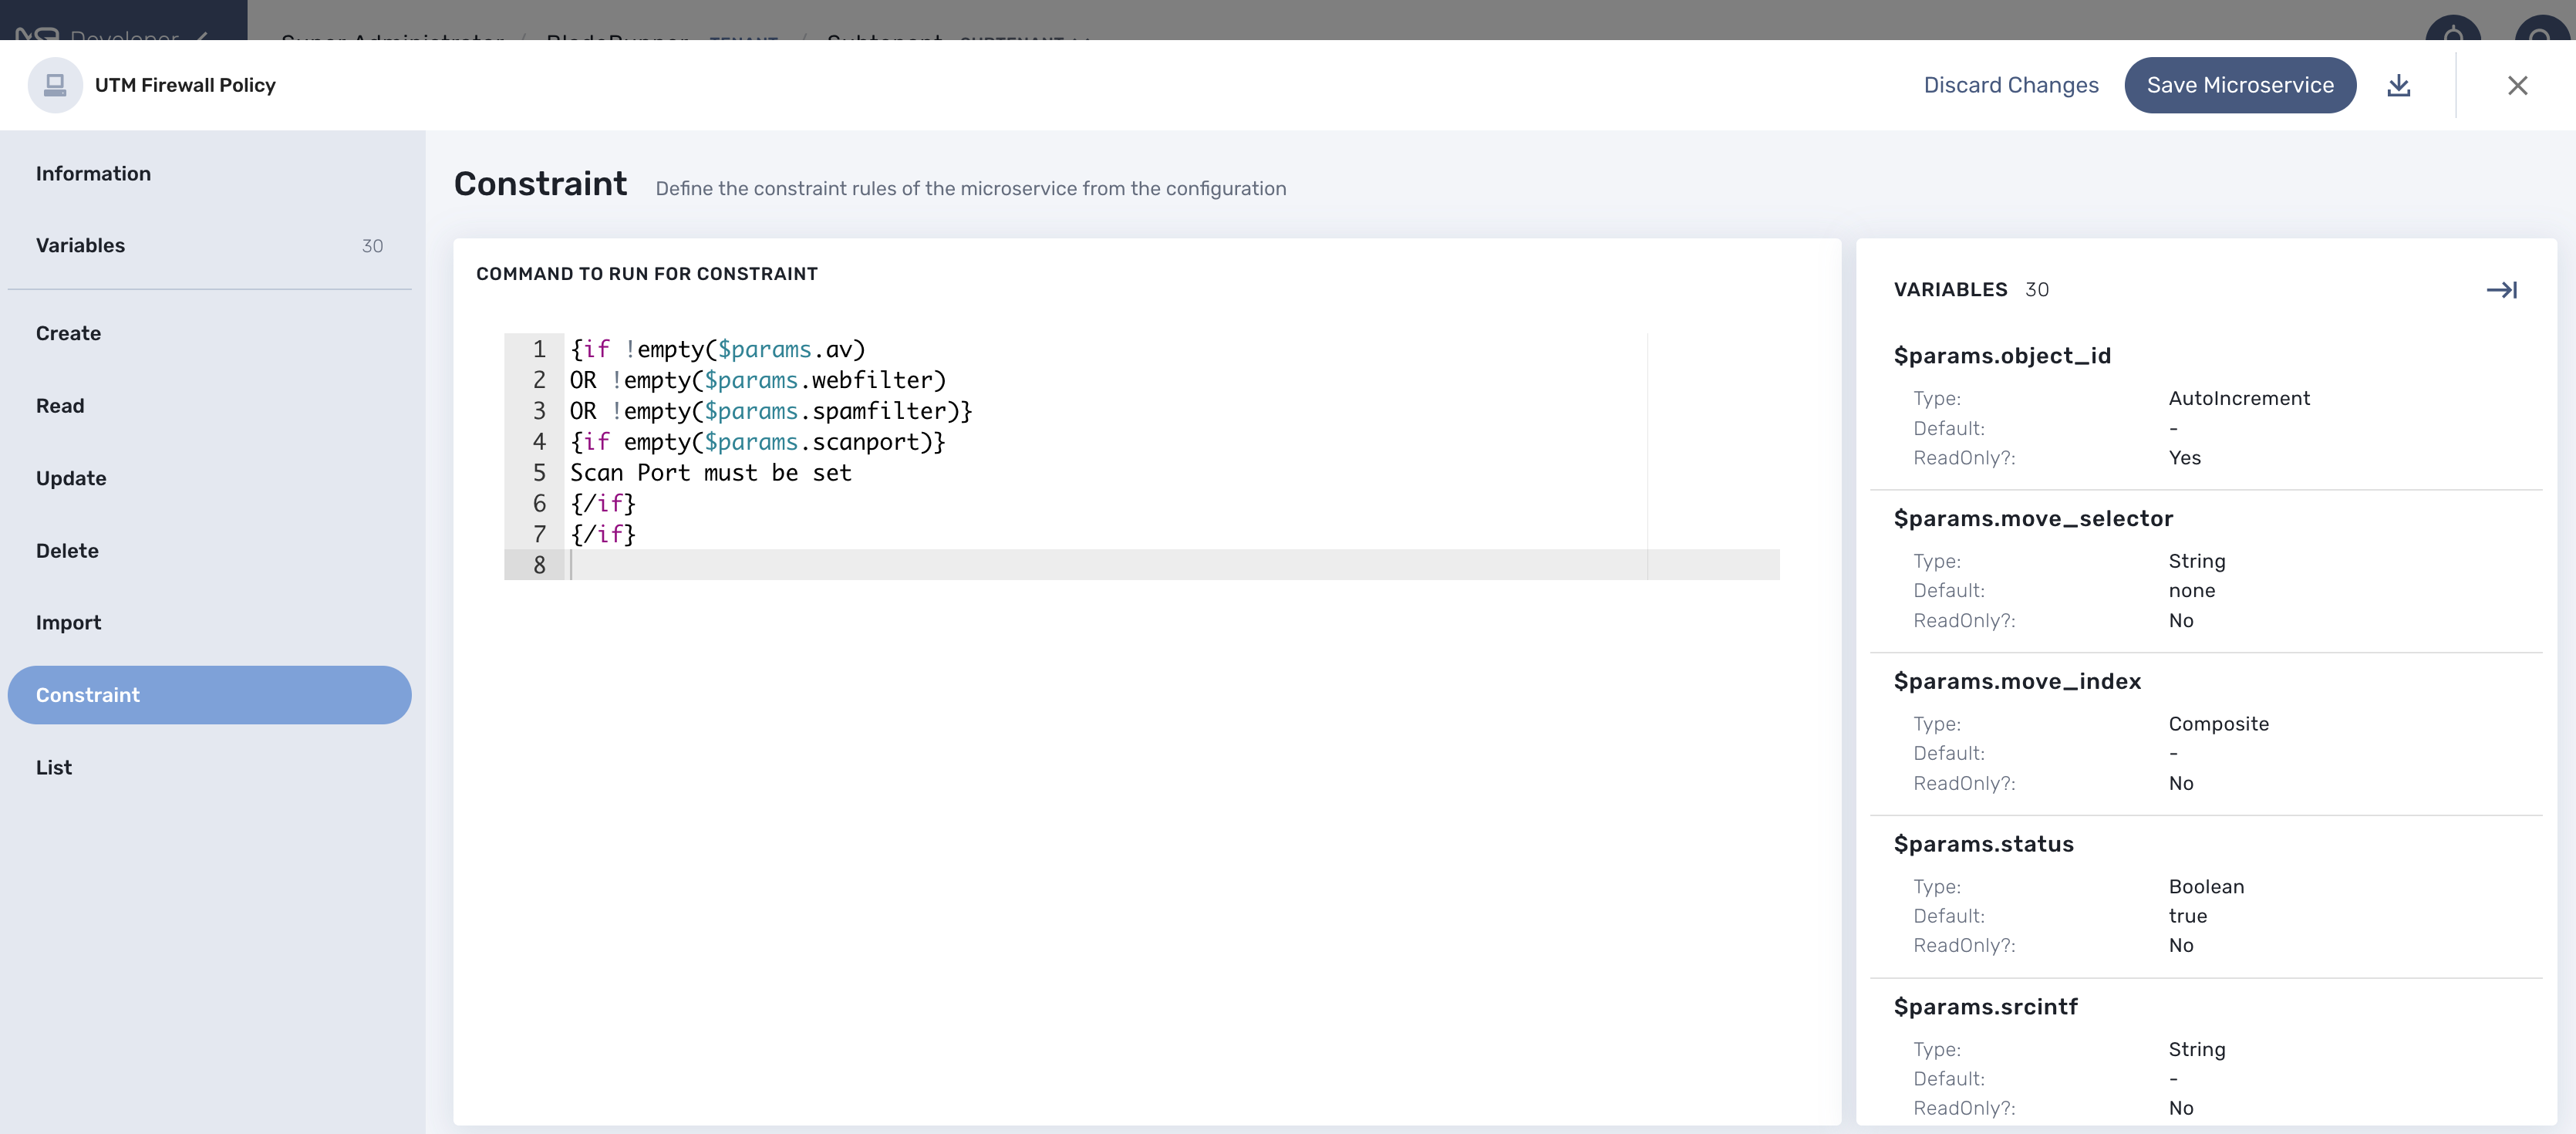
Constraint
In most cases, the constraint definition is straight forward when defining a microservice variable. Based on the type of the variable, the UI will check if the provided value is consistent with the type. For example if the type is "IP Address", the format of the value should be an IP address.
In some cases, though, the constraint is more complex and may depend on a combination of several conditions that can involve multiple variables.
For example, the 5 variables params.av, params.webfilter, params.spamfilter, params.ips, and params.scanport have the following dependencies:
-
if
params.avis set thenparams.scanportmust be set -
if
params.webfilteris set thenparams.scanportmust be set -
if
params.spamfilteris set thenparams.scanportmust be set -
if
params.ipsis set thenparams.scanportis not mandatory
To make things simpler, it is possible to add a custom constraint evaluation to the object definition.
The custom constraint is implemented as a smarty template:
{if !empty($params.av)
	OR !empty($params.webfilter)
	OR !empty($params.spamfilter)}
	{if empty($params.scanport)}
	Scan Port must be set
	{/if}
{/if}
Create, Update or Delete Execution flow
The diagram below shows the flow of execution when one of the Create, Update or Delete function is executed by the REST API (directly or from the UI)
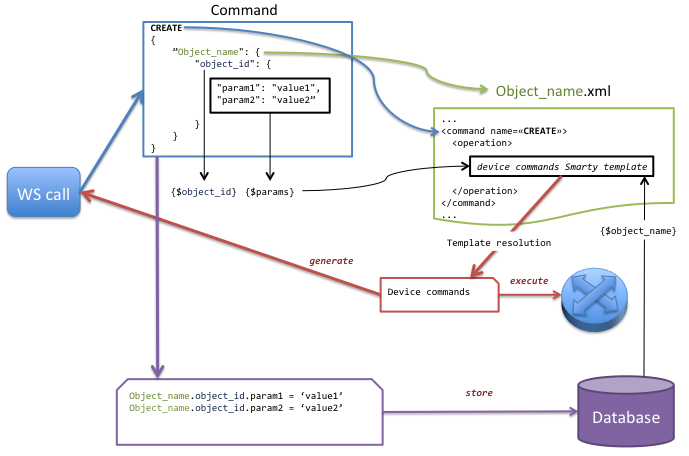
-
A command (CREATE here) is send via web service.
-
The microservice name is used to retrieve the associated XML definition file associated to the managed entity.
-
The command name is used to find the <command> section in the XML definition file.
-
The variables {$object_id} and {$params} are created to parse the template of the XML definition file.
-
Variables from the database are also created to parse the template of the XML definition file.
-
The template generates device commands used to perform the requested command on the object.
-
The device commands generated are returned to the web service call.
-
Optionally the device commands generated are applied to the managed entity.
-
Optionally the object extracted from the web service call is stored in the database.