Variables are used to hold the parameters to pass to a workflow process. For instance, the port and IP address to block in a firewall policy.
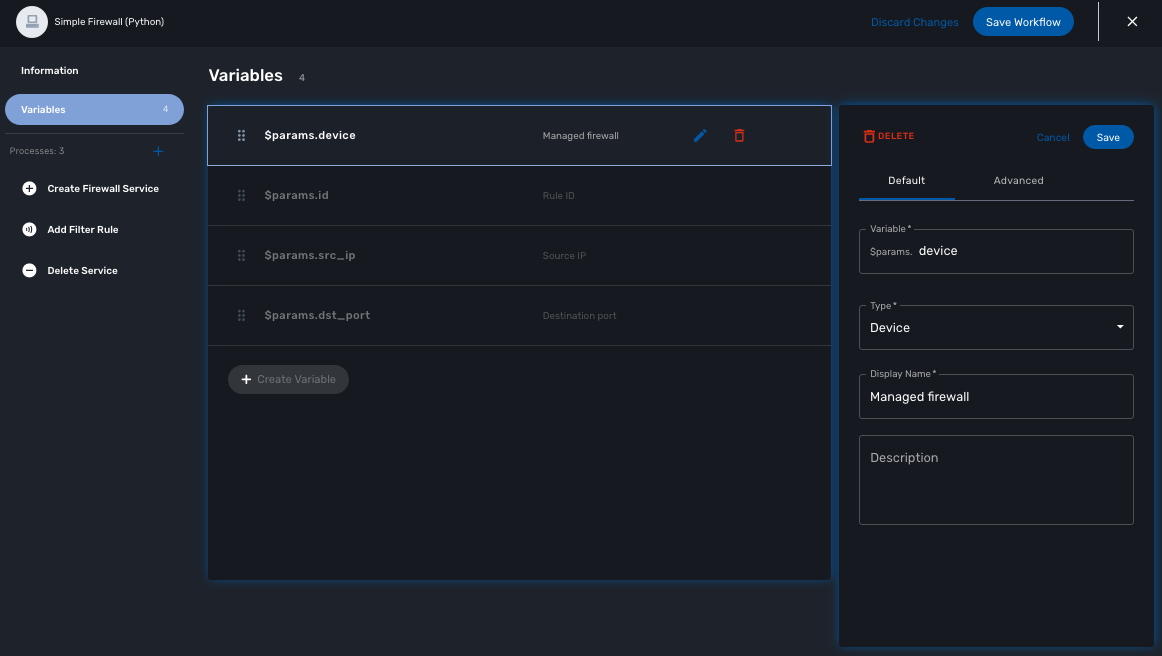
All variables are referenced with the prefix $params which is automatically set in the variable editor screen and when a variable has to be referenced in one of the workflow functions, you need to use the syntax {$params.your_variable} (see below for more examples).
By default the type of a variable is String but other types are supported such as Integer, Boolean, Password, IpAddress, Microservice Reference,…
Overview
Variables are used to hold the parameters to pass to a workflow process. For instance, the port and IP address to block in a firewall policy.
Variables can also be used to display user information that is not necessarily meant to be used for configuring the managed entity.
Setting variables is done from the section "Variables" on the workflow editor screen.
The type of a variable will affect the way the workflow end user form will be rendered.
For instance, the type boolean will render the variable with true/false radio buttons.
Default settings
When creating or editing a variable, there are some information that need to be provided in the "Default" section.
Variable
Name of the variable to use in the implementation of the workflow or when calling the REST API.
Type
The type of the variable should be one from the list below
String
The default type for a variable, it will accepts any value and the UI renders it as a input field without any specifc validation with regards to the value set.
Boolean
This data type accepts a value of true or false, the UI will render it as a checkbox.
Integer
This data type represents a numerical value, the UI will render it as an input field restricted to integer.
Code
This type allows to render a variable as a textfield with the possibility to select a code language (default is simple text) for syntax highlighting
Password
| not supported yet |
This data type represents a multi-character value that is hidden from plain sight (i.e. the value is represented as asterisks instead of clear text).
IPv4 address and mask, IPv6 mask
| not supported yet |
This data type will enforce data validation against IP address formats.
Composite
The variable type composite provide ways to add control over the behavior of the workflow user form.
It can be used, for instance, to show/hide parts of the form based on the value of another component of the form.
Let’s take a simple example to illustrate the use of the composite type with a simple workflow for managing firewall policy.
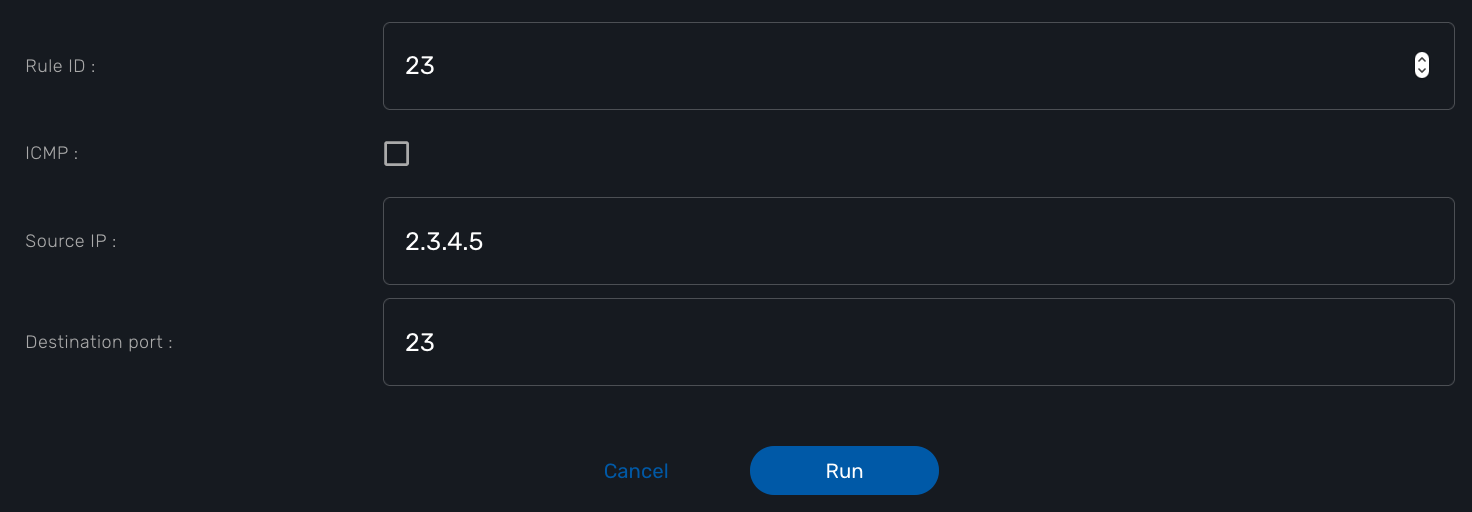
The workflow allows the user to create a firewall policy to block a source IP address and a destination port but the user may also need to select the protocol TCP, UDP or ICMP and in the case of ICMP, the destination port is not relevant. We need to build a workflow UI where the user will have to provide the source IP and destination port when the protocol is TC or UDP and only the source IP when the protocol is ICMP.
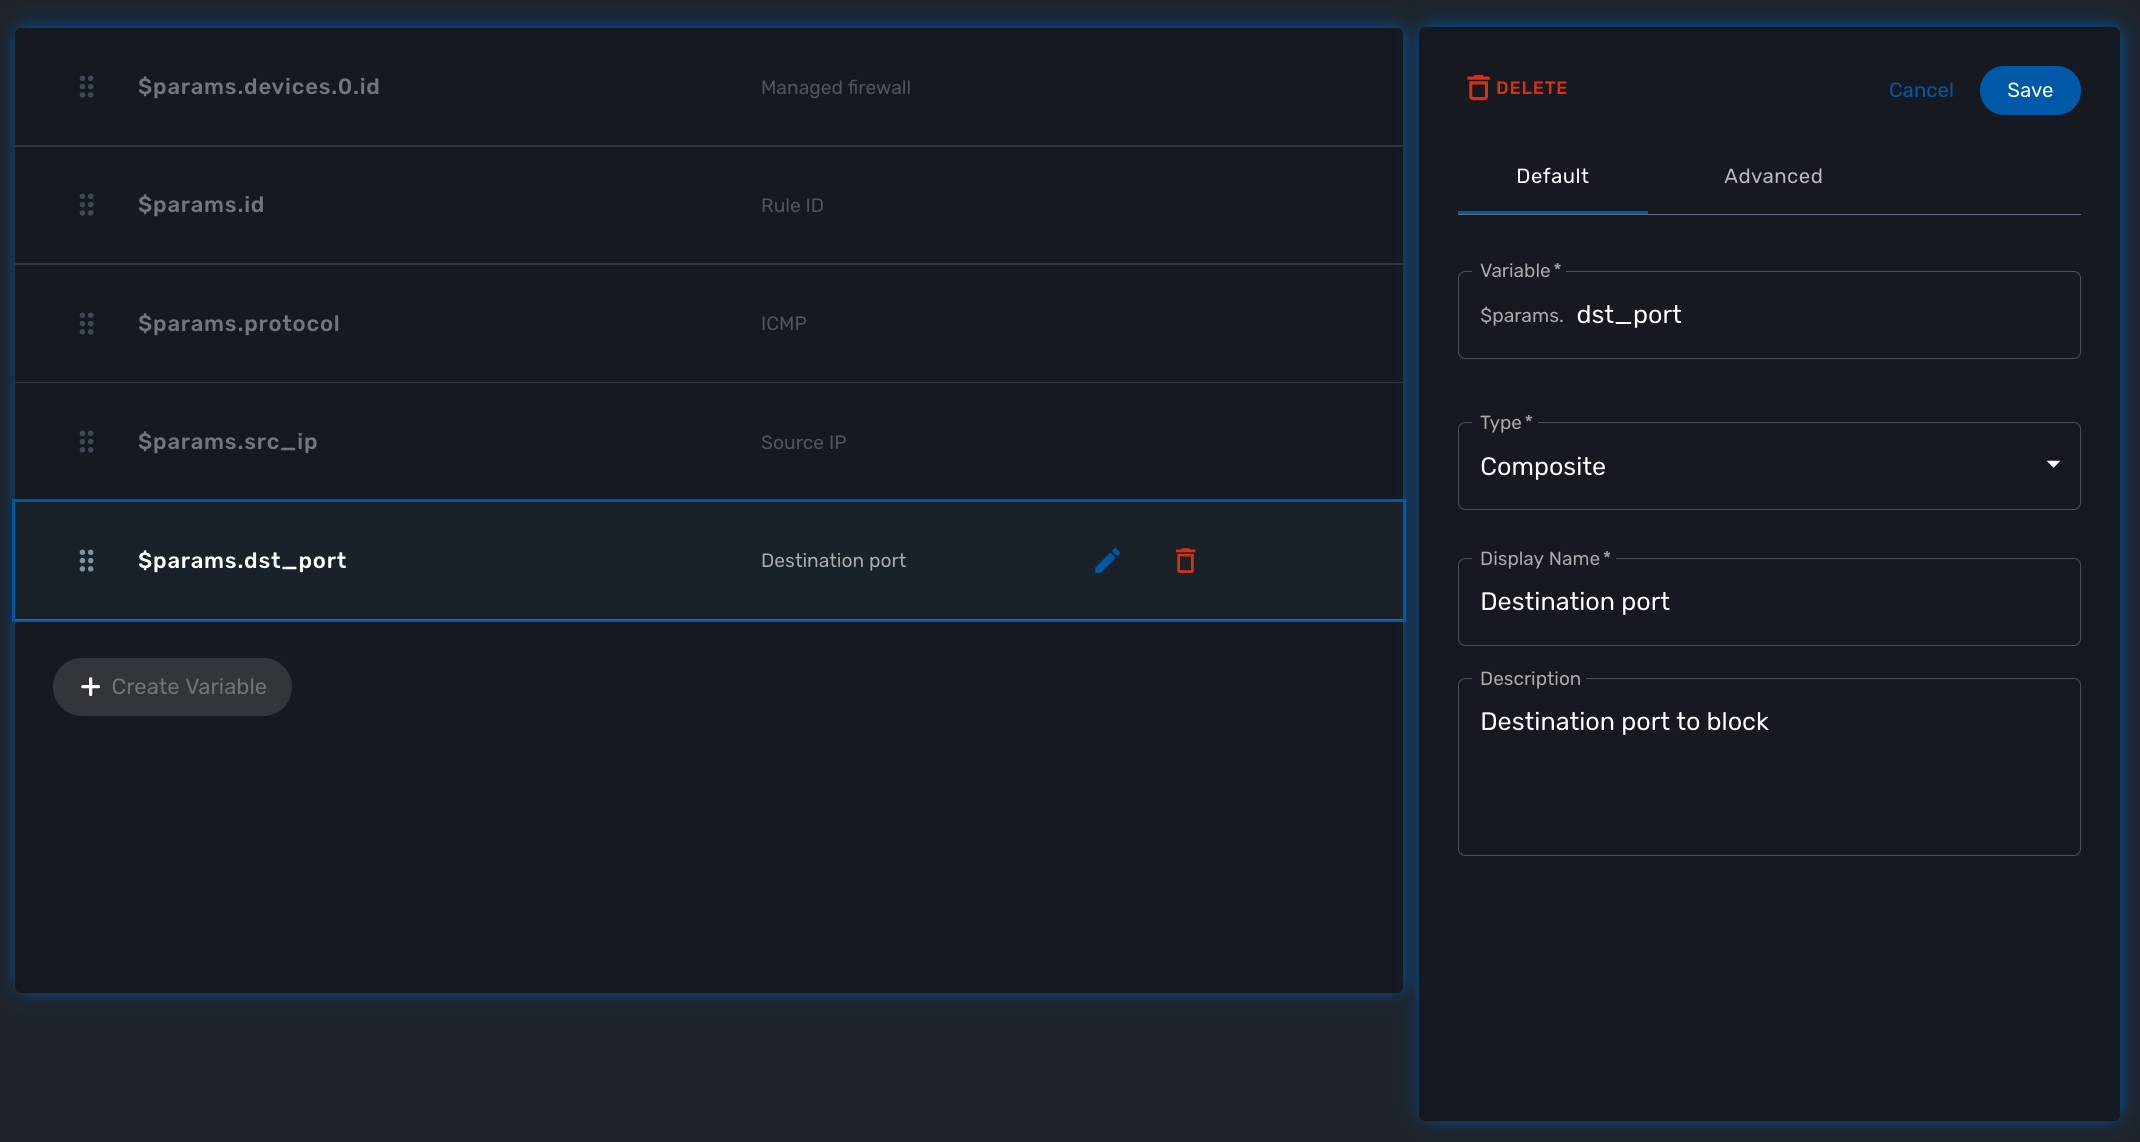
In this example, the variable "dst_port" for the destination port should be typed as a composite because it’s behavior when rendered as a user web form will depend on the other variable "protocol".

To implement this behavior, set the type of "dst_port" variable to "Composite".
In the advanced parameter tab, first choose the "Selector Variable" and select the protocol (note that the list shows the display name, not the actual name of the variable)
Then configure the "Behavior for the Composite". The selector is a boolean so you can only have 2 types of behavior, one for true and one for false.
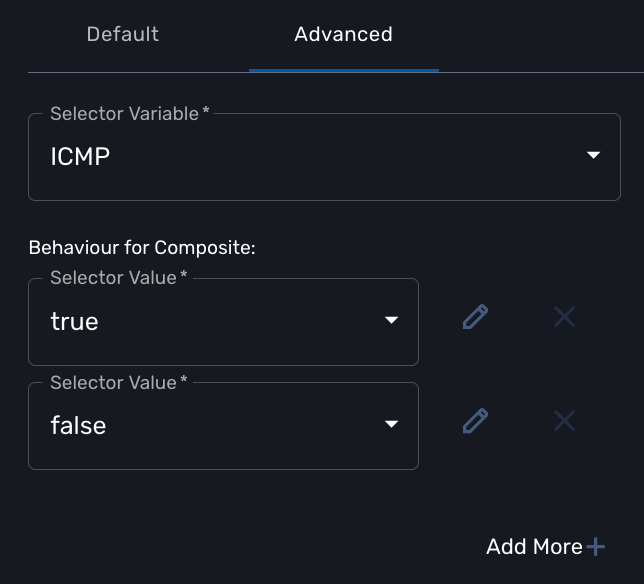
Each behavior can be configured by editing it with the pencil icon.
In our case, if the selector is set to true (when the user selects ICMP), the variable "dst_port" should be hidden: uncheck the attribute "Visible" in the advanced parameters for composite.
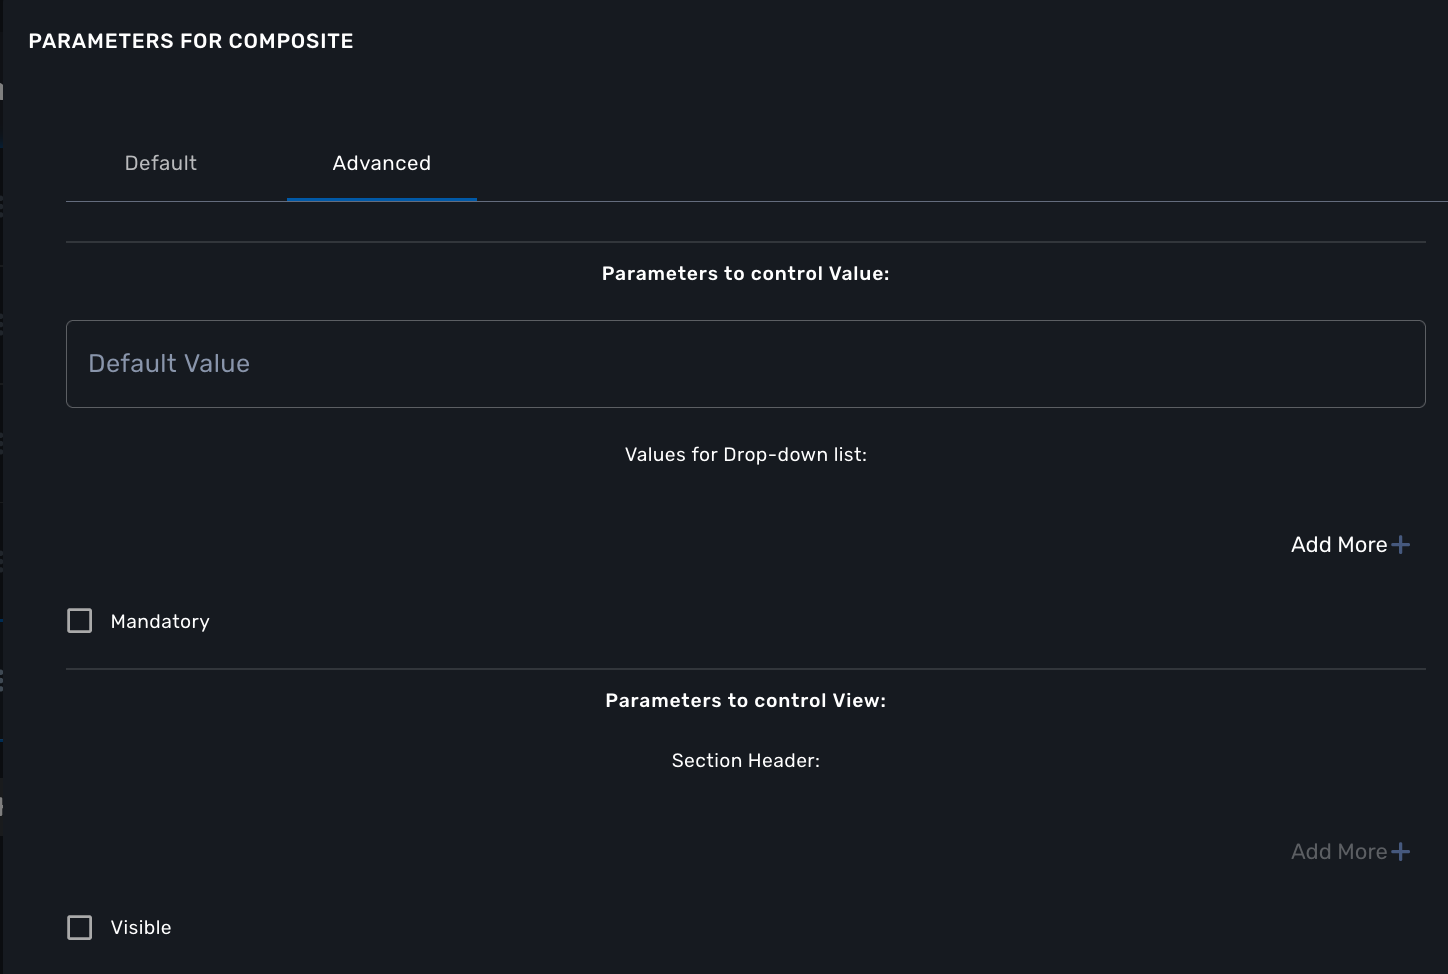
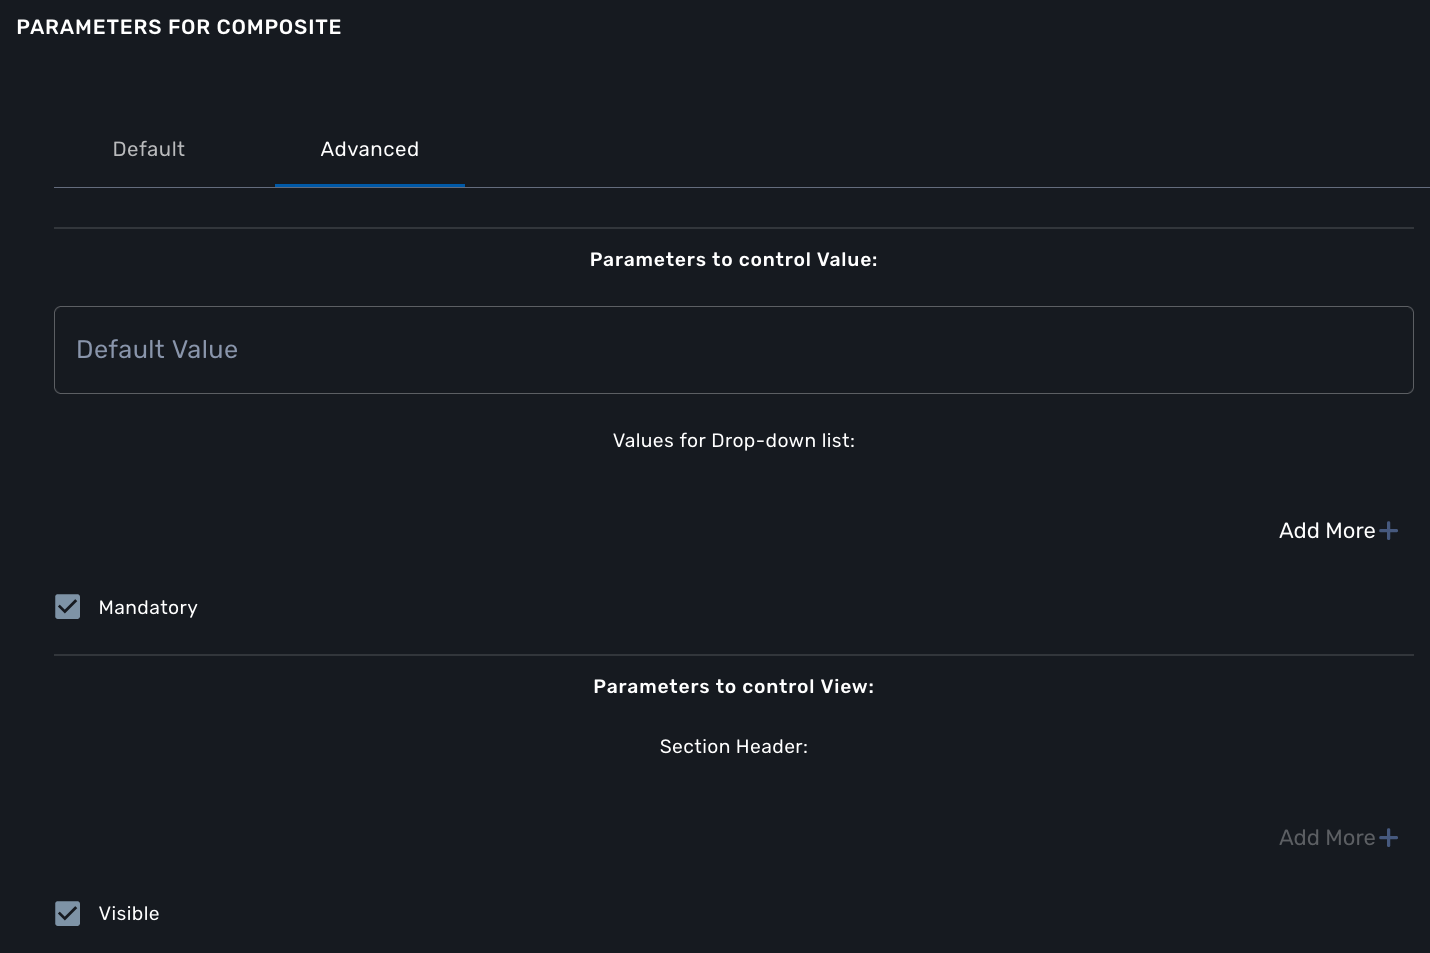
And when the selector is set to false, the variable "dst_port" should be visible and mandatory.
Link
| not supported yet |
This type is useful if you wat to display a URL in the user form, for instance to link to some documentation on a web server. It is usually used in read-only mode with the URL set as the default value of the variable
Auto Increment
This type is used to maintain an incremental counter in within the instances of a workflow for a managed entity. This is useful for managing the object_id.
Increment |
an integer to define the increment step |
Start Increment |
the initial value for the variable |
Workflows sharing the same increment |
a list of workflows that are also using the same variable and need to share a common value. |
Device
This type is used to allow the user to select a managed entity and pass its identifier to the implementation of the workflow.
In the task implementation you need to list the variables with "Device" for the type
function list_args()
{
  create_var_def('my_device');
}from msa_sdk.variables import Variables
TaskVariables = Variables()
TaskVariables.add('my_device')List of managed entities
A very common use of the type Device is for automating configuration (or any other automated action) over a list of managed entities.
You can do that by creating a array variable with the type Device and loop through the array in the task.
from msa_sdk.variables import Variables
from msa_sdk.msa_api import MSA_API
from msa_sdk import util

dev_var = Variables()
dev_var.add('me_list.0.id')                                       (1)

context = Variables.task_call(dev_var)
process_id = context['SERVICEINSTANCEID']                         (2)

me_list = context['me_list']                                      (3)

for me_id in me_list:                                             (4)
    util.log_to_process_file(process_id, me_id['id'])             (5)

ret = MSA_API.process_content('ENDED', 'Task OK', context, True)
print(ret)| 1 | declare the the array variable to be displayed in UI |
| 2 | read the current process ID |
| 3 | read the list of managed entities selected by the user on the UI |
| 4 | loop through the list and print each managed entity ID in the process log file |
| 5 | print the managed entity identifier in the process log file |
function list_args()
{
  create_var_def('devices.0.id');
}

// read the ID of the selected managed entity
$devices = $context['devices'];

foreach ($devices as $device) {
  $device_id = $device['id'];

  logToFile("update device $device_id");
}
Subtenant
This type will allow the user to select a subtenant and use the subtenant ID from the workflow instance context in the task.
The source code below will let the user select a subtenant and display the subtenant ID on the execution console
<?php
require_once '/opt/fmc_repository/Process/Reference/Common/common.php';

function list_args()
{
  create_var_def('subtenant');                (1)
}

$subtenant = $context['subtenant'];           (2)

task_success('Task OK: '.$subtenant);         (3)
?>| 1 | declare the variable subtenant to be displayed in the user form |
| 2 | read the variable value from the context |
| 3 | print the value on the execution console |

List of subtenant
If you need to select multiple subtenants, you have to create an array variable with the type Customer.
With the variable $params.subtenants.0.id typed as Customer, the code below will ask for the user to select 1 or more subtenant, print the identifier of each one in the process log file and display the number of subtenant selected on the UI.
<?php
require_once '/opt/fmc_repository/Process/Reference/Common/common.php';

function list_args()
{
  create_var_def('subtenants.0.id');
}

$subtenants = $context['subtenants'];

foreach ($subtenants as $subtenant) {           (1)
  logToFile("subtenant: ".$subtenant['id']);    (2)
}

task_success('Task OK: '.sizeof($subtenants )." subtenant selected");
?>| 1 | loop through the list of subtenants |
| 2 | log the value in the process log file |
| the code for iterating over an array of managed entities is very similar |
Microservice reference
This type is key when integrating workflows and microservices.
It allows you to import and use the microservice instance data from a managed entity in your automation code.
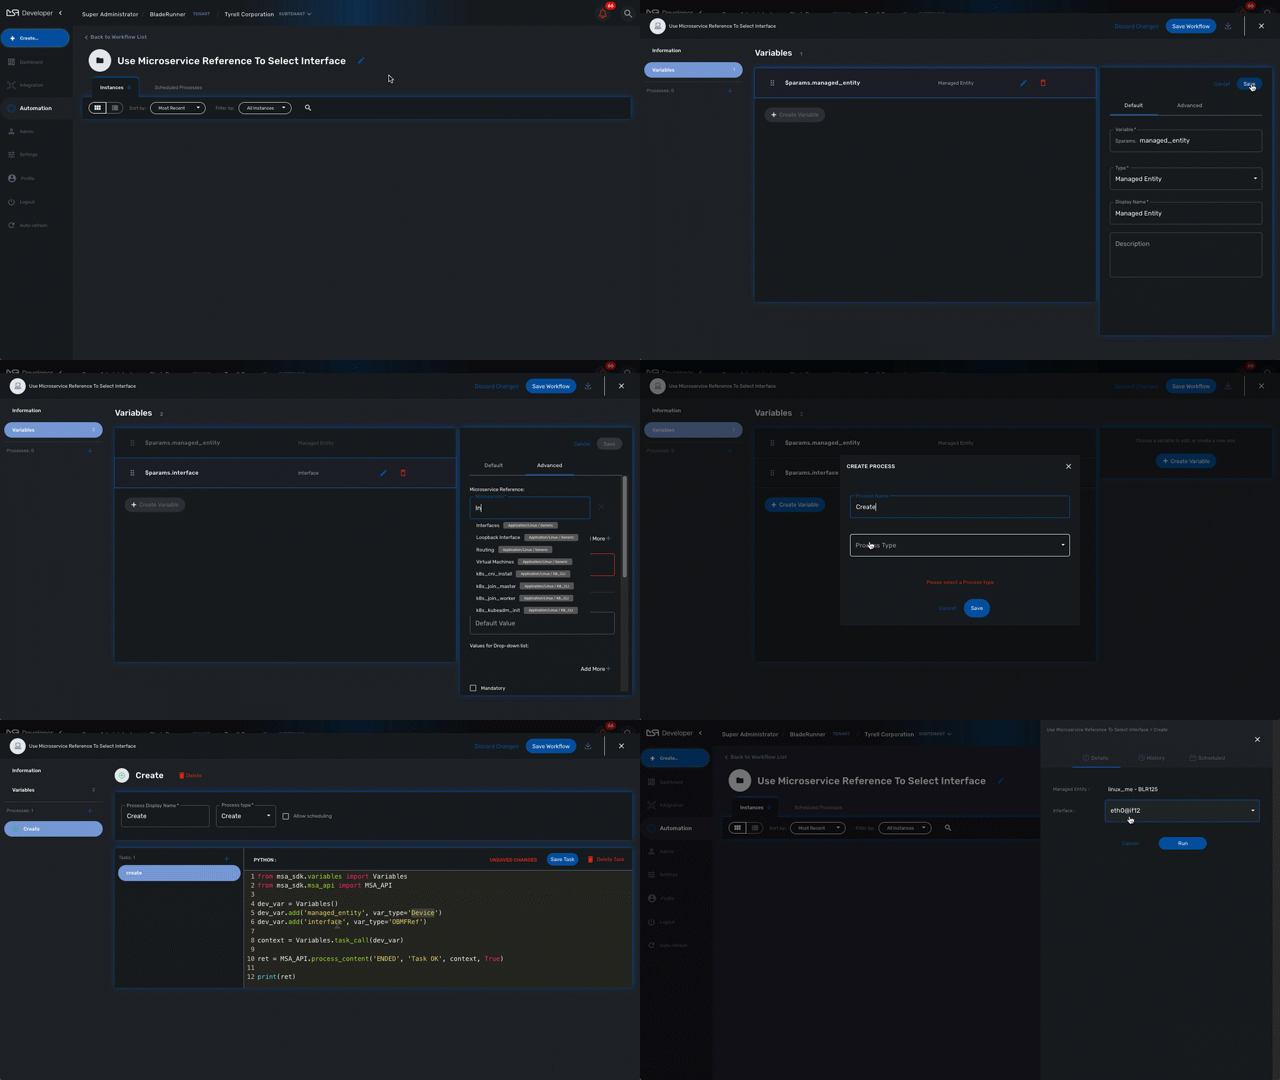
To use this type you need 2 variables:
-
a variable with the type
Managed Entityto select the managed entity to get the data from -
a variable with the type
Microservice Referenceto select the microservice that will pull the data
When creating a variable typed Microservice Reference you need to select the Managed Entity variable to use and the microservice that will act as the data source.
| the microservice must be attached to the managed entity with a deployment setting in order for the microservice reference to work. |
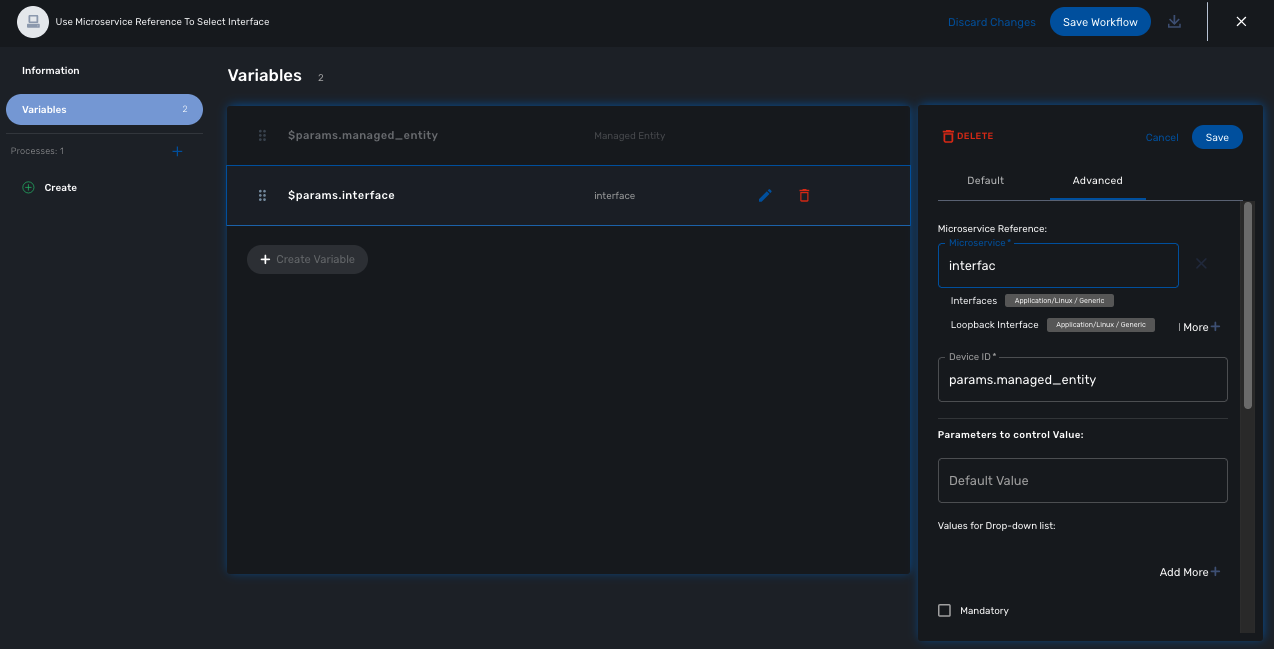
In the example below, the variable $params.interface is typed as Microservice Reference.
In the "Advanced" tab, the field "Microservice Reference" references one or several microservice and the field "Device ID" references a managed entity.
from msa_sdk.variables import Variables
from msa_sdk.msa_api import MSA_API

dev_var = Variables()
dev_var.add('managed_entity')
dev_var.add('interface.0.name')

context = Variables.task_call(dev_var)

ret = MSA_API.process_content('ENDED', 'Task OK', context, True)

print(ret)
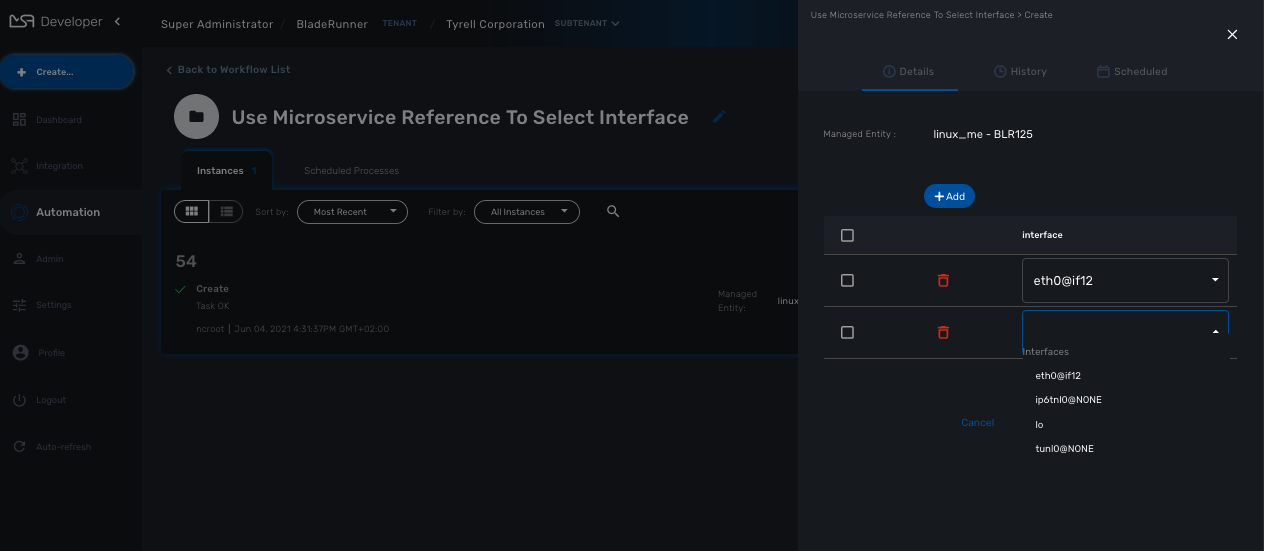
It also possible to use an array to select multiple values from the microservice
from msa_sdk.variables import Variables
from msa_sdk.msa_api import MSA_API

dev_var = Variables()
dev_var.add('managed_entity', var_type='Device')
dev_var.add('interface.0.name', var_type='OBMFRef') (1)

context = Variables.task_call(dev_var)

ret = MSA_API.process_content('ENDED', 'Task OK', context, True)

print(ret)| 1 | Use a variable array to allow multiple value selection |
Workflow reference
This type is useful for referencing a workflow from another one.
Display Name
The display value for the variable name.
Description
An optional description of this variable.
Advanced settings
Depending on the selected type, some advanced parameters may be differ.
| Setting | Description |
|---|---|
Default Value |
the default value that will be used when creating a new workflow instance |
Values for Drop-down |
a list of possible value the user can choose from |
Mandatory |
a value has to be provided for this variable |
Read only variable |
the value cannot be edited |
Section Header |
group some variables in the workflow console (see below). |
Show only in edit view |
hide the variable from the workflow console |
Array settings
When you are dealing with variable arrays, these options will let you control the possible actions a user can have over the array.
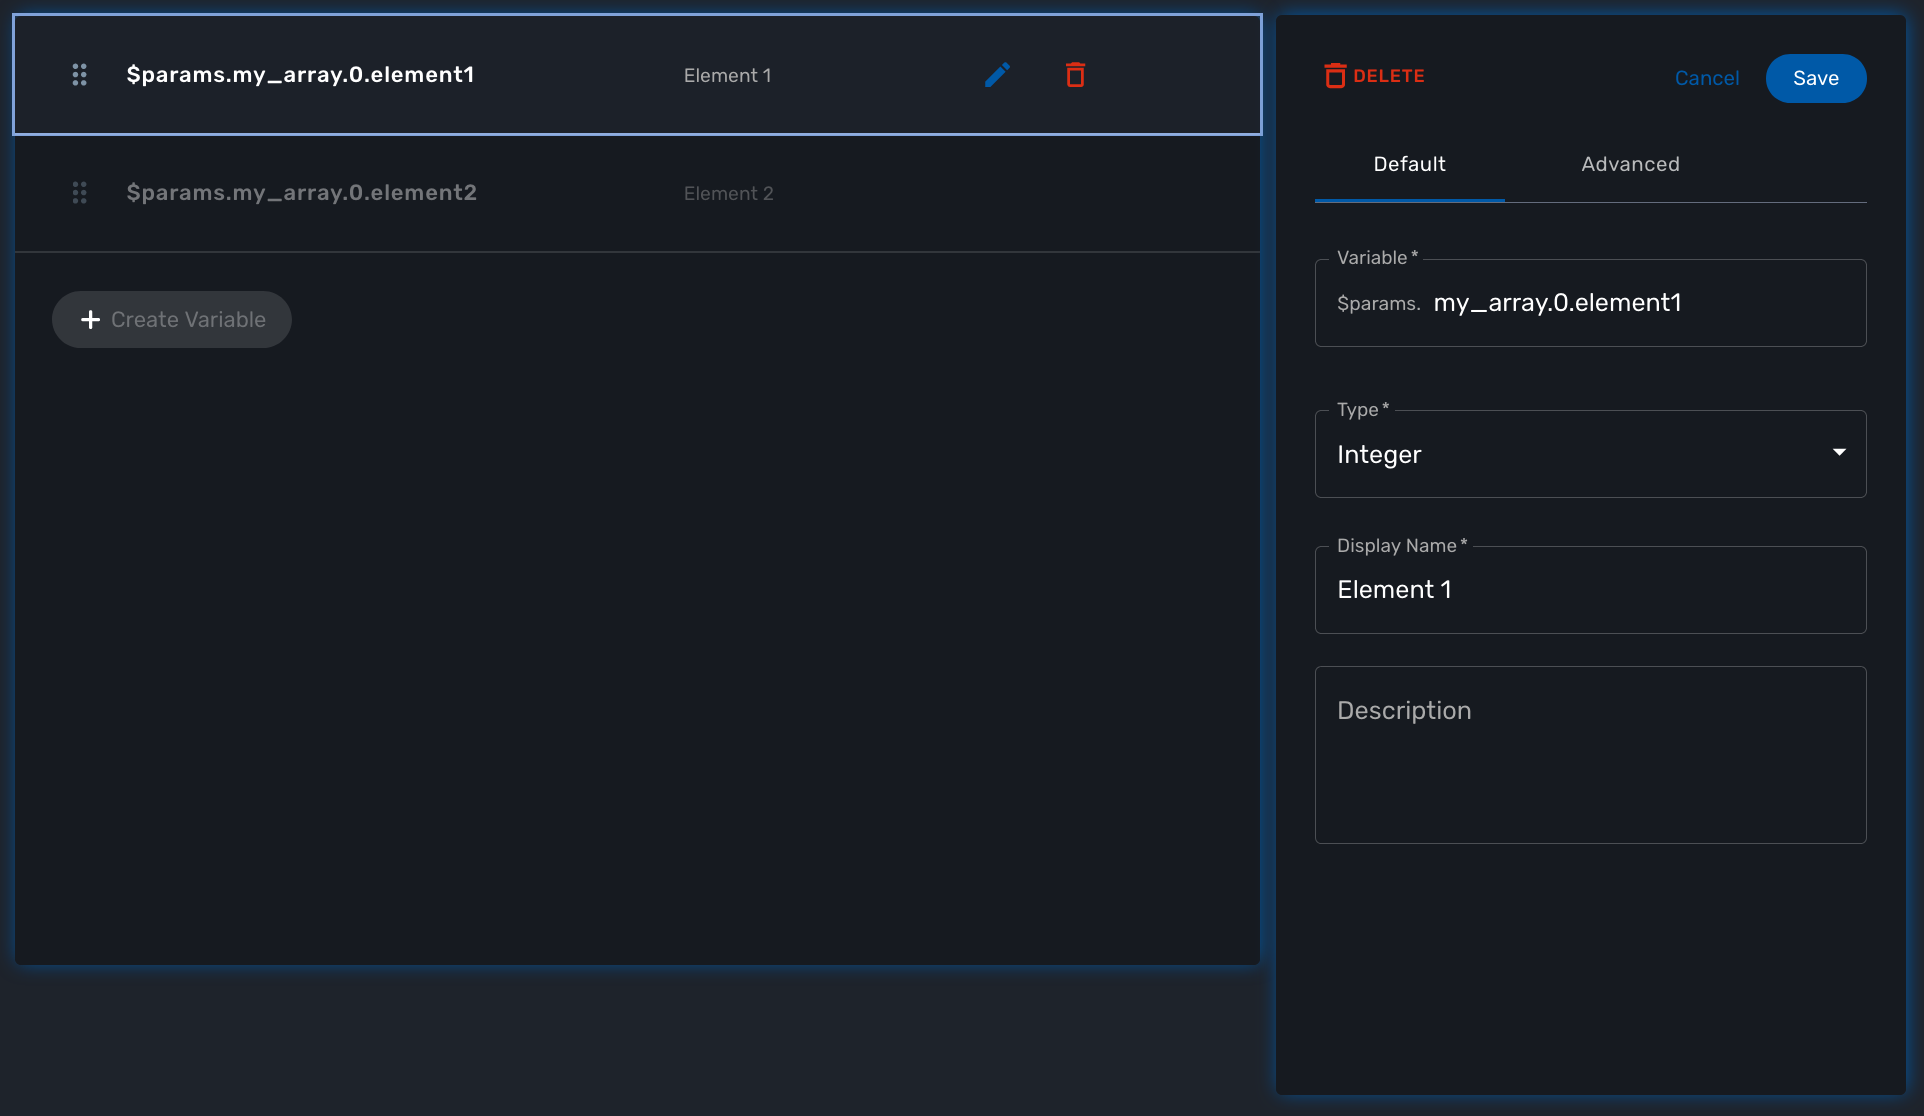
Variable arrays
To create a variable array, you need to follow a precise naming convention: $params.<ARRAY NAME>.0.<ELEMENT NAME>. The 0, is the separator that will allow the UI and the configuration engine that this variable is an array.
