This documentation will guide you through the implementation of a simple workflow to block a source IP and a destination port on a Linux based VNF
Overview
This firewall policy management tutorial will show you:
-
how to use the Microservices and the Workflows to create a layer of abstraction on top of your managed entities.
-
how to call a Microservice from a Workflow
-
how to design a simple workflow in Python
The firewall will be implemented by a Linux VNF and we will use iptables to configure the security policies.
| This tutorial can be implemented with the mini lab and its Linux based managed entity. |
The high level specifications for this use case are:
-
The user must be able to specify an IP address and a service (network port) on the workflow end-user UI console
-
The user must be able to select a managed entity to configure
-
The workflow will use the two parameters IP and port to automatically configure the firewall selected by the user
Implementation
Microservice design
Firewall Implementation on Linux
-
Based on Linux iptables
-
Takes an IP and a port as parameters
Iptables
Below are some sample iptable CLI commands used to perform IP/port based filtering
sudo iptables -A INPUT -p tcp --dport <PORT TO BLOCK> -s <IP TO BLOCK> -j DROP
sudo iptables -A FORWARD -p tcp --dport <PORT TO BLOCK> -s <IP TO BLOCK> -j DROPiptables -L INPUT -n | grep -v Chain | grep -v targetReturns
DROP       tcp  --  92.103.182.20        0.0.0.0/0           tcp dpt:
DROP       tcp  --  92.103.182.20        0.0.0.0/0           tcp dpt:80
Implementation steps
These are the steps to follow to build the Microservice. These steps are the usual steps designing and developping Microservices.
-
Step 1: Create a new Microservice in the repository.
-
Step 2: Implement the CREATE command.
-
Step 3: Implement the IMPORT command.
-
Step 4: Implement the DELETE command.
-
Step 5: Test and check the Linux vFW via the command line interface.
Create a new microservice
Create a new microservice simple_firewall
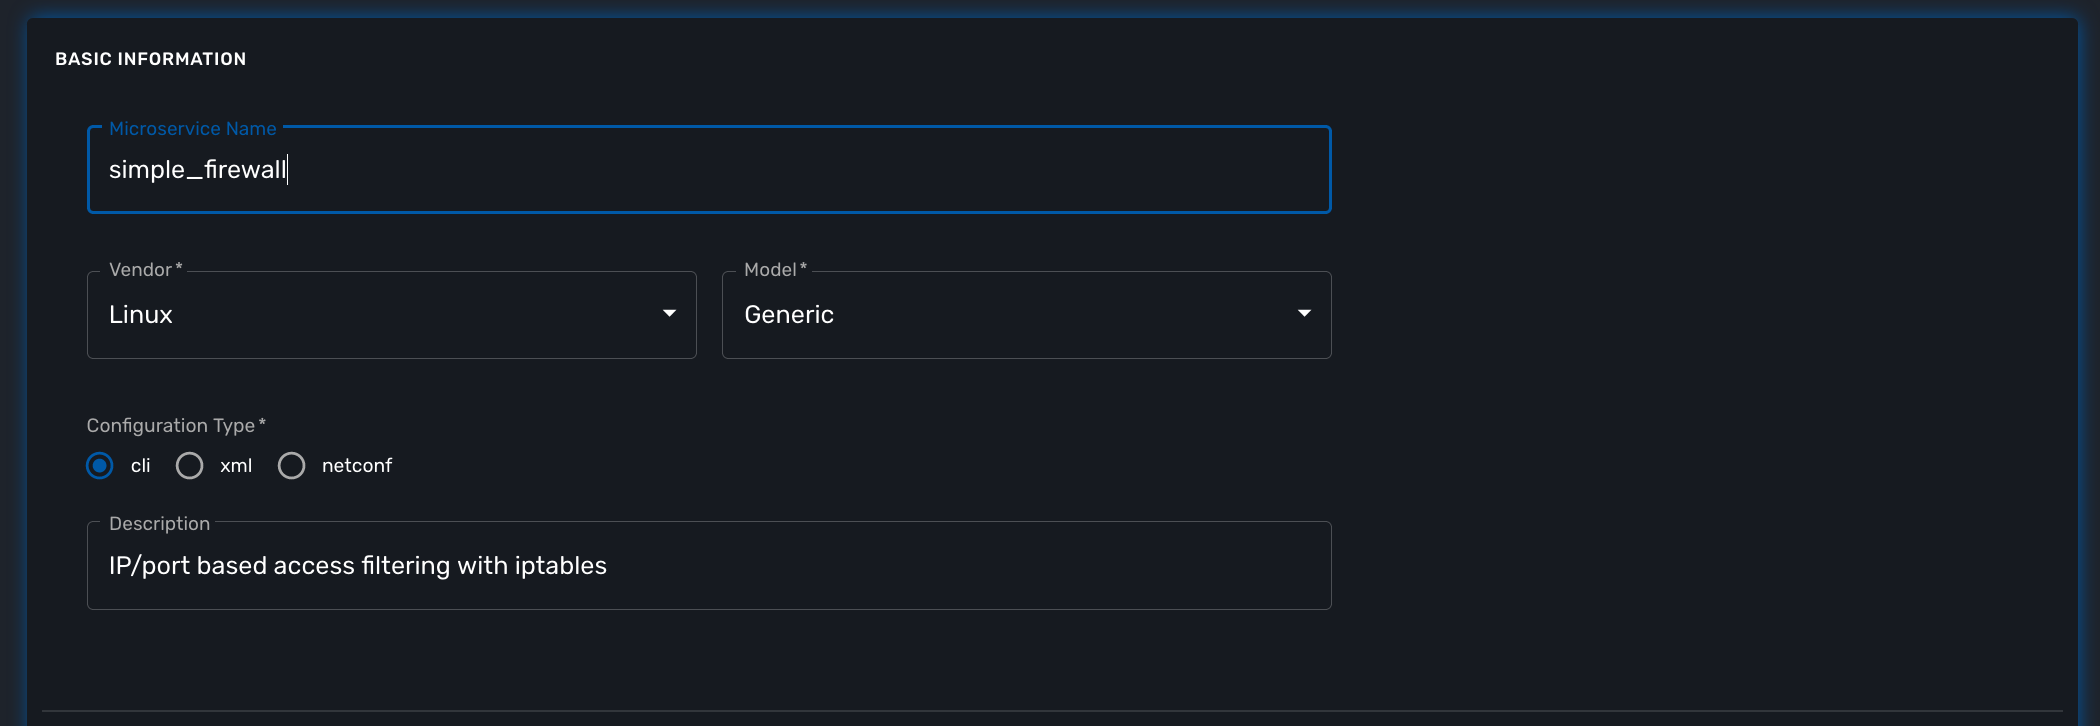
| You can refer to the documentation on microservice editor to learn how to create a new microservice. |
Implement the CREATE command
The creation of a filtering rule using iptable can be implemented with the CLI commands below.
These commands take 2 parameters, a port and an IP address.
Edit the CREATE function of your microservice and copy the implementation below:
sudo iptables -A INPUT -p tcp --dport {$params.dst_port} -s {$params.src_ip} -j DROP
sudo iptables -A FORWARD -p tcp --dport {$params.dst_port} -s {$params.src_ip}  -j DROP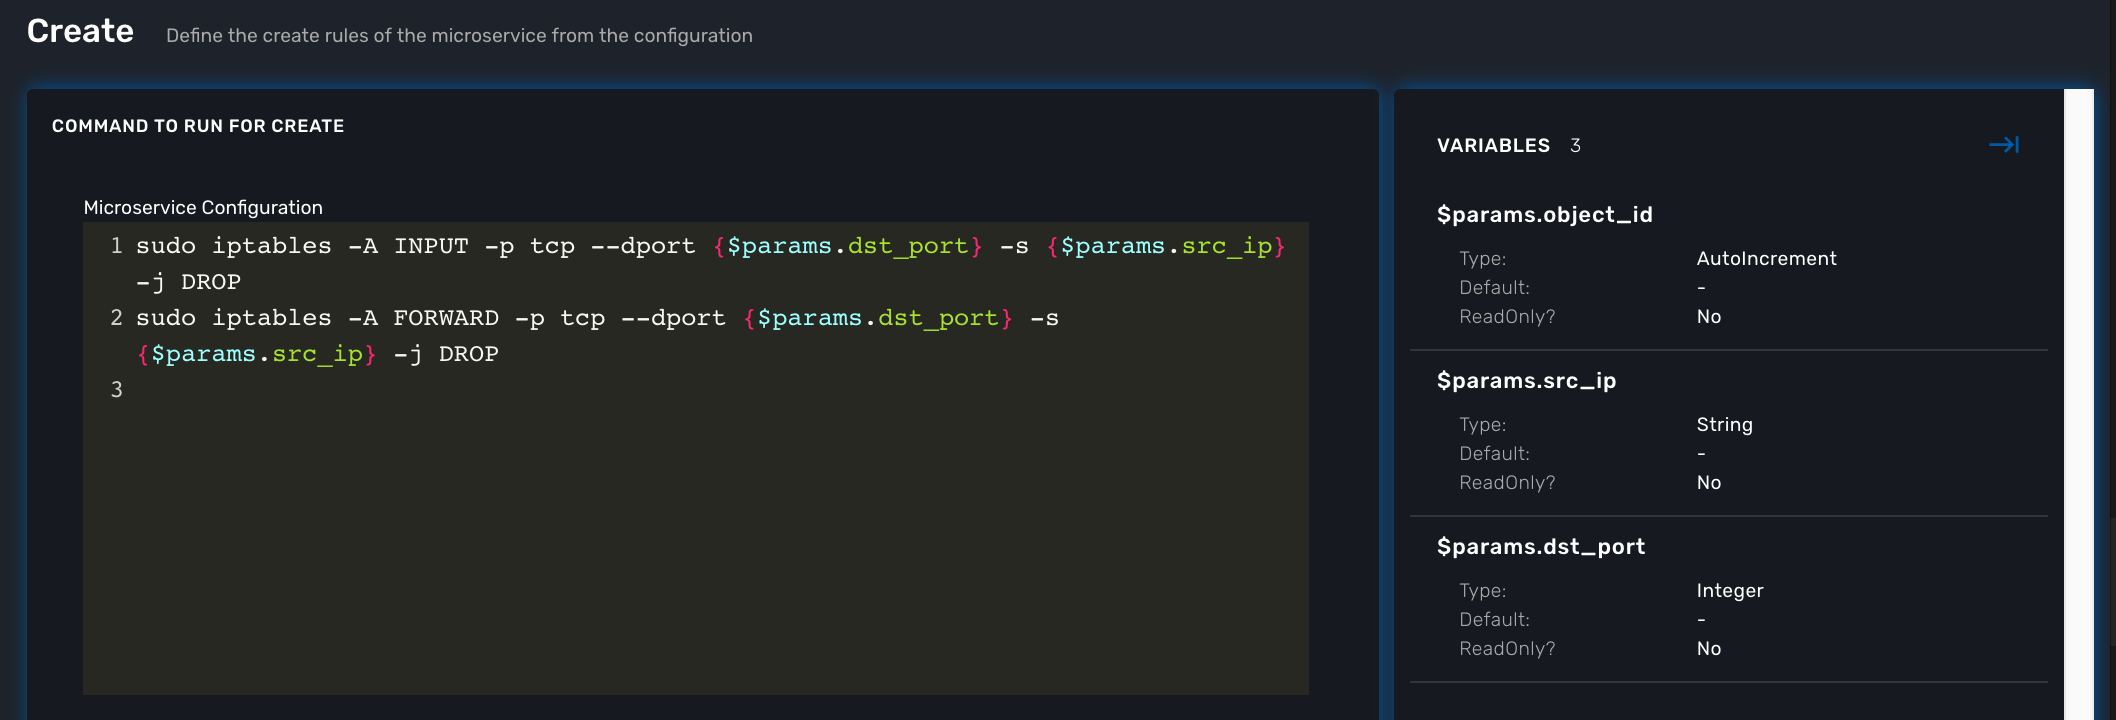
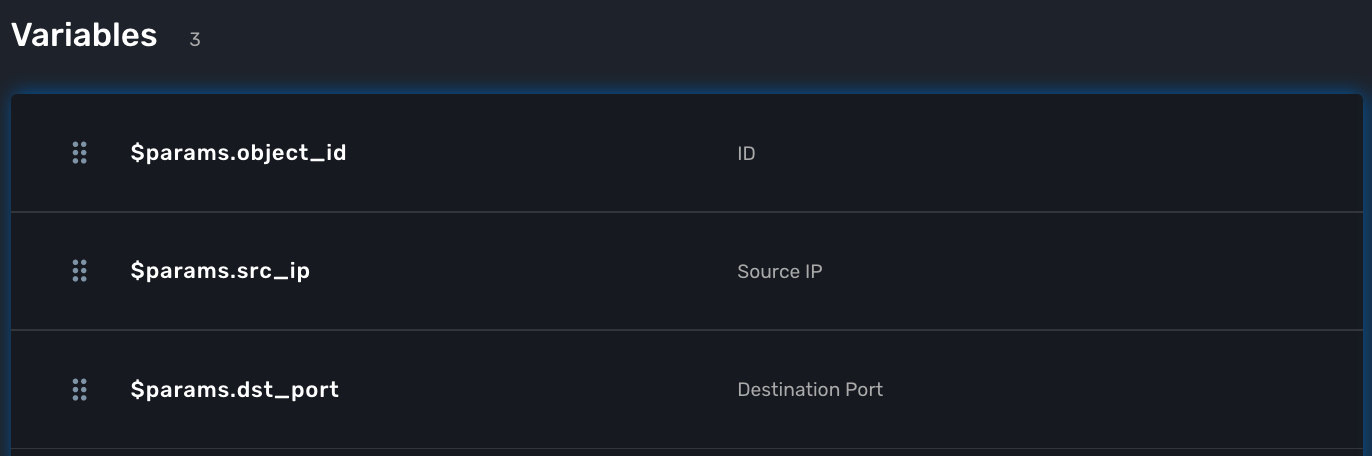
You need to create the 2 variables dst_port and src_ip as well as object_id which is a mandatory variable.
At this point the microservice is ready for a first test. Use a deployment setting to associate it to your managed entity
Save and close, select managed entity and click on the tab "configure", select the microservice simple_firewall and click on "+ Add Row"
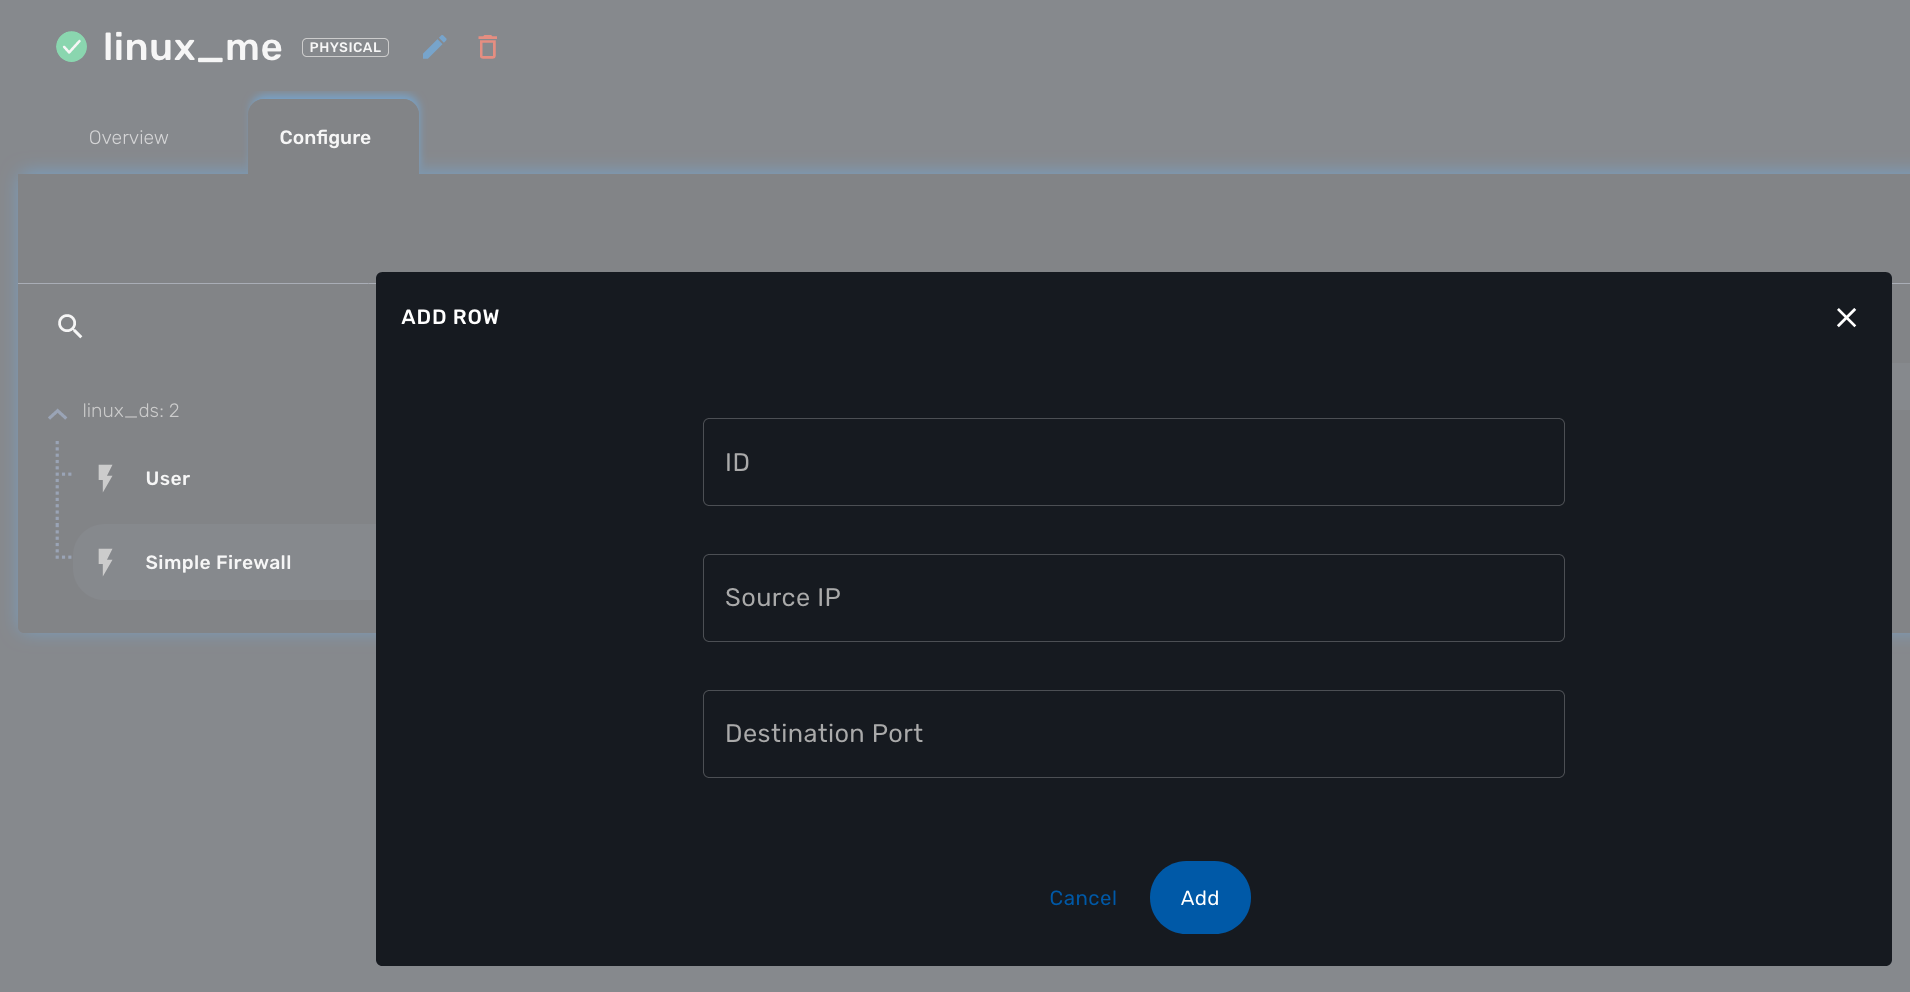
Please make sure linux_me is activated, otherwise "Activate" it. Then click "Apply Changes".
Once the configuration has been applied, you can connect to the managed entity CLI and verify that iptables was configured as expected.
$ docker-compose exec linux_me bash

[root@linux_me /]# sudo iptables --line-numbers -L INPUT -n
Chain INPUT (policy ACCEPT)
target     prot opt source               destination
DROP       tcp  --  192.168.23.45        0.0.0.0/0           tcp dpt:2345
Implement the IMPORT command
Once you are able to create new rules, you need to make sure that the MSactivator™ microservice database is reflecting the configuration on the managed entity. To acheive that, you need to implement the IMPORT function.
The role of the IMPORT command is to import the current device configuration into the MSactivator™ database.
The implementation of the IMPORT is based on a set of regular expressions that build a parser that will extract the values of the Microservice variables.
The IMPORT is made of 3 parts:
-
the command to run on the device (for CLI command based device).
-
the configuration parser, implemented with a set of regular expressions. Only the Microservice identifier extractor is mandatory.
-
a set of optional post-import operations implemented in Smarty language (https://www.smarty.net/).
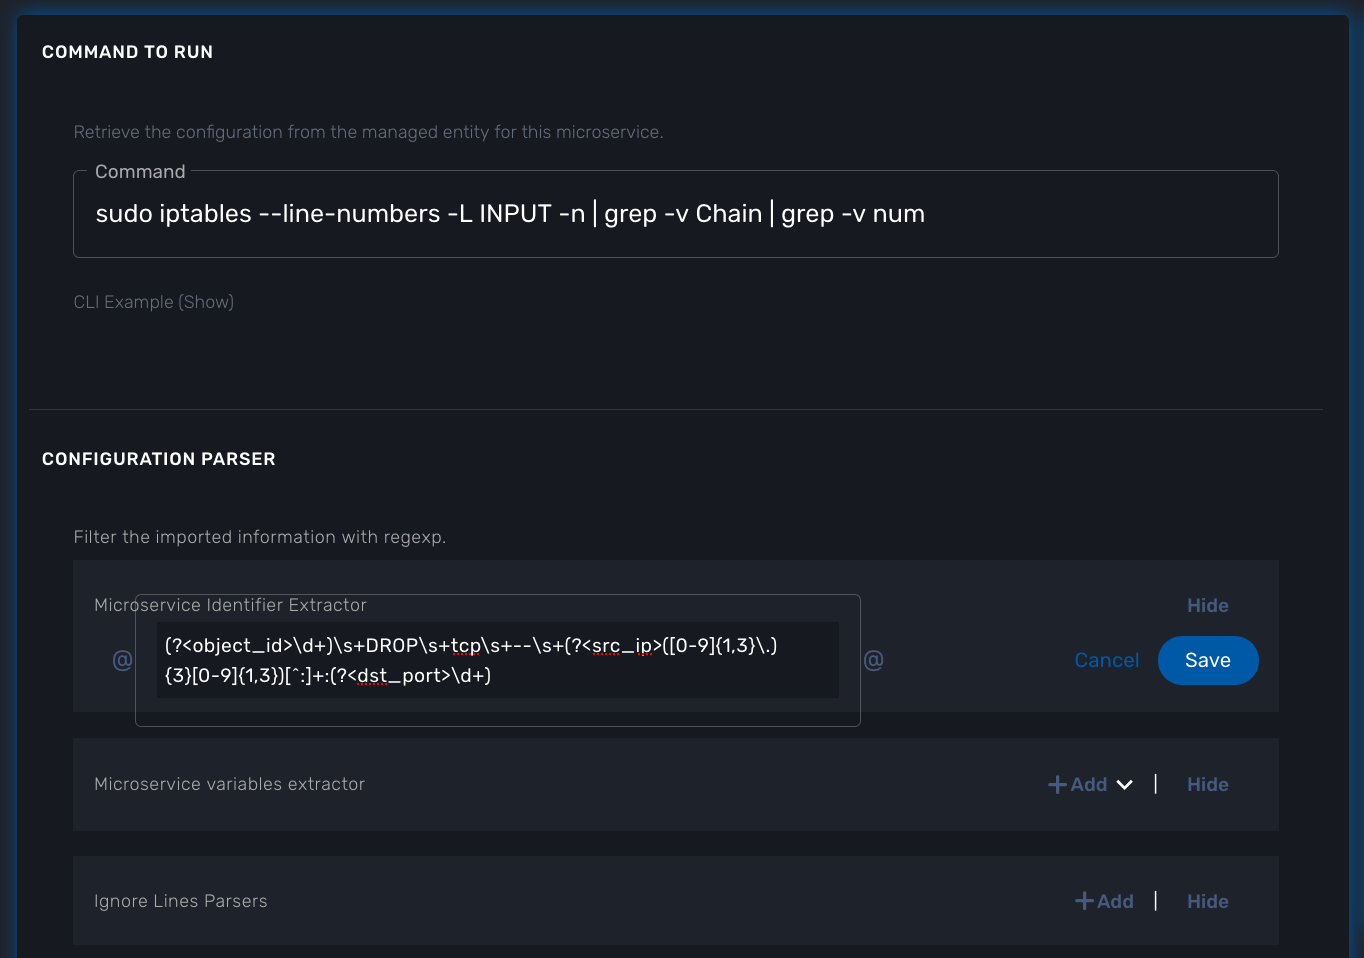
Command to run on the device
To list the iptables rules the CLI command to use is:
# sudo iptables -L INPUT -n
Chain INPUT (policy ACCEPT)
target     prot opt source               destination
DROP       tcp  --  192.168.1.2          0.0.0.0/0           tcp dpt:80
DROP       tcp  --  192.168.1.4          0.0.0.0/0           tcp dpt:443
We can add some "grep" commands to remove the lines that starts with "Chain" and "target" and therefore ease the parsing of the output.
| The use of grep here is a straightforward way, specific to this use case, to have a simple and easy to parse output. The same result could also be achieved by adding a parser instruction to ignore the first 2 lines starting with "Chain" and "target". |
# sudo iptables --line-numbers -L INPUT -n | grep -v Chain | grep -v num
1    DROP       tcp  --  192.168.1.2          0.0.0.0/0           tcp dpt:80
2    DROP       tcp  --  192.168.1.4          0.0.0.0/0           tcp dpt:443
Identifier extractor
The identifier extracter will parse each line and assign the rule ID to the Microservice variable object_id.
Since the rule contains the other variables on the same line, the identifier extractor will also extract the source IP and the destination port.
The regular expression below will extract the object_id, the src_ip and the dst_port.
(?<object_id>\d+)\s+DROP\s+tcp\s+--\s+(?<src_ip>([0-9]{1,3}\.){3}[0-9]{1,3})[^:]+:(?<dst_port>\d+)
Test and check the Linux vFW via the command line interface
The microservice is ready to be tested.
Make sure that you can add and delete a policy rule, that it’s reflected on the Linux firewall, and that the parameters are also properly synchronised after a call to CREATE or DELETE.
You can also add some iptables rules manually on the Linux CLI and run a configuration synchronisation to make sure that your manual changes are properly imported.
Add another IP to block.
[root@linux_me /]# sudo iptables -A INPUT -p tcp --dport 2345 -s 192.168.67.98 -j DROP
[root@linux_me /]# sudo iptables -A FORWARD -p tcp --dport 2345 -s 192.168.67.98 -j DROP
[root@linux_me /]# sudo iptables -L INPUT -n
Chain INPUT (policy ACCEPT)
target     prot opt source               destination
DROP       tcp  --  192.168.23.45        0.0.0.0/0           tcp dpt:2345
DROP       tcp  --  192.168.67.98        0.0.0.0/0           tcp dpt:2345
And use "Synchronize with Managed Entity" to import the new rule in the configuration database.

Implement the DELETE command
The deletion of the iptables INPUT and FORWARD rules is executed with the CLI command below:
sudo iptables -D INPUT -p tcp --dport <PORT TO BLOCK>  -s <IP TO BLOCK>  -j DROP
sudo iptables -D FORWARD -p tcp --dport <PORT TO BLOCK>  -s <IP TO BLOCK>  -j DROP
This will be written in the Delete command of the microservice as:
sudo iptables -D INPUT -p tcp --dport {$simple_firewall.$object_id.dst_port} -s {$simple_firewall.$object_id.src_ip} -j DROP
sudo iptables -D FORWARD -p tcp --dport {$simple_firewall.$object_id.dst_port} -s {$simple_firewall.$object_id.src_ip} -j DROPConclusion
With the microservice design, you have been defining an abstraction layer on top of a security VNF.
This Microservice defines de facto an API for a simple firewall management.
You can call the Create/Update/Delete function of the microservice simple_firewall from a script or a third party REST client.
command CREATE
parameters {"simple_firewall":{"44":{"dst_port":"9876","object_id":"44","src_ip":"192.168.23.1"}}}
This use case could be extended to other vendors provided that the microservices are defining the same variables: dst_port, src_ip, object_id (which is mandatory)
Workflow design
In this section you are going to create a workflow on top of the microservice.
You will see that the implementation of the workflow doesn’t not depend on the vendor provided that some condition on the microservice design are met:
-
the name of the microservice should be the same for every supported vendor.
-
each vendor microservice will have to implement the same set of variables.
The workflow will be a very simple workflow with 3 processes, implemented in python.
-
process
Create Firewall Service(type CREATE) -
process
Add Filter Rule(type UPDATE) -
process
Delete Service(type DELETE)
Create a new workflow
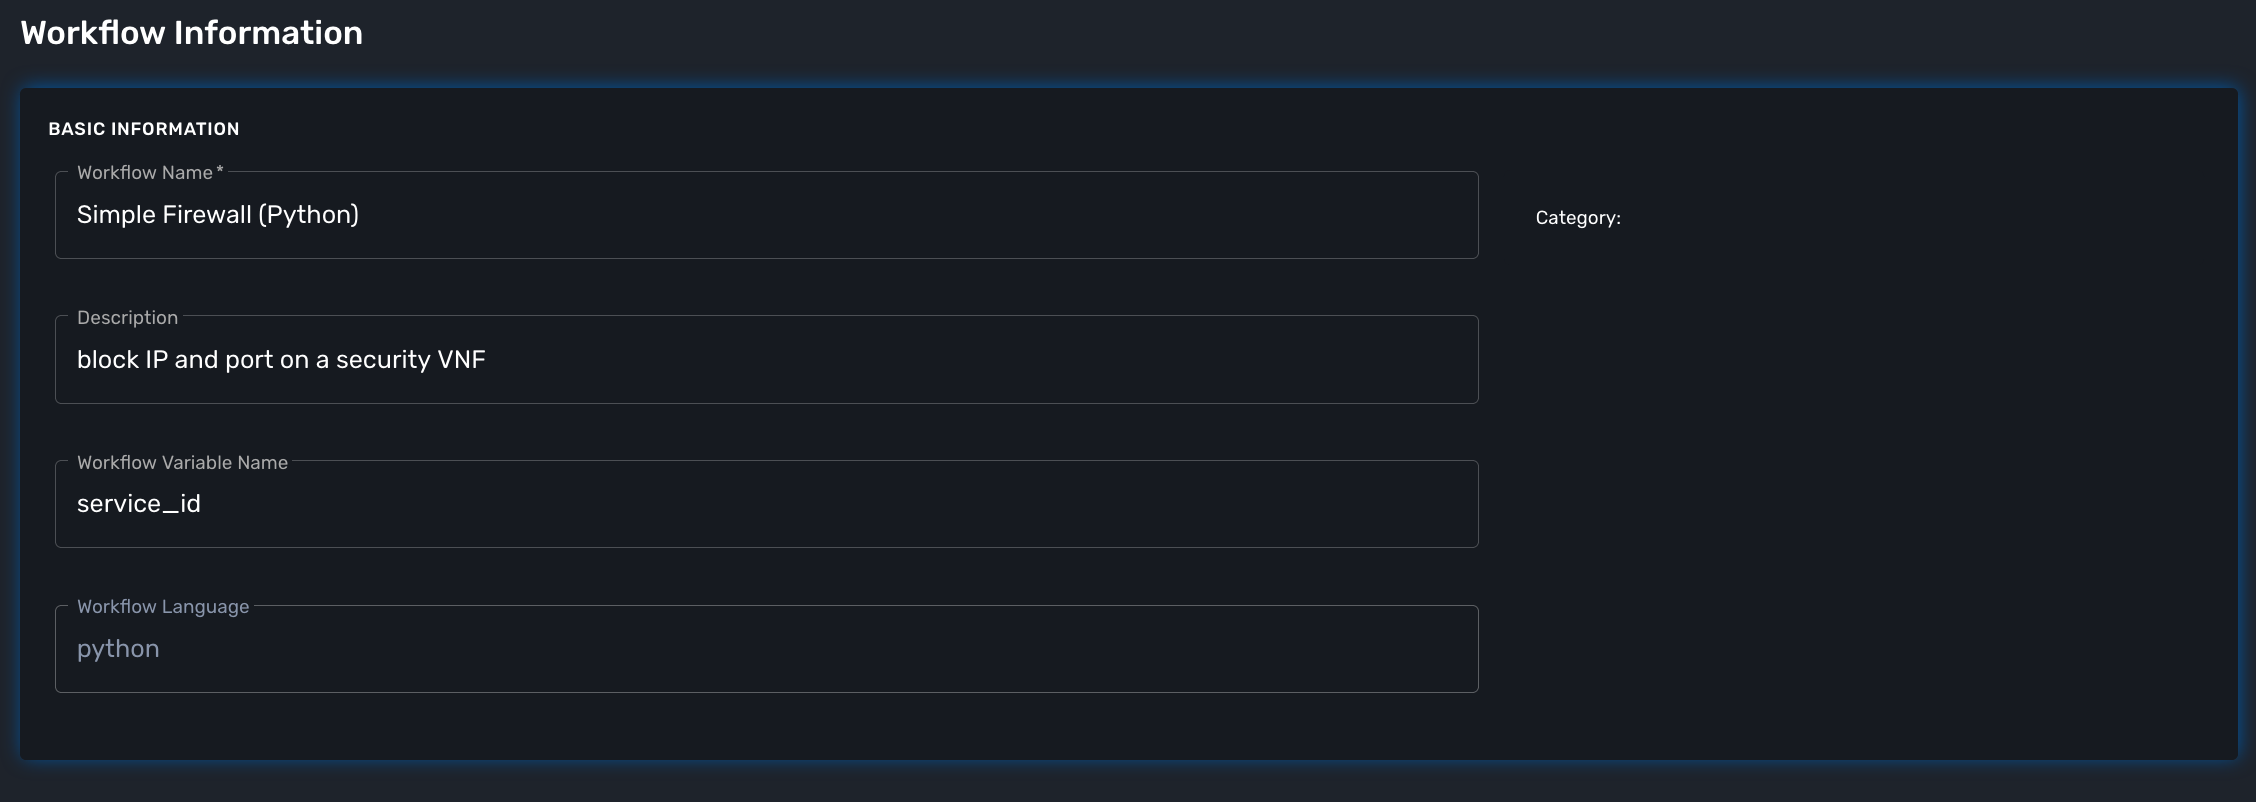
| set the workflow language to python and set service_id as the workflow variable name. |
Add the variables
You need 4 variables to map with the simple_firewall microservice:
-
id: for the firewall rule ID - type: Integer
-
src_ip: for the source IP to block - type: String
-
dst_port: for the destination port to block - type: Integer
-
devices.0.id: to allow the user to select a list of managed entity to configure - type: Managed Entity
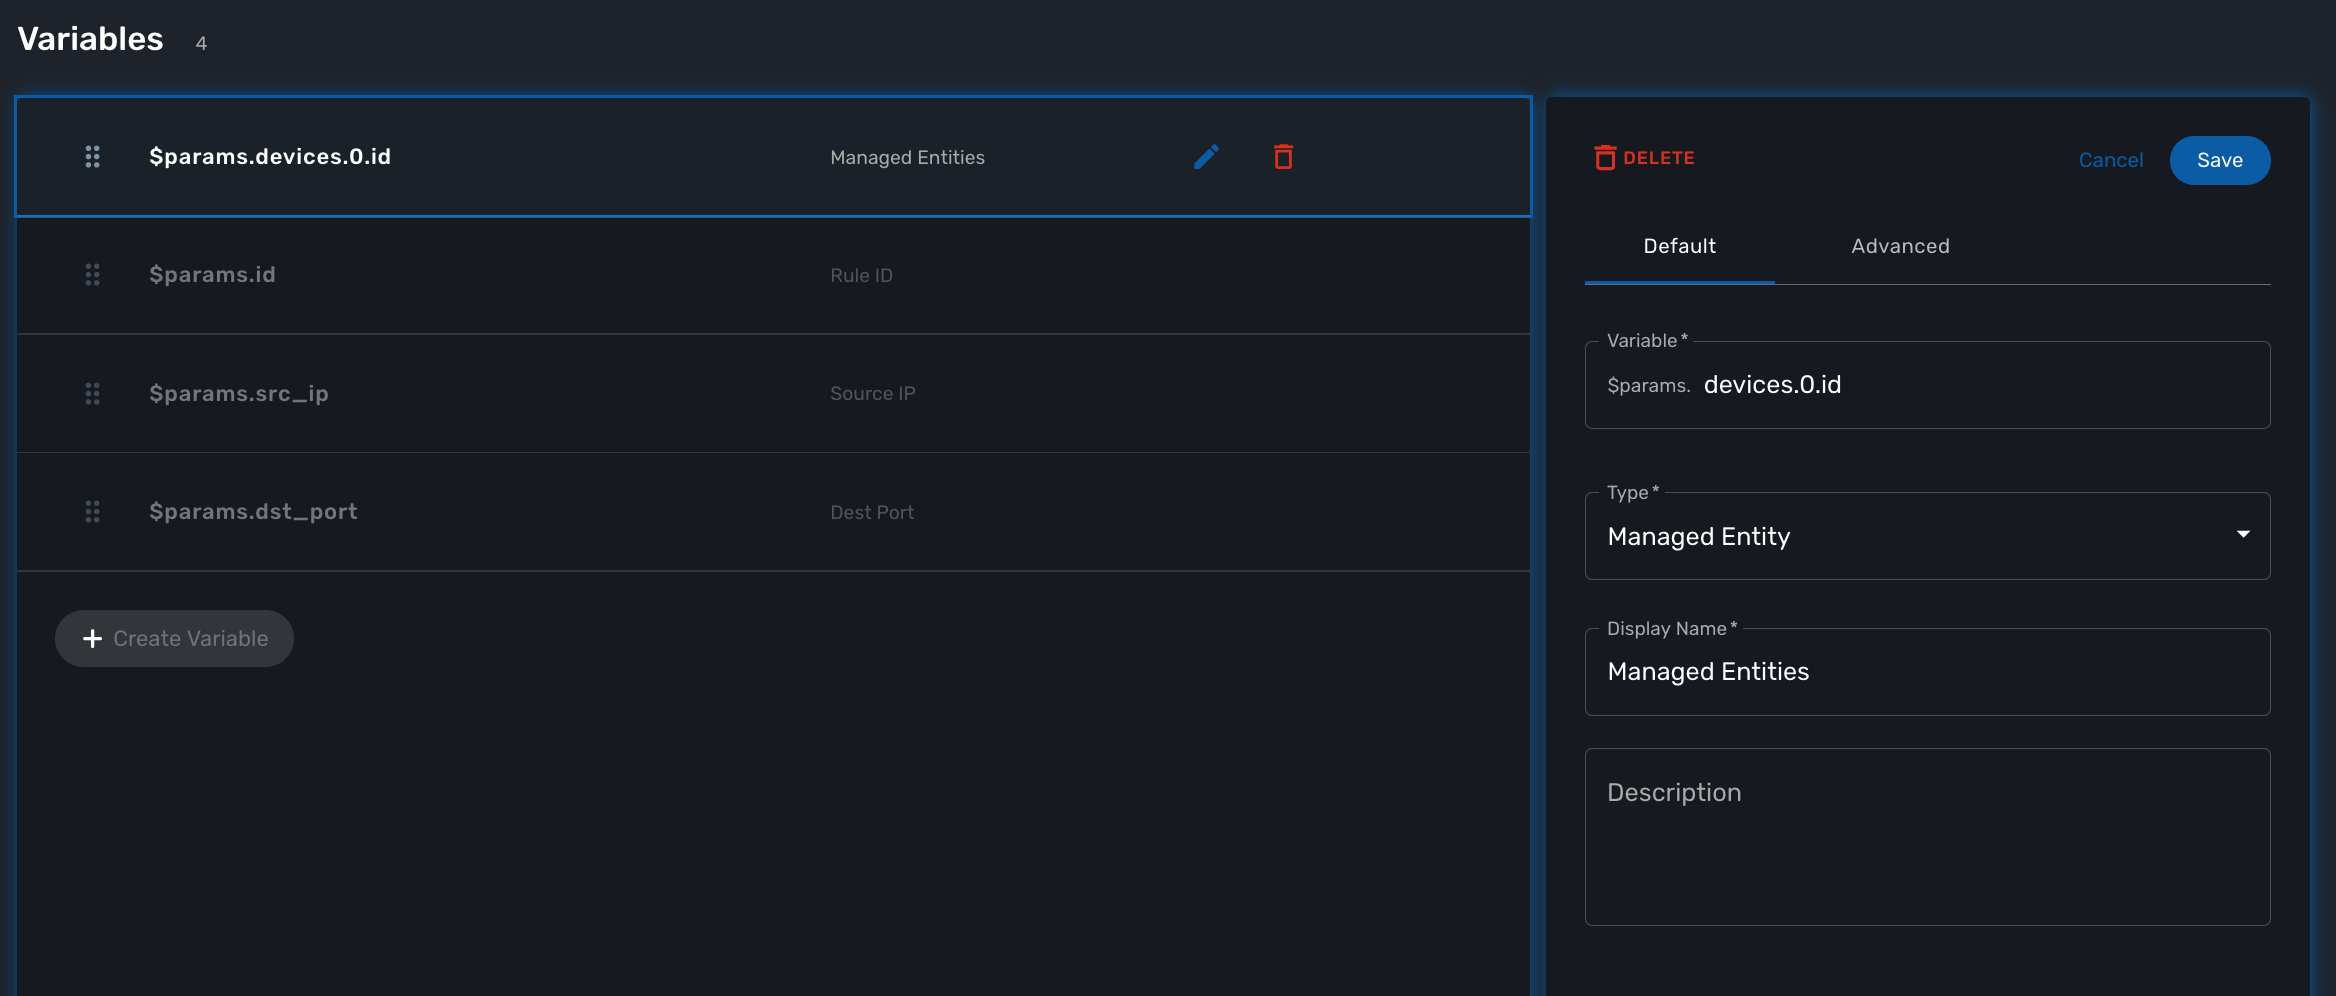
| the type Device is a special type that will let the user select a managed entity from the process execution screen |
Implement the processes
Create the processes and for each processes add a task.
Make sure that each process type is correctly set as detailed above.
The source code below can be directly copied in the tasks.
process Create Firewall Service
from msa_sdk.variables import Variables             (1)
from msa_sdk.msa_api import MSA_API

dev_var = Variables()
dev_var.add('devices.0.id', var_type='Device')      (2)

context = Variables.task_call(dev_var)              (3)

ret = MSA_API.process_content('ENDED',              (4)
                              f'Firewall service created. {len(context["devices"])} Managed Entity selected',
                              context, True)
print(ret)process Add Filter Rule
import json
from msa_sdk.variables import Variables
from msa_sdk.msa_api import MSA_API
from msa_sdk.order import Order
from msa_sdk import util

# List all the parameters required by the task
dev_var = Variables()                                                       (1)
dev_var.add('id', var_type='Integer')
dev_var.add('src_ip', var_type='String')
dev_var.add('dst_port', var_type='Integer')
context = Variables.task_call(dev_var)
process_id = context['SERVICEINSTANCEID']

devices = context['devices']
for device in devices:
  # extract the database ID
  device_db_id = device['id'][3:]                                              (2)

  # build the Microservice JSON params for the CREATE
  micro_service_vars_array = {"object_id": context['id'],                       (3)
                              "src_ip": context['src_ip'],
                              "dst_port": context['dst_port']
                              }

  object_id = context['id']                                                     (4)

  simple_firewall = {"simple_firewall": {object_id: micro_service_vars_array}}       (5)

  # call the CREATE for simple_firewall MS for each device
  order = Order(device_db_id)
  order.command_execute('CREATE', simple_firewall)              (6)

  # convert dict object into json
  content = json.loads(order.content)                    (7)

  # check if the response is OK
  if order.response.ok:
    ret = MSA_API.process_content('ENDED',
                                  f'STATUS: {content["status"]}, \
                                  MESSAGE: {content["message"]}',
                                  context, True)
  else:
    ret = MSA_API.process_content('FAILED',
                                  f'Policy update failed \
                                  - {order.content}',
                                  context, True)

print(ret)| 1 | list all the parameters required by the task |
| 2 | read the ID of the selected managed entity |
| 3 | build the microservice JSON parameters for the CREATE |
| 4 | create the dictionary, make sure that the key is the name of the microservice |
| 5 | call the CREATE for simple_firewall MS for each device |
| 6 | call the microservice CREATE with the parameters. Make sure to transform the dictionary to JSON |
| 7 | get the response and process it |
process Delete Service
from msa_sdk.variables import Variables
from msa_sdk.msa_api import MSA_API

dev_var = Variables()
context = Variables.task_call()

ret = MSA_API.process_content('ENDED', f'Firewall service deleted', context, True)
print(ret)
Run the workflow
Go to the "Automation" section of your sub-tenant and select the workflow.
Click on "+ Create Firewall Service" (this action is generated based on the name of the process), select one or both linux managed entity and click "Run"
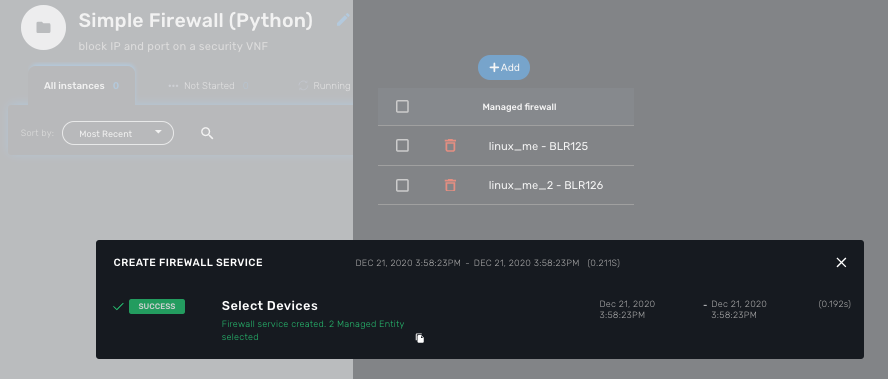
A new instance of the workflow is now created and you can call the process to create a firewall rule with "Add Filter Rule"
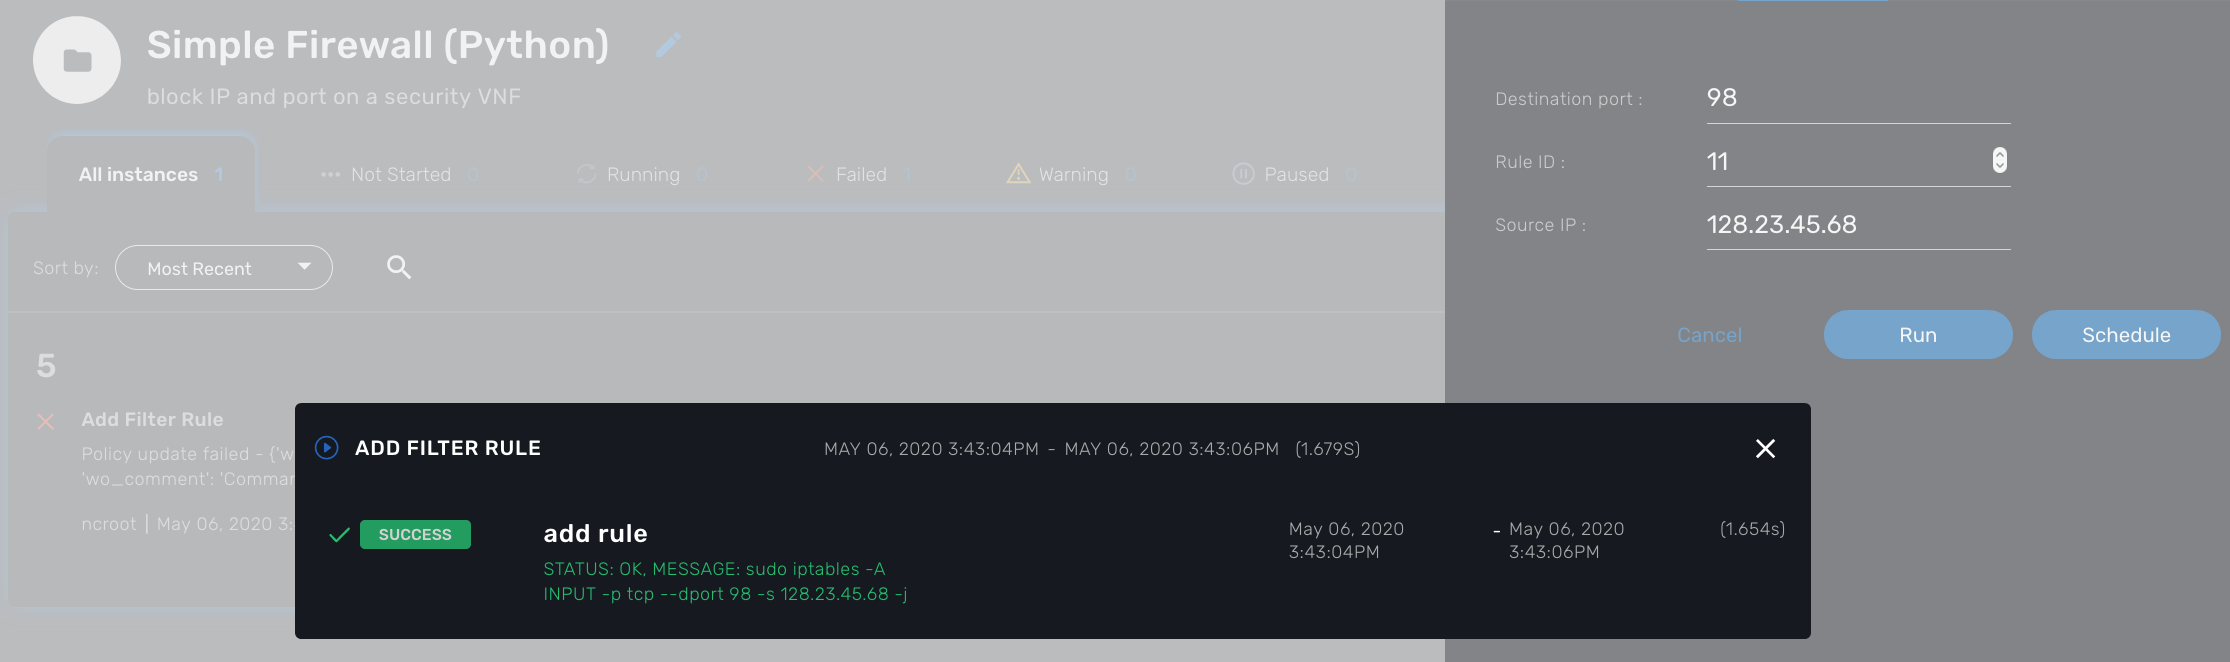
Delete the instance with the process "Delete Service"
Getting the Sources
The source of this tutorial is available on GitHub.
The Microservice simple_firewall.xml can be downloaded from here
The Workflow can installed from here
Readme.adoc is available to help you install the workflow
The PHP version of Simple Firewall workflow can also be downloaded from here.