|
|
|
This documentation contains a set of tutorials and examples to help you get familiar with the MSactivator™ as a development platform.
Developer Portal
The developer portal provides the tools to design, develop and test automated and integrated processes.
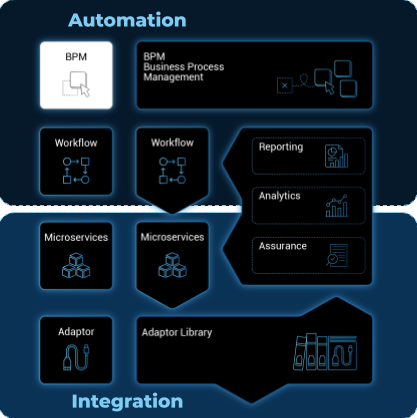
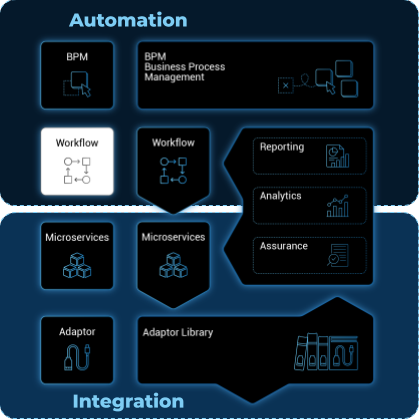
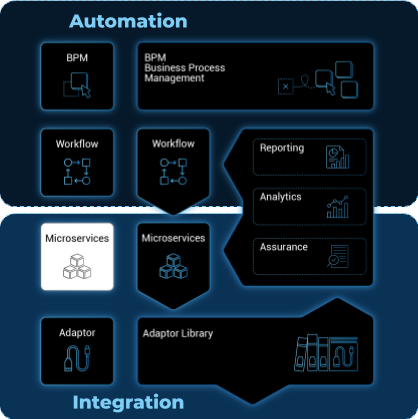
After connecting to the developer portal you will see the 3 swimlanes for the automation and integration provided by the MSactivator™.
You can either start creating new libraries or view and edit the existing ones.
BPM Editor
The BPM editor is a web based UI for designing BPM processes.
Overview
The MSactivator™ provides a web based user interface editor for designing BPM (Business Process Model).
BPM are sitting at the top of the automation layer and the editor will allow you to create BPM in a codeless way.
BPM design
To create a new BPM from the developer portal, click on "+ Create" from the swimlane "BPM Library."
You can also browse through the existing BPM by clicking on "See more".
| you need to select a sub-tenant to see the BPM. |
BPMN elements
The MSactivator™ BPM engine supports the following BPMN elements:


| Bear in mind that a gateway is not a task! You have to determine facts and needs before reaching a gateway. |
Parallel gateway (AND)
Gateways can also be used to model concurrency in a process.
The most straightforward gateway to introduce concurrency in a process model is the Parallel Gateway, which allows forking into multiple paths of execution or joining multiple incoming paths of execution.
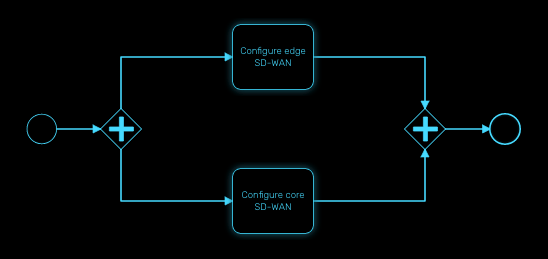
The functionality of the parallel gateway is based on the incoming and outgoing sequence flow(s):
-
fork: all outgoing sequence flows are followed in parallel, creating one concurrent execution for each sequence flow.
-
join: all concurrent executions arriving at the parallel gateway wait at the gateway until an execution has arrived for each of the incoming sequence flows. Then the process continues past the joining gateway.
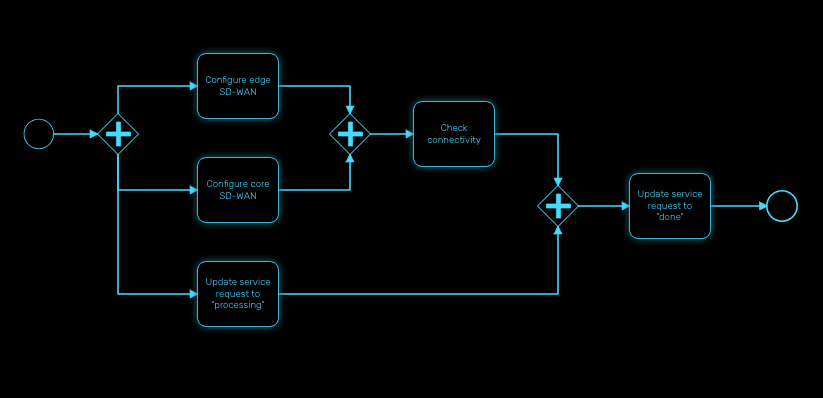
Note that a parallel gateway does not need to be ‘balanced’ (i.e., a matching number of incoming/outgoing sequence flows for corresponding parallel gateways). A parallel gateway will simply wait for all incoming sequence flows and create a concurrent path of execution for each outgoing sequence flow, not influenced by other constructs in the process model. So, the following process is legal in MSactivator™:
Decision gateway (XOR)
The XOR gateway will let you model a decision in the process.
When the execution arrives at this decision gateway, all outgoing sequence flows are evaluated in the order in which they have been defined. The sequence flow whose condition evaluates to ‘true’ is selected for continuing the process.
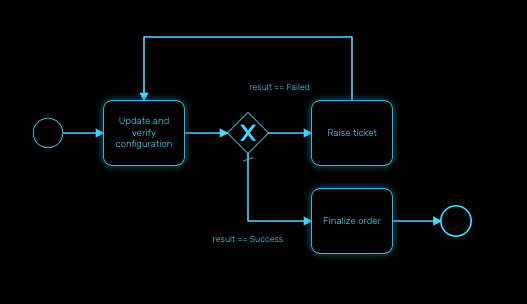
To configure the gateway, you need to select the outbound link from the gateway, choose the inbound task and configure the condition to transition to the next BPM task.
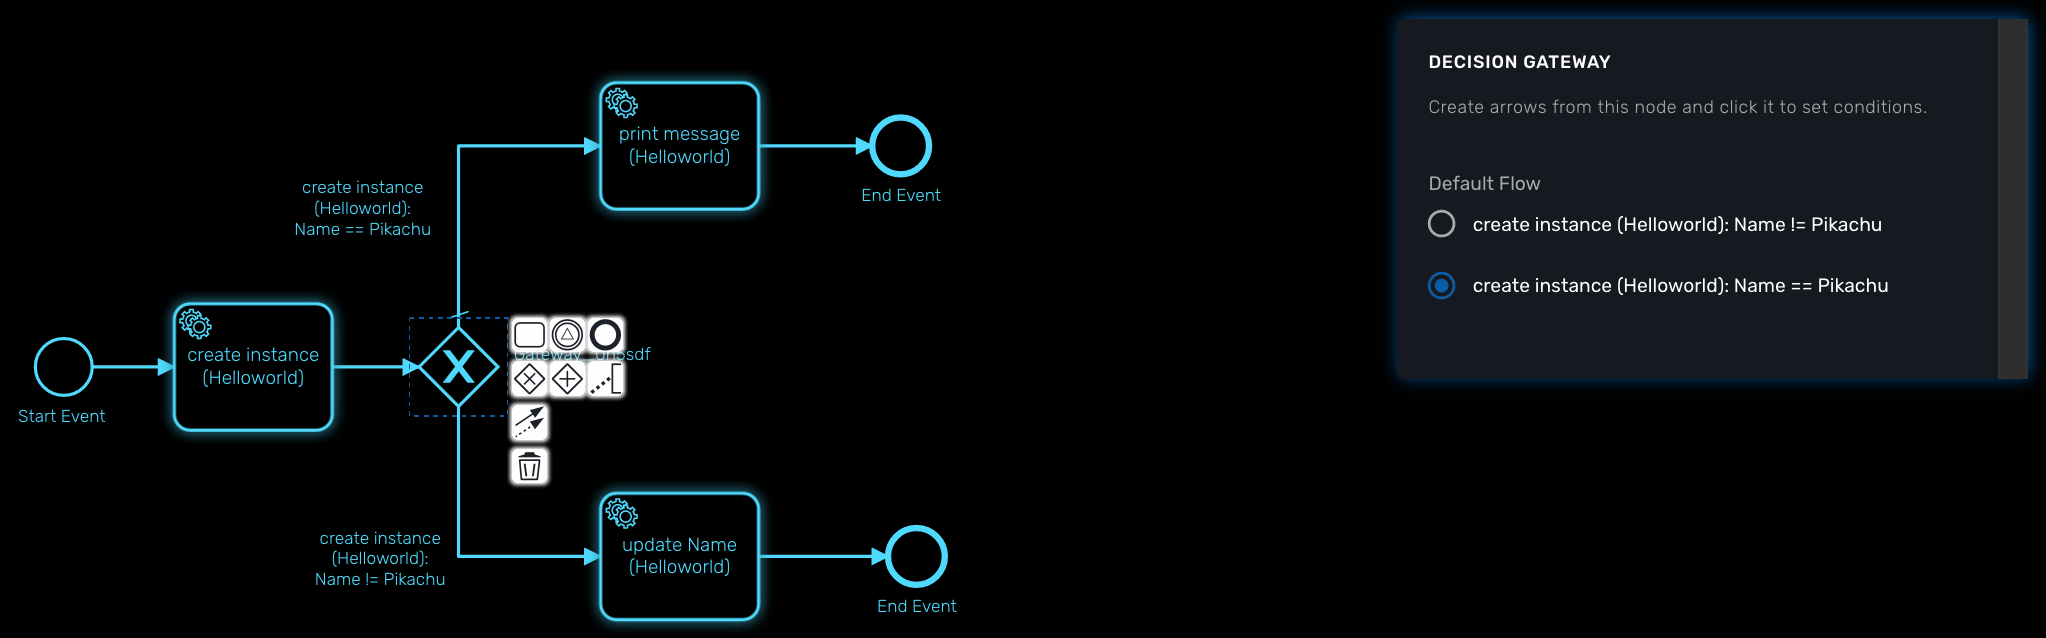
Configure a decision gateway
To configure a decision gateway, you need to configure each of its outbound links and select one of the outbound link to be the default flow.
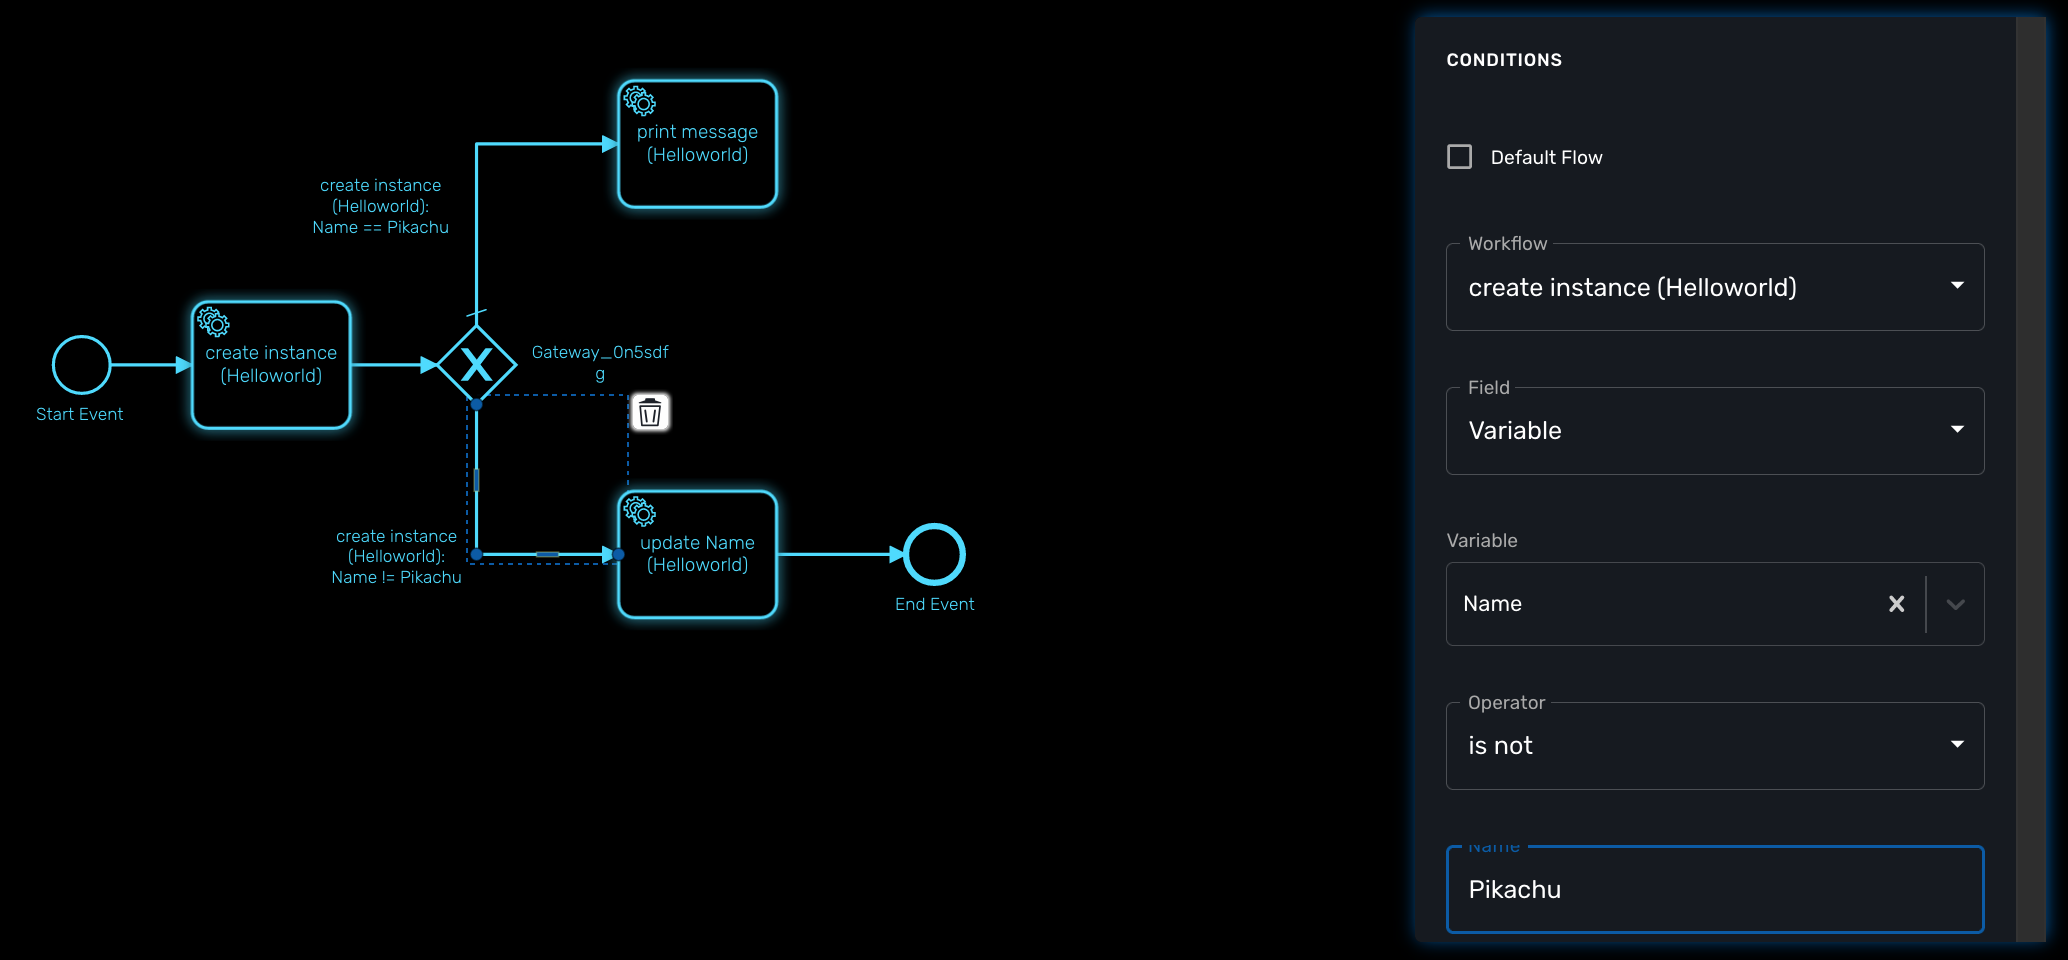
Default flow
Click on the decision gateway ans select the default flow of the process when there is not suitable condition based on the result of the inbound task.
Workflow
For each outbound link, select the inbound workflow that will be used as the condition source for the link.
Field
Select the field to use to test the condition. Field can be "Variable" or "Result Status".
With "Variable", you can choose one of the workflow variable and test its value for the decision.
With "Result Status", the decision will depend on the execution status of the workflow.
Design a BPM process
Create a new BPM
Click on "Create" to create a new BPM editor.
Use your mouse to add tasks and link them together.
| A BPM process must have a StartEvent and an EndEvent. |
| Only one executable BPM process can be specified in a BPM definition. |

You can save your BPM at anytime and edit it later. When you save you BPM, you need to select a sub-tenant.
| A BPM is associated to a single sub-tenant. |
Connecting workflows and processes
Select an executable task to see the list of workflows (based on the sub-tenant selected), then select a process and provide its input parameters.
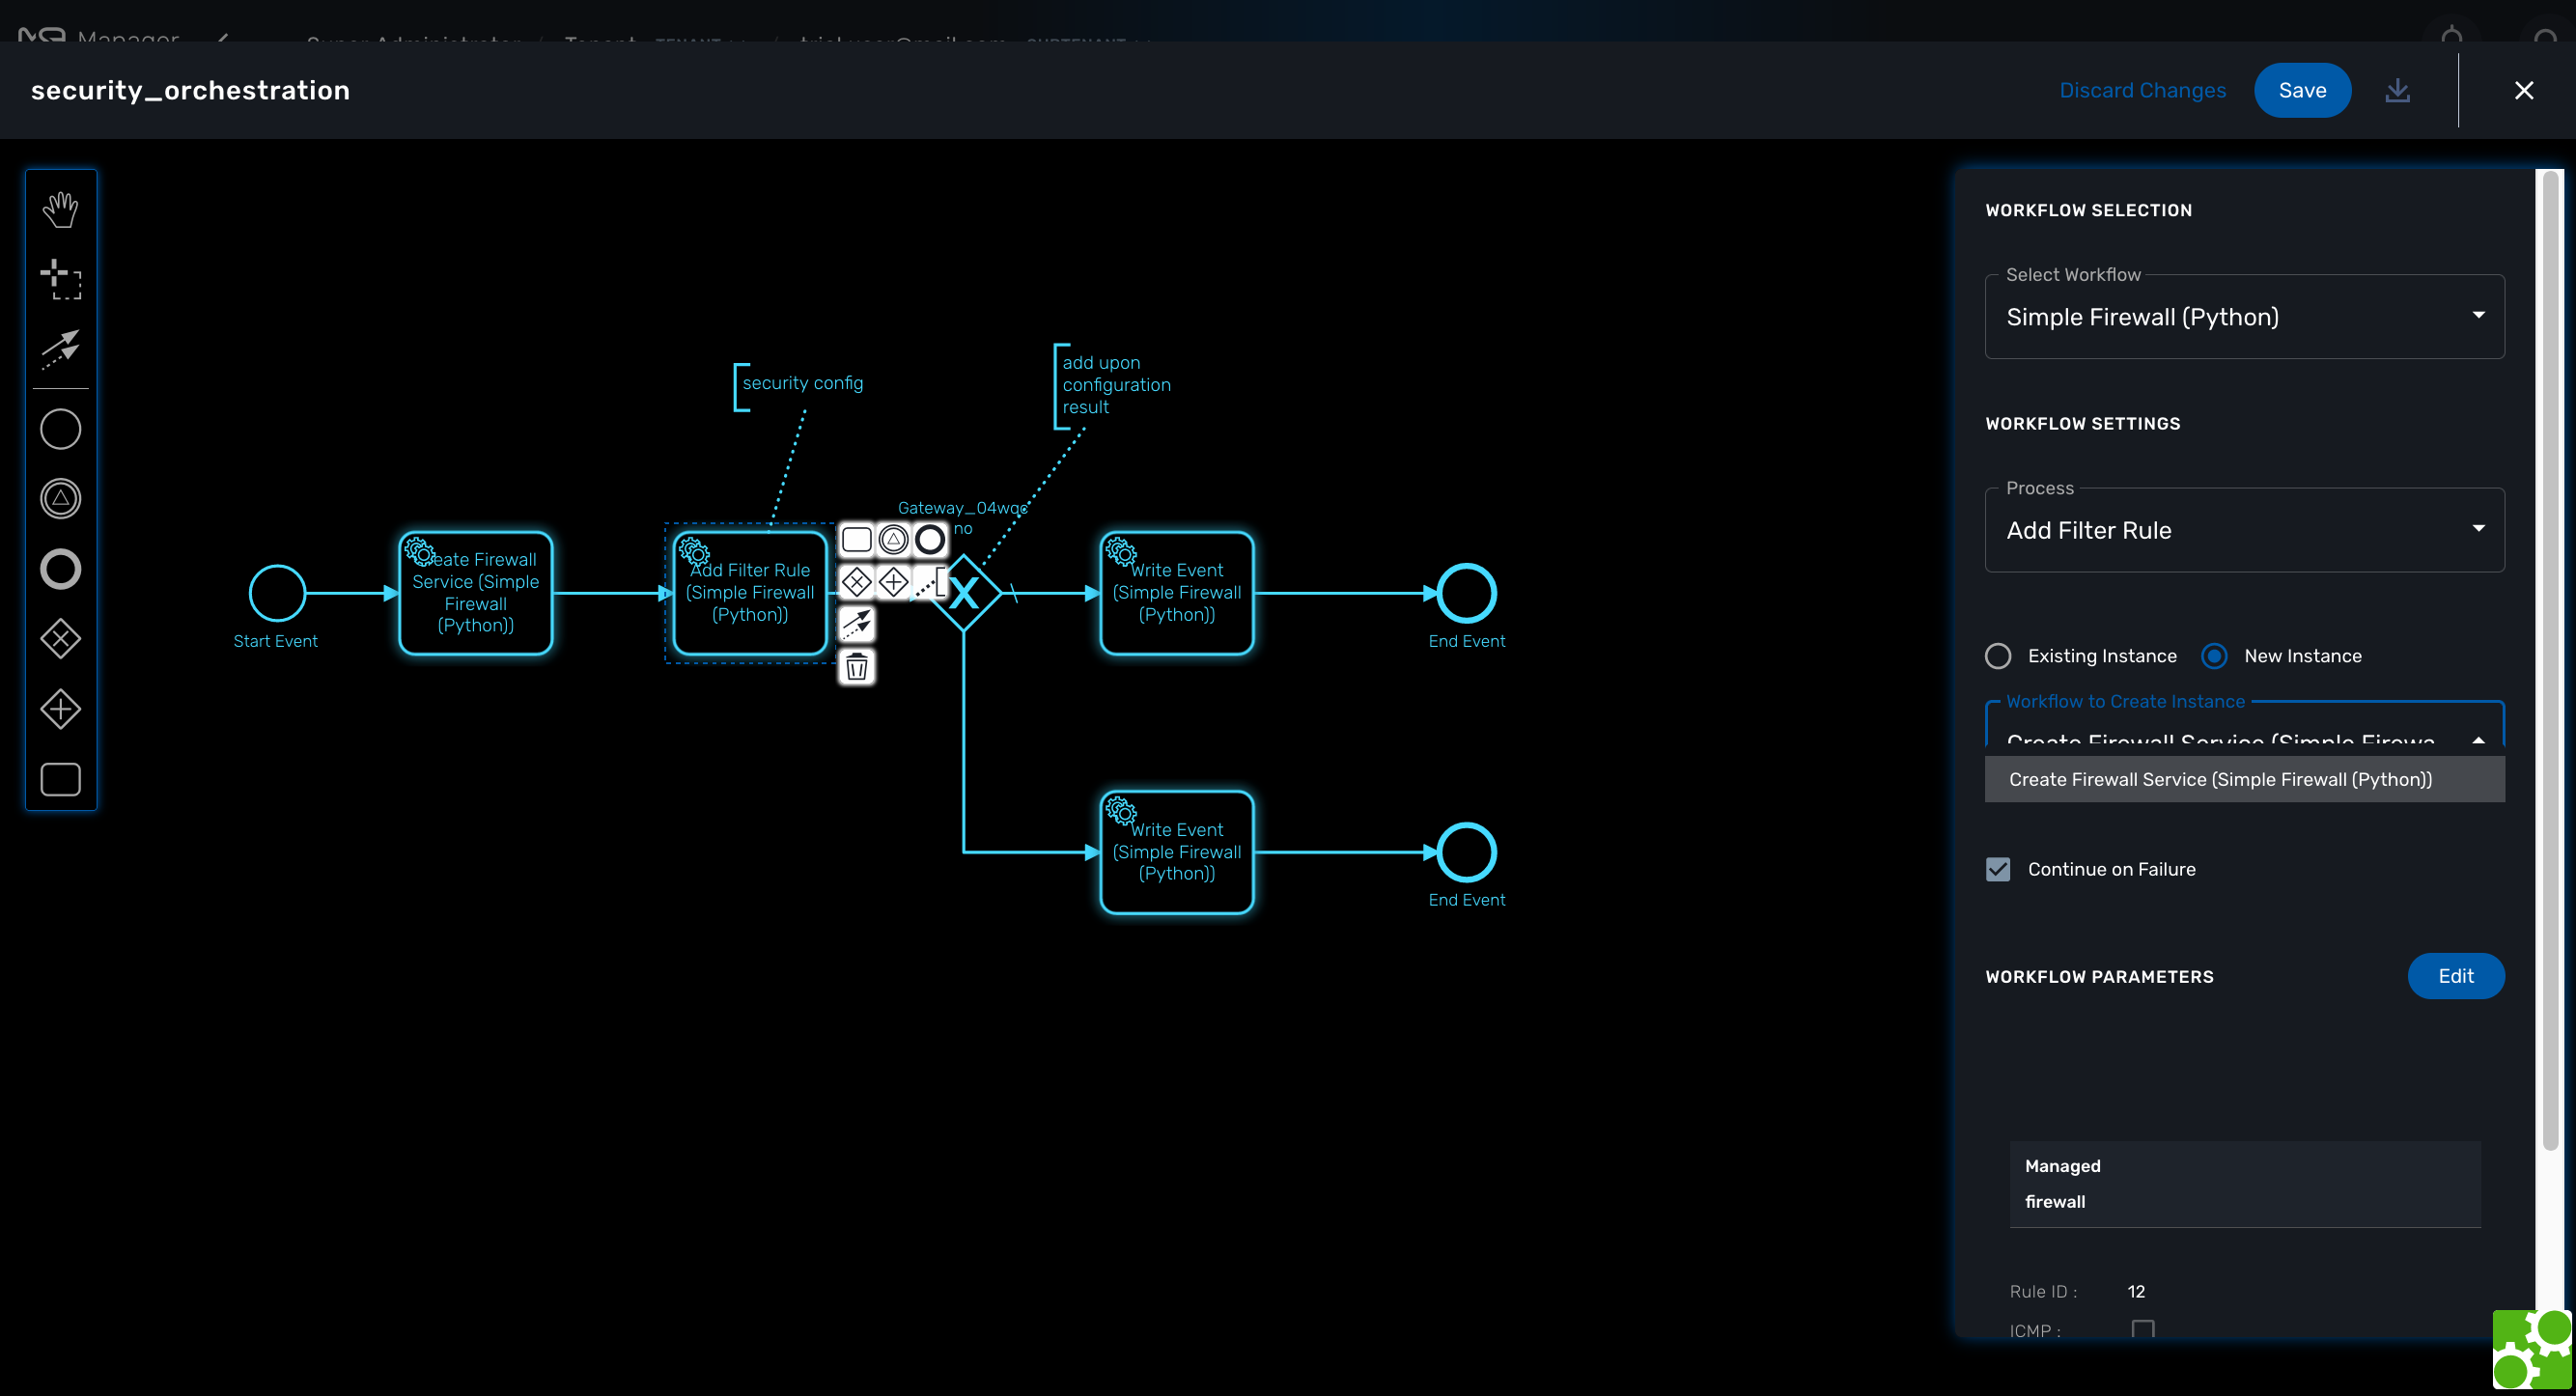
If the process you select in a BPM task is a "UPDATE" process (see Workflow design for more details), you’ll have the possibility to select either an existing Workflow instance or use a new instance created by one of the previous BPM task.
This is extremely useful for BPM designers for chaining tasks together.
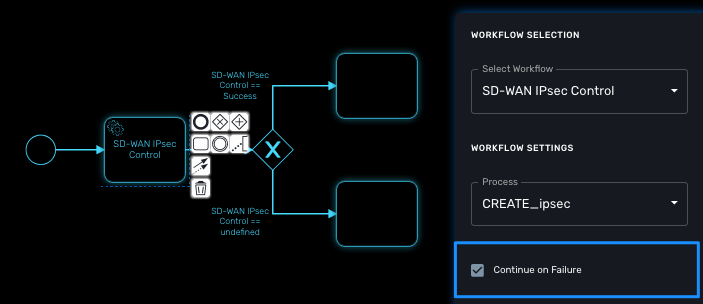
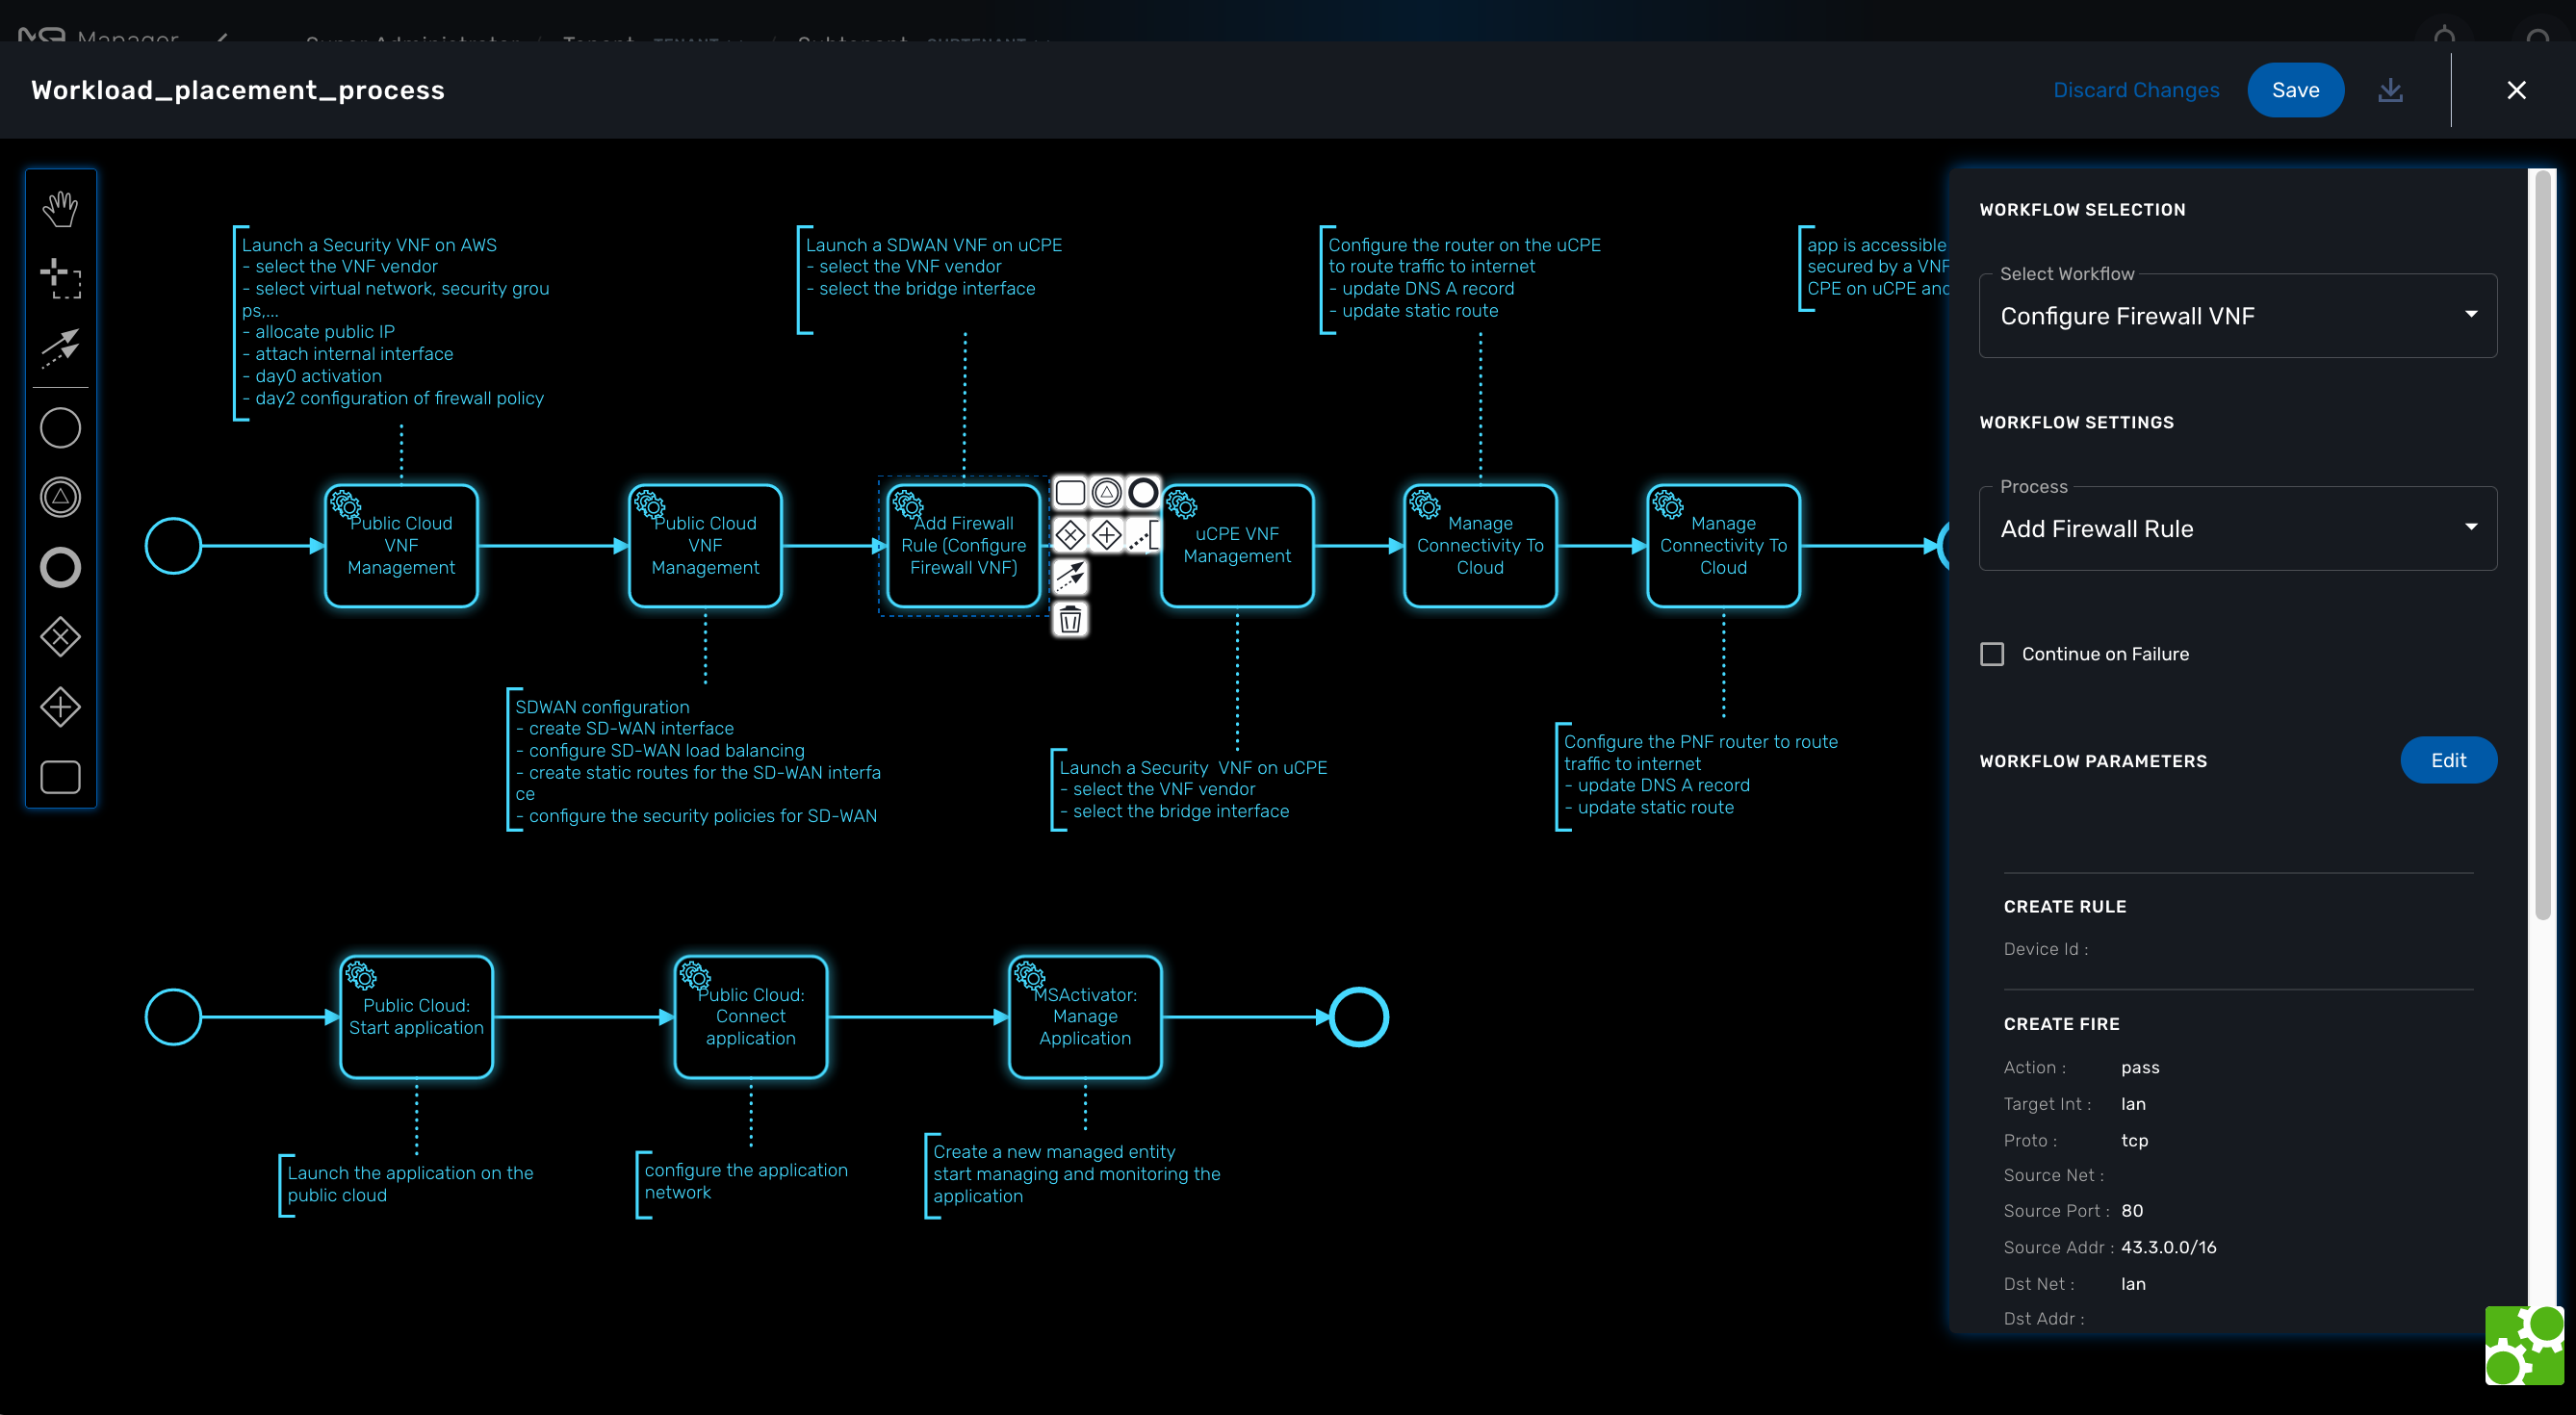
Execution flow control
By default, the BPM execution will stop whenever the associated workflow process execution fails but you may need to make sure that the BPM continues to execute despite the failure. This is typically the case when there is a decision gateway where execution is routed based on the status of the process execution.
To allow the BPM process to continue executing after a workflow process execution fails, you need to edit the BPM task and check "Continue on Failure."
Execution breakpoint
With the execution breakpoint you can create pauses in the BPM flow execution. The BPM process will run, stop and wait for the user to select the breakpoint symbol and click "Continue BPM" to resume it’s execution.
Breakpoints can be used for debugging a complex BPM process without triggering all the workflow and doing a step by step execution. It can also be used to organise a complex BPM into several part and allow for manual validation of each intermediate steps.
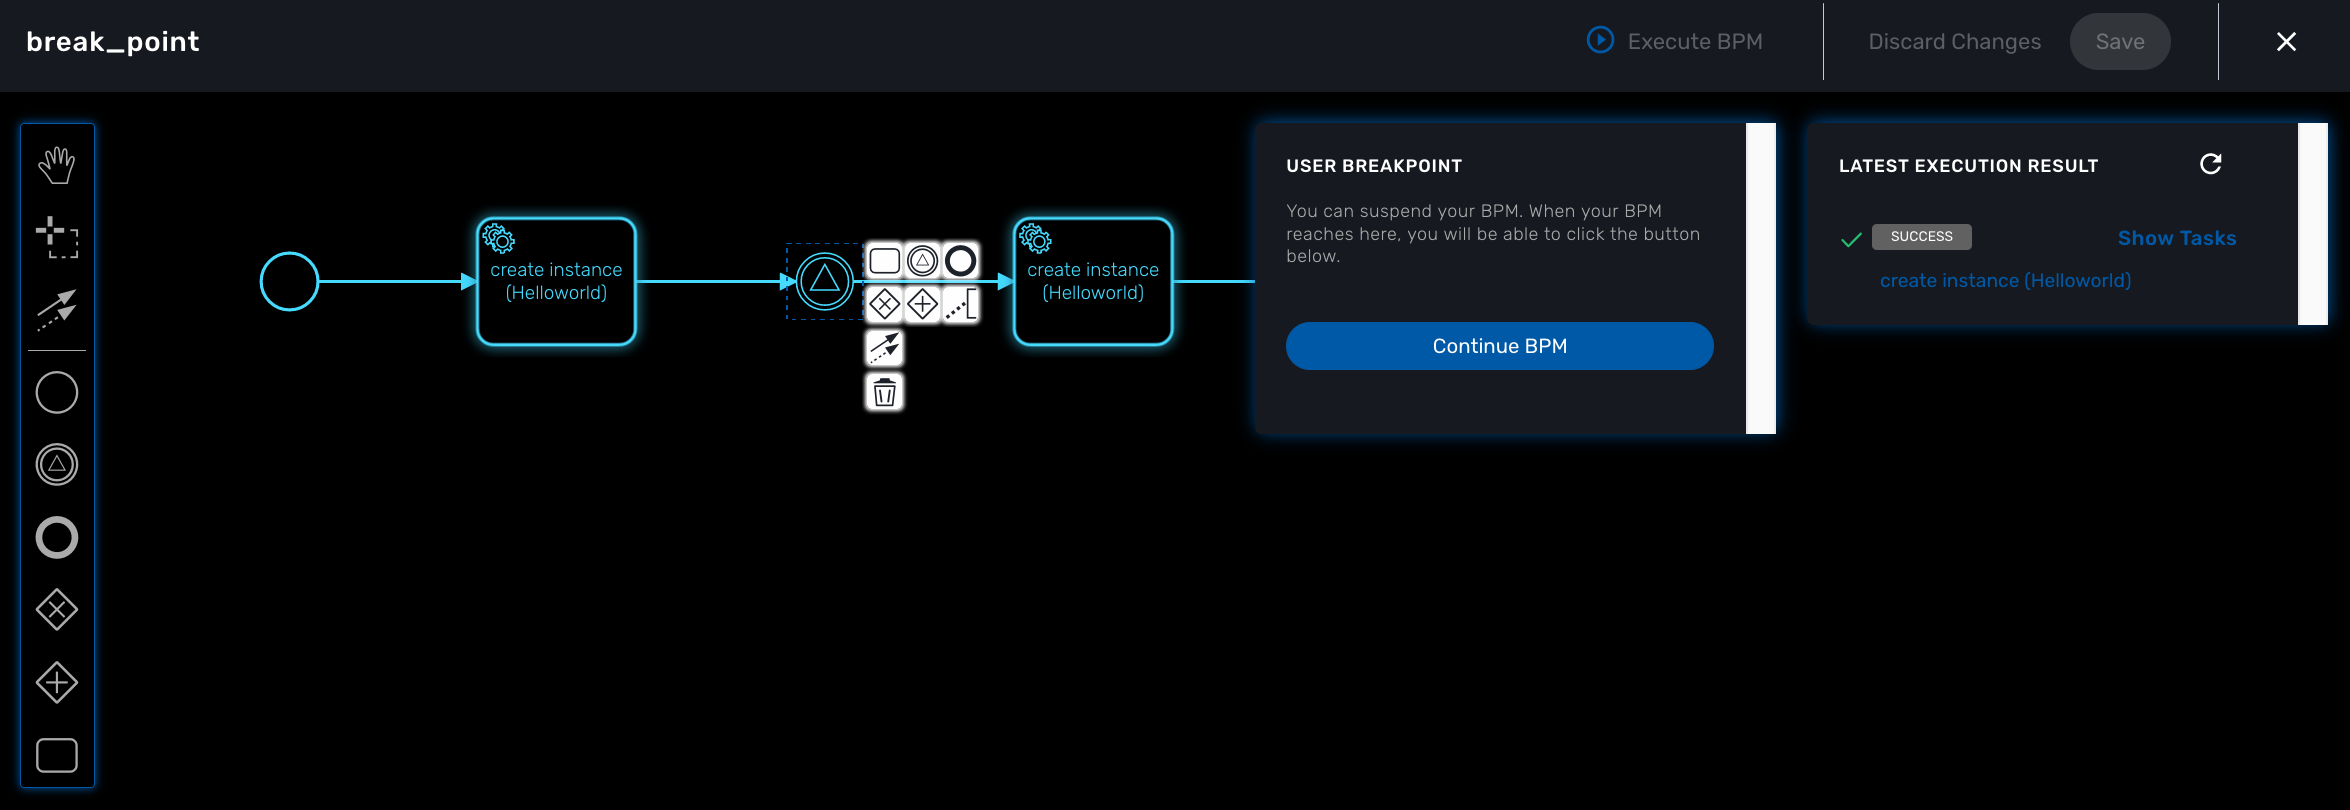
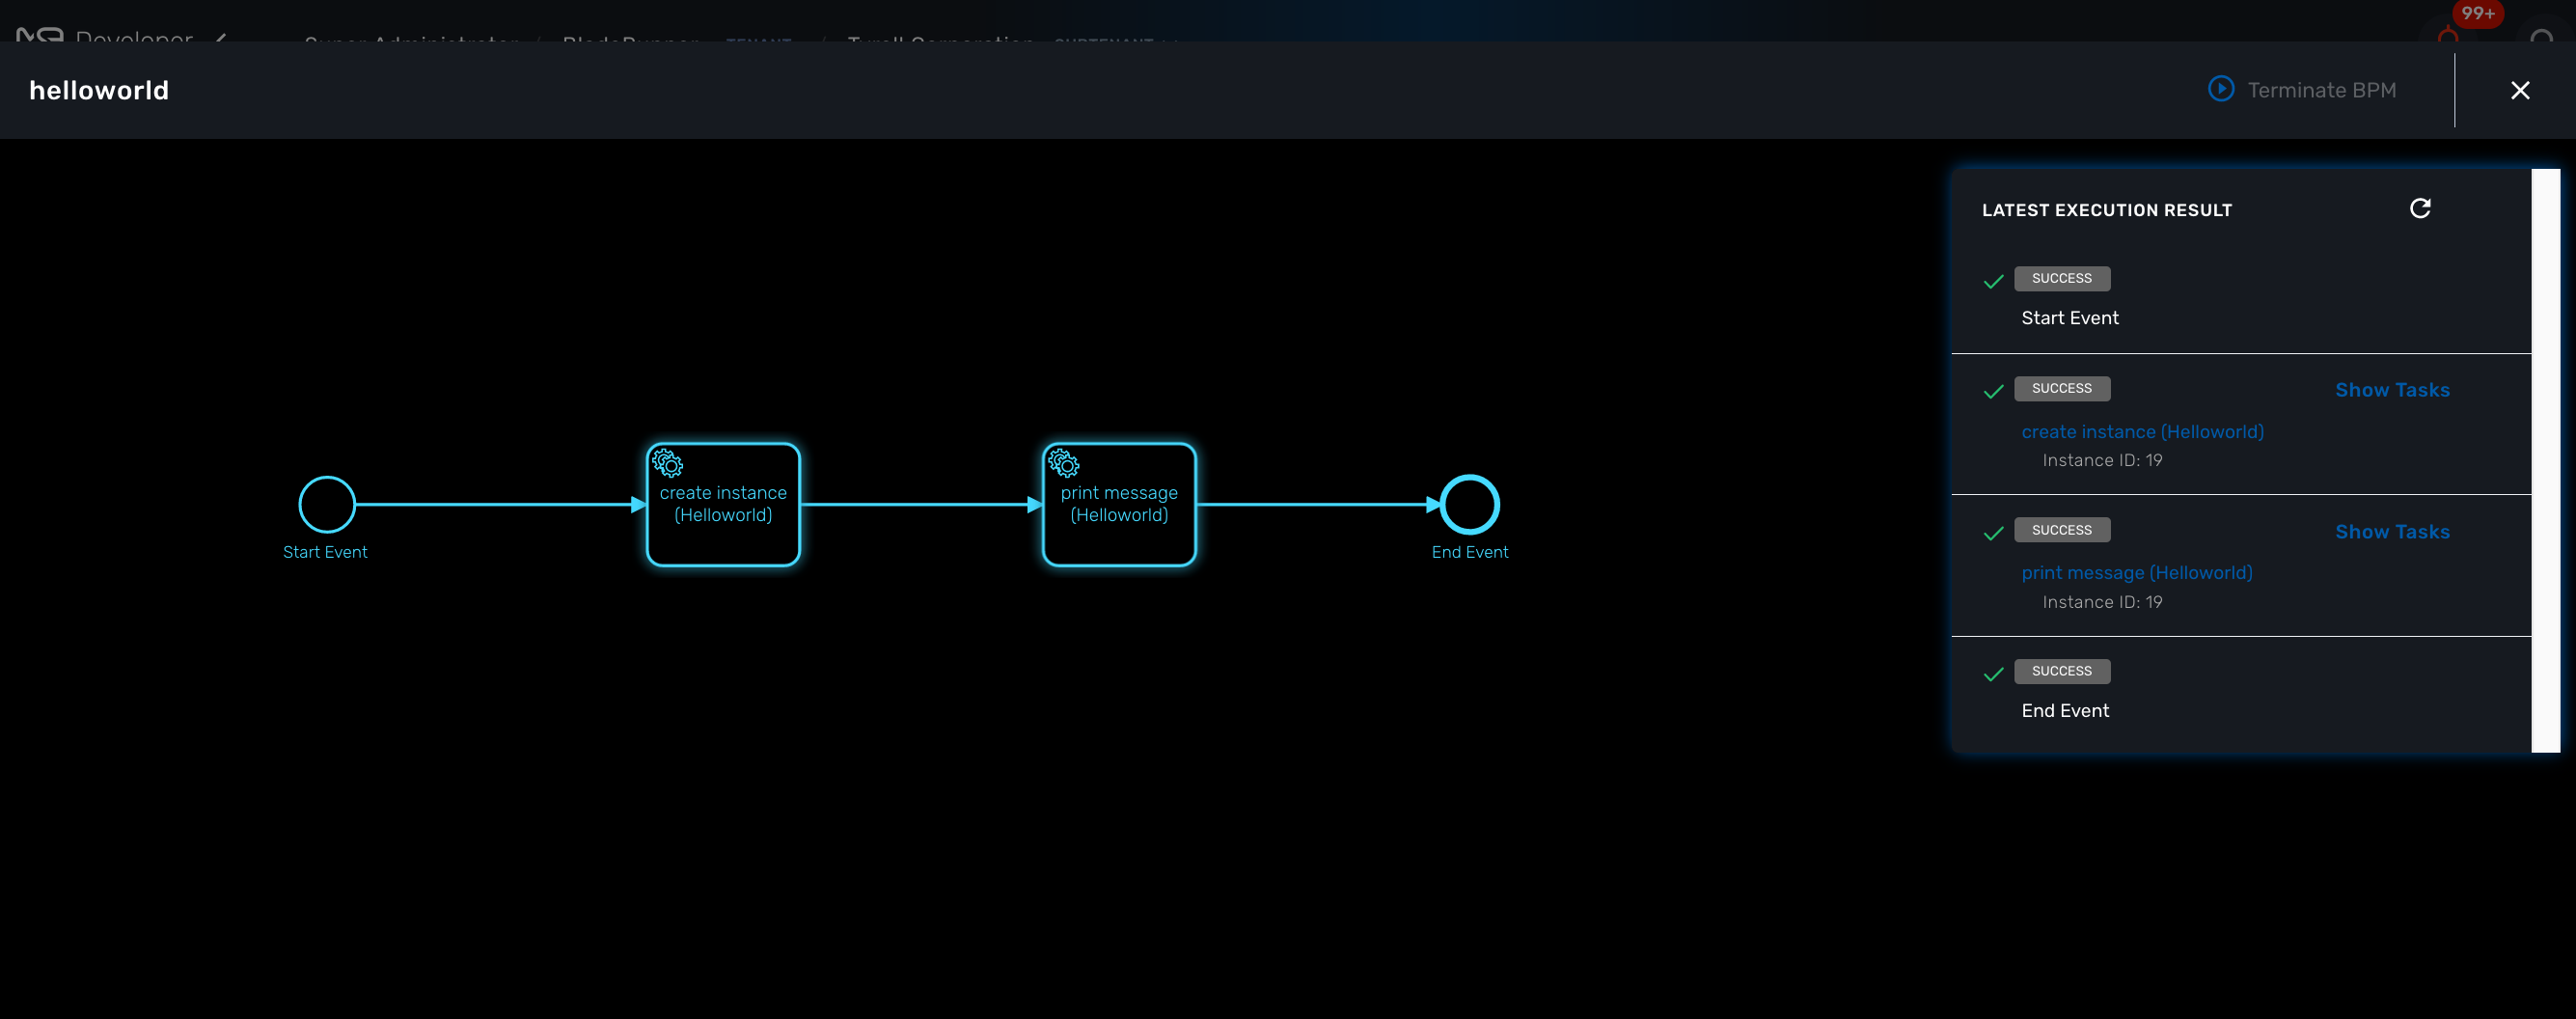
Execution tracking
The BPM engine will start executing the BPM tasks one by one and the status of the current workflow process execution will be updated live in the view "LATEST EXECUTION RESULT" while the detail of the process execution will be displayed.
![]()
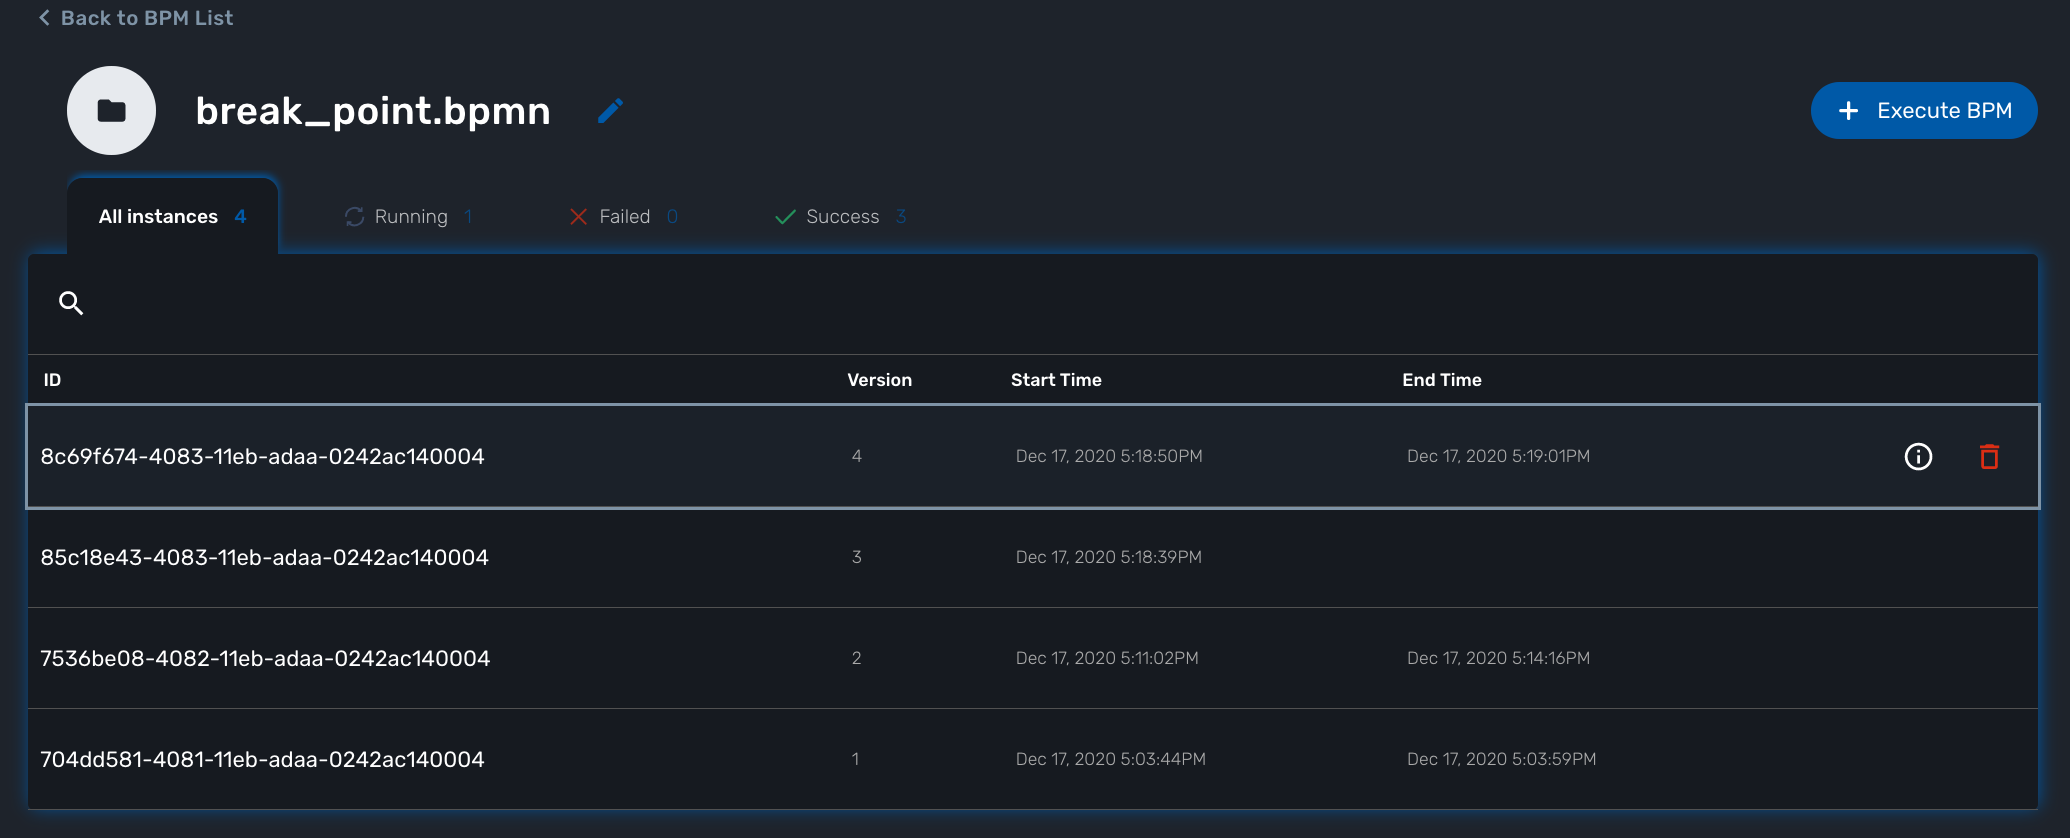
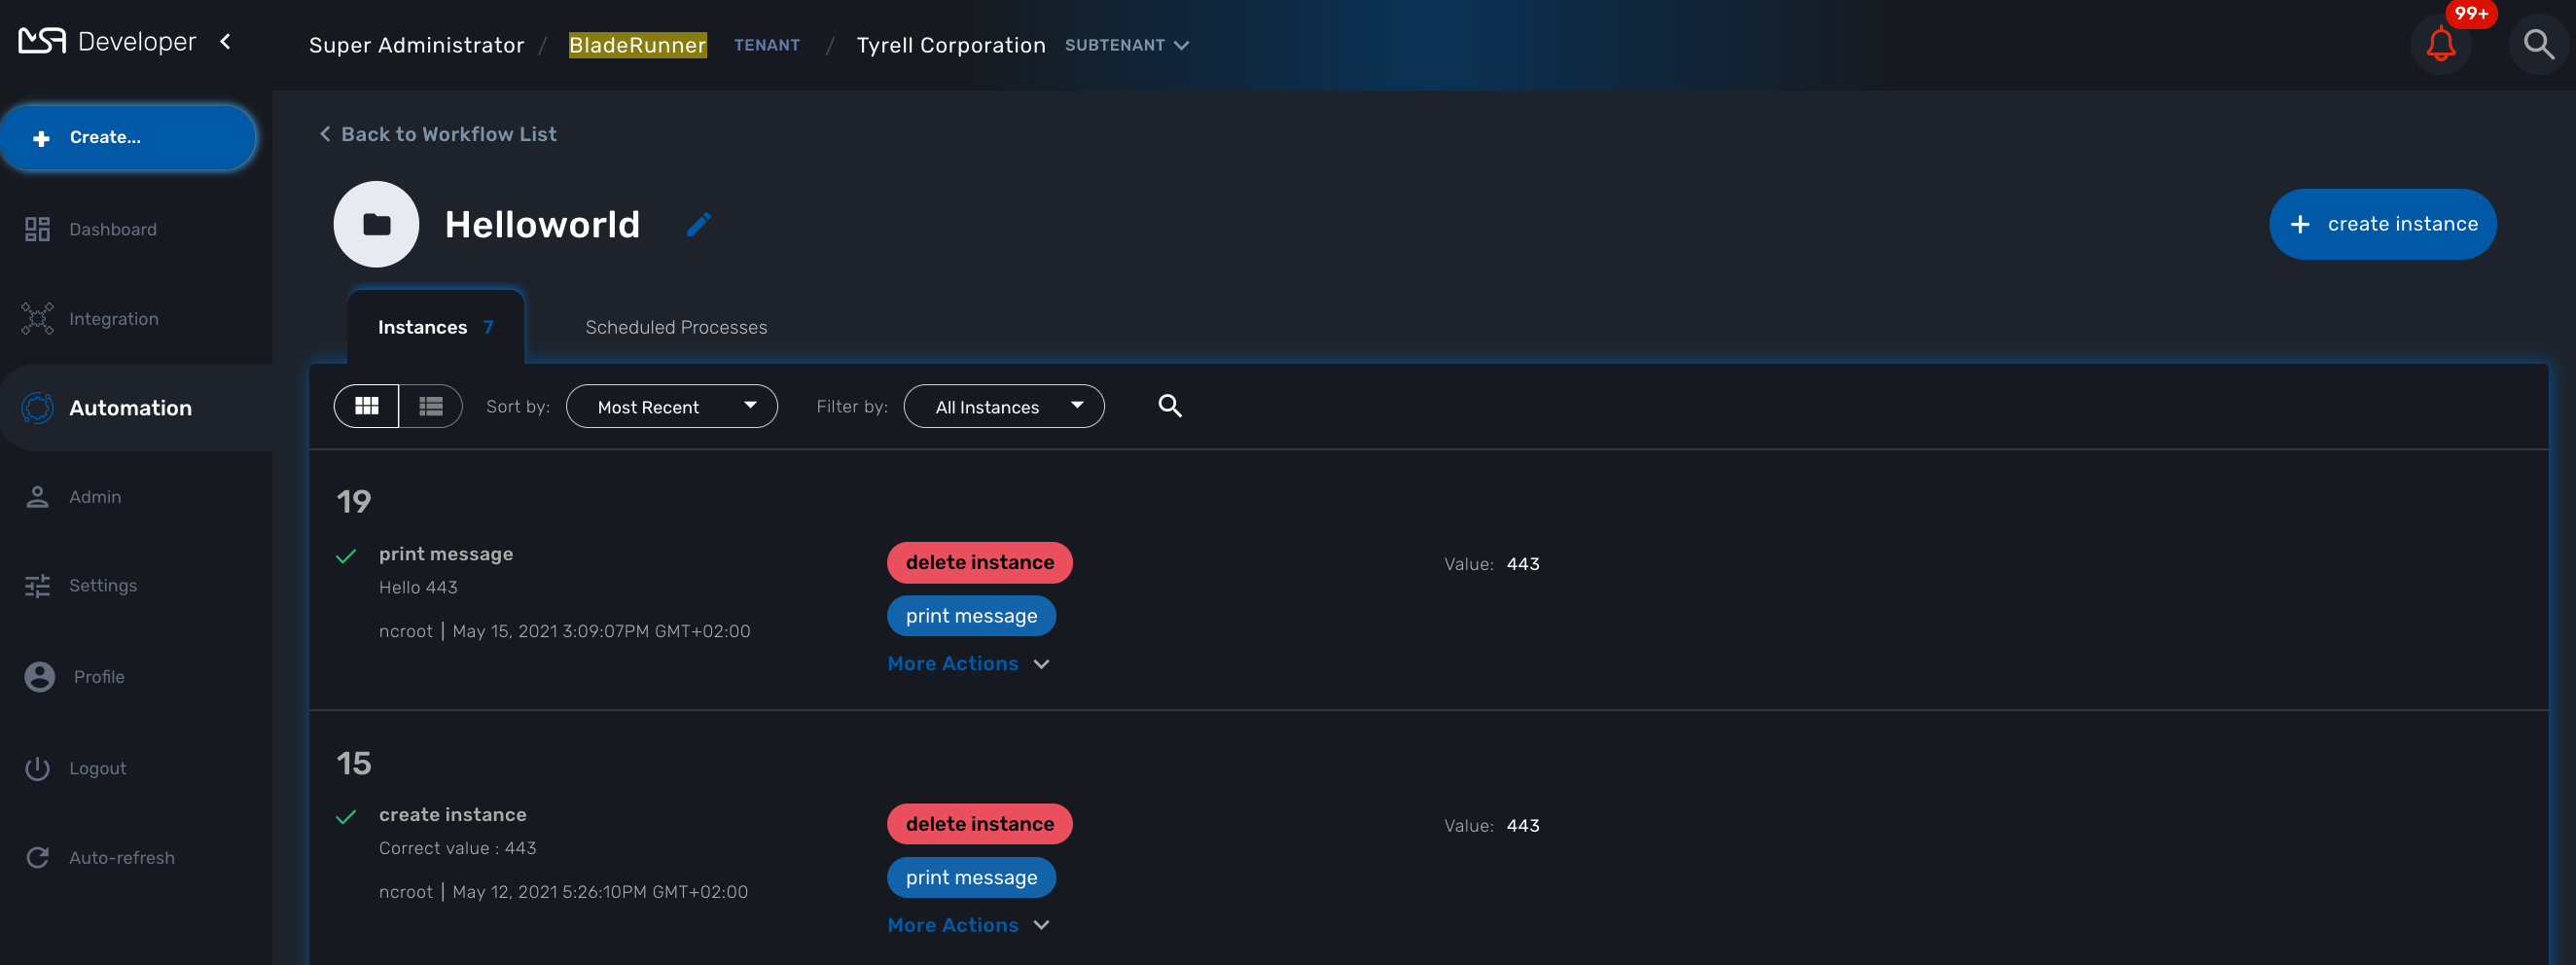
BPM instances management
BPM are associated to a subtenant in a way which is very similar to workflows, you can manage the instances of BPM executions.
For instance, if you executed a BPM with a breakpoint, you don’t need to leave the BPM execution screen open. You can trigger the execution, close the screen and later, select the instance and open it.
Getting Started Developing BPM
The BPM (Business Process Modeling) will allow you to design your processes to automate and then execute these processes.
Uses of BPMN
Business Process modeling is used to communicate a wide variety of information to a wide variety of audiences. BPMN is designed to cover many types of modeling and allows the creation of end-to-end Business Processes.
The structural elements of BPMN allow the viewer to be able to easily differentiate between sections of a BPMN Diagram.
The MSactivator™ provides the support for executable BPM Processes.
With the BPM design console, you can design your BPM and connect the BPM elements to Workflows.
The MSactivator™ provides a partial support of the BPMN 2.0 specification and you will be able to use Event and Activities.
will let you specify the beginning and the end of the process execution.
Integration Task will allow you to specify the flow of execution of your BPM.
Use text annotation to add some description to your BPM elements.
Not supported yes
Example
The BPM below is made of 1 start event, 5 integration task and an end event.
Each integration task calls a workflow from the workflows that are associated to the current customer.
Create or Edit a BPM
To create a new BPM you need to select "Automation" on the left menu. This will list any BPM available for the current customer.
You can either edit a BPM or create a new one from this screen. Use you mouse to add elements and link them together.
For each task, you need to select a workflow and one of the process from that workflow.
The BPM editor will list all the processes defined in a workflow and when the process is selected it will list the variables that are defined in the tasks by the function list_args.
| you should only select workflow processes with the type CREATE. |
You can save your BPM design anytime and edit it later.
The BPM files are stored in the repository under /opt/fmc_repository/Datafiles/<TENANT ID>/<CUSTOMER ID>/bpmn
The Helloworld BPM
This tutorial will show you, in a simple way how to create a new BPM and call a Workflow.
It is using the Helloworld example wich is detailed in this documentation: Getting Started Developing Workflows.
As stated above, the BPM tasks can only call Workflow process with the type CREATE. Before creating the BPM, you need to add a new process to the Helloworld workflow and make sure its type is CREATE. This process can have a single task and you can reuse the PHP code from the Helloworld tutorial.
Once this is done, go to the "BPM" section under "Automation" and click on "+ Create BPM".
Add a Task Activity and an End Event.
Click on the task, select the Helloworld workflow, then from the list of process, select the new CREATE process. Provide a value for the parameter name and save the BPM
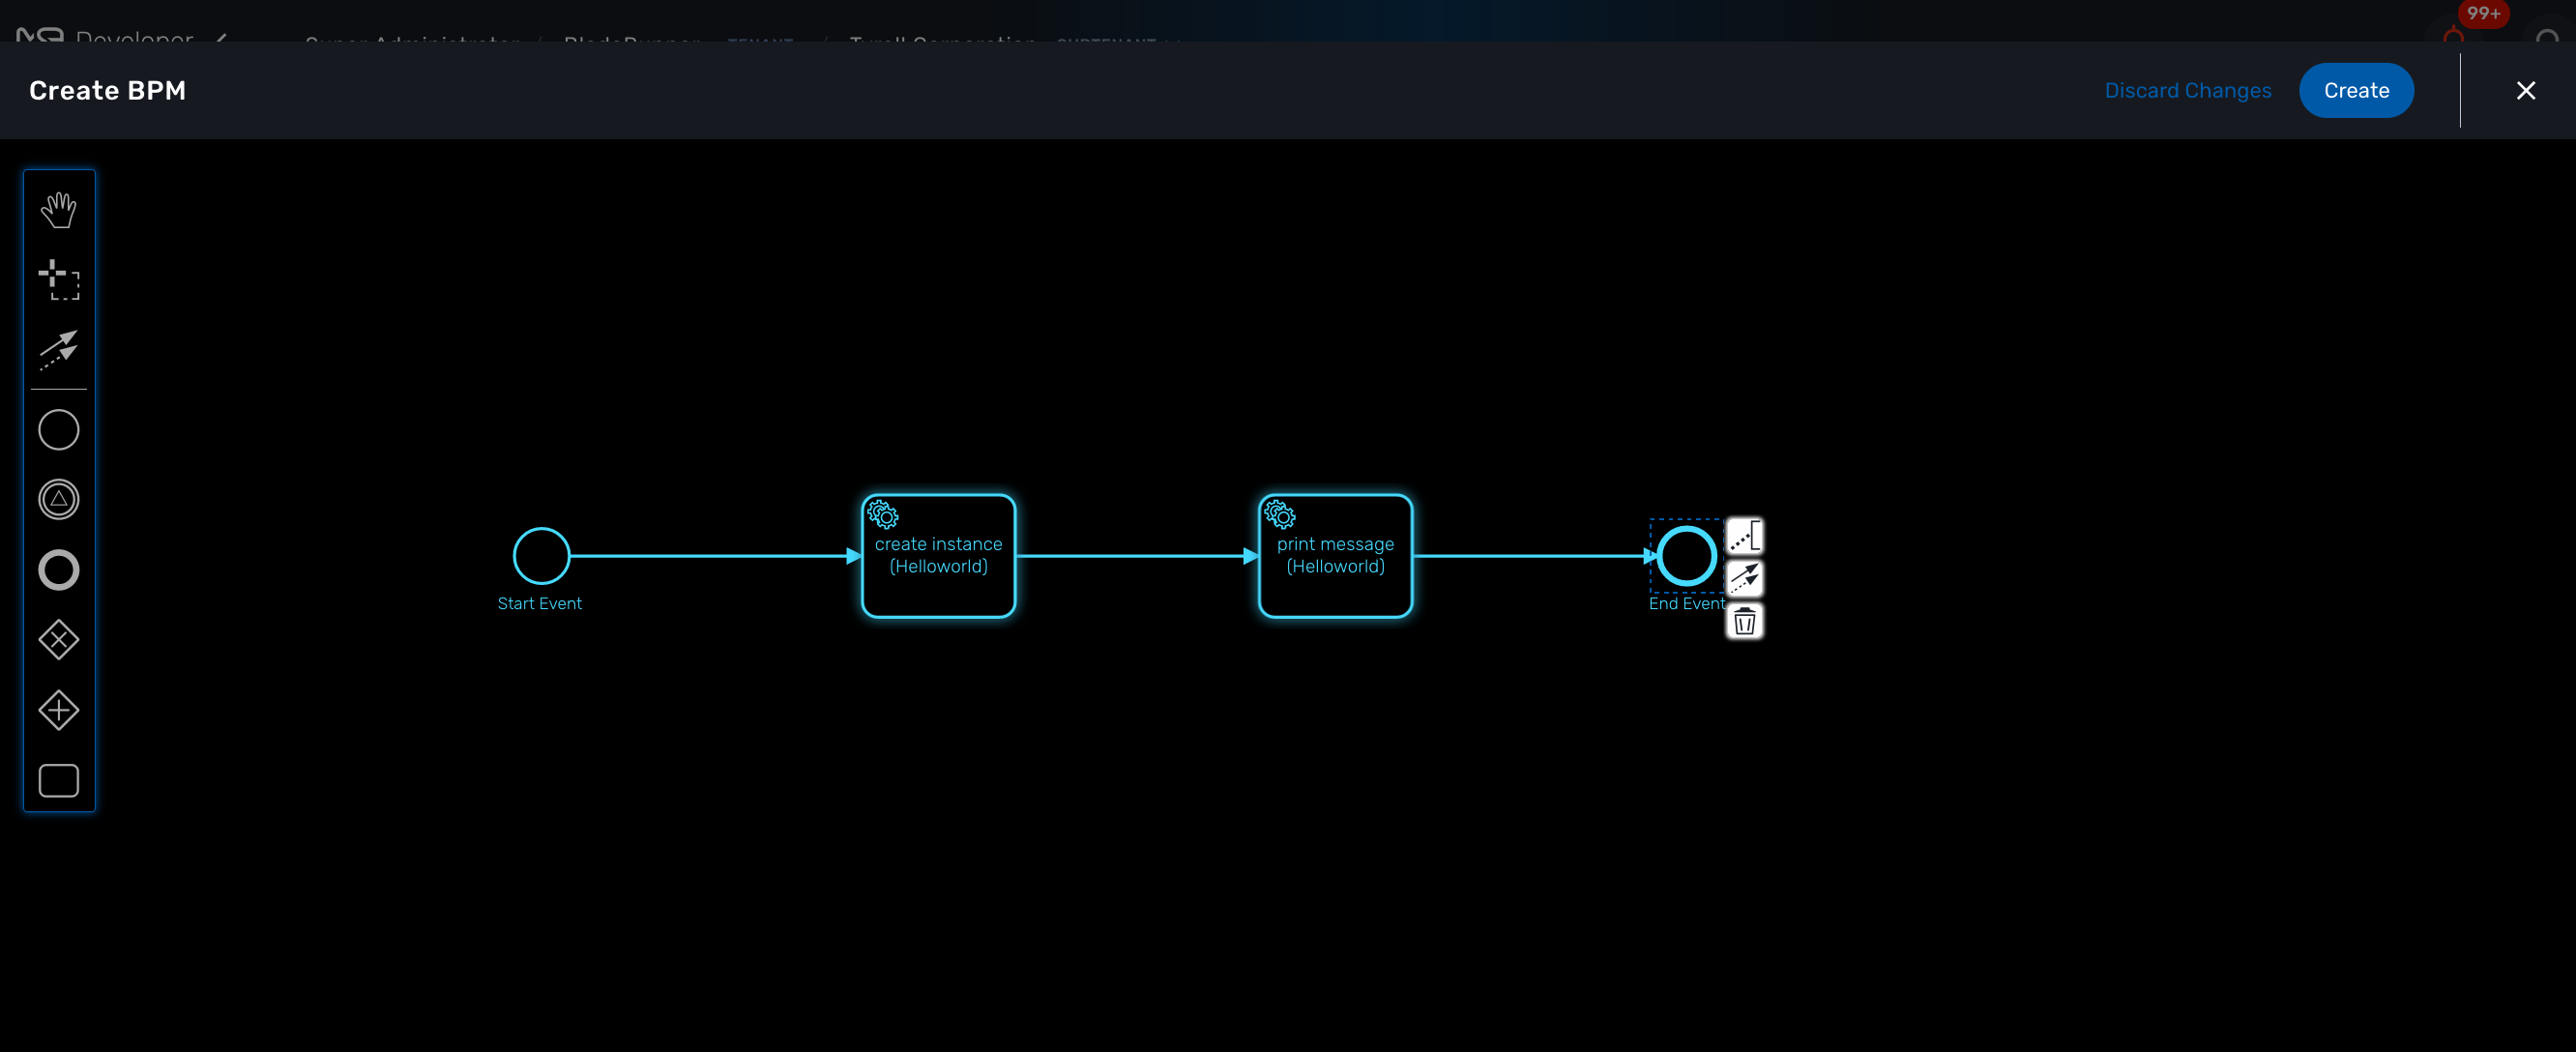
To test your BPM, click on it’s name from the list of BPM and click on "Execute BPM".
You can check that the workflow process was executed and the message is visible in the processes execution status.
Workflow Editor
The workflow editor is a web based UI tool for designing, developing, testing and releasing automation workflows.
Overview
With the workflow editor, you can create new workflows or edit existing workflows.
This document explains how to use the editor to design workflows and implement them in PHP or in Python.
The Workflow designer and execution engine are located in the architecture layer, between the BPM and the Microservice.
Workflow overview
A workflow is a automation entity that can be used to automate all sorts of simple to complex processes.
A workflow is defined by
-
a set of variables that can be used to hold the state of a workflow instance;
-
a set of processes made out of tasks. This is where the execution is coded.
The tasks are scripts that can be implemented either in PHP or in Python.
The lifecycle of a workflow
There are 3 main types of workflow processes:
CREATE
execute an automated process and create a new instance of the workflows.
UPDATE
execute an automated process that will (but it’s not mandatory) update the state of the process.
DELETE
execute an automated process that will also remove the instance of the workflow.
| a delete process can be assigned to the trash icon of the workflow instances. By default, the thrash icon action will only delete the workflow instance without executing any specific process. |
Execution status
The status a normal process execution is defined by the implementation of the tasks and it’s the responsibility of the developer to handle the termination status. As a developer, you have 3 statuses, defined by constants in PHP or Python, that you can use in your task to define the condition for transiting from a task to the next one.
-
ENDED: the execution was successful, the next task will be executed and if it was the last task, the process will be marked as "Success".
-
WARNING: the execution was successful but some warning were raised, the next task will be executed and if it was the last task, the process status will be displayed as "Warning".
-
FAILED: the execution failed, the process execution will stop at the current task and the process status will be noted as "Failed".
| these documentations to get more details and code samples on this topic: PHP SDK and Python SDK |
How to persist the state of a workflow instance
The variables are used to define the current state of a workflow instance, this state is maintained in a context which is persisted in the database.
For each workflow instance, the variable and their values are stored in the database in a context. This context is accessible in read-write mode anytime in the process tasks, in order to store a value of a variable or read a value from a variable.
in Python: read a value from the context
context = Variables.task_call()
my_name = context['name']
set a value in the context
context['name'] = my_namein PHP: read a value from the context
$my_name = $context['name'];set a value in the context
$context['name'] = $my_name;The context is persisted in the database and its value is updated after each task execution.
This is how variable values can be passed, during the execution of a process, from one task to another.
| by default, the variables that are declared a persisted in the context but you can also create local variables in the tasks and store them in the context. |
Editor Overview
To create a new workflow, connect to the developer portal and click "+ Create" on the workflow library swimlane.
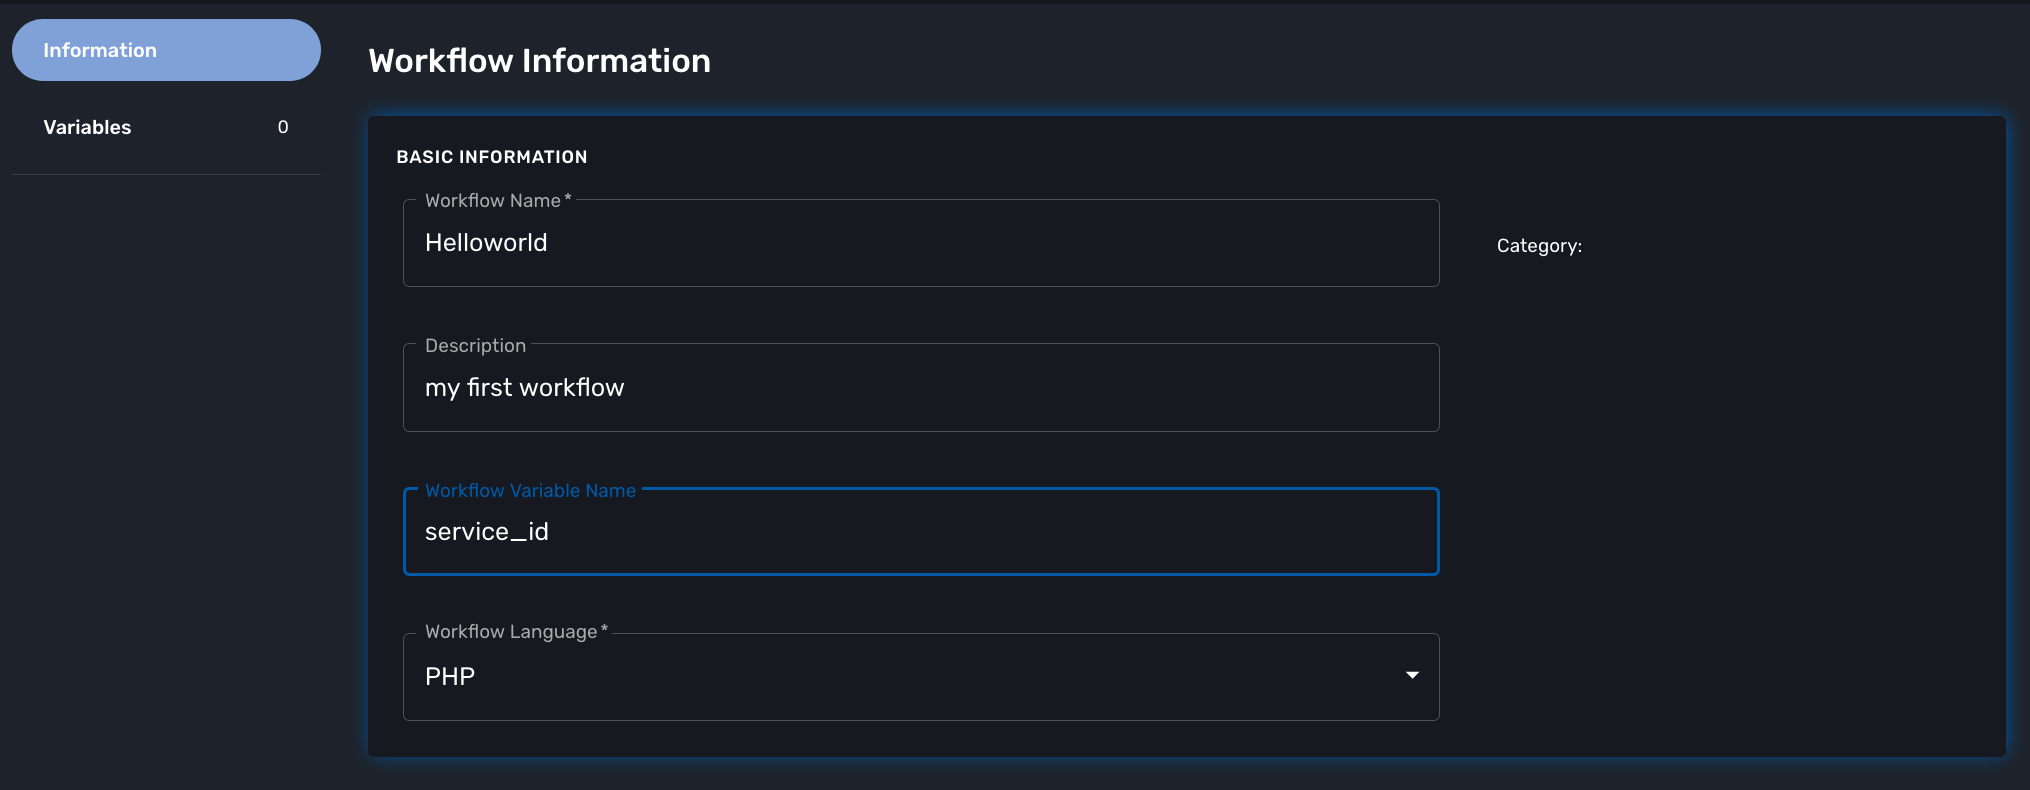
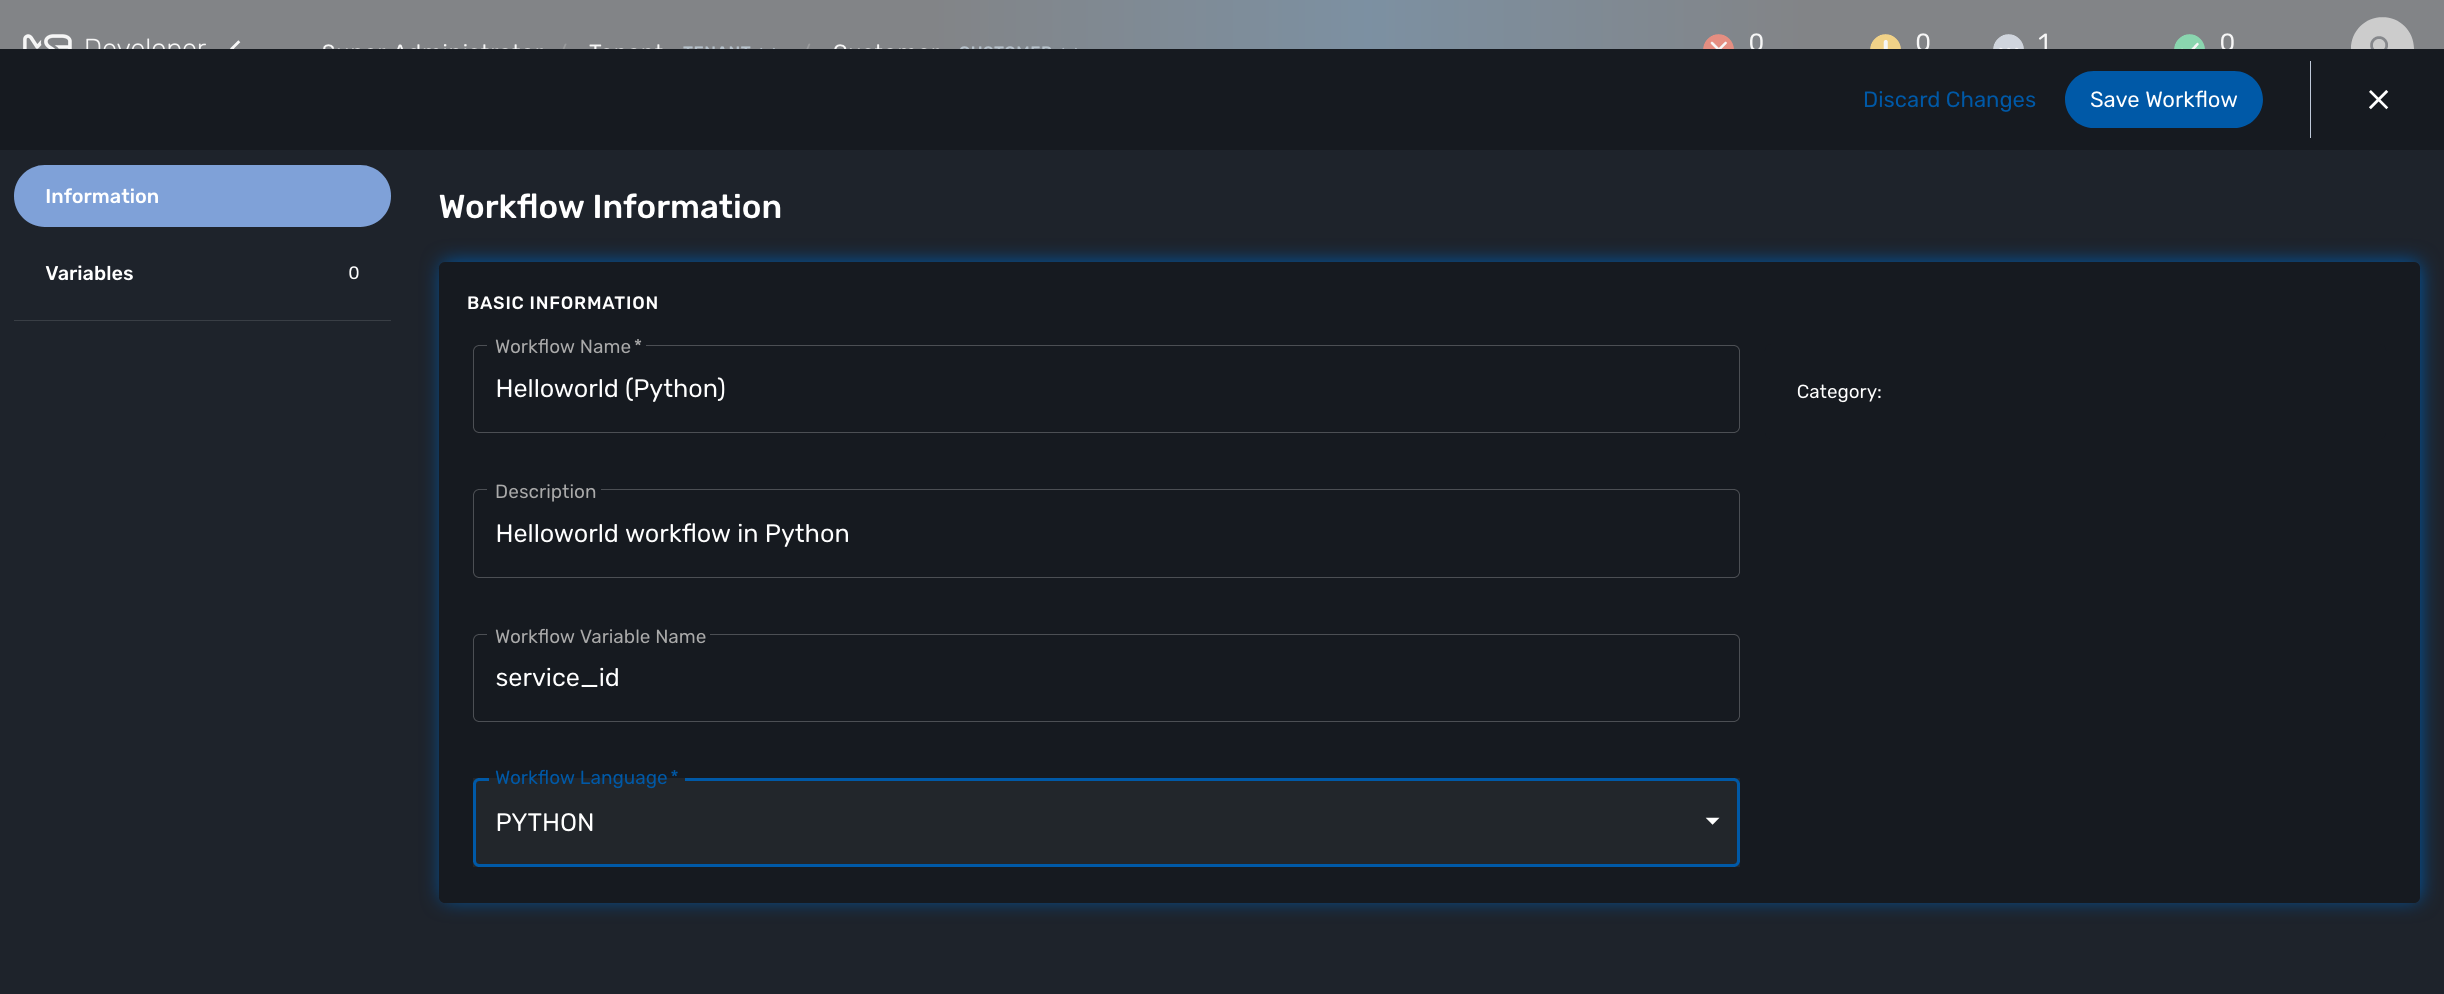
Workflow information
Provide the information related to the workflow:
-
Workflow Name: the name of the workflow
-
Description: a description of the workflow
-
Delete process: the delete process to associate to the workflow instance trash icon.
-
Workflow variable name: default to service_id (see below for more detail about this field)
-
Workflow language: PHP or PYTHON (this cannot be edited)
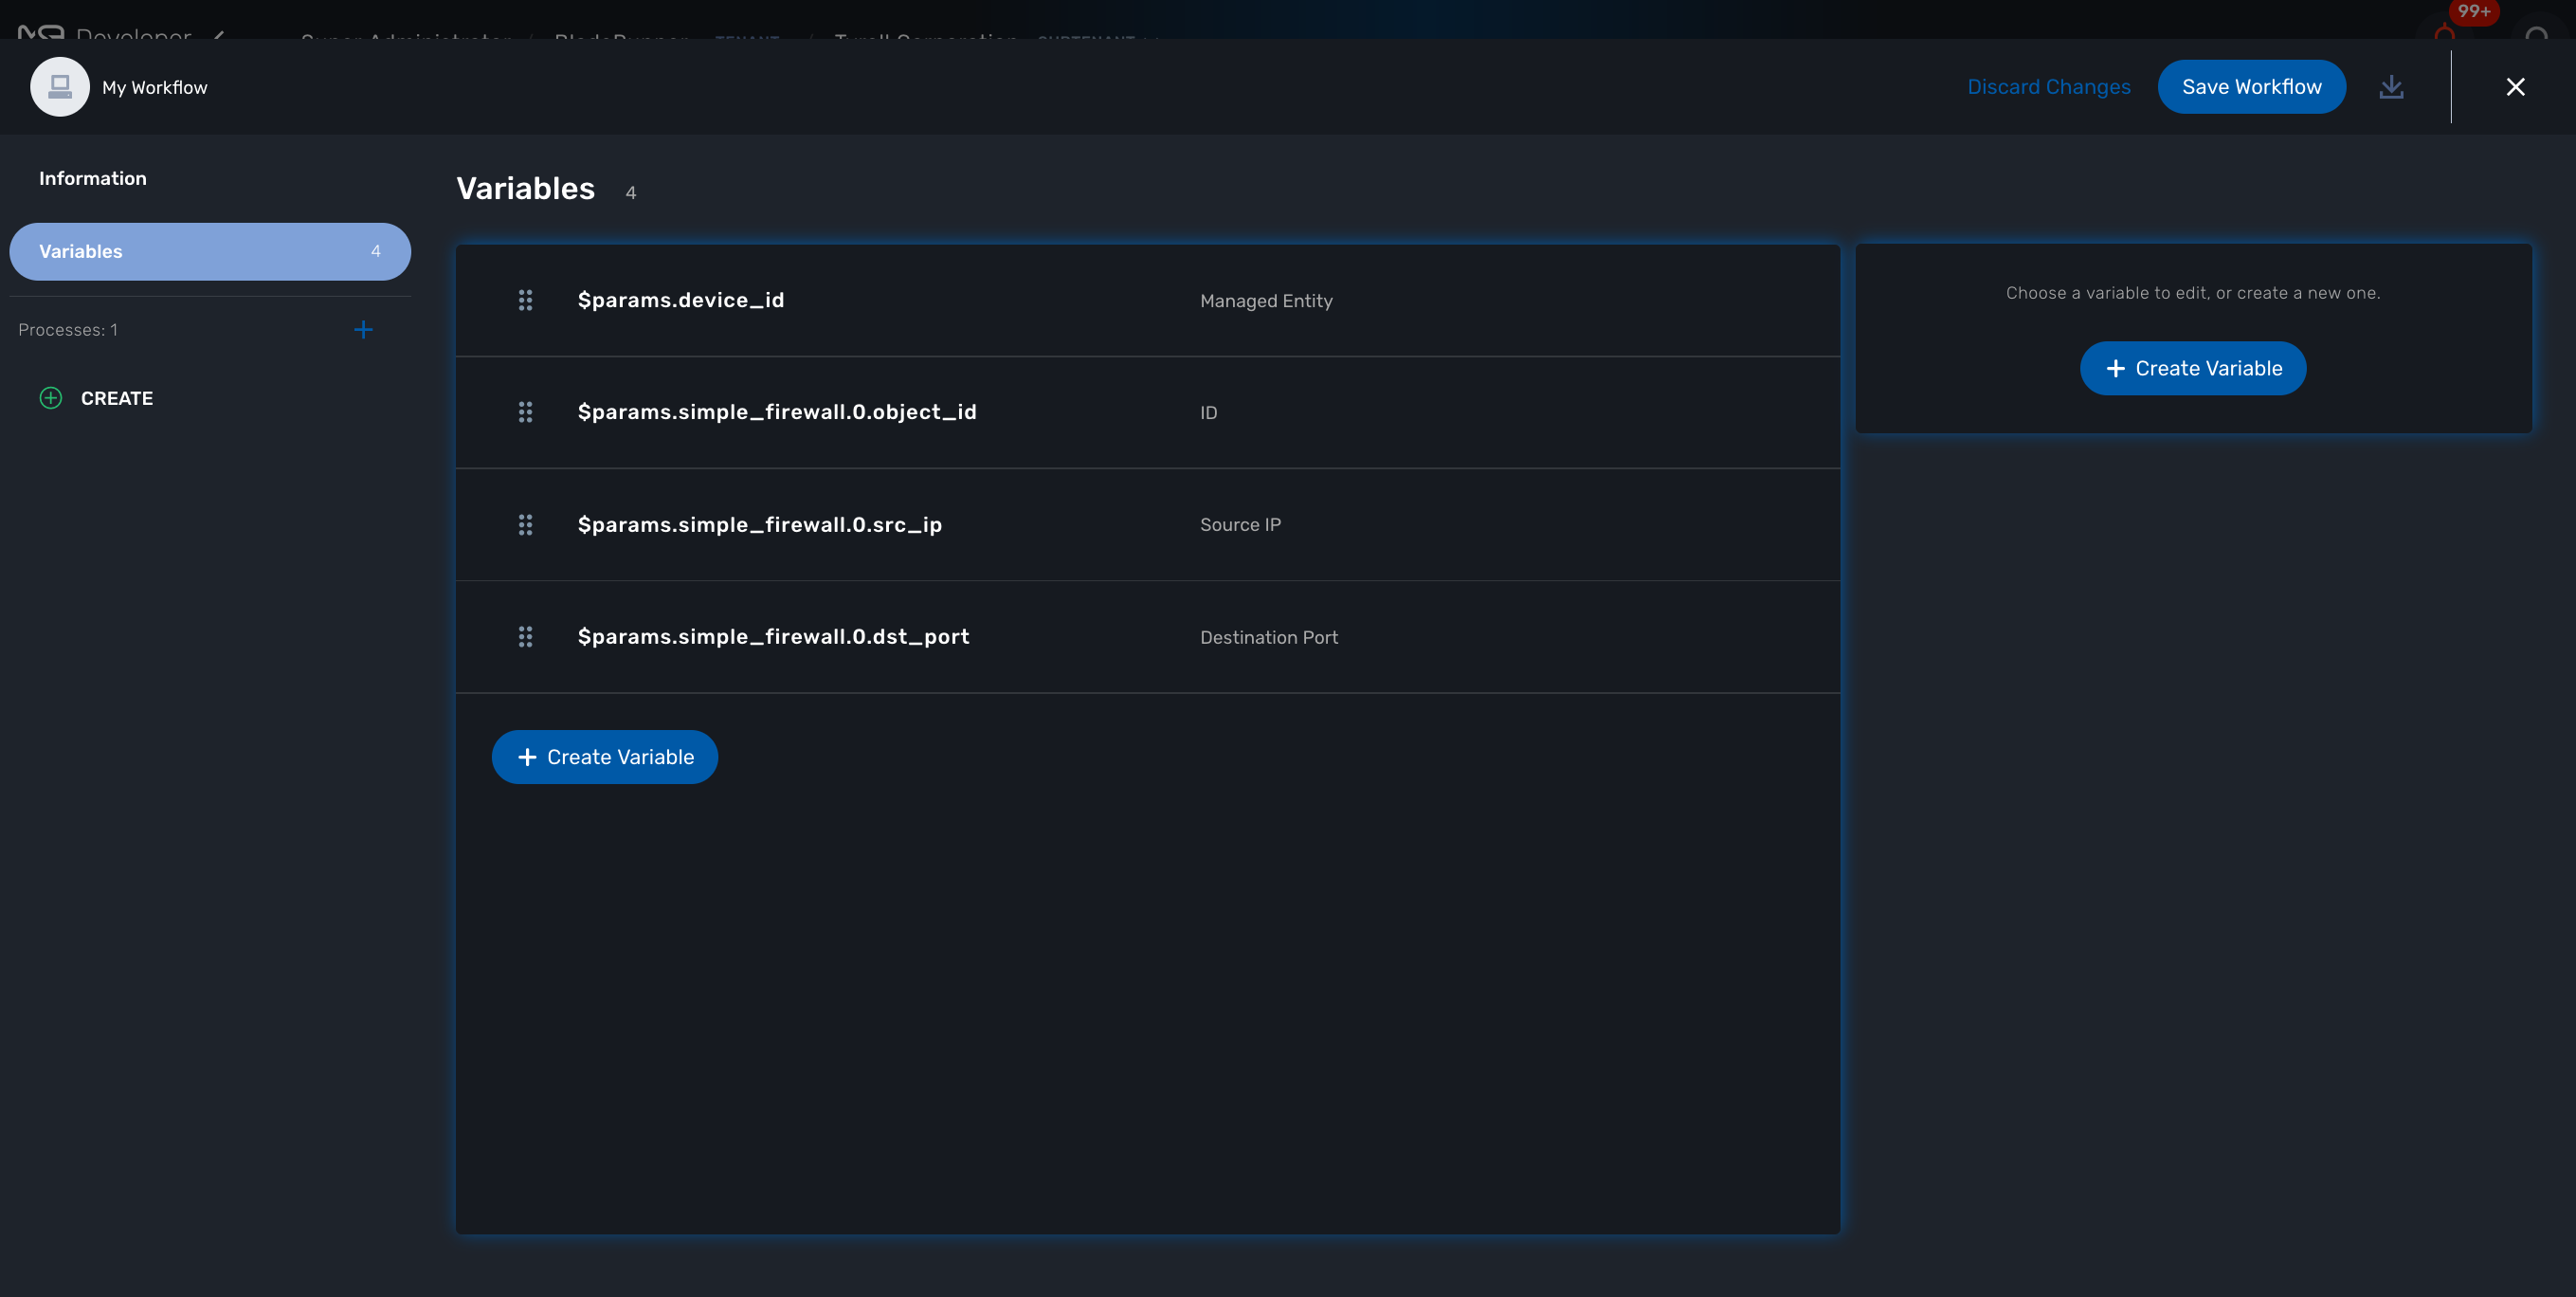
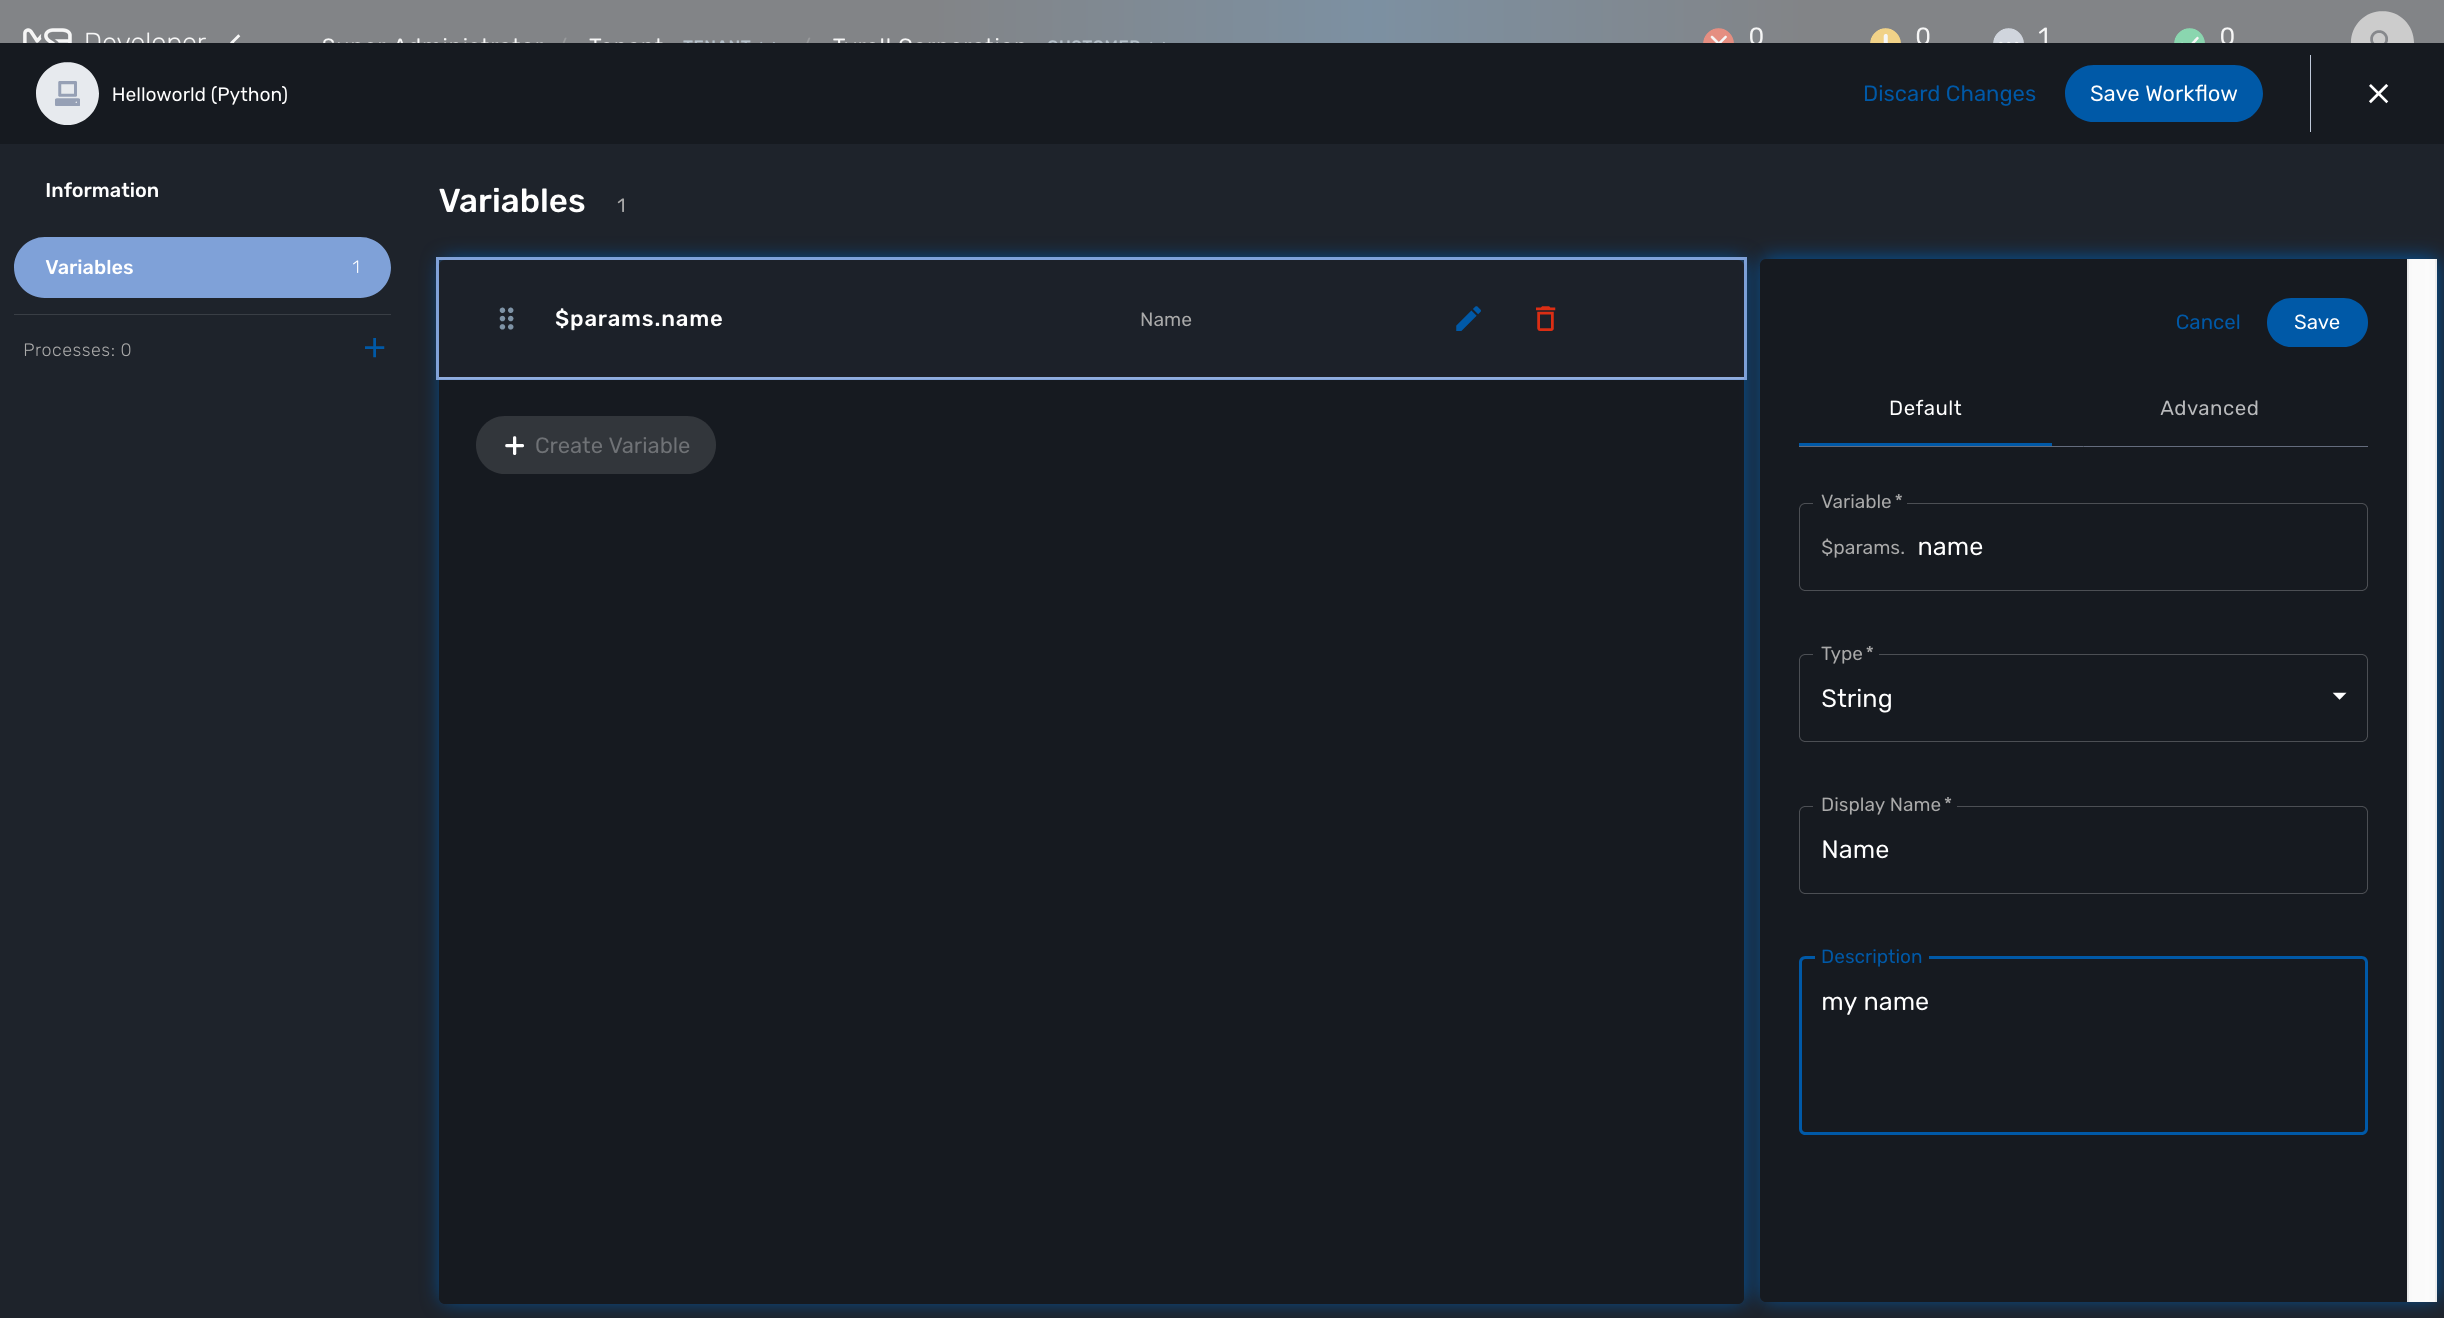
Workflow variables
Use "+ Create Variable" to add a variable to this workflow.
A variable can be used to store data in the context of the workflow instance and it can also be used to generate the user input fields when executing a process from the UI.
It is possible to define a variable for "internal" use and decide to keep is hidden from the end-user.
A variable has a name, a type and a display name
This documentation will give you more details on the variables and the various types available.
Workflow processes
A workflow can have as many processes as needed. The processes provide the "public" functions exposed by a workflow either with the UI or the REST API.
To create a process, click on the "+" and provide a name and a type (CREATE, UPDATE or DELETE).
| the other types listed in the UI are not supported yet. |
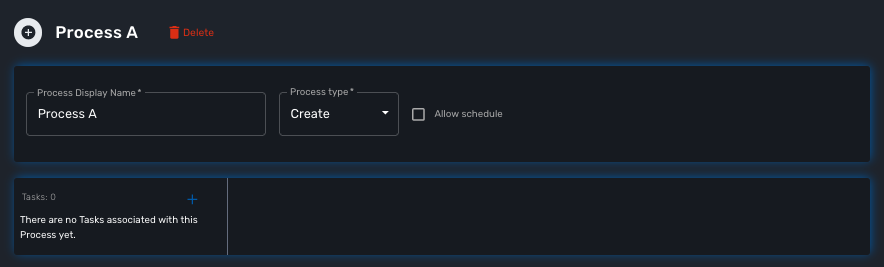
Process scheduling
Scheduling of process execution can be authorize when defining a process by checking "Allow scheduling" on the process definition screen.
When scheduling is allowed, the user execute the process either the usual way by clicking "Run" or use "Schedule" to configure the process execution scheduling.
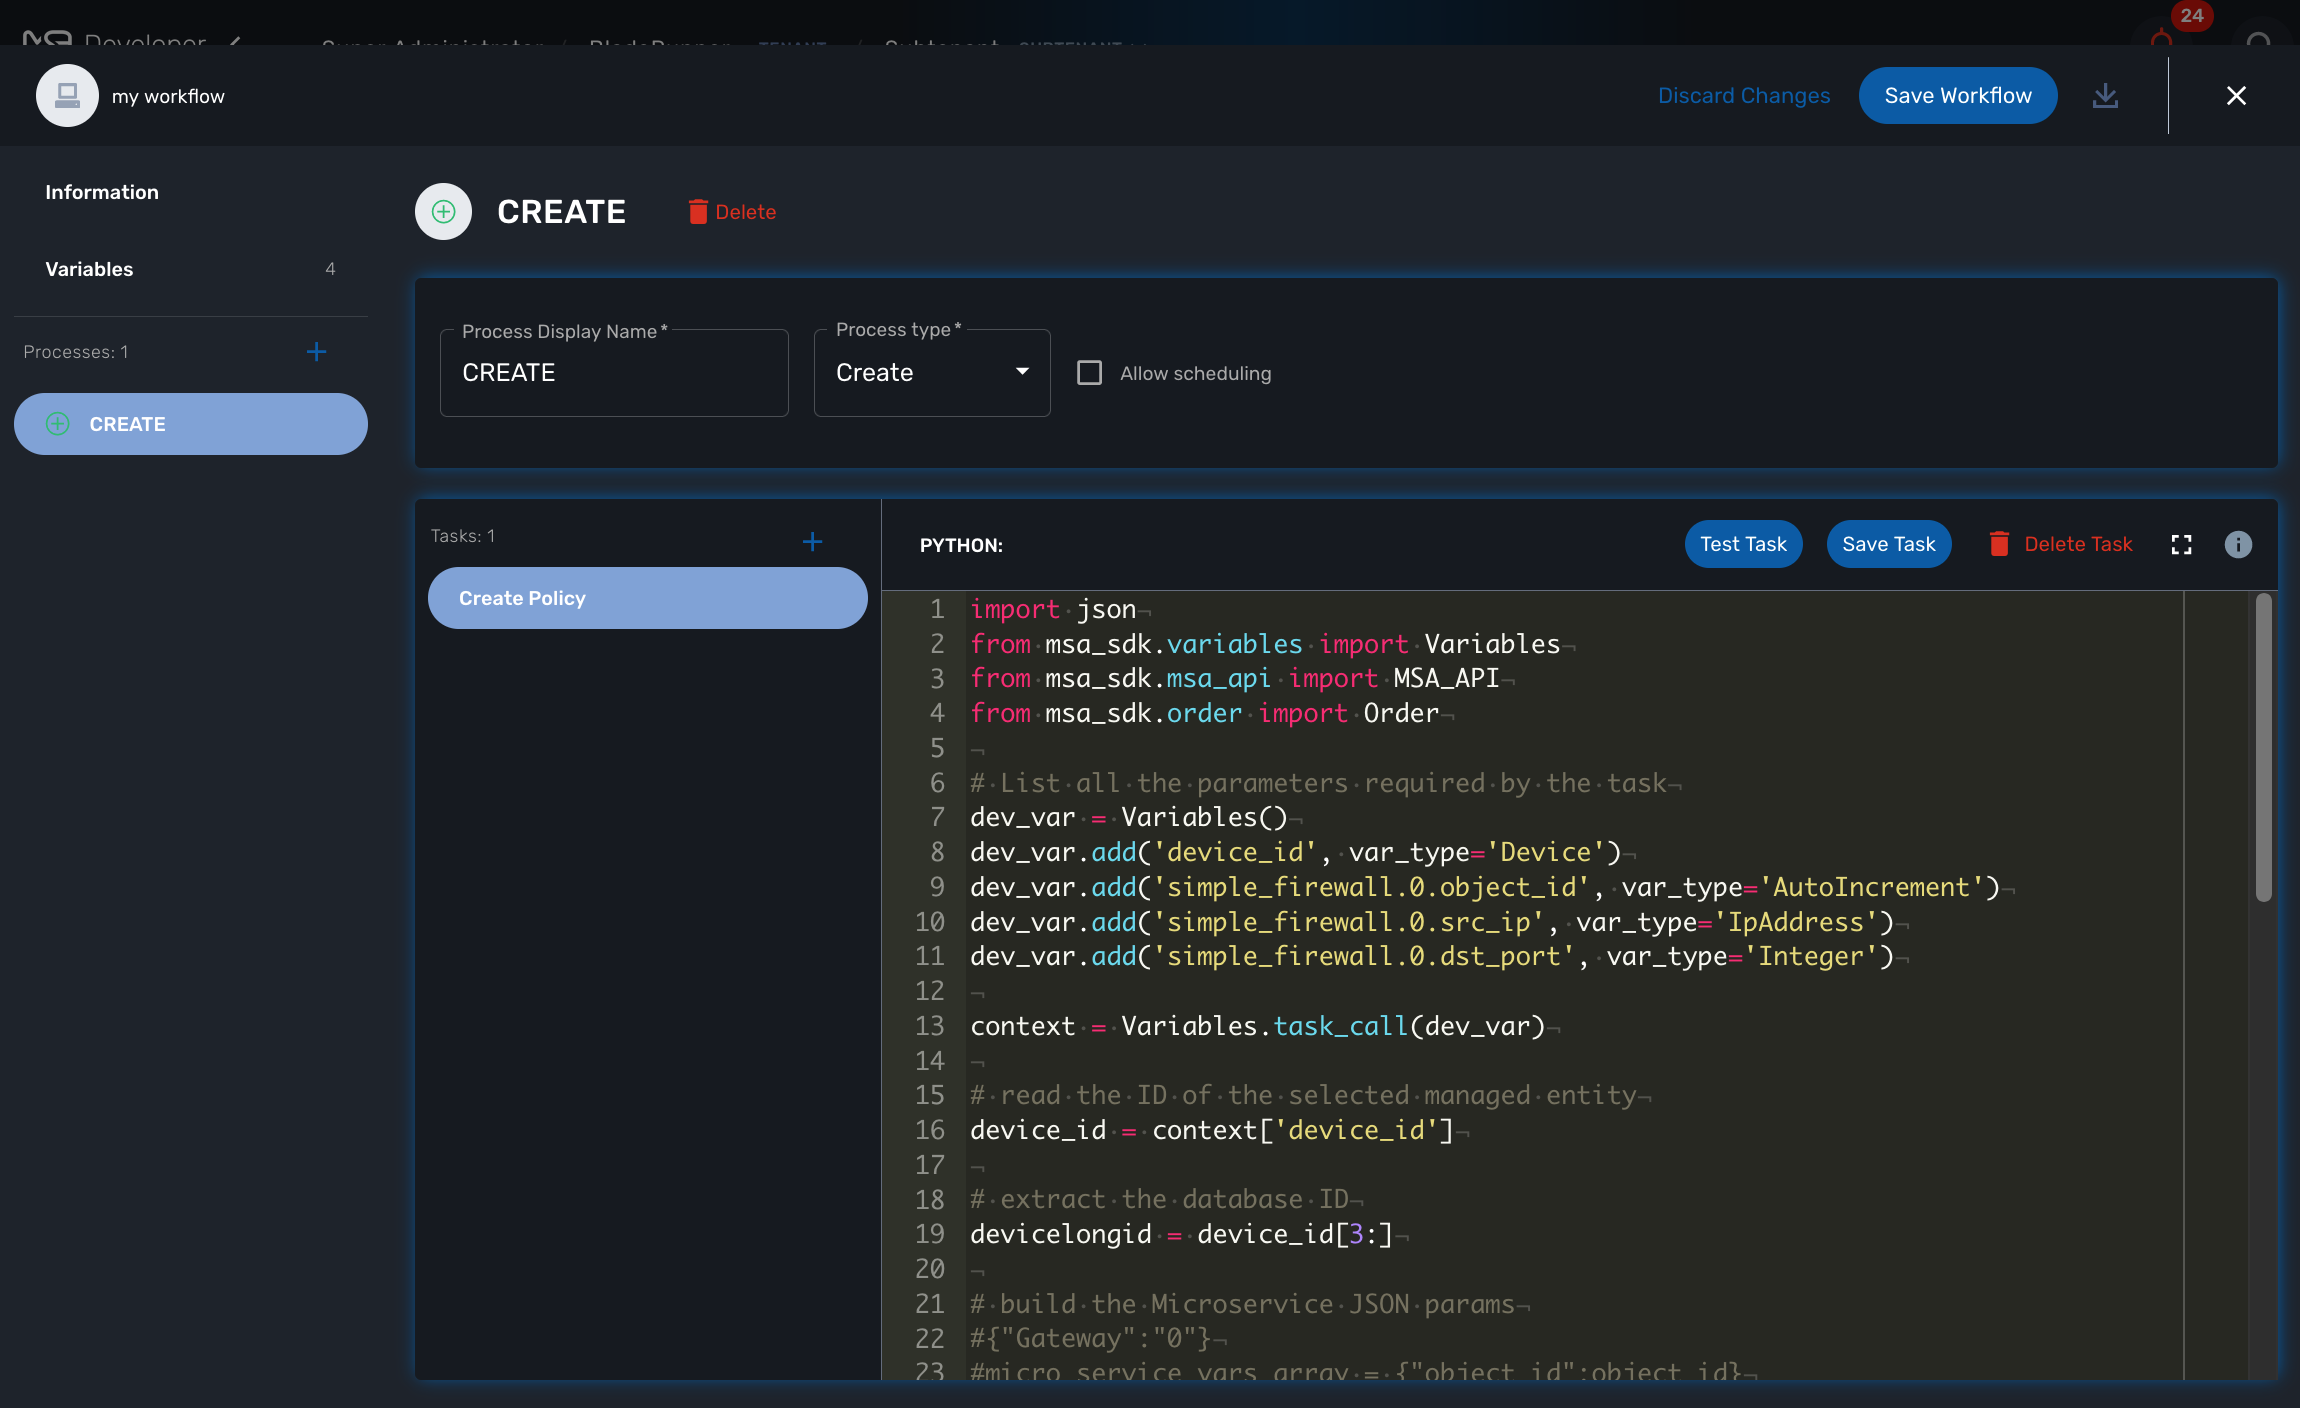
Tasks
The tasks are the smallest execution unit of a workflow.
A process can have as many tasks as needed and although it’s possible to implement a process with a single task, splitting the overall process execution into smaller tasks will ease the code maintenance and the execution monitoring.
Depending on the workflow language selected when creating the workflow, the task should be implemented either in Python or in PHP.
When creating a new task, the UI will populate the code editor with a pre-defined code template that you can use to start coding your tasks.
PHP template
<?php

require_once '/opt/fmc_repository/Process/Reference/Common/common.php';                     (1)

function list_args()                                                                        (2)
{
  create_var_def('var_name', 'String');
  create_var_def('var_name2', 'Integer');
}

check_mandatory_param('var_name');                                                          (3)

/**
 * $context => workflow context variable one per Instance
 * ENTER YOUR CODE HERE
 */
$context['var_name2'] = $context['var_name2'] + 1;                                          (4)

if ($context['var_name2'] % 2 === 0) {                                                      (5)
	$ret = prepare_json_response(FAILED, 'Task Failed', $context, true);
	echo "$ret\n";
	exit;
}

task_success('Task OK');   // or task_error('Task FAILED');                                 (6)
?>| 1 | include the php SDK libraries. |
| 2 | function to list all the parameters required by the task and that should also be rendered as user input field. |
| 3 | function to check whether all the mandatory parameters are present in user input. |
| 4 | assign a variable with a modified value from another variable. |
| 5 | task execution status will depend on the value of a variable |
| 6 | end of the task. |
Python template
from msa_sdk.variables import Variables		(1)
from msa_sdk.msa_api import MSA_API


dev_var = Variables()
dev_var.add('var_name', var_type='String')			(2)
dev_var.add('var_name2', var_type='Integer')


context = Variables.task_call(dev_var)
context['var_name2'] = int(context['var_name2']) + 1   (3)

ret = MSA_API.process_content('ENDED', 'Task OK', context, True)
print(ret) (4)| 1 | include the php SDK libraries. |
| 2 | list all the parameters required by the task and that should also be rendered as user input field. |
| 3 | update the current context with another value read from the context. |
| 4 | end of the task. |
Microservice to Task code generation
When you create a task you have the possibility to create a simple task pre-coded with on of the template above but you can also choose to create a task from a Microservice call.
If you select the second option, you’ll have the possibility to select a Microservice and one for it’s function to generate a task with all the code to execute this microservice auto-generated.

The code of the task is automatically generated.
The variables related to the microservice are added.
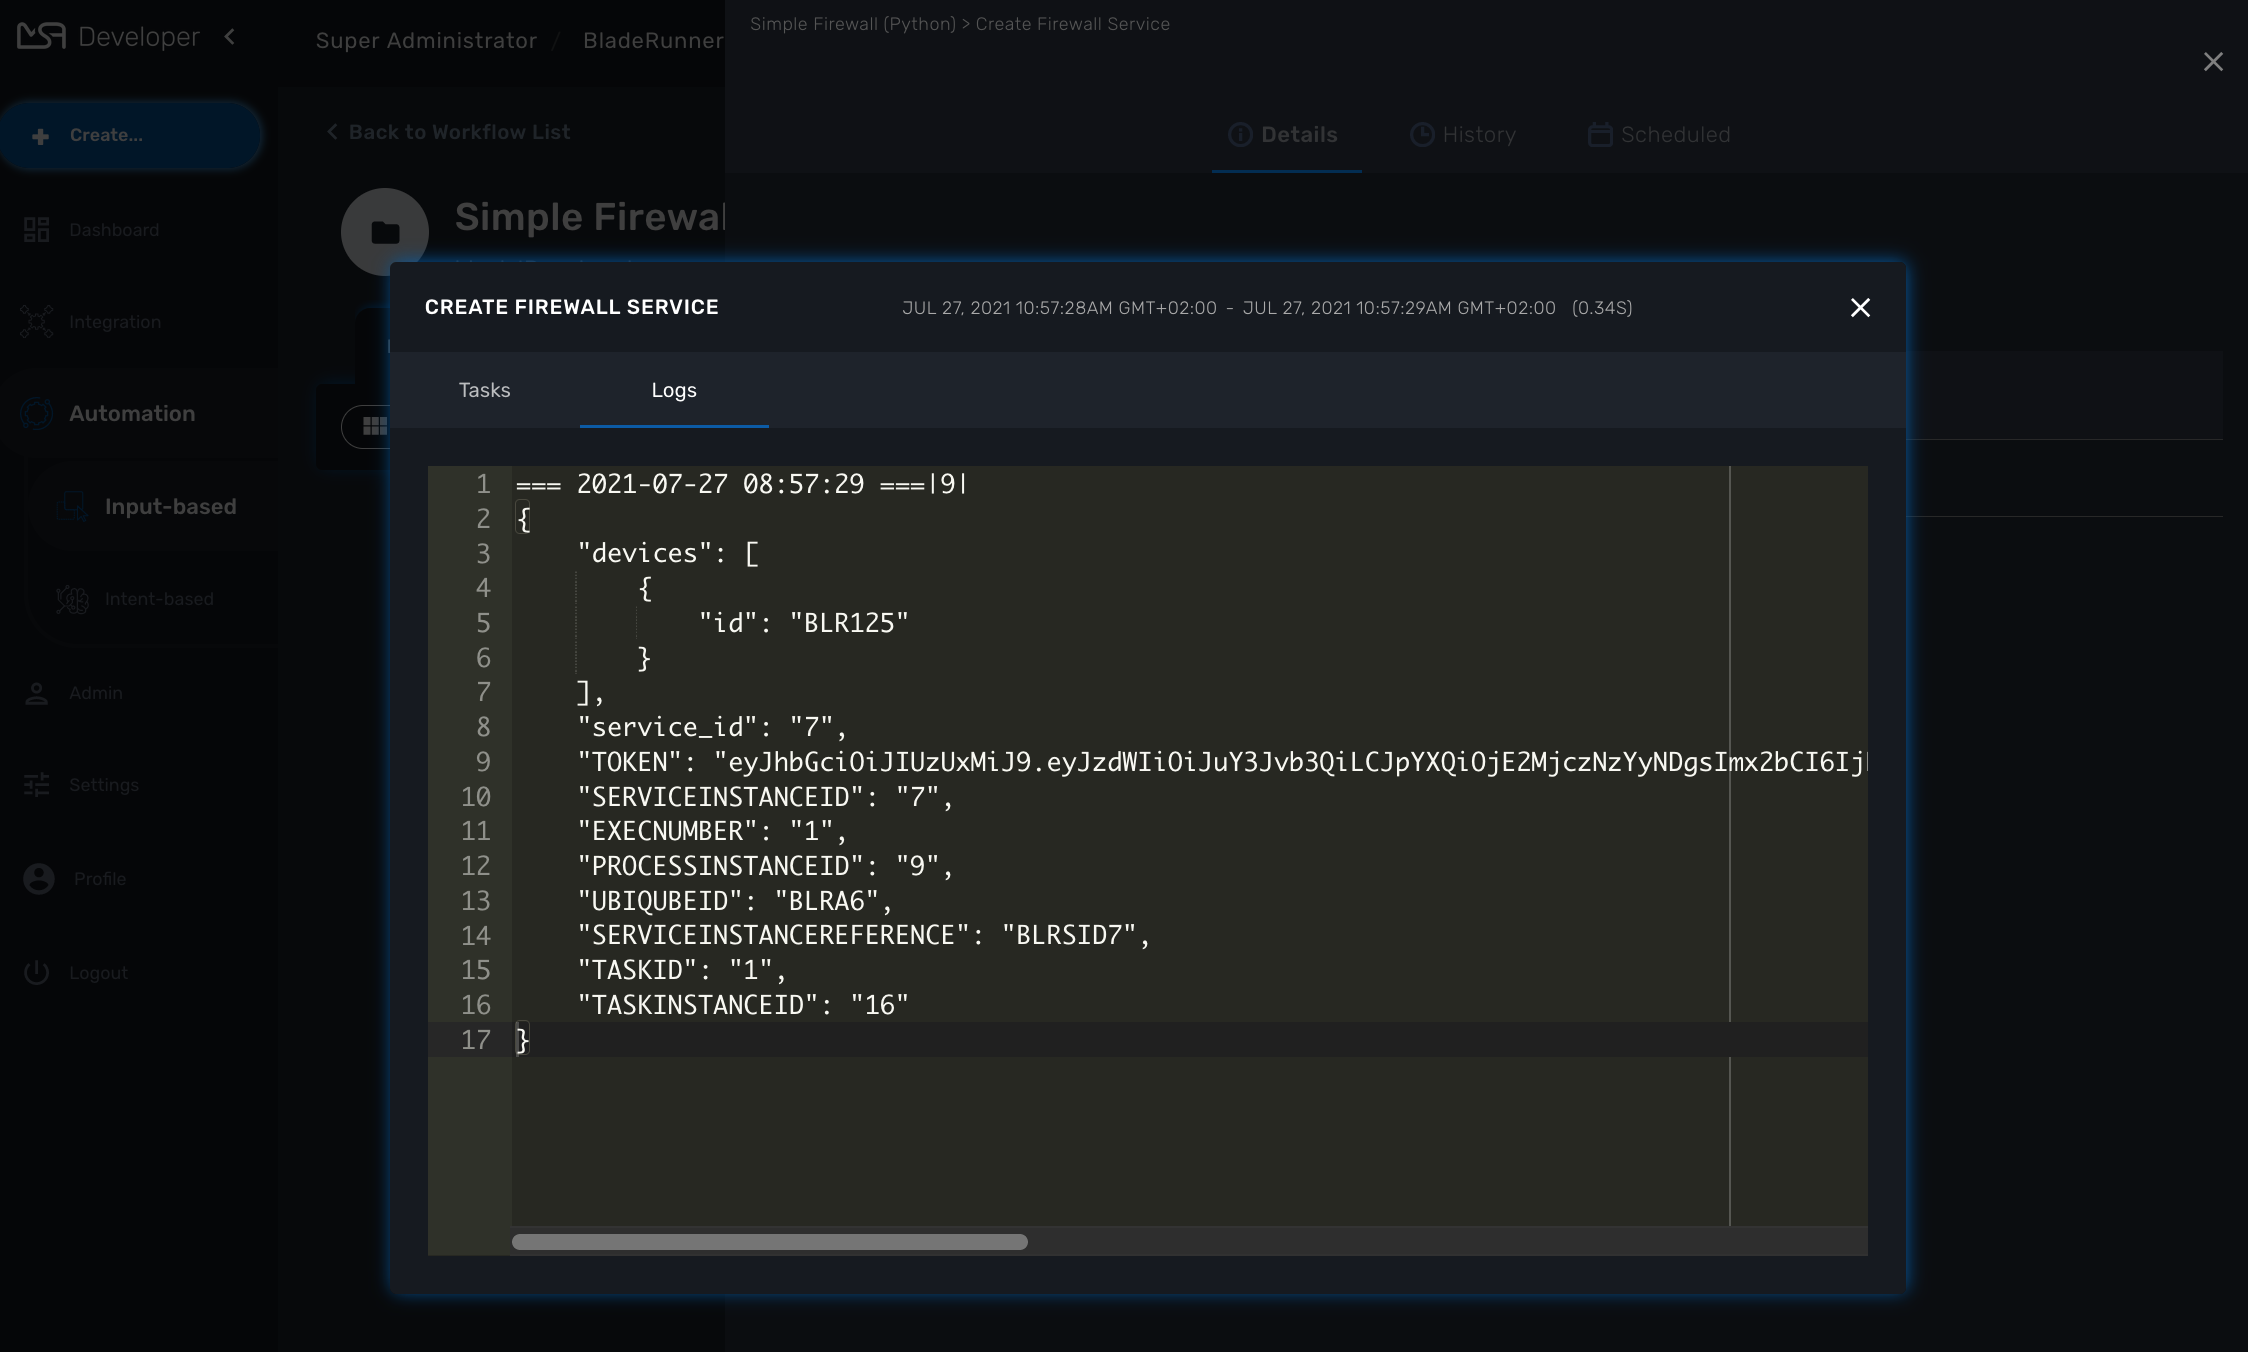
Logging and troubleshooting
You can add debugging information to help you with your development and also provide useful information for troubleshooting task in production.
The log files are generated per workflow instance in the container msa_api under /opt/wildfly/logs/processLog/. The log files are formatted as process-XX.log where XX is the workflow instance ID.

You can monitor the logs of a process by opening the logs tab in the process execution view.
You can also monitor the logs of a process with the CLI command below
docker-compose exec msa-api tail -F /opt/wildfly/logs/processLog/process-XX.log
require_once '/opt/fmc_repository/Process/Reference/Common/common.php';

logToFile("a message");from msa_sdk.variables import Variables
from msa_sdk import util
dev_var = Variables()
context = Variables.task_call(dev_var)
process_id = context['SERVICEINSTANCEID']
util.log_to_process_file(process_id, 'a message')Workflow Variables
Variables are used to hold the parameters to pass to a workflow process. For instance, the port and IP address to block in a firewall policy.
All variables are referenced with the prefix $params which is automatically set in the variable editor screen and when a variable has to be referenced in one of the workflow functions, you need to use the syntax {$params.your_variable} (see below for more examples).
By default the type of a variable is String but other types are supported such as Integer, Boolean, Password, IpAddress, Microservice Reference,…
Overview
Variables are used to hold the parameters to pass to a workflow process. For instance, the port and IP address to block in a firewall policy.
Variables can also be used to display user information that is not necessarily meant to be used for configuring the managed entity.
Setting variables is done from the section "Variables" on the workflow editor screen.
The type of a variable will affect the way the workflow end user form will be rendered.
For instance, the type boolean will render the variable with true/false radio buttons.
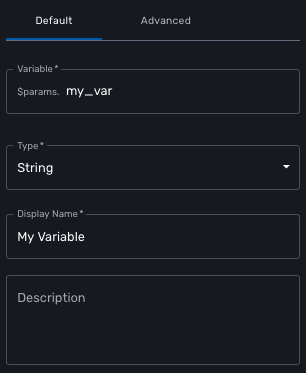
Default settings
When creating or editing a variable, there are some information that need to be provided in the "Default" section.
Variable
Name of the variable to use in the implementation of the workflow or when calling the REST API.
Type
The type of the variable should be one from the list below
String
The default type for a variable, it will accepts any value and the UI renders it as a input field without any specifc validation with regards to the value set.
Boolean
This data type accepts a value of true or false, the UI will render it as a checkbox.
Integer
This data type represents a numerical value, the UI will render it as an input field restricted to integer.
Code
This type allows to render a variable as a textfield with the possibility to select a code language (default is simple text) for syntax highlighting
Password
| not supported yet |
This data type represents a multi-character value that is hidden from plain sight (i.e. the value is represented as asterisks instead of clear text).
IPv4 address and mask, IPv6 mask
| not supported yet |
This data type will enforce data validation against IP address formats.
Composite
The variable type composite provide ways to add control over the behavior of the workflow user form.
It can be used, for instance, to show/hide parts of the form based on the value of another component of the form.
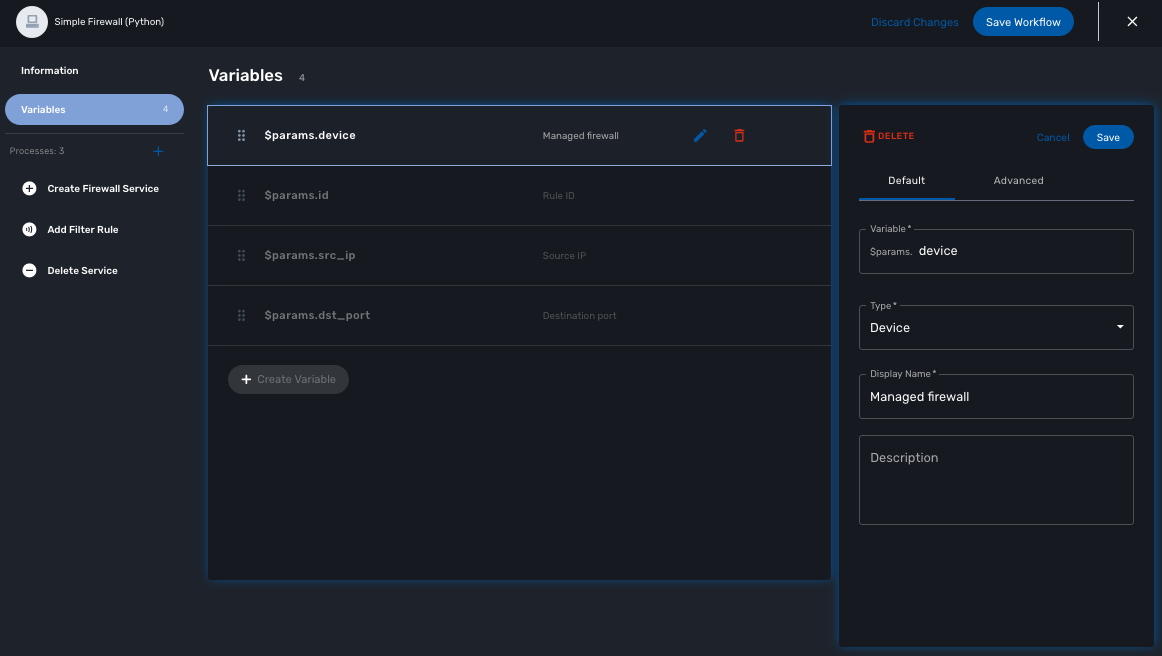
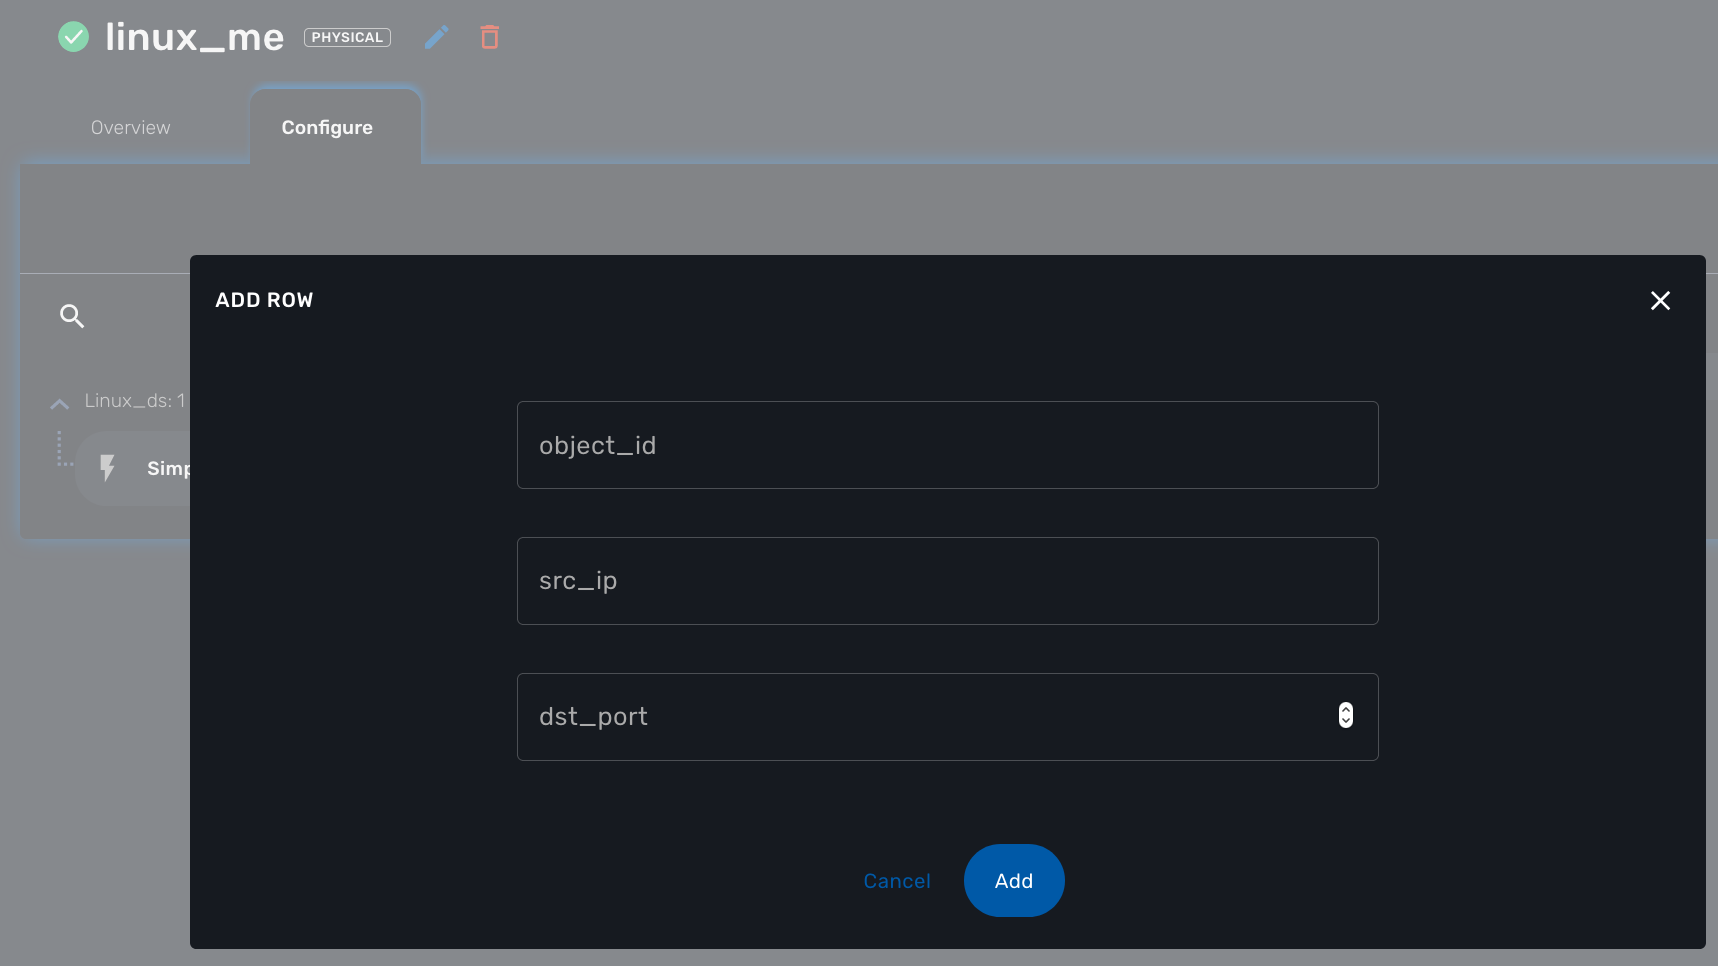
Let’s take a simple example to illustrate the use of the composite type with a simple workflow for managing firewall policy.
The workflow allows the user to create a firewall policy to block a source IP address and a destination port but the user may also need to select the protocol TCP, UDP or ICMP and in the case of ICMP, the destination port is not relevant. We need to build a workflow UI where the user will have to provide the source IP and destination port when the protocol is TC or UDP and only the source IP when the protocol is ICMP.
In this example, the variable "dst_port" for the destination port should be typed as a composite because it’s behavior when rendered as a user web form will depend on the other variable "protocol".

To implement this behavior, set the type of "dst_port" variable to "Composite".
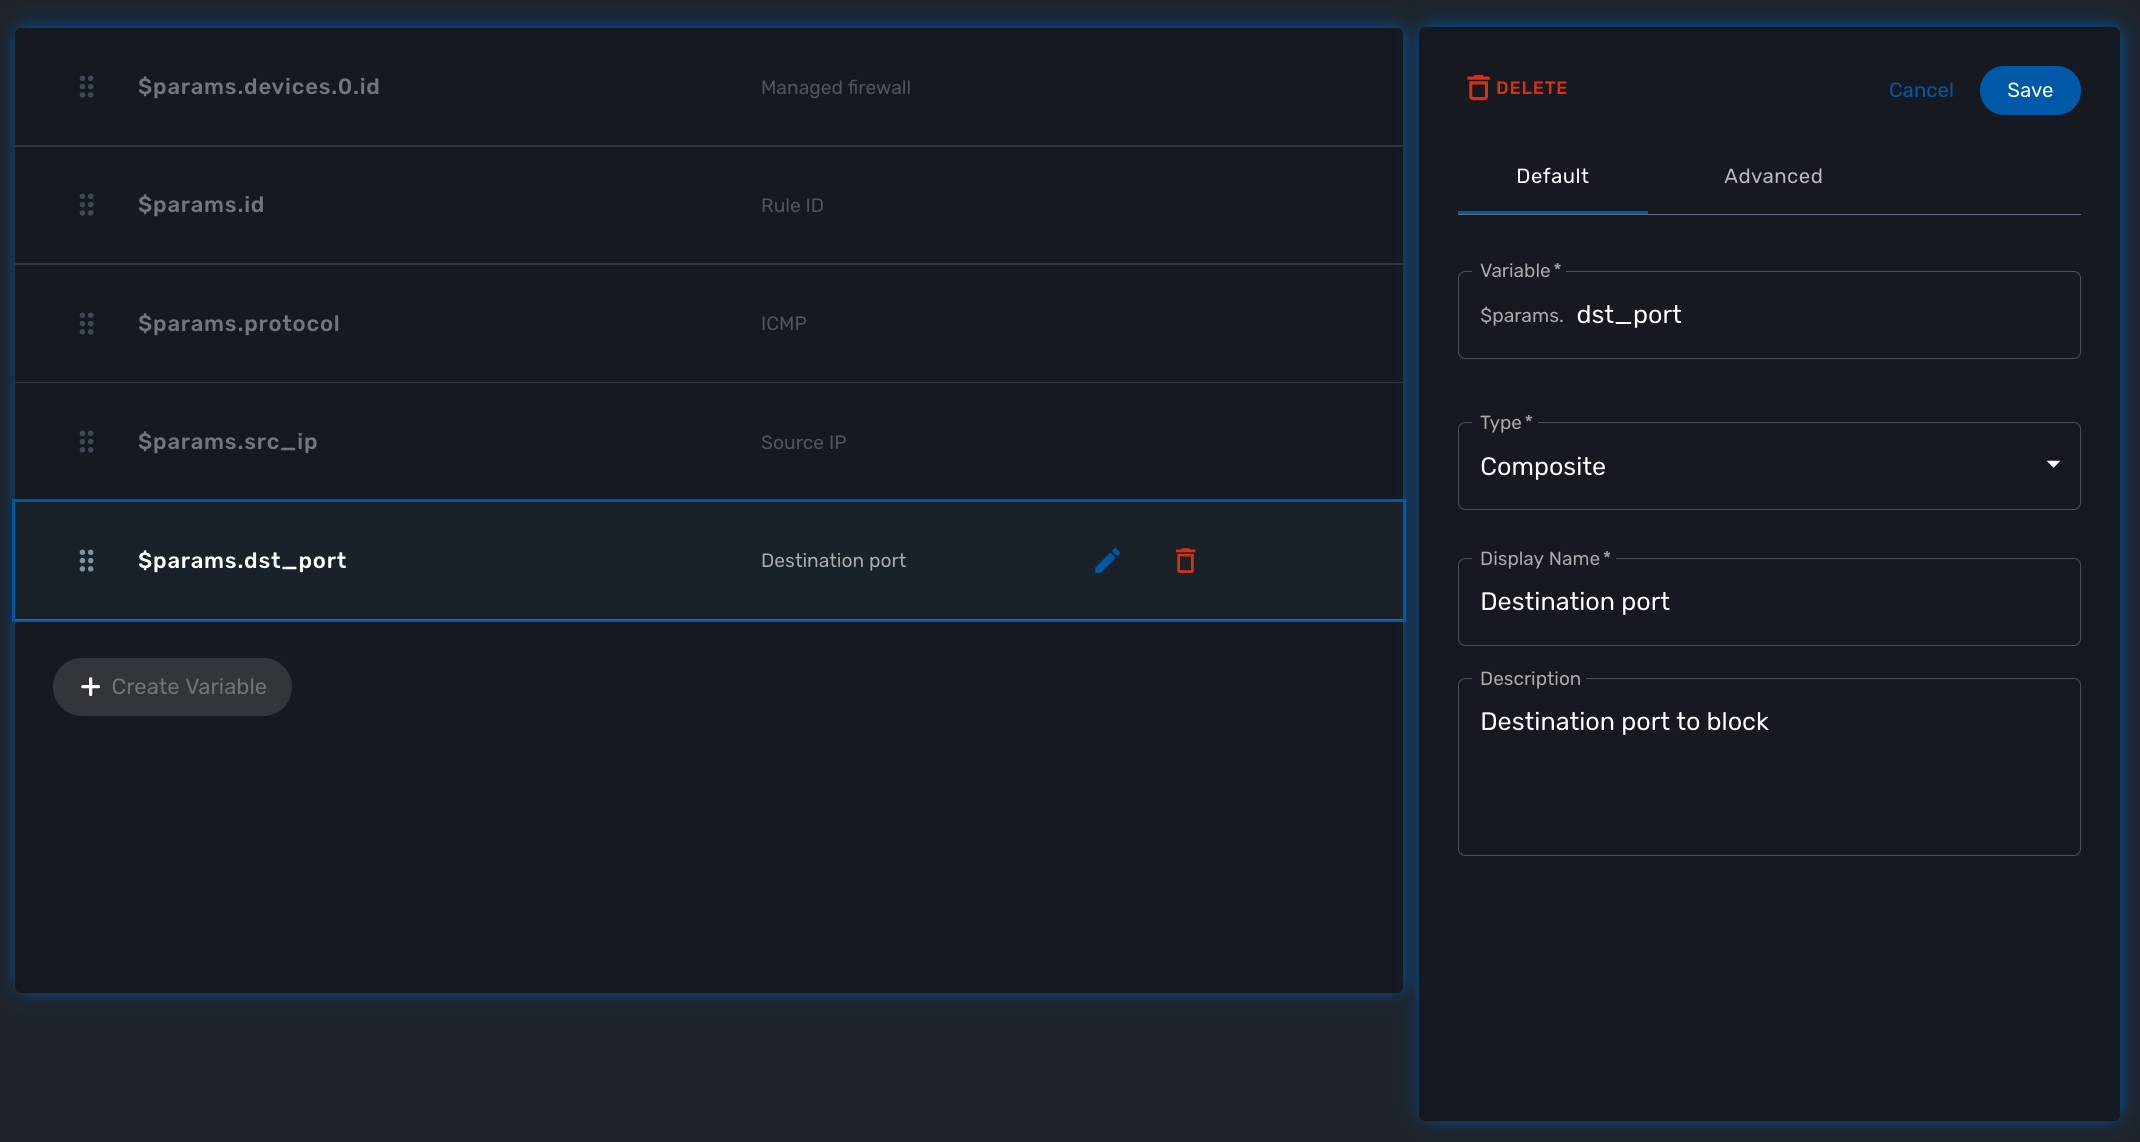
In the advanced parameter tab, first choose the "Selector Variable" and select the protocol (note that the list shows the display name, not the actual name of the variable)
Then configure the "Behavior for the Composite". The selector is a boolean so you can only have 2 types of behavior, one for true and one for false.
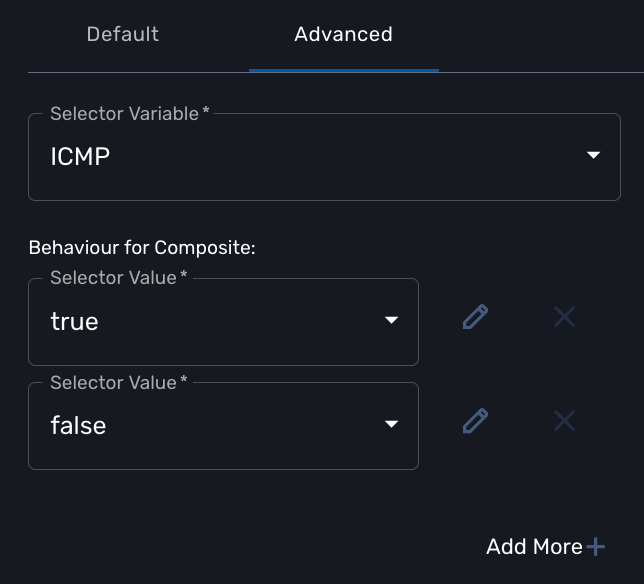
Each behavior can be configured by editing it with the pencil icon.
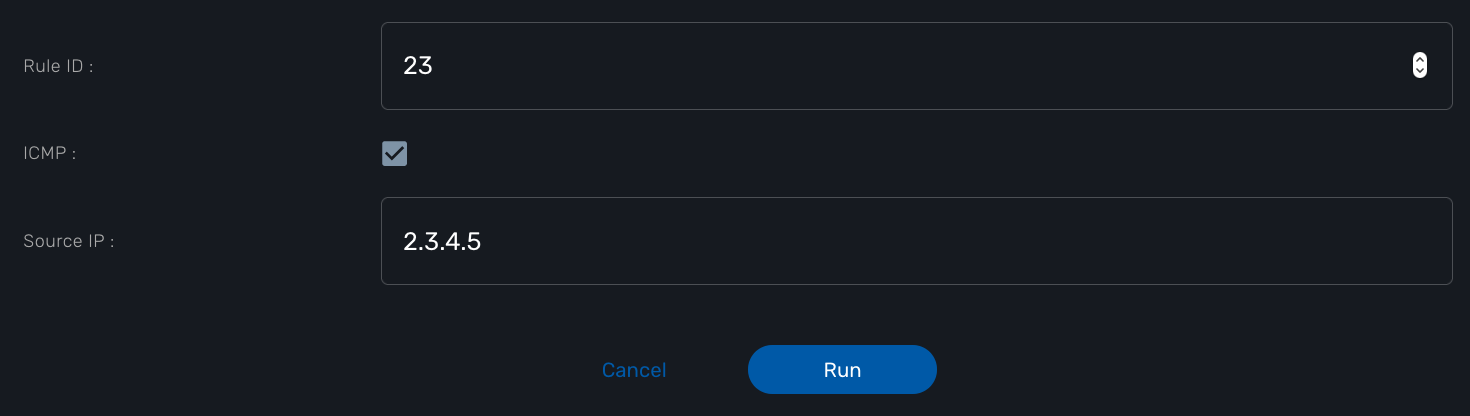
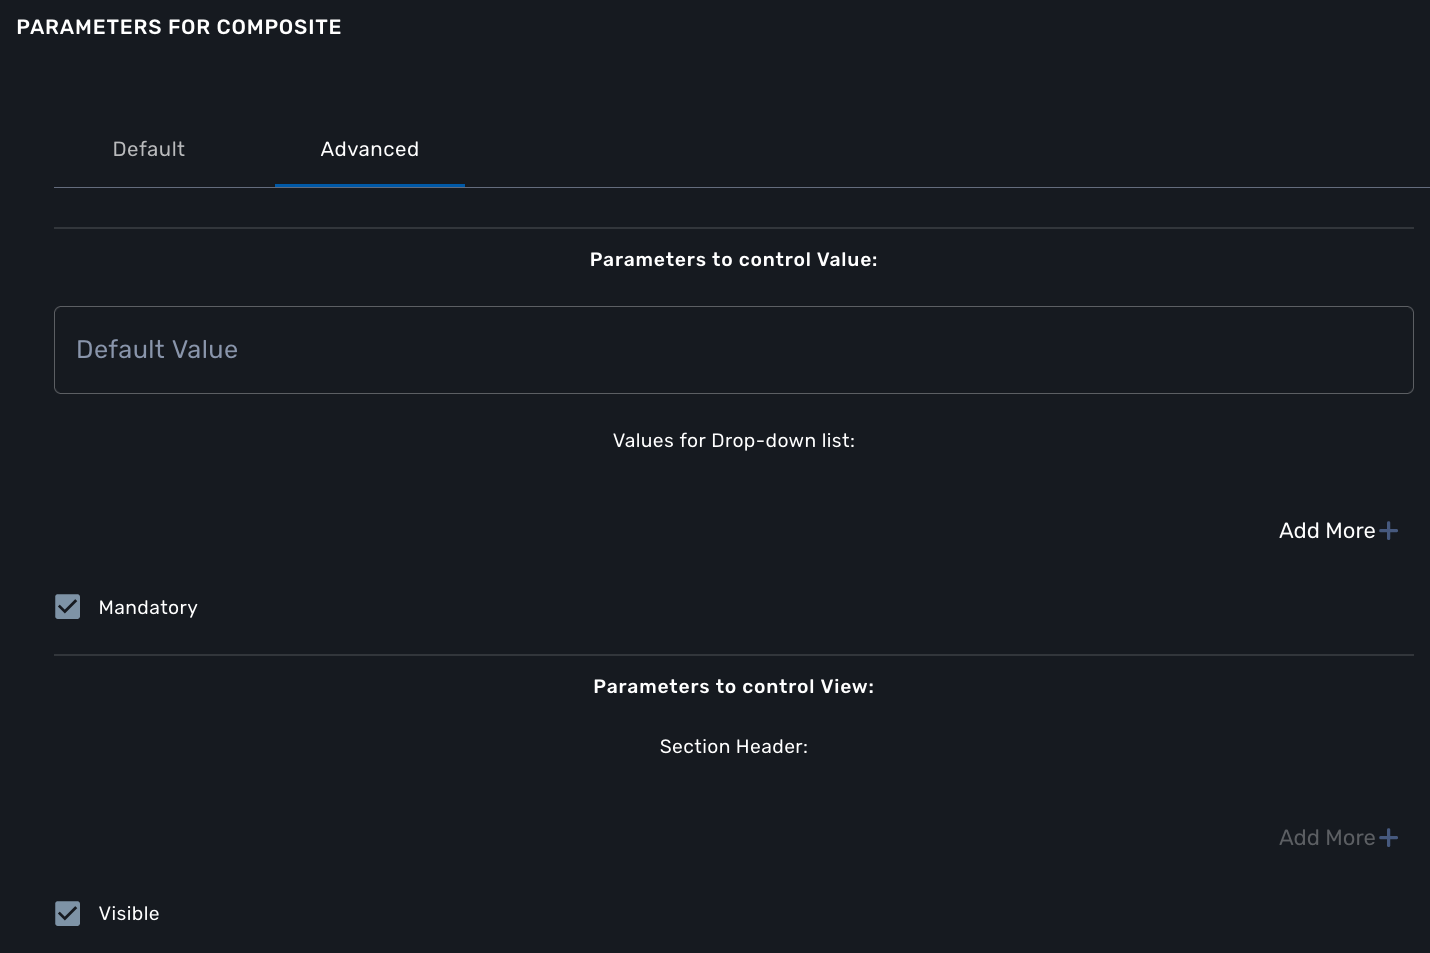
In our case, if the selector is set to true (when the user selects ICMP), the variable "dst_port" should be hidden: uncheck the attribute "Visible" in the advanced parameters for composite.
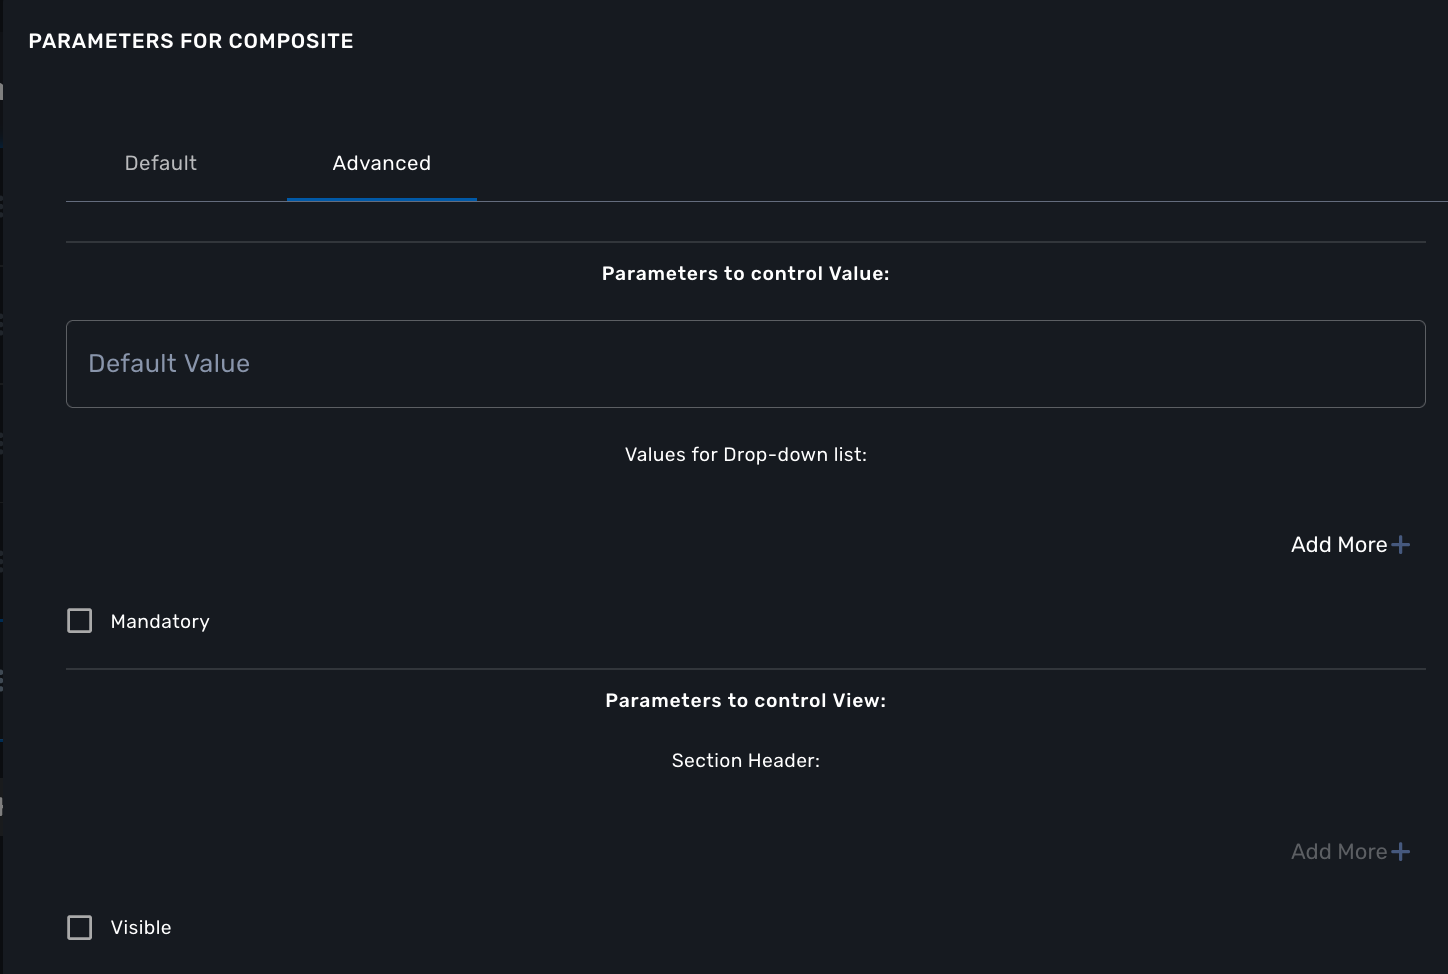
And when the selector is set to false, the variable "dst_port" should be visible and mandatory.
Link
| not supported yet |
This type is useful if you wat to display a URL in the user form, for instance to link to some documentation on a web server. It is usually used in read-only mode with the URL set as the default value of the variable
Auto Increment
This type is used to maintain an incremental counter in within the instances of a workflow for a managed entity. This is useful for managing the object_id.
Increment |
an integer to define the increment step |
Start Increment |
the initial value for the variable |
Workflows sharing the same increment |
a list of workflows that are also using the same variable and need to share a common value. |
Device
This type is used to allow the user to select a managed entity and pass its identifier to the implementation of the workflow.
In the task implementation you need to list the variables with "Device" for the type
function list_args()
{
  create_var_def('my_device');
}from msa_sdk.variables import Variables
TaskVariables = Variables()
TaskVariables.add('my_device')A very common use of the type Device is for automating configuration (or any other automated action) over a list of managed entities.
You can do that by creating a array variable with the type Device and loop through the array in the task.
from msa_sdk.variables import Variables
from msa_sdk.msa_api import MSA_API
from msa_sdk import util

dev_var = Variables()
dev_var.add('me_list.0.id')                                       (1)

context = Variables.task_call(dev_var)
process_id = context['SERVICEINSTANCEID']                         (2)

me_list = context['me_list']                                      (3)

for me_id in me_list:                                             (4)
    util.log_to_process_file(process_id, me_id['id'])             (5)

ret = MSA_API.process_content('ENDED', 'Task OK', context, True)
print(ret)| 1 | declare the the array variable to be displayed in UI |
| 2 | read the current process ID |
| 3 | read the list of managed entities selected by the user on the UI |
| 4 | loop through the list and print each managed entity ID in the process log file |
| 5 | print the managed entity identifier in the process log file |
function list_args()
{
  create_var_def('devices.0.id');
}

// read the ID of the selected managed entity
$devices = $context['devices'];

foreach ($devices as $device) {
  $device_id = $device['id'];

  logToFile("update device $device_id");
}
Subtenant
This type will allow the user to select a subtenant and use the subtenant ID from the workflow instance context in the task.
The source code below will let the user select a subtenant and display the subtenant ID on the execution console
<?php
require_once '/opt/fmc_repository/Process/Reference/Common/common.php';

function list_args()
{
  create_var_def('subtenant');                (1)
}

$subtenant = $context['subtenant'];           (2)

task_success('Task OK: '.$subtenant);         (3)
?>| 1 | declare the variable subtenant to be displayed in the user form |
| 2 | read the variable value from the context |
| 3 | print the value on the execution console |

If you need to select multiple subtenants, you have to create an array variable with the type Customer.
With the variable $params.subtenants.0.id typed as Customer, the code below will ask for the user to select 1 or more subtenant, print the identifier of each one in the process log file and display the number of subtenant selected on the UI.
<?php
require_once '/opt/fmc_repository/Process/Reference/Common/common.php';

function list_args()
{
  create_var_def('subtenants.0.id');
}

$subtenants = $context['subtenants'];

foreach ($subtenants as $subtenant) {           (1)
  logToFile("subtenant: ".$subtenant['id']);    (2)
}

task_success('Task OK: '.sizeof($subtenants )." subtenant selected");
?>| 1 | loop through the list of subtenants |
| 2 | log the value in the process log file |
| the code for iterating over an array of managed entities is very similar |
Microservice reference
This type is key when integrating workflows and microservices.
It allows you to import and use the microservice instance data from a managed entity in your automation code.
To use this type you need 2 variables:
-
a variable with the type
Managed Entityto select the managed entity to get the data from -
a variable with the type
Microservice Referenceto select the microservice that will pull the data
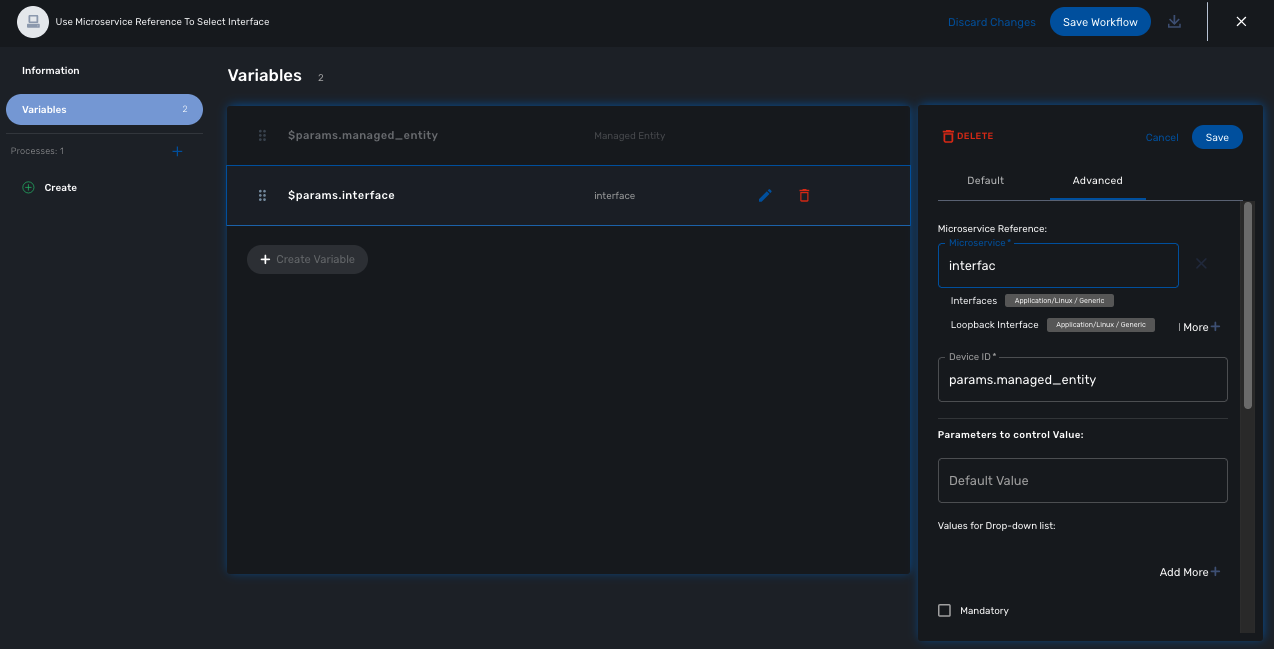
When creating a variable typed Microservice Reference you need to select the Managed Entity variable to use and the microservice that will act as the data source.
| the microservice must be attached to the managed entity with a deployment setting in order for the microservice reference to work. |
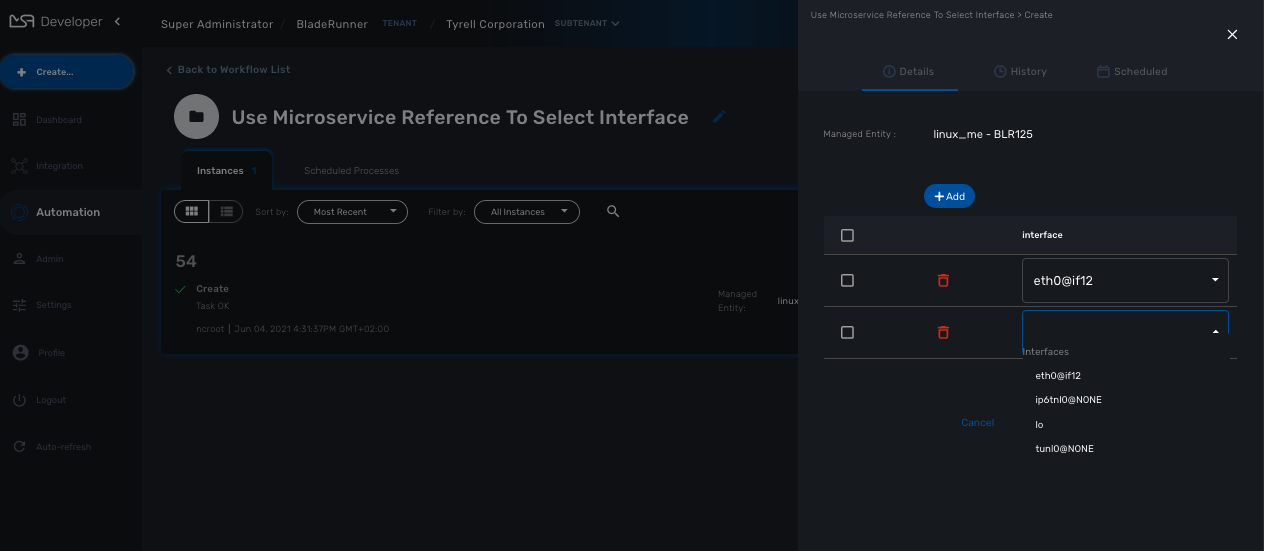
In the example below, the variable $params.interface is typed as Microservice Reference.
In the "Advanced" tab, the field "Microservice Reference" references one or several microservice and the field "Device ID" references a managed entity.
from msa_sdk.variables import Variables
from msa_sdk.msa_api import MSA_API

dev_var = Variables()
dev_var.add('managed_entity')
dev_var.add('interface.0.name')

context = Variables.task_call(dev_var)

ret = MSA_API.process_content('ENDED', 'Task OK', context, True)

print(ret)
It also possible to use an array to select multiple values from the microservice
from msa_sdk.variables import Variables
from msa_sdk.msa_api import MSA_API

dev_var = Variables()
dev_var.add('managed_entity', var_type='Device')
dev_var.add('interface.0.name', var_type='OBMFRef') (1)

context = Variables.task_call(dev_var)

ret = MSA_API.process_content('ENDED', 'Task OK', context, True)

print(ret)| 1 | Use a variable array to allow multiple value selection |
Workflow reference
This type is useful for referencing a workflow from another one.
Display Name
The display value for the variable name.
Description
An optional description of this variable.
Advanced settings
Depending on the selected type, some advanced parameters may be differ.
| Setting | Description |
|---|---|
Default Value |
the default value that will be used when creating a new workflow instance |
Values for Drop-down |
a list of possible value the user can choose from |
Mandatory |
a value has to be provided for this variable |
Read only variable |
the value cannot be edited |
Section Header |
group some variables in the workflow console (see below). |
Show only in edit view |
hide the variable from the workflow console |
Array settings
When you are dealing with variable arrays, these options will let you control the possible actions a user can have over the array.
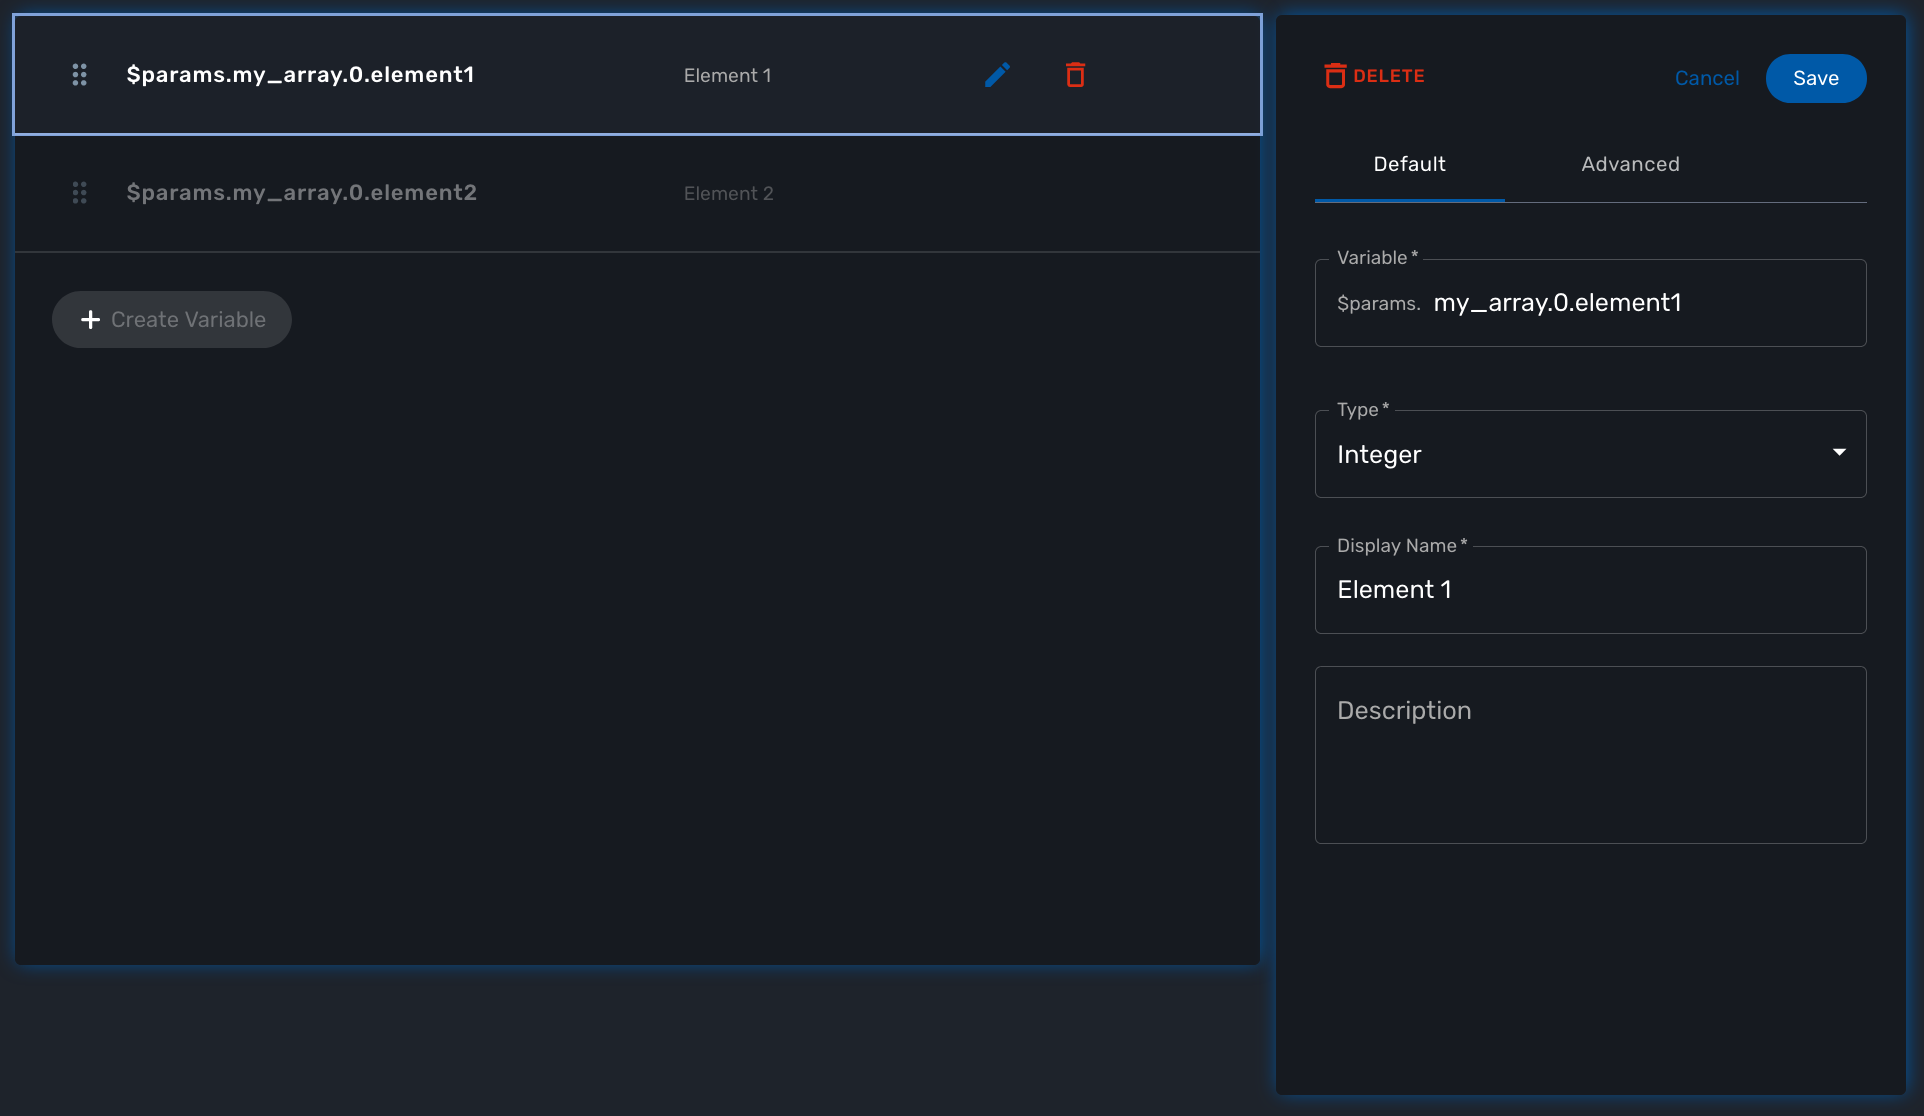
Variable arrays
To create a variable array, you need to follow a precise naming convention: $params.<ARRAY NAME>.0.<ELEMENT NAME>. The 0, is the separator that will allow the UI and the configuration engine that this variable is an array.
Getting Started Developing Workflows in PHP
Overview
This tutorial walks you through the design and development of your first workflow.
Workflows can be used to automate a wide variety of tasks and processes, such as:
-
Service configuration chaining
-
VNF lifecycle management
-
Configuration audit and verification
-
Automated customer on-boarding
-
…
The "Helloworld" Workflow
As an example, we’ll use the "Helloworld" workflow. The "Helloworld" workflow will print a name as IN parameter and will display a message to the user ("Hello NAME").
This workflow is composed of 3 processes: one to create the new instance of the workflow, one to enter the name and print it, and one to delete the instance.
Create a new Workflow
From the Developer dashboard click on "+ Create"

In the tab "Information", set a name, a description and set the Workflow variable name to service_id and save your workflow.
Create a variable "Name" in the tab "Variable".

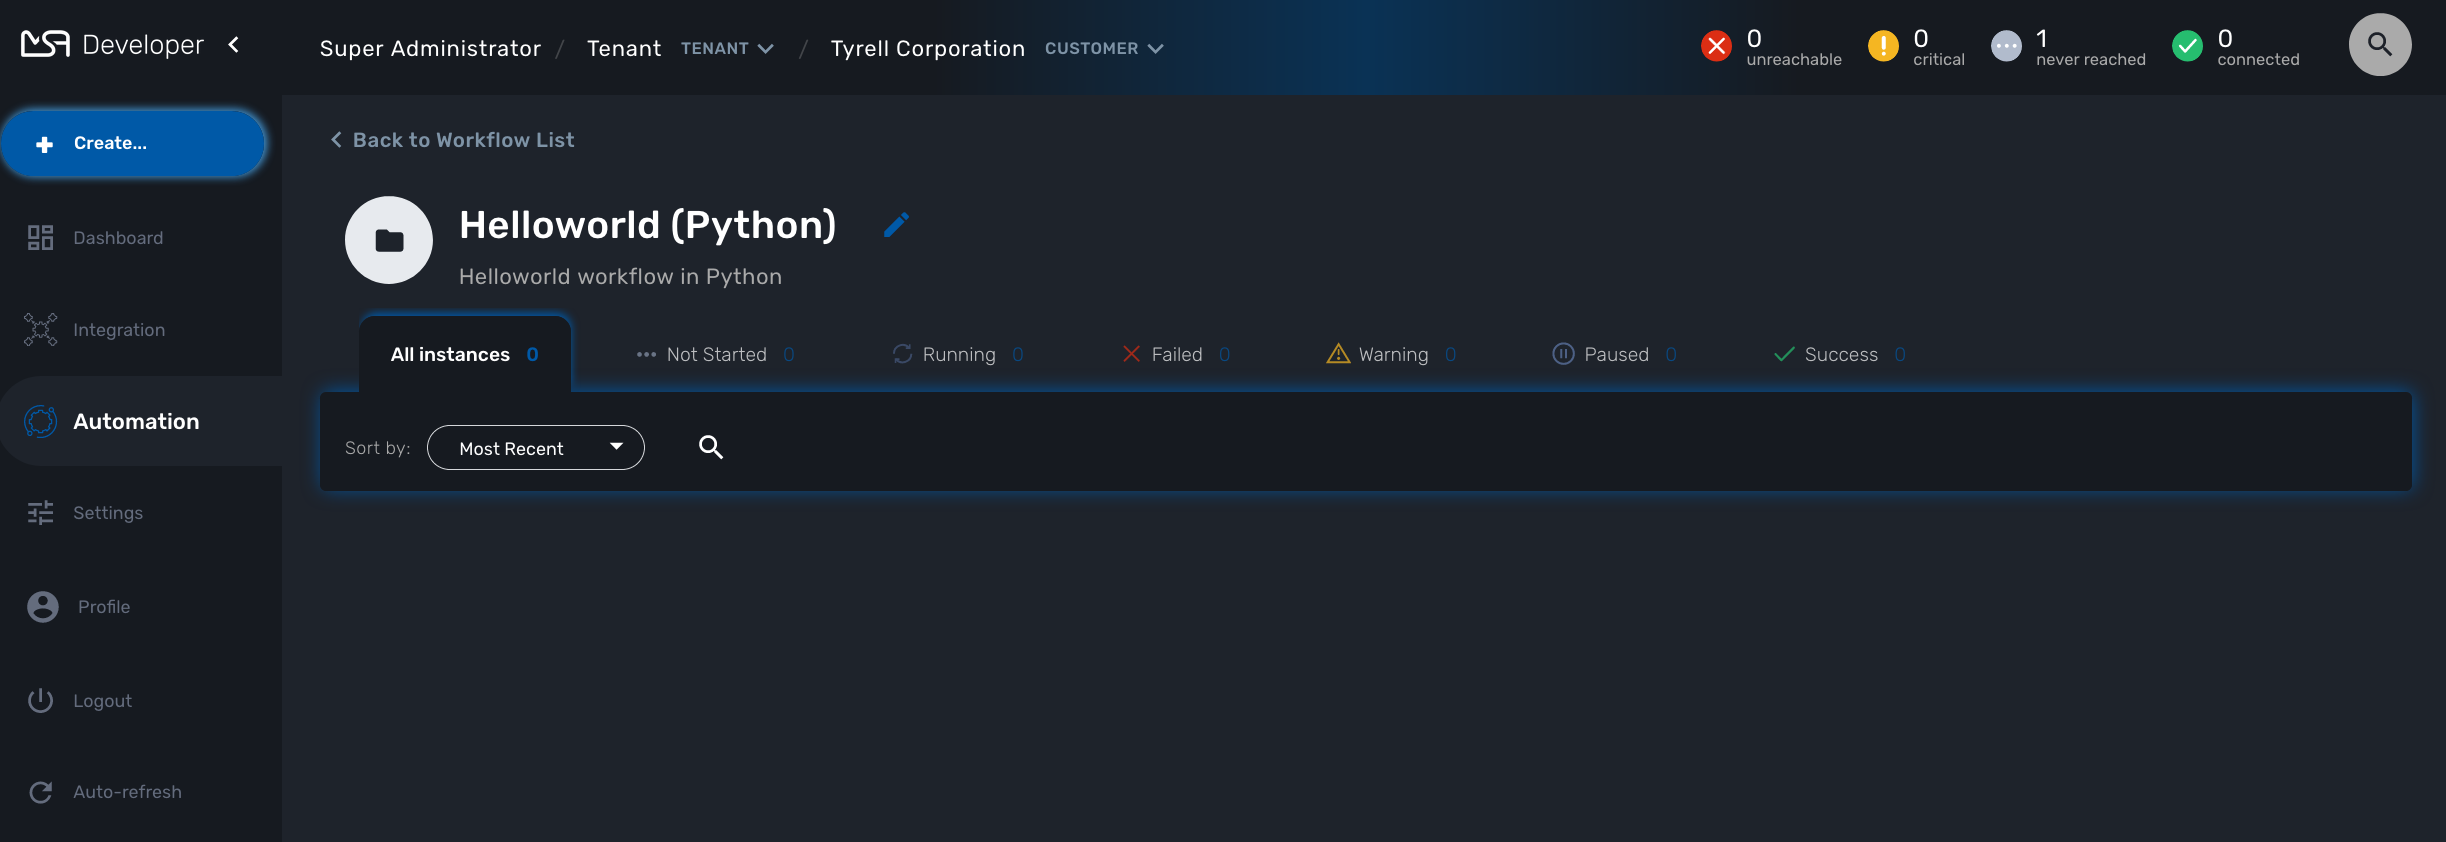
To start testing your workflow, you need to associate it to a customer. Make sure that you have no tenant selected, go to the "Automation" section, you should see your workflow in the list.
You can use the magnifier to search for it.
Use the link "Add to.." to associate the workflow to a customer.
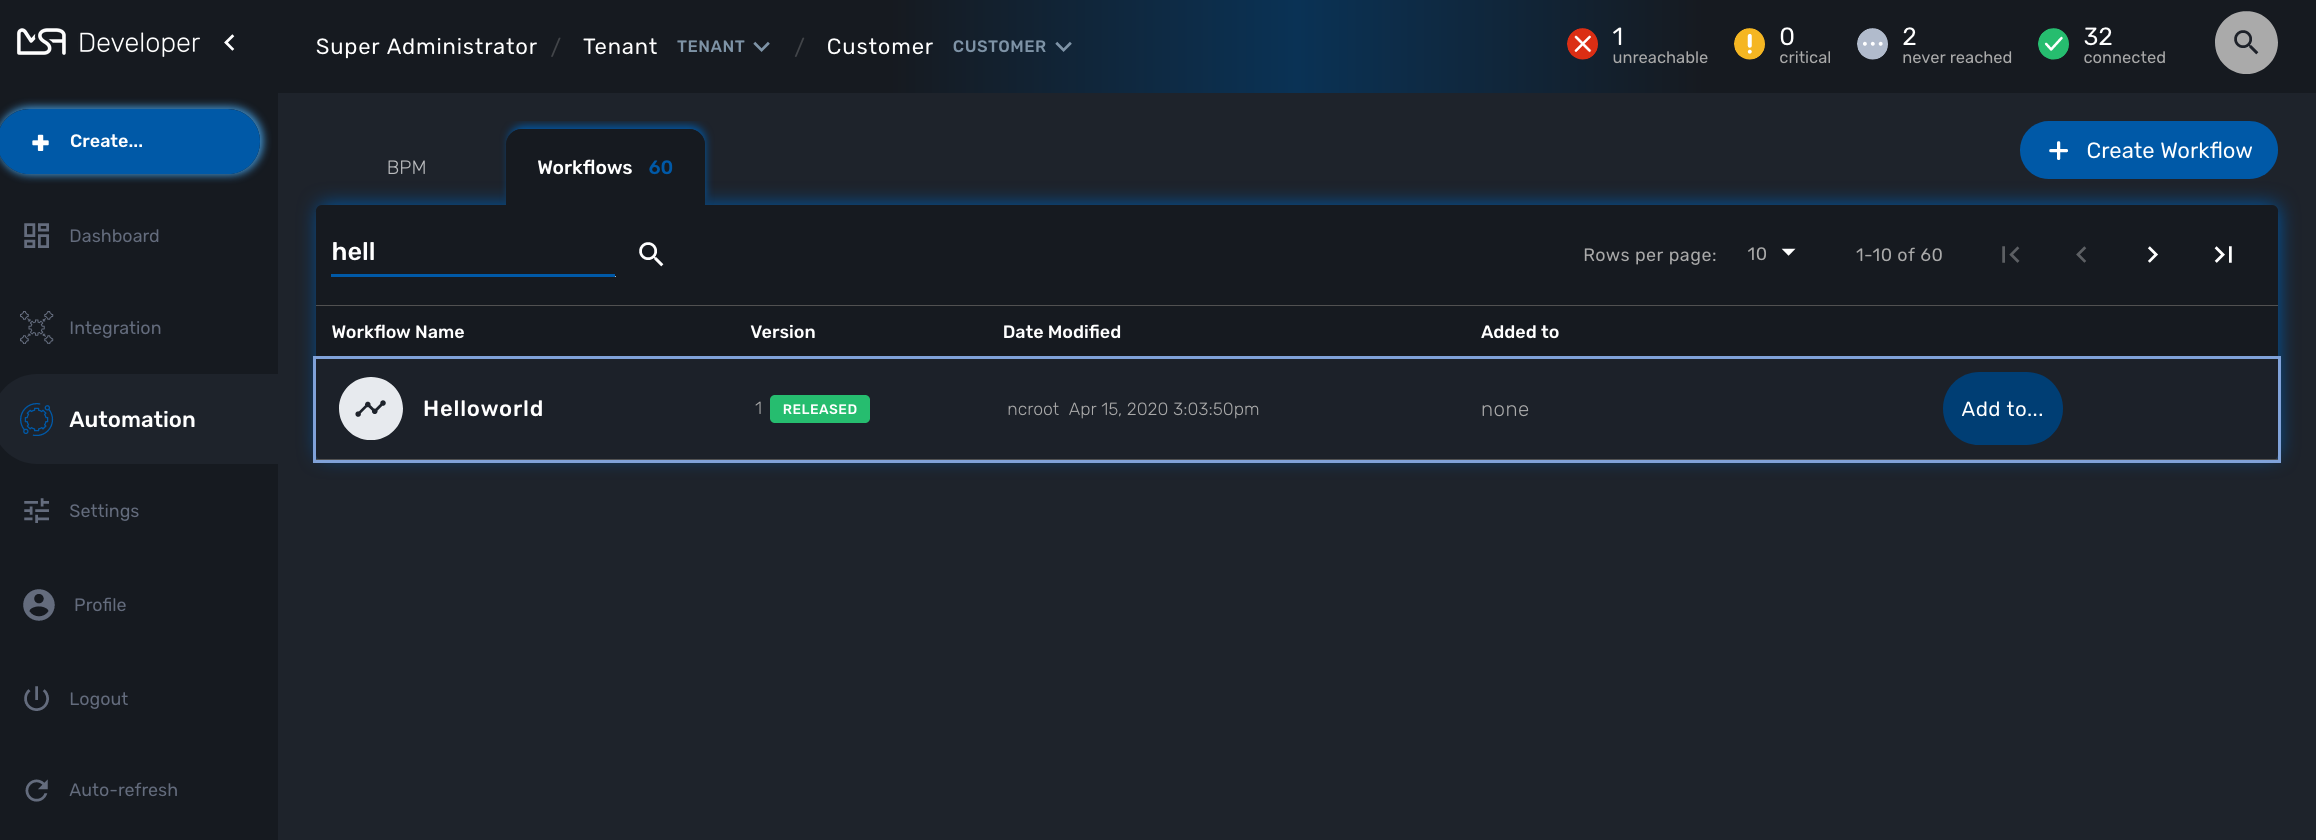
Select the customer to use for designing and testing the workflow.
Once done, you can select your customer, list its workflows and edit it with the pencil icon.
Create the Processes
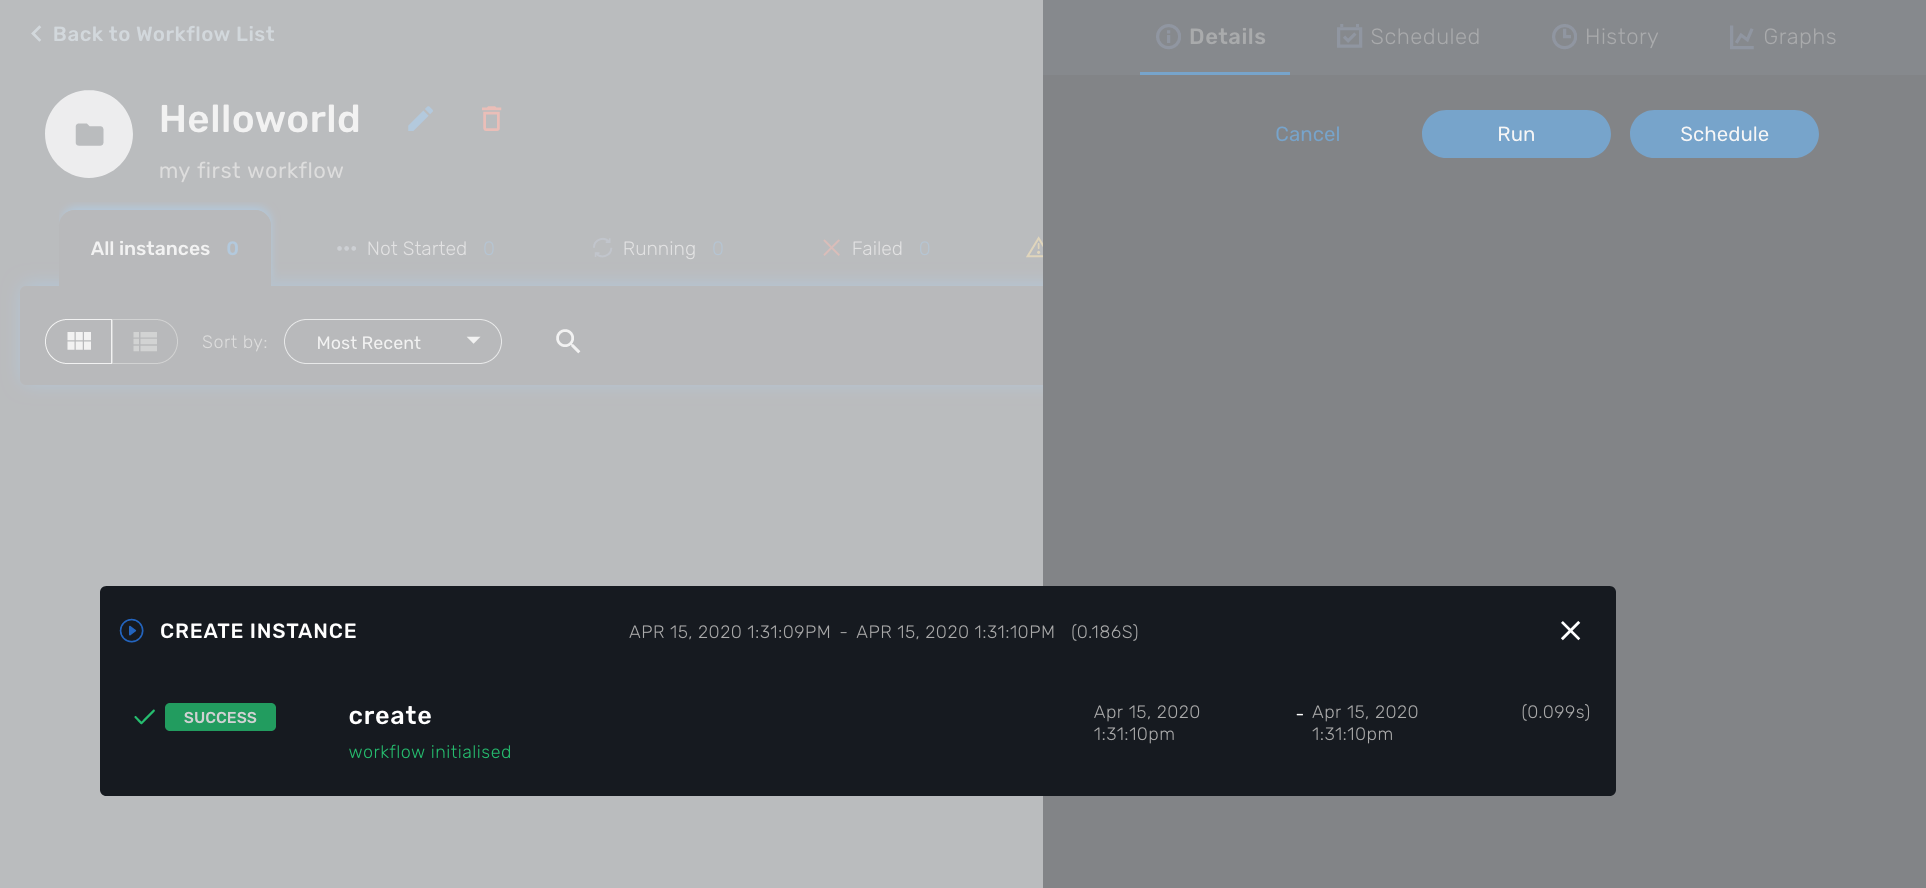
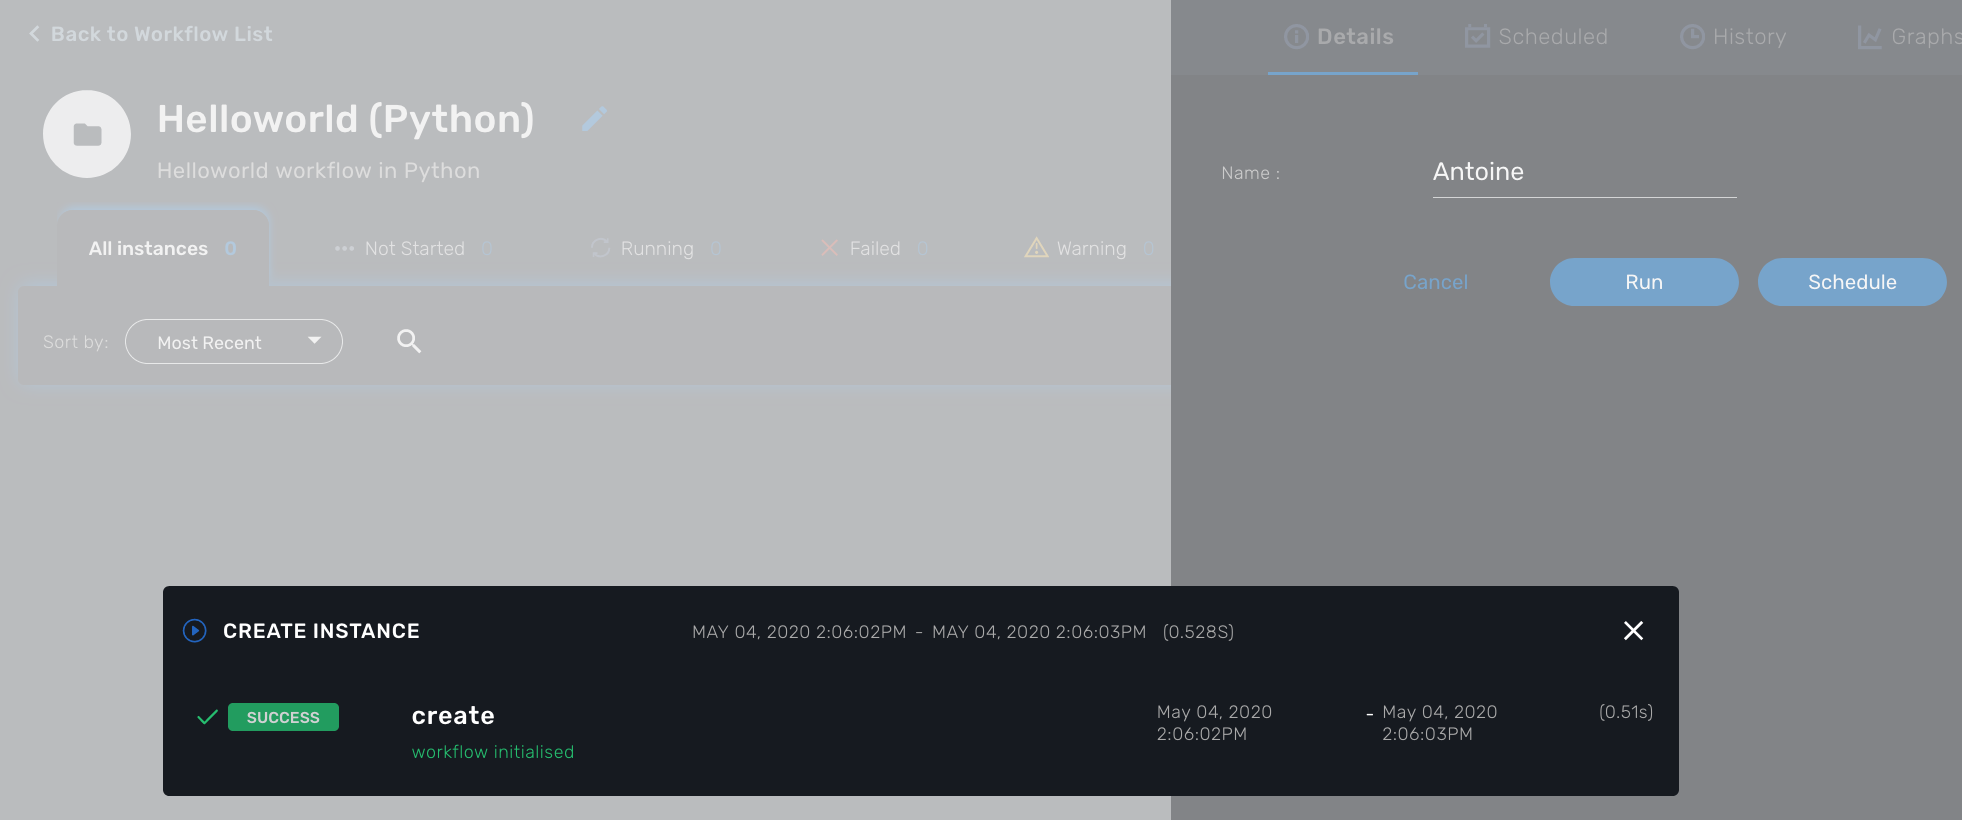
The "create instance" Process
In order to be used, every Workflow should be instantiated first. This is the role of the process with the type "Create".
| even though for most use cases, a single "CREATE" process is sufficient, it is possible to have several "CREATE" processes to support various ways of creating the Workflow instance (You can relate that to having several object constructor in an OOP language such as Java). |
For this tutorial you will create one process named "create instance" and add one task to this process. This task will simply display a message to the process execution console.
<?php
/**
 * This file is necessary to include to use all the in-built libraries of /opt/fmc_repository/Reference/Common
 */
require_once '/opt/fmc_repository/Process/Reference/Common/common.php';
/**
 * List all the parameters required by the task
 */
function list_args() { }
/**
 * End of the task do not modify after this point
 */
task_exit(ENDED, "workflow initialised");
?>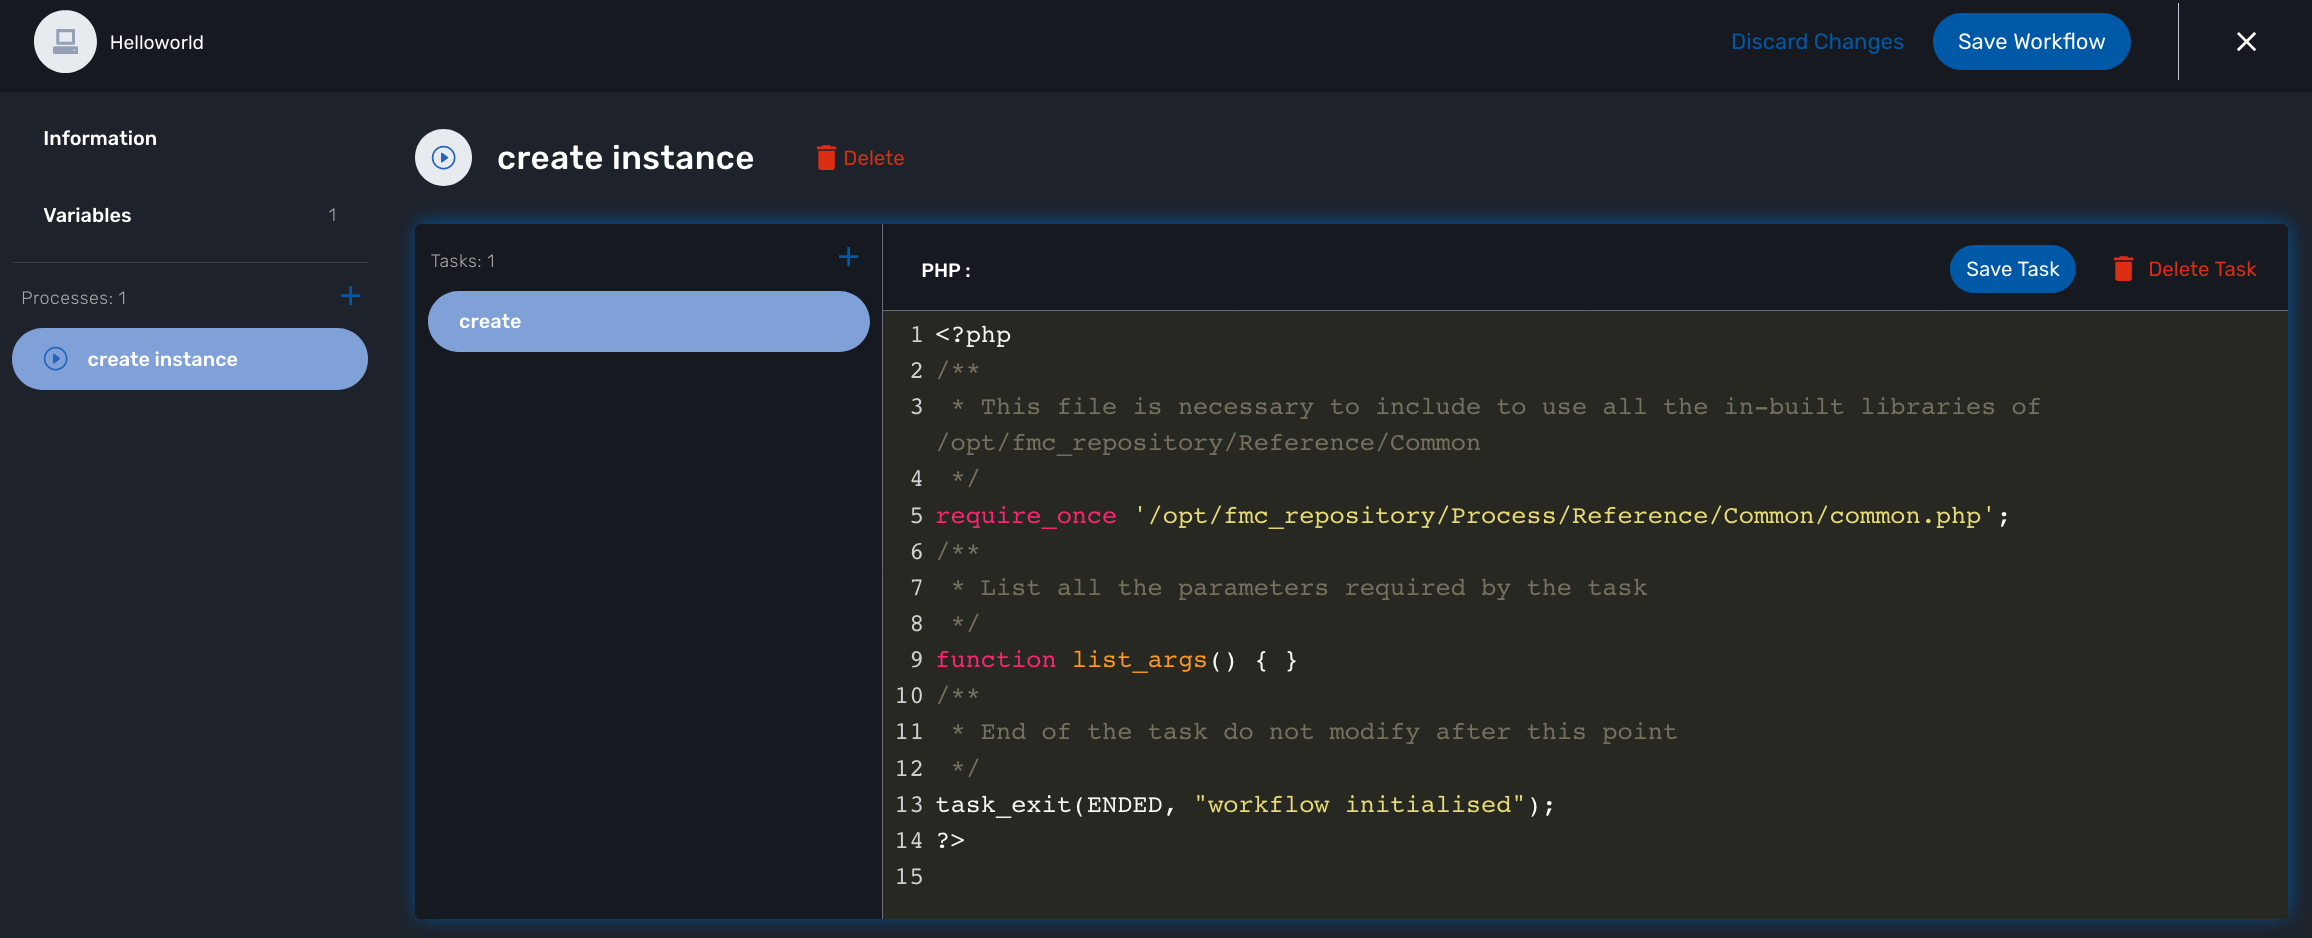
Once done, save the Workflow.
The "delete instance" Process
Follow the same steps as in the "create instance" process, but make sure that the type of the process is set to "DELETE", instead of "CREATE".
| In our case, we only need the instance to be deleted, therefore we don’t need a Task to be added to this Process but in a real world use case, your DELETE process will probably take care of removing or cleaning up some parts of your managed system. |
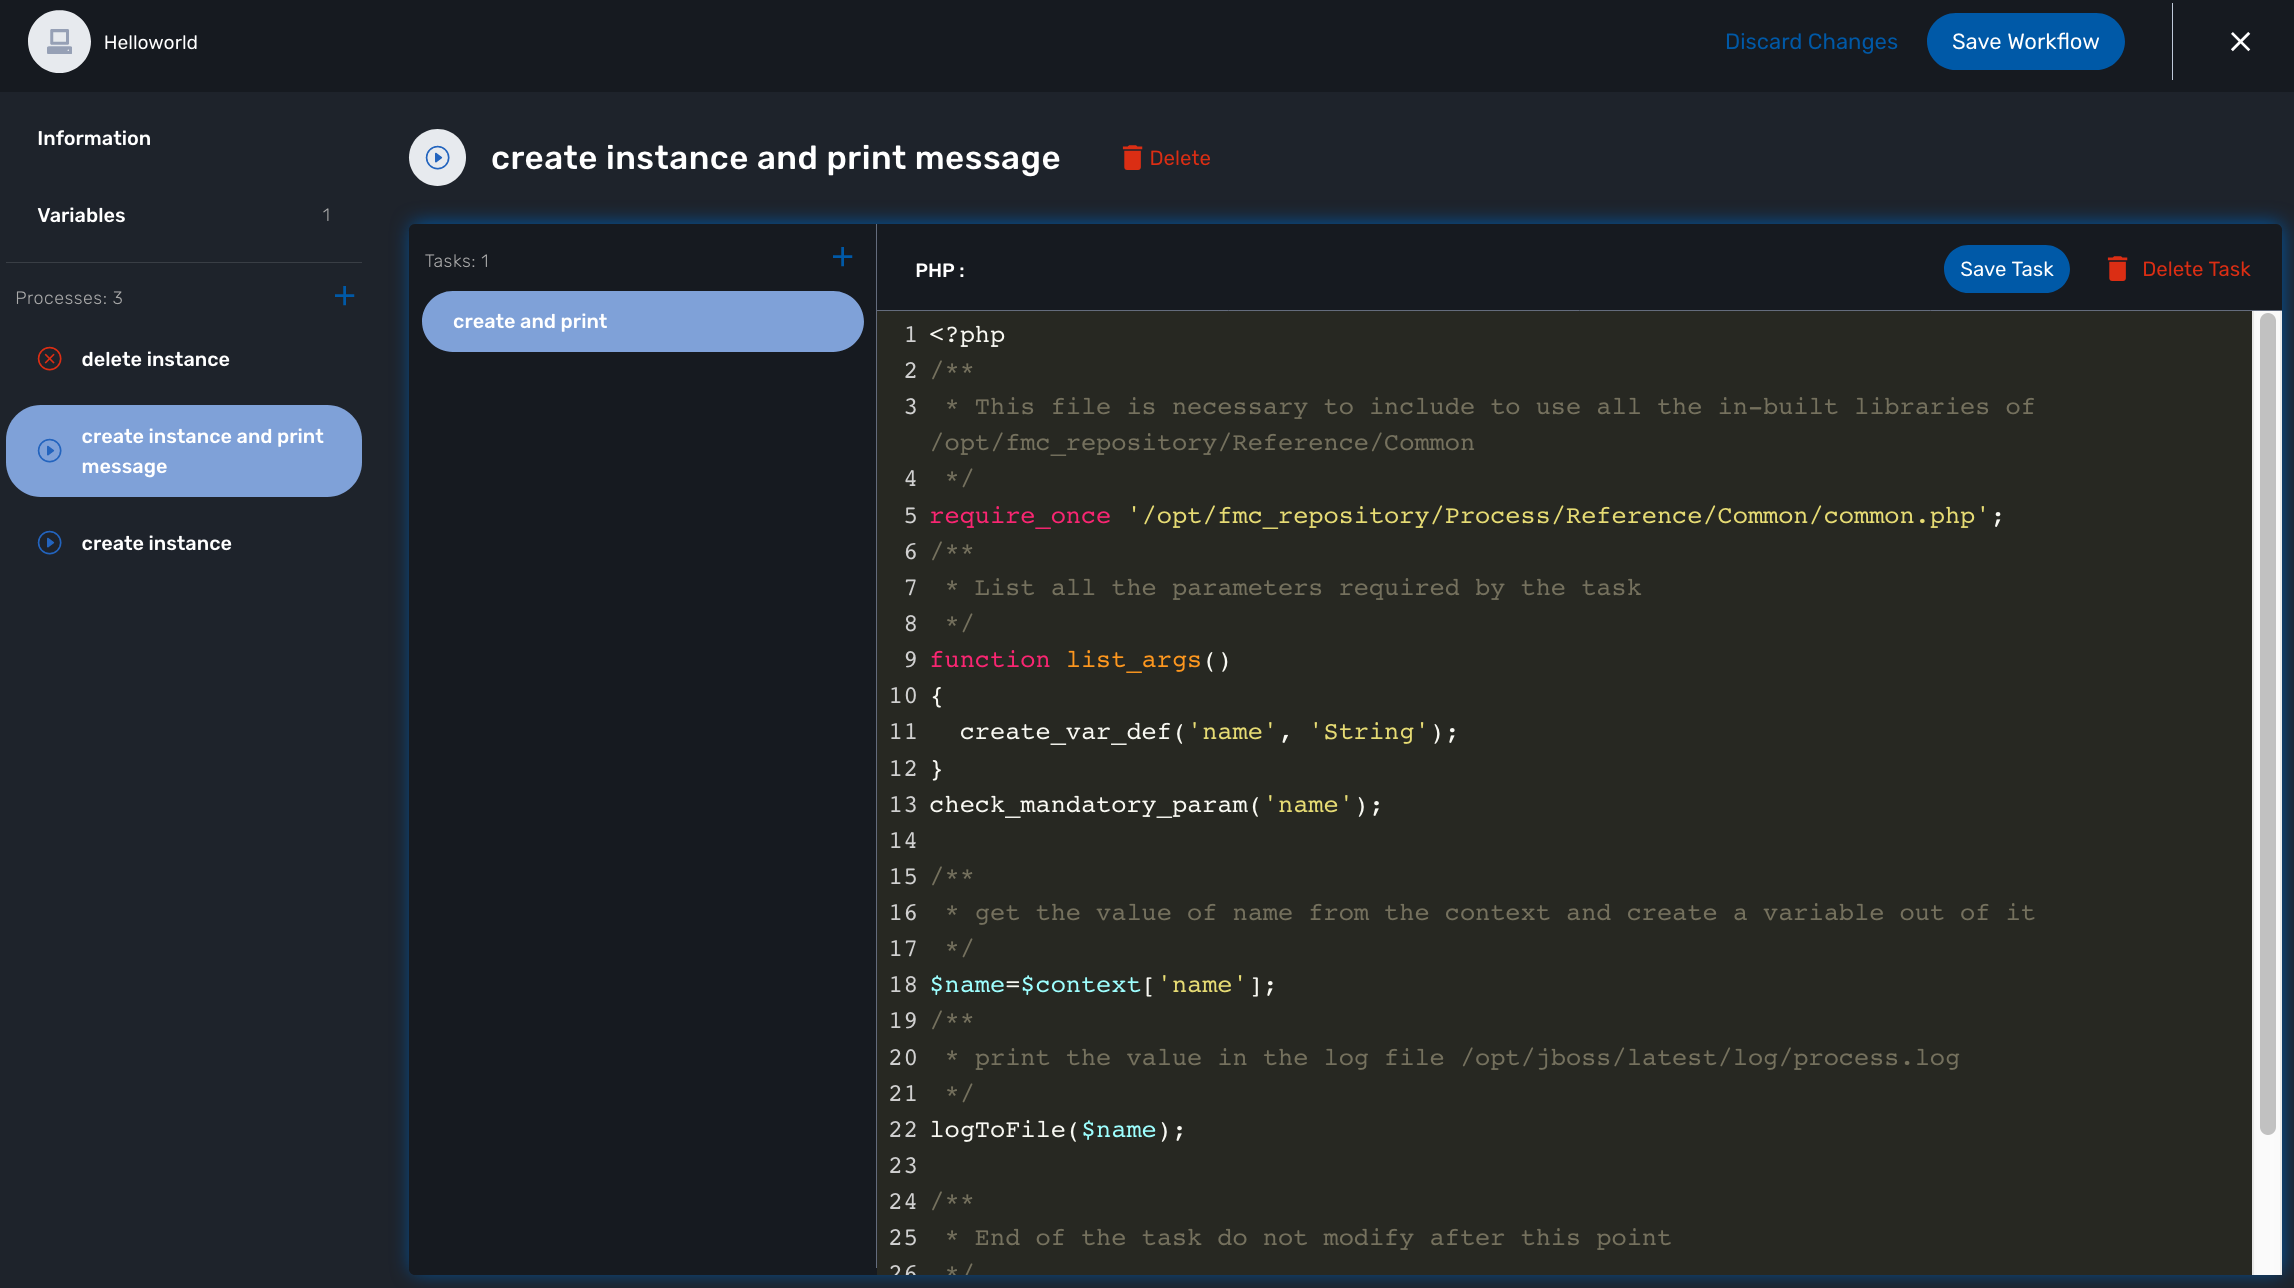
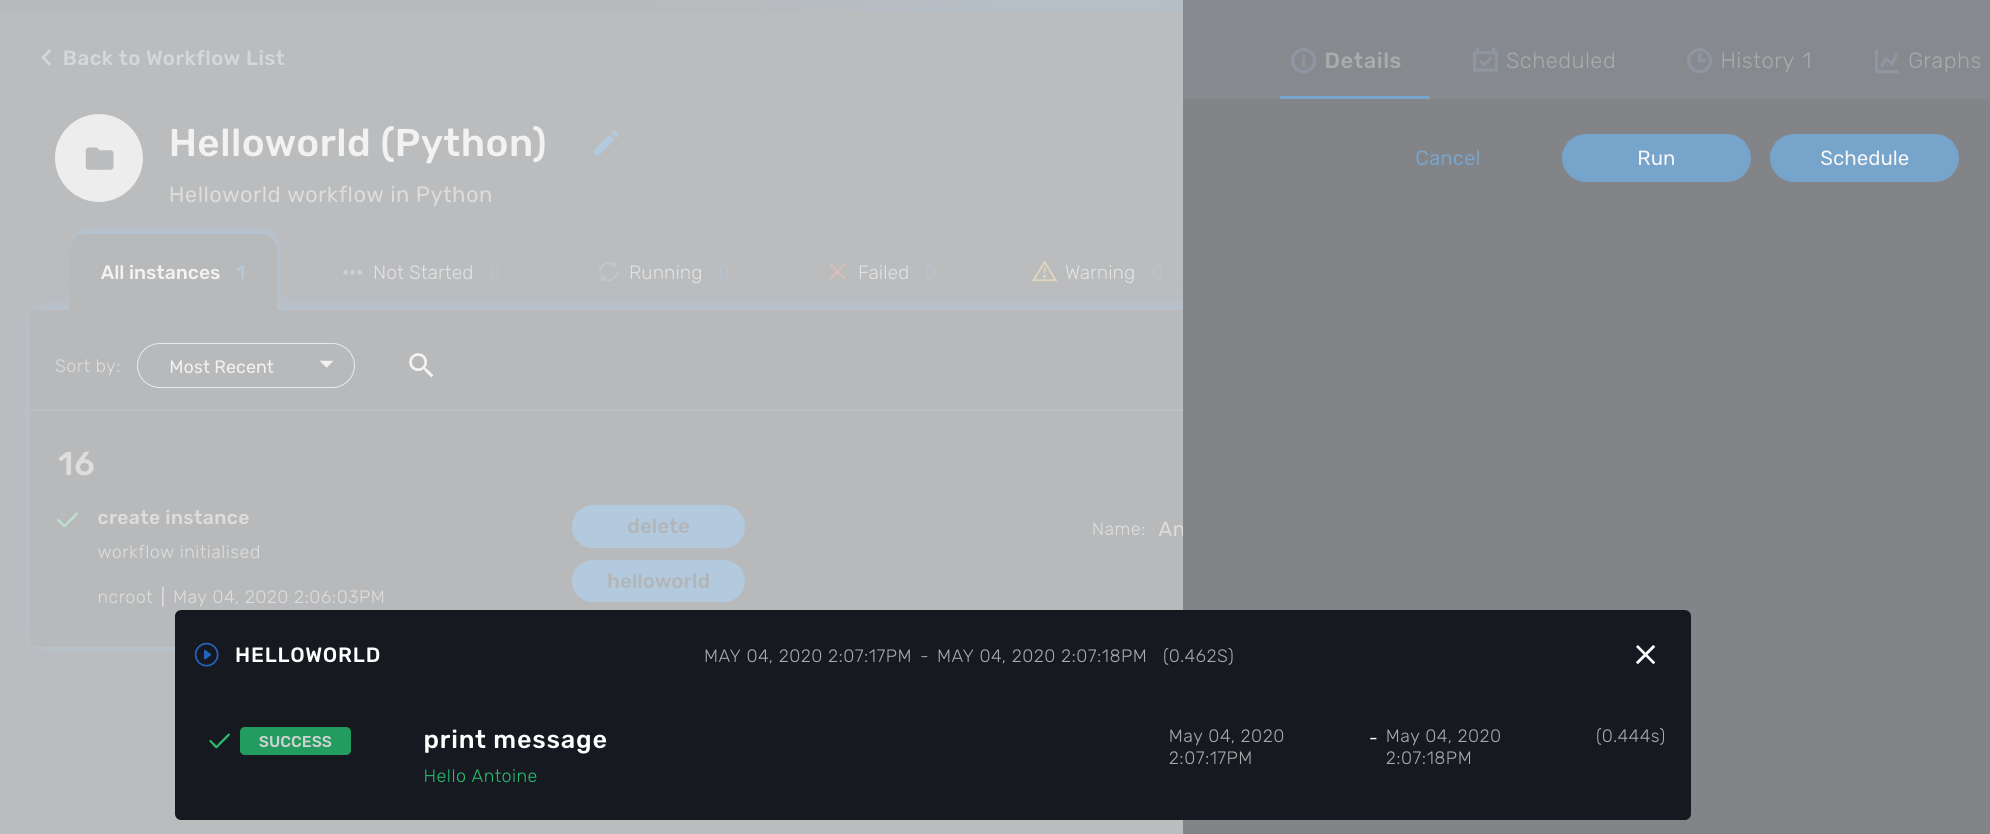
The "print message" Process
For the print process, use the process type "UPDATE". It will take one parameter that will be used to print your message. Use the code below to create a task that will read the name from the user form and print it in the live console.
<?php
/**
 * This file is necessary to include to use all the in-built libraries of /opt/fmc_repository/Reference/Common
 */
require_once '/opt/fmc_repository/Process/Reference/Common/common.php';
/**
 * List all the parameters required by the task
 */
function list_args()
{
  create_var_def('name', 'String');
}
check_mandatory_param('name');

/**
 * get the value of name from the context and create a variable out of it
 */
$name=$context['name'];
/**
 * print the value in the log file /opt/jboss/latest/log/process.log
 */
logToFile($name);

/**
 * End of the task do not modify after this point
 */
task_exit(ENDED, "Hello " . $name);

?>
Test the Workflow
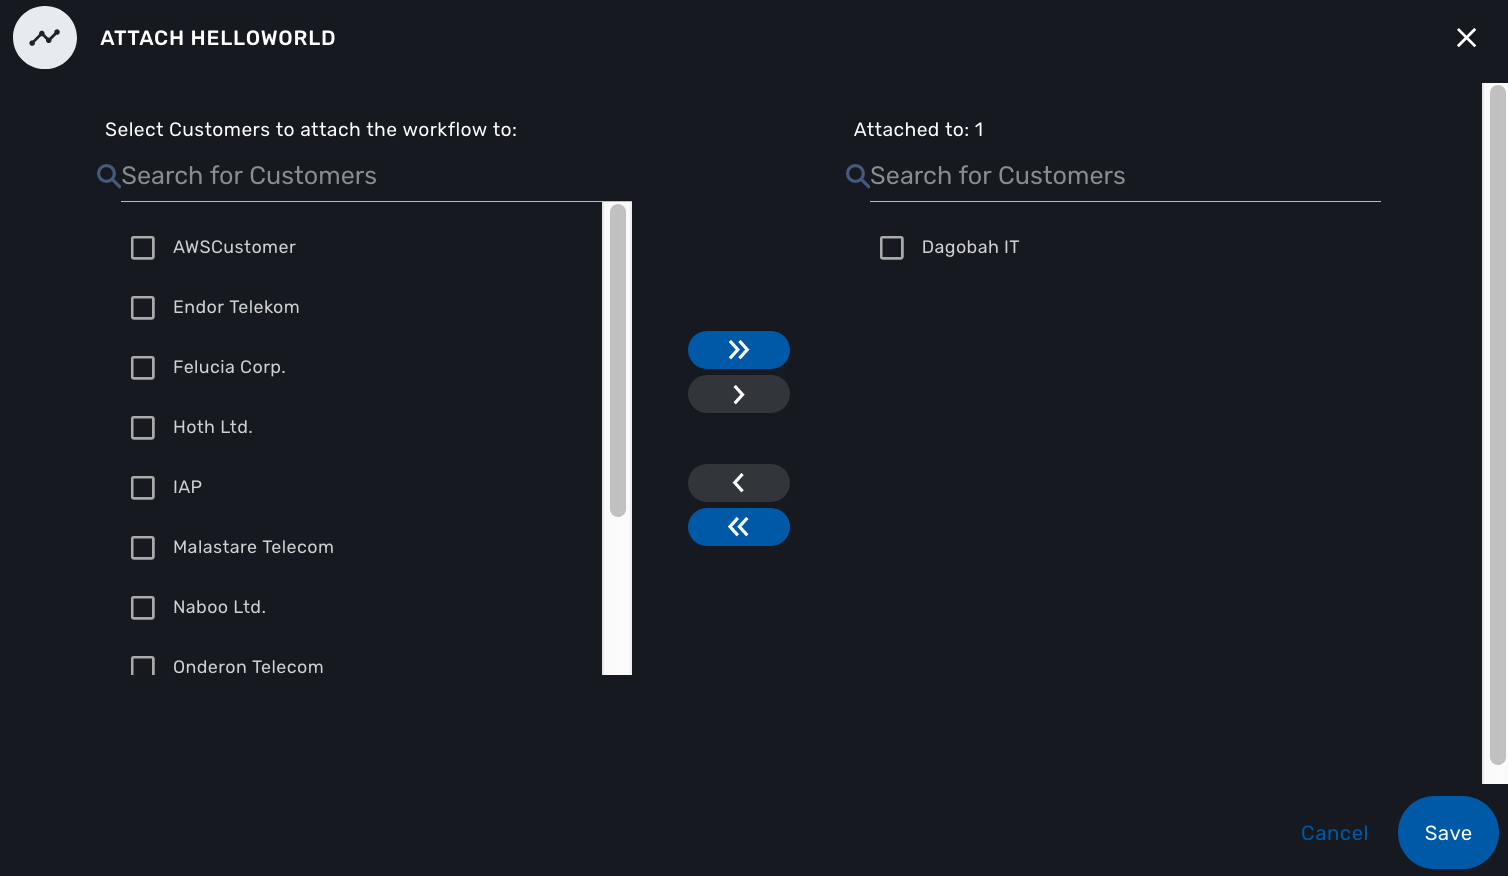
Before you can test the workflow and execute some processes, you need to attach the workflow to your current subtenant.
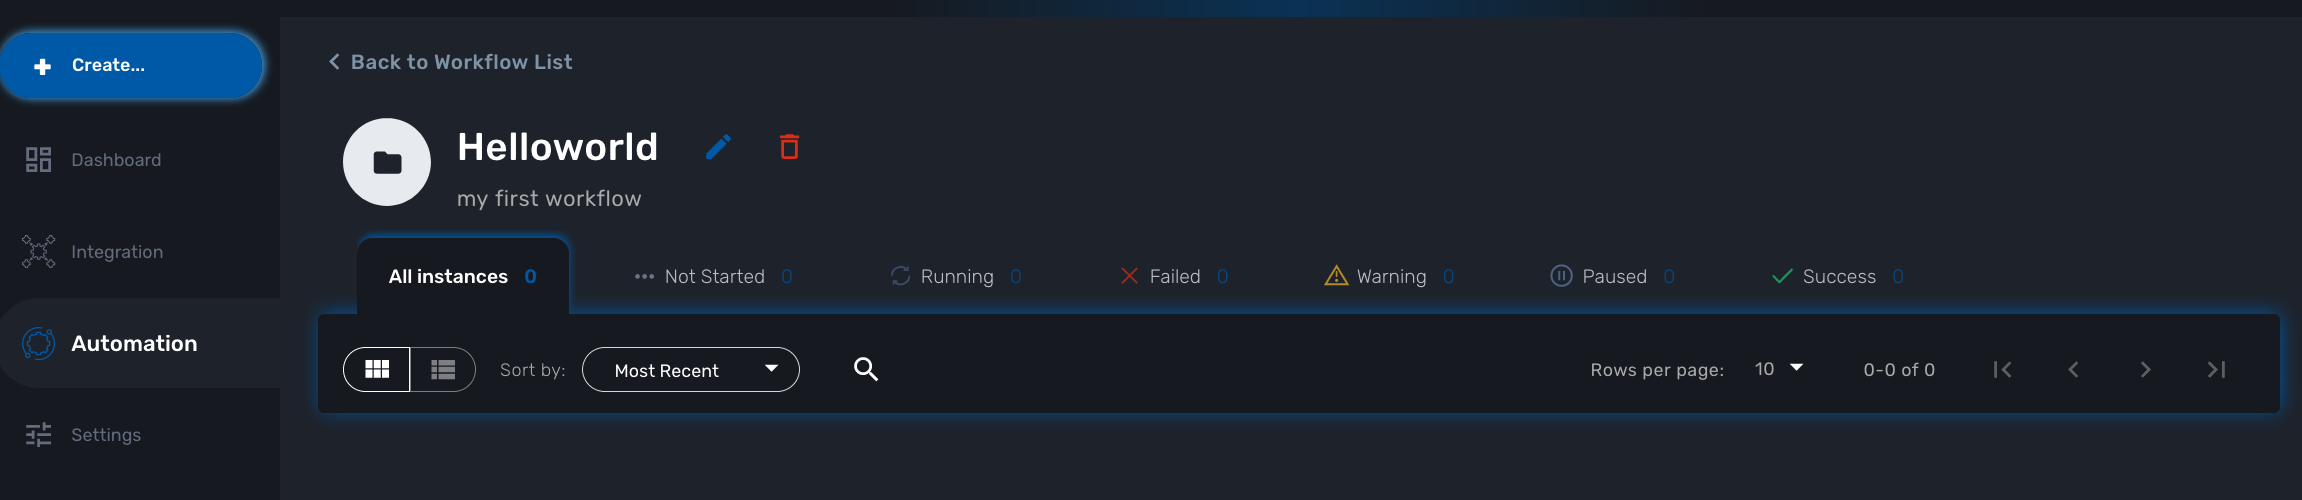
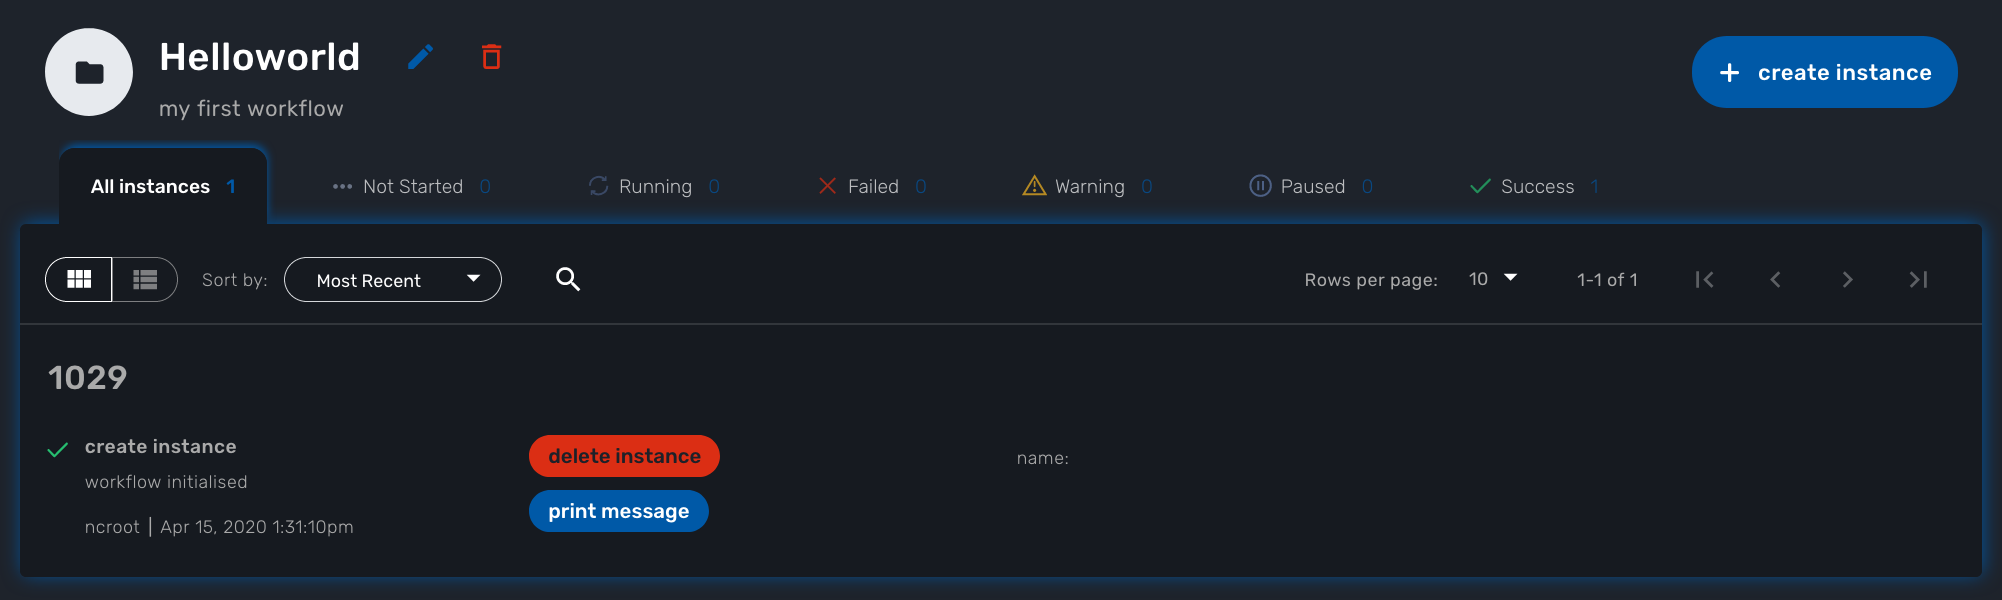
Use the "+ create instance" action to execute the "create instance" process and create a new instance of your workflow.
A new instance is available and you can execute the process "print message".
The process "print message" will start executing and will executes the tasks sequentially.
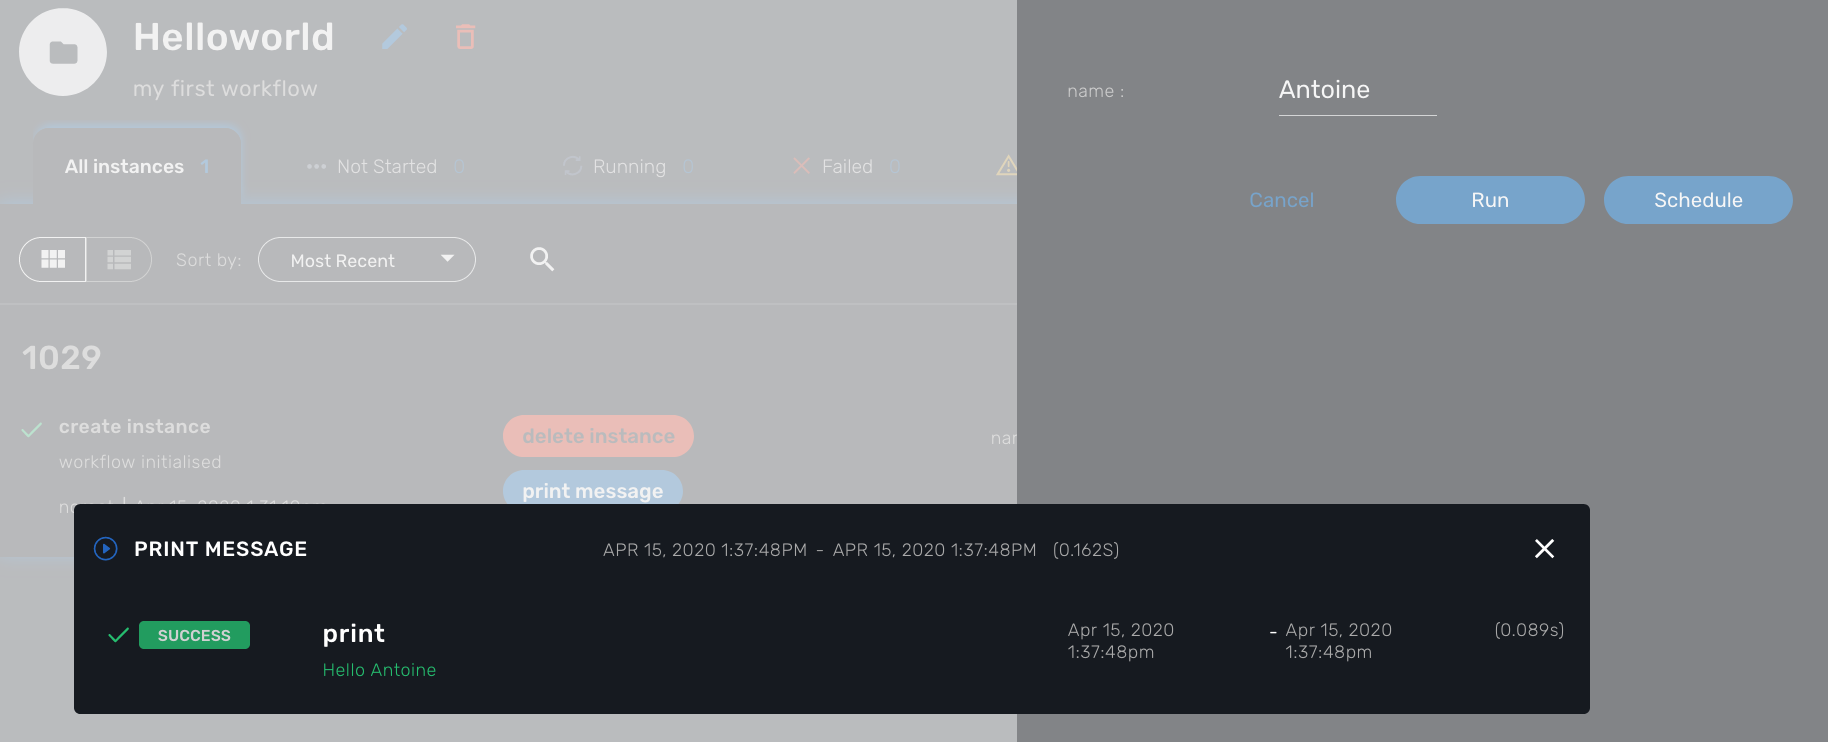
The name will be displayed in the task execution status popup, below the name of the task.
Getting Started Developing Workflows in Python
Overview
This tutorial walks you through the design and development of your first workflow in Python. This tutorial is similar to the Helloworld example in PHP
Workflows can be used to automate a wide variety of tasks and processes, such as:
-
Service configuration chaining
-
VNF lifecycle management
-
Configuration audit and verification
-
Automated customer on-boarding
-
…
The "Hello world" Workflow
As an example, we’ll use the "Helloworld" workflow. The "Helloworld" workflow will print a name as IN parameter and will display a message to the user ("Hello NAME").
This workflow is composed of 3 processes: one to create the new instance of the workflow, one to enter the name and print it, and one to delete the instance.
Create a New Workflow
From the Developer dashboard click on "+ Create"
In the tab "Information", set a name, a description and set the Workflow variable name to service_id and save your workflow.
Create a variable "Name" in the tab "Variable".
To start testing your workflow, you need to associate it to a customer. Make sure that you have no tenant selected, go to the "Automation" section, you should see your workflow in the list.
You can use the magnifier to search for it.
Use the link "Add to.." to associate the workflow to a customer.
Select the customer to use for designing and testing the workflow.
Once done, you can select your customer, list its workflows and edit it with the pencil icon.
Create the Processes
The "create instance" Process
In order to be used, every Workflow should be instantiated first. This is the role of the process with the type "Create".
| even though for most use cases, a single "CREATE" process is sufficient, it is possible to have several "CREATE" processes to support various ways of creating the Workflow instance (You can relate that to having several object constructor in an OOP language such as Java). |
For this tutorial you will create one process named "create instance" and add one task to this process. This task will simply display a message to the process execution console.
from msa_sdk.variables import Variables
from msa_sdk.msa_api import MSA_API

dev_var = Variables()
dev_var.add('name', var_type='String')

context = Variables.task_call(dev_var)

ret = MSA_API.process_content('ENDED', 'workflow initialized', context, True)
print(ret)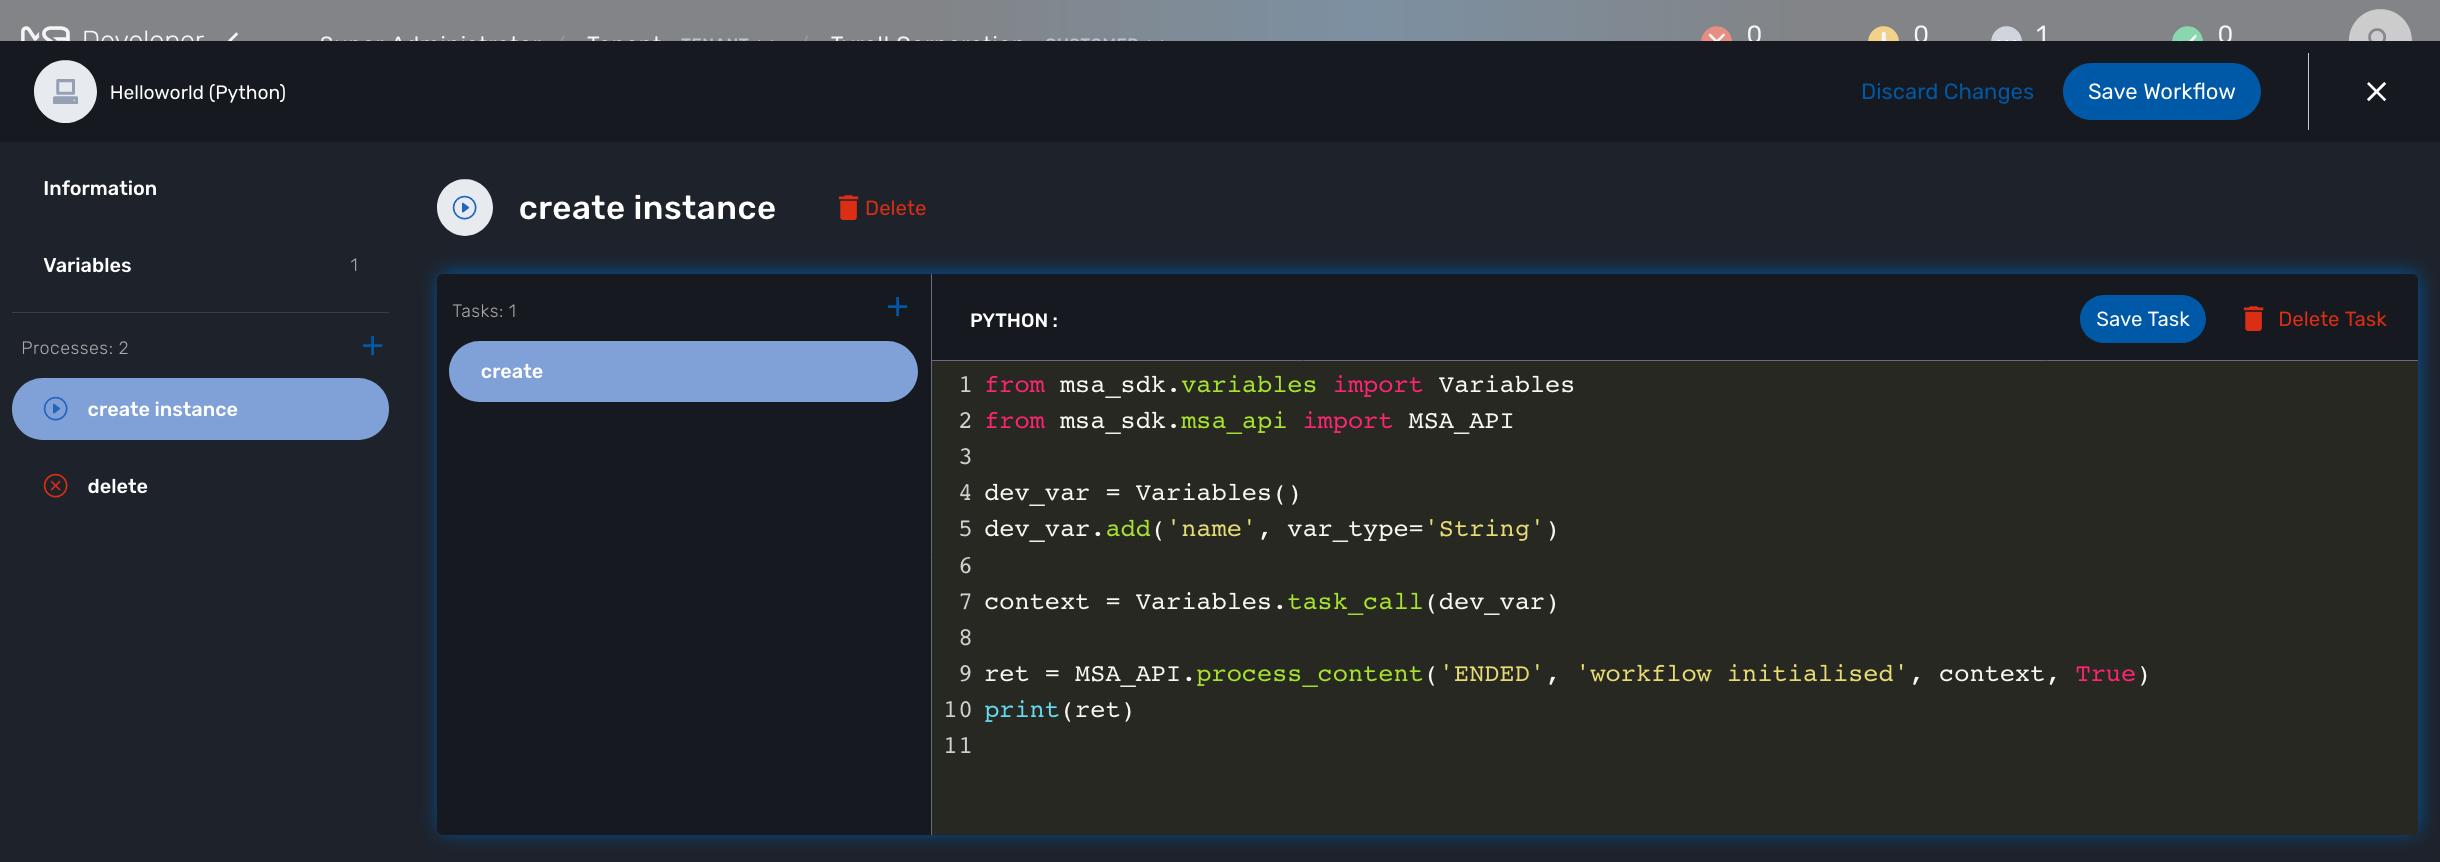
Once done, save the Workflow.
The "delete instance" Process
Follow the same steps as in the "create instance" process, but make sure that the type of the process is set to "DELETE", instead of "CREATE".
| In our case, we only need the instance to be deleted, therefore we don’t need a Task to be added to this Process but in a real world use case, your DELETE process will probably take care of removing or cleaning up some parts of your managed system. |
The "print message" Process
For the print process, use the process type "UPDATE". It will take one parameter that will be used to print your message. Use the code below to create a task that will read the name from the user form and print it in the live console.
from msa_sdk.variables import Variables
from msa_sdk.msa_api import MSA_API

context = Variables.task_call()
my_name = context['name']

ret = MSA_API.process_content('ENDED', f'Hello {my_name}', context, True)
print(ret)
Test the Workflow
Use the "+ create instance" action to execute the "create instance" process and create a new instance of your workflow.
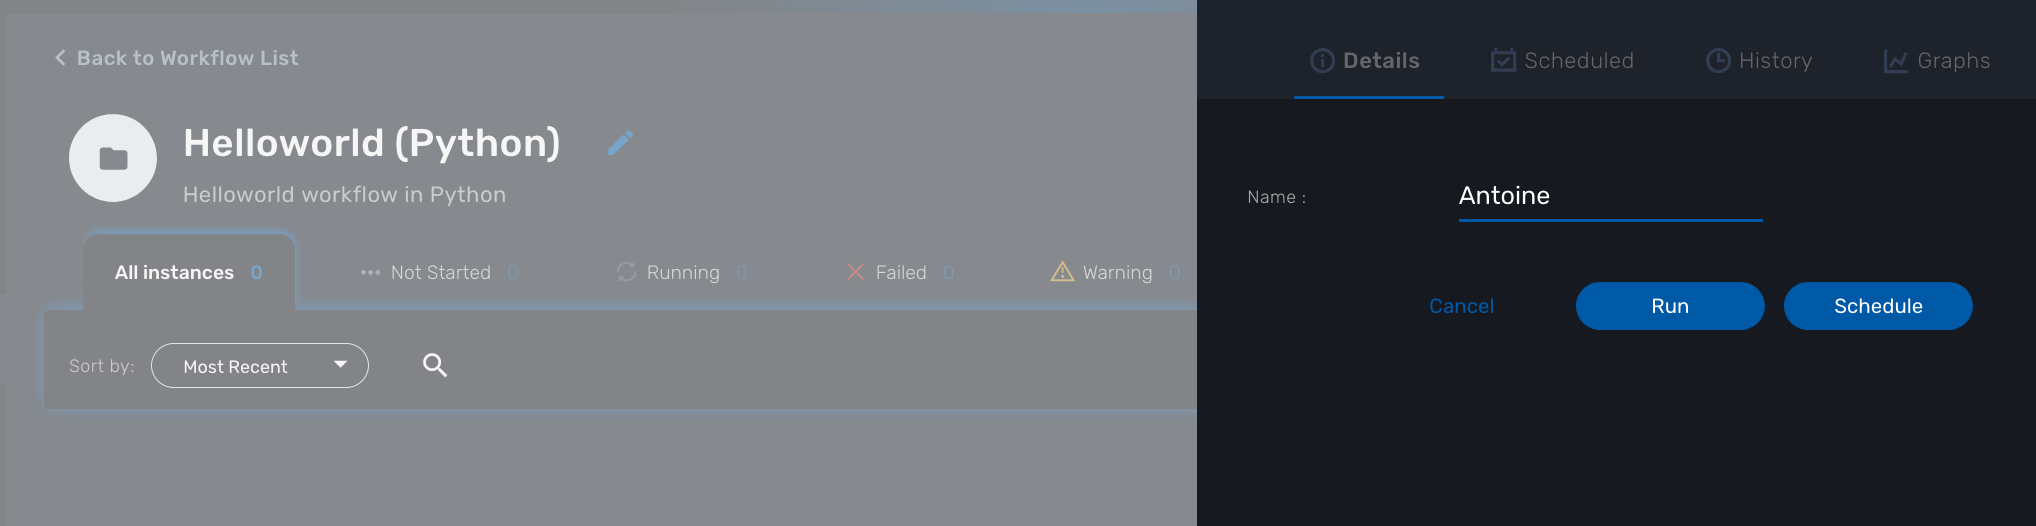
A new instance is available and you can execute the process "print message".
The process "print message" will start executing and will executes the tasks sequentially.
The name will be displayed in the task execution status popup, below the name of the task.
Python SDK
The MSactivator™ provides a support for Python SDK dedicated to developing automation workflows.
Overview
This SDK provides a set of functions to call the MSactivator™ REST API and automate action on the MSactivator™ such as create and activate managed entities, call microservice functions, call processes from other workflows…
The SDK API documentation is available online on your MSactivator™ instance at: https://localhost/msa_sdk
Contribution
The sources of the SDK is available on Github.
Code samples
Sample implementation of a SDK function.
This code sample is an example of the implementation of a Python SDK function to create a new managed entity.
class Device(MSA_API):

    self.api_path = "/device"

    def create(self):
        self.action = 'Create device'
        self.path = '{}/v2/{}'.format(self.api_path, self.customer_id)      (1)

        data = {"manufacturerId": self.manufacturer_id,
                "modelId": self.model_id,
                "managementAddress": self.management_address,
                "reporting": self.reporting,
                "useNat": self.use_nat,
                "logEnabled": self.log_enabled,
                "logMoreEnabled": self.log_more_enabled,
                "managementInterface": self.management_interface,
                "mailAlerting": self.mail_alerting,
                "passwordAdmin": self.password_admin,
                "externalReference": self.device_external,
                "login": self.login,
                "name": self.name,
                "password": self.password,
                "id": 0,
                "snmpCommunity": self.snmp_community}
        if self.management_port:
            data["managementPort"] = self.management_port

        self.call_post(data)                                                (2)
        self.fail = not self.response.ok
        if self.response.ok:
            self.device_id = json.loads(self.content)['id']

return json.loads(self.content)| 1 | the REST API to call |
| 2 | post the data to the REST API |
Sample call of a function in a workflow task.
from msa_sdk.device import Device
from msa_sdk.variables import Variables
import json

dev_var = Variables()                           (1)

dev_var.add('customer_id')
dev_var.add('managed_device_name')
dev_var.add('manufacturer_id')
dev_var.add('model_id')
dev_var.add('device_ip_address')
dev_var.add('login')
dev_var.add('password')
dev_var.add('password_admin')

context = Variables.task_call(dev_var)

new_device = Device(context['customer_id'], context['managed_device_name'], context['manufacturer_id'],context['model_id'], context['login'], context['password'], context['password_admin'],context['device_ip_address'])

new_device.create()                             (2)

context['device_id'] = new_device.device_id     (3)

print(new_device.process_content('ENDED', 'Task OK', context, False))| 1 | define the parameters to pass to the API |
| 2 | create the new managed entity |
| 3 | store the ID of the new managed entity in the workflow instance context |
Microservice functions
Call a microservice CREATE/UPDATE/DELETE function
from msa_sdk.variables import Variables
from msa_sdk.msa_api import MSA_API
from msa_sdk.order import Order
from msa_sdk.orchestration import Orchestration
from msa_sdk import util
import json

me_id = context['me'][3:]                                   (1)

micro_service_vars_array = {                                (2)
                            "object_id": "12.1.1.1",
                            "mask": "255.255.255.0",
                            "gateway": "10.10.1.254"
                           }
object_id = "null"
route = {"routing": {object_id: micro_service_vars_array}}  (3)
try:
  ms_order = Order(me_id)
  ms_order.command_execute('CREATE', route)                 (4)
except Exception as e:
  ret = MSA_API.process_content('FAILED', f'CREATE ERROR: {str(e)}', context, True)
print(ret)| 1 | Read the ID of the managed entity from the context, assuming the variable 'me' type is Device |
| 2 | Build the Microservice JSON params for the CREATE operation of the microservice. |
| 3 | The value of the key should match the Microservice file name (stripped of the .xml file extension) |
| 4 | Call the CREATE for simple_firewall MS for each device (use UPDATE or DELETE for the other operations) |
The function command_execute is defined in order.py
Call a microservice CREATE on multiple managed entities
from msa_sdk.variables import Variables
from msa_sdk.msa_api import MSA_API
from msa_sdk.order import Order
from msa_sdk import util

dev_var = Variables()
dev_var.add('object_id')
dev_var.add('service')
dev_var.add('src_ip')
dev_var.add('src_itf')
dev_var.add('dst_ip')
dev_var.add('dst_itf')
dev_var.add('firewalls.0.id')     (1)
dev_var = Variables()

context = Variables.task_call(dev_var)

object_id = context['object_id']

micro_service_vars_array = {"object_id": context['object_id'],
                        	"src_ip": context['src_ip'],
                        	"src_mask": '255.255.255.255',
                        	"dst_ip": context['dst_ip'],
                        	"dst_mask": '255.255.255.255',
                        	"src_itf": context['src_itf'],
                        	"dst_itf": context['dst_itf'],
                        	"action": 'deny',
                        	"service": context['service']
                        	}

simple_firewall = {"simple_firewall": {object_id: micro_service_vars_array}}

firewalls = context['firewalls']
for firewall in firewalls:
  devicelongid = firewall['id'][-3:]
  try:
    order = Order(devicelongid)
    order.command_execute('CREATE', simple_firewall)
  except Exception as e:
    ret = MSA_API.process_content('FAILED', f'CREATE ERROR: {str(e)}', context, True)
    print(ret)

ret = MSA_API.process_content('ENDED',
                          	f'IPTABLES RULE INITIALIZED',
                          	context, True)

print(ret)| 1 | use a variable array typed as a Managed Entity |
Call a microservice IMPORT function
from msa_sdk.variables import Variables
from msa_sdk.msa_api import MSA_API
from msa_sdk.order import Order
from msa_sdk.orchestration import Orchestration
from msa_sdk import util
import json

try:
  order = Order(me_id)                                      (1)
  order.command_execute('IMPORT', {"routing":"0"})          (2)
  order.command_objects_instances("routing")                (3)
  ms_instances = json.loads(order.content)                  (4)

except Exception as e:
  ret = MSA_API.process_content('FAILED', f'IMPORT ERROR: {str(e)}', context, True)
print(ret)| 1 | initialize an Order object |
| 2 | execute the IMPORT of a microservice defined in a file routing.xml |
| 3 | get the microservice instances |
| 4 | store the instance in a variable to further reuse |
How to create you libraries of functions
When developing a workflow you will probably have de define some functions that will be used in multiple tasks.
In order to avoid code duplication and ease the maintenance of your workflow one option is to create a common folder at the same level as your other task folder and create a python file common.py where the shared functions will be defined.
my_workflow
  |- my_workflow.xml
  |- common
    |- common.py
  |- process_1
    |- task1.py
common.py will contain the python code and can also import the Python SDK as well as other Python modules
from msa_sdk.variables import Variables
from msa_sdk.msa_api import MSA_API
from msa_sdk import util
from msa_sdk.order import Order
from datetime import datetime
import time
import json
import typing
import copy
import requests
import ipaddress
import re
import pandas as Pandas

dev_var = Variables()
context = Variables.task_call(dev_var)

# Function: to convert
def printTable(myDict):             (1)
  df = Pandas.DataFrame.from_records(myDict)
return df.to_string()| 1 | a function that can be used in a task |
In the task implementation you need to add the following lines to import this common library
import os
import os.path
import sys
from pathlib import Path
from msa_sdk.variables import Variables
from msa_sdk.msa_api import MSA_API
currentdir = os.path.dirname(os.path.realpath(__file__))      (1)
parentdir = os.path.dirname(currentdir)
sys.path.append(parentdir)
from common.common import *

dev_var = Variables()
context = Variables.task_call(dev_var)

if data:
  result = printTable(data)                                   (2)
  context['result'] = result

ret = MSA_API.process_content('ENDED', 'DONE', context, True)

print(ret)| 1 | include the path of common in the modules |
| 2 | call the method defined in the common library |
How to extend the SDK
Create a custom library of scripts
You can extend the SDK by adding your own scripts in the MSactivator™. The scripts have to be added in the container msa_dev, under the directory /opt/fmc_repository/Process/PythonReference/custom
In a workflow task, you can use the code below to import your custom scripts
import custom.myfileor
from custom.myfile import SOME_METHOD
You can create a git repository under /opt/fmc_repository/Process/PythonReference/custom with git init and set a remote to a remote repository to ease the management and versioning of your custom SDK library
|
Install additional Python modules
To install an additional Python package you need to log into the msa_dev container and execute
python3 -m pip install \
--install-option="--install-lib=/opt/fmc_repository/Process/PythonReference" PACKAGE (1)| 1 | PACKAGE is the name of the Python package to install |
To list the packages that are installed
python3 -m pip listMiscellaneous
Output messages to the process execution UI
When a task runs, it is often useful to be able to provide real time message update on the UI.
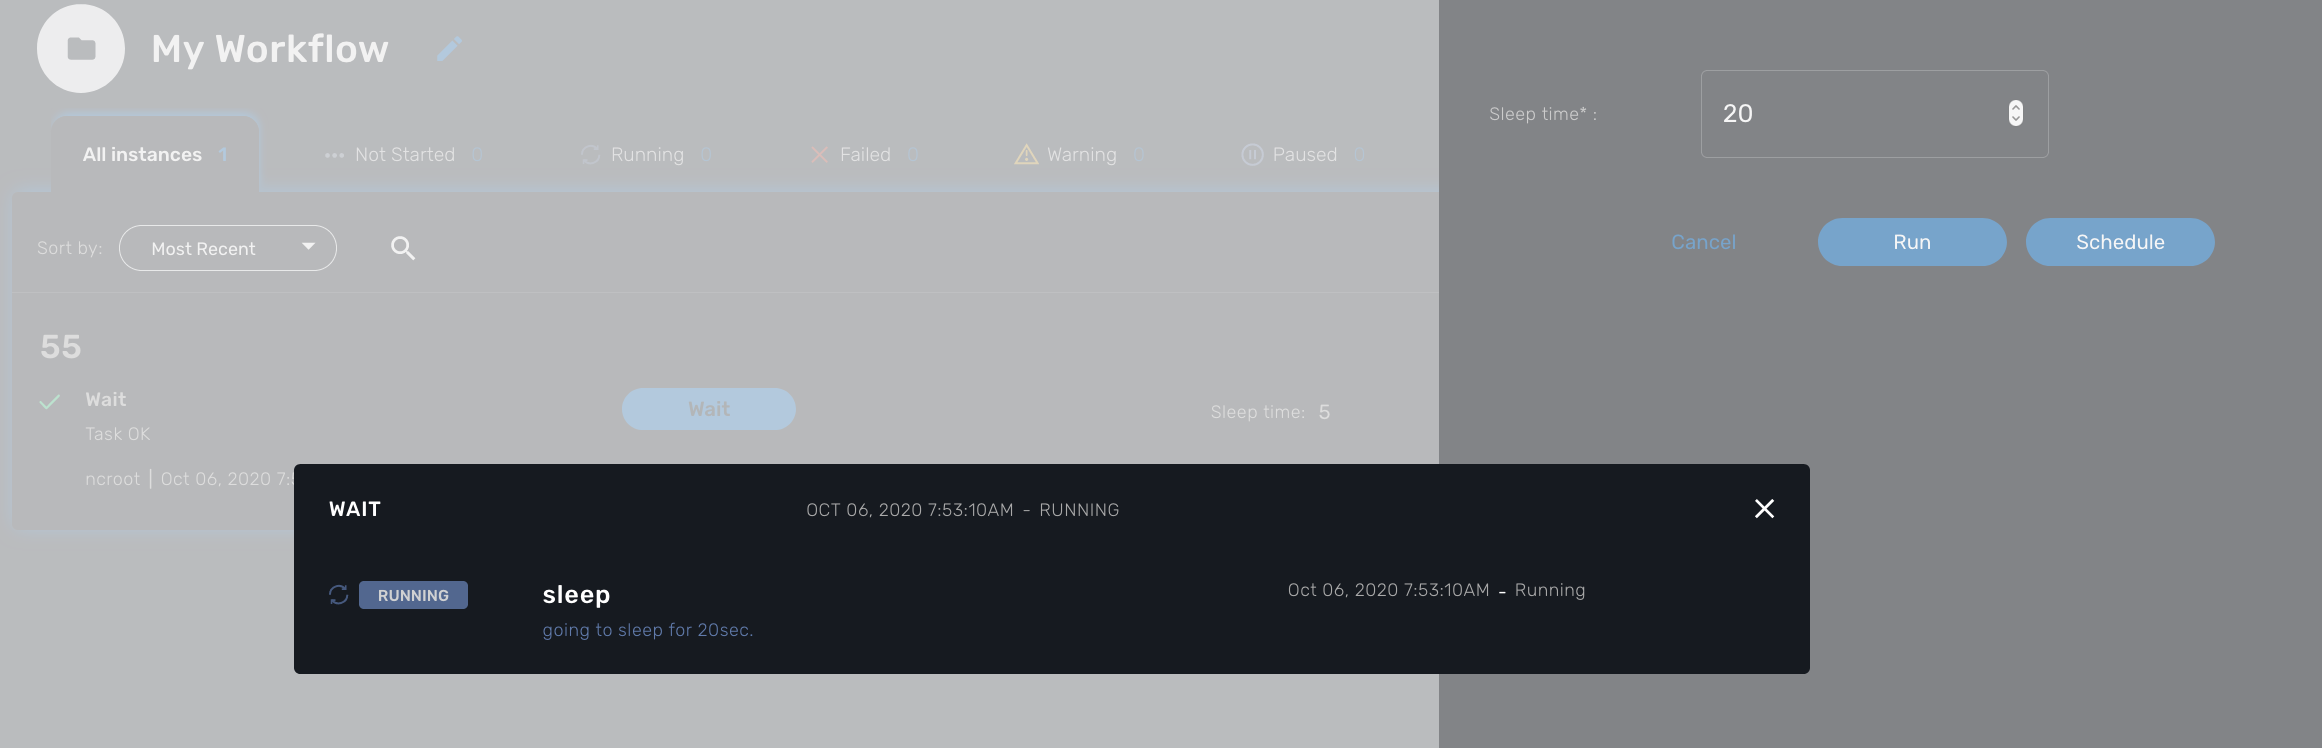
The code sample below shows how to do it.
from msa_sdk.orchestration import Orchestration
from msa_sdk.msa_api import MSA_API
import time

Orchestration = Orchestration(context['UBIQUBEID'])
async_update_list = (context['PROCESSINSTANCEID'],
                    context['TASKID'],
                    context['EXECNUMBER'])                                  (1)


Orchestration.update_asynchronous_task_details(*async_update_list,
                                               'going to sleep')            (2)
time.sleep(2)                                                               (3)
Orchestration.update_asynchronous_task_details(*async_update_list,
'wake up') (4)| 1 | creates an array with the information about current process and task |
| 2 | update the UI with a message |
| 3 | execute some code |
| 4 | update the UI with another message |
Write debug message in the process log file
To write debugging messages in the process execution log file (msa-api container, under /opt/wildfly/logs ) you can use the function log_to_process_file
from msa_sdk import util

dev_var = Variables()
context = Variables.task_call(dev_var)

process_id = context['SERVICEINSTANCEID']     (1)

util.log_to_process_file(process_id, 'a debug message')| 1 | read the current process ID from the context |
PHP SDK
The MSactivator™ provides a support for PHP SDK dedicated to developing automation workflows.
Overview
This SDK provides a set of functions that can be used to call the MSactivator™ REST API and automate actions on the MSactivator™ such as create and activate managed entities, call microservice function, call processes from other workflows…
Where to find the source code of the SDK?
The SDK functions are implemented in a set of PHP files stored in the MSactivator™ container msa_dev under /opt/fmc_repository/Process/Reference/Common/Library
The PHP files are organised by API topic and contains the functions that are calling the REST API.
These functions can be called directly when implementing the tasks of the workflow processes.
Code samples
Sample implementation of a SDK PHP function
The source code below shows the implementation of one of the functions provided by the SDK.
/**
 * Create Subtenant                                                                            (1)
 * curl -u ncroot:ubiqube  -H "Content-Type: application/json" \
 *   -XPOST 'http://ip_address/ubi-api-rest/customer/{prefix}?name={name}&reference={reference}' -d '
    {
        "name": "contactName",
        "firstName": "contactFirstName",
        "address": {
            "streetName1": "sn1",
            "streetName2": "sn2",
            "streetName3": "sn3",
            "city": "city123",
            "zipCode": "zip123",
            "country": "Country098",
            "fax": "1233",
            "email": "contact @ company.com",
            "phone": "123"
        }

    }
 */
function _customer_create ($operator_prefix,
                            $customer_name,
                            $external_reference = "",
                            $contact_details = "{}") {                                            (2)

	$msa_rest_api = "customer/{$operator_prefix}?name={$customer_name}&reference={$external_reference}";
	$curl_cmd = create_msa_operation_request(OP_POST, $msa_rest_api, $contact_details);           (3)
	$response = perform_curl_operation($curl_cmd, "CREATE CUSTOMER");                             (4)
	$response = json_decode($response, true);
	if ($response['wo_status'] !== ENDED) {                                                       (5)
		$response = json_encode($response);
		return $response;
	}
	$response = prepare_json_response(ENDED, ENDED_SUCCESSFULLY, $response['wo_newparams']['response_body']);
	return $response;
}| 1 | A description of the function and an sample call of the matching REST API |
| 2 | The function of the SDK always starts with _ |
| 3 | Call a SDK helper function to build the curl request |
| 4 | Call a SDK helper function to execute the curl request |
| 5 | Call a SDK helper function (defined in utility.php) to format a response with proper status, comment and response payload |
Sample call of a SDK function in a workflow task.
// Create subtenant
logToFile("Creating subtenant:\n");

$customer_contact_details_array = array();  	                                              (1)
$customer_contact_details_array['firstName'] = $customer_contact_first_name;
$customer_contact_details_array['name'] = $customer_contact_name;
if (isset($context['email_recipient']) && $context['email_recipient']){
  $address = array('email' => $context['email_recipient']);
  $customer_contact_details_array['address'] = $address;
}

$customer_contact_details_json = json_encode($customer_contact_details_array);  	          (2)

// Call function to create customer
$response = _customer_create ($operator_prefix, $customer_name, $customer_ext_reference,
                                $customer_contact_details_json);  	                          (3)

$response = json_decode($response, true); 	                                                  (4)
if ($response['wo_status'] !== ENDED) {		                                                  (5)
    $response = json_encode($response);
    echo $response;
    exit;
}
logToFile(debug_dump($response['wo_newparams'], "RESPONSE\n")); (6)| 1 | Build the array with the customer contact details. This parameter is defaulted by an empty array |
| 2 | Encode the array into it’s json representation |
| 3 | Call the SDK function |
| 4 | Get the JSON response as an array |
| 5 | If the call to the function failed, echo the response and exit the task |
| 6 | If the call was successful continue the task execution |
Output messages to the process execution UI
When a task runs, it is often useful to be able to provide real time message update on the UI.
The code sample below shows how to do it.
$PROCESSINSTANCEID = $context['PROCESSINSTANCEID'];
$EXECNUMBER = $context['EXECNUMBER'];
$TASKID = $context['TASKID'];
$process_params = array('PROCESSINSTANCEID' => $PROCESSINSTANCEID,                      (1)
						'EXECNUMBER' => $EXECNUMBER,
						'TASKID' => $TASKID);

update_asynchronous_task_details($process_params,
                                "going to sleep for ".$context['sleep']. "sec.");        (2)
sleep($context['sleep']);                                                                (3)
update_asynchronous_task_details($process_params, "wakeup"); (4)| 1 | creates an array with the information about current process and task |
| 2 | update the UI with a message |
| 3 | execute some code |
| 4 | update the UI with another message |
Microservice functions
Call a microservice CREATE/UPDATE/DELETE function
$micro_service_vars_array = array ();                           (1)
$micro_service_vars_array ['object_id'] = $context ['id'];      (2)

$micro_service_vars_array ['src_ip'] = $context ['src_ip'];
$micro_service_vars_array ['src_mask'] = $context ['src_mask'];

$micro_service_vars_array ['dst_ip'] = $context ['dst_ip'];
$micro_service_vars_array ['dst_mask'] = $context ['dst_mask'];

$micro_service_vars_array ['service'] = $context ['service'];
$micro_service_vars_array ['action'] = $context ['action'];

$object_id = $context ['id'];

$simple_firewall = array (
		'simple_firewall' => array (                            (3)
				$object_id => $micro_service_vars_array
		)
);

$response = execute_command_and_verify_response ( $managed_entity_id, CMD_CREATE, $simple_firewall, "CREATE simple_firewall" ); (4)| 1 | Build the Microservice JSON params for the CREATE operation of the microservice. |
| 2 | Assign the values passed to the workflow process to the array of parameters of the Microservice. |
| 3 | The value of the key should match the Microservice file name (stripped of the .xml file extension) |
| 4 | Call the CREATE for simple_firewall MS for each device (use CMD_UPDATE or CMD_DELETE for the other operations) |
The function execute_command_and_verify_response is defined in msa_common.php
Synchronize the managed entity configuration
The code sample below uses a PHP function from the SDK to trigger this operation by calling the IMPORT function of a microservice
$response = synchronize_objects_and_verify_response($managed_entity_id); (1)| 1 | The variable $managed_entity_id is the database ID of the managed entity |
Useful functions
Here is a list of some of the most commonly used functions.
Managed entities
function _device_create ($customer_id, $device_name, $manufacturer_id,
						$model_id, $login, $password, $password_admin,
						$management_address, $device_external_reference = "",
						$log_enabled = "true", $log_more_enabled = "true",
$mail_alerting = "true", $reporting = "false", $snmp_community = SNMP_COMMUNITY_DEFAULT, $managementInterface = "")location: device_rest.php
| if you need to set the hostname or update the credentials you can use some dedicated functions from device_rest.php |
function _device_do_initial_provisioning_by_id ($device_id)location: device_rest.php
function _device_delete ($device_id) {location: device_rest.php
Tenant and Subtenant
function _operator_create ($operator_prefix, $name)location: operator_rest.php
function _customer_create ($operator_prefix, $customer_name, $external_reference = "", $contact_details = "{}")location: customer_rest.php
Microservice Editor
The microservice editor is a web based UI tool for designing, developing, testing and releasing microservices.
Microservice editor
Overview
From the developer portal, click on "Create Microservice" to create the microservice.
The microservice console is composed of a vertical menu on the left and a main screen
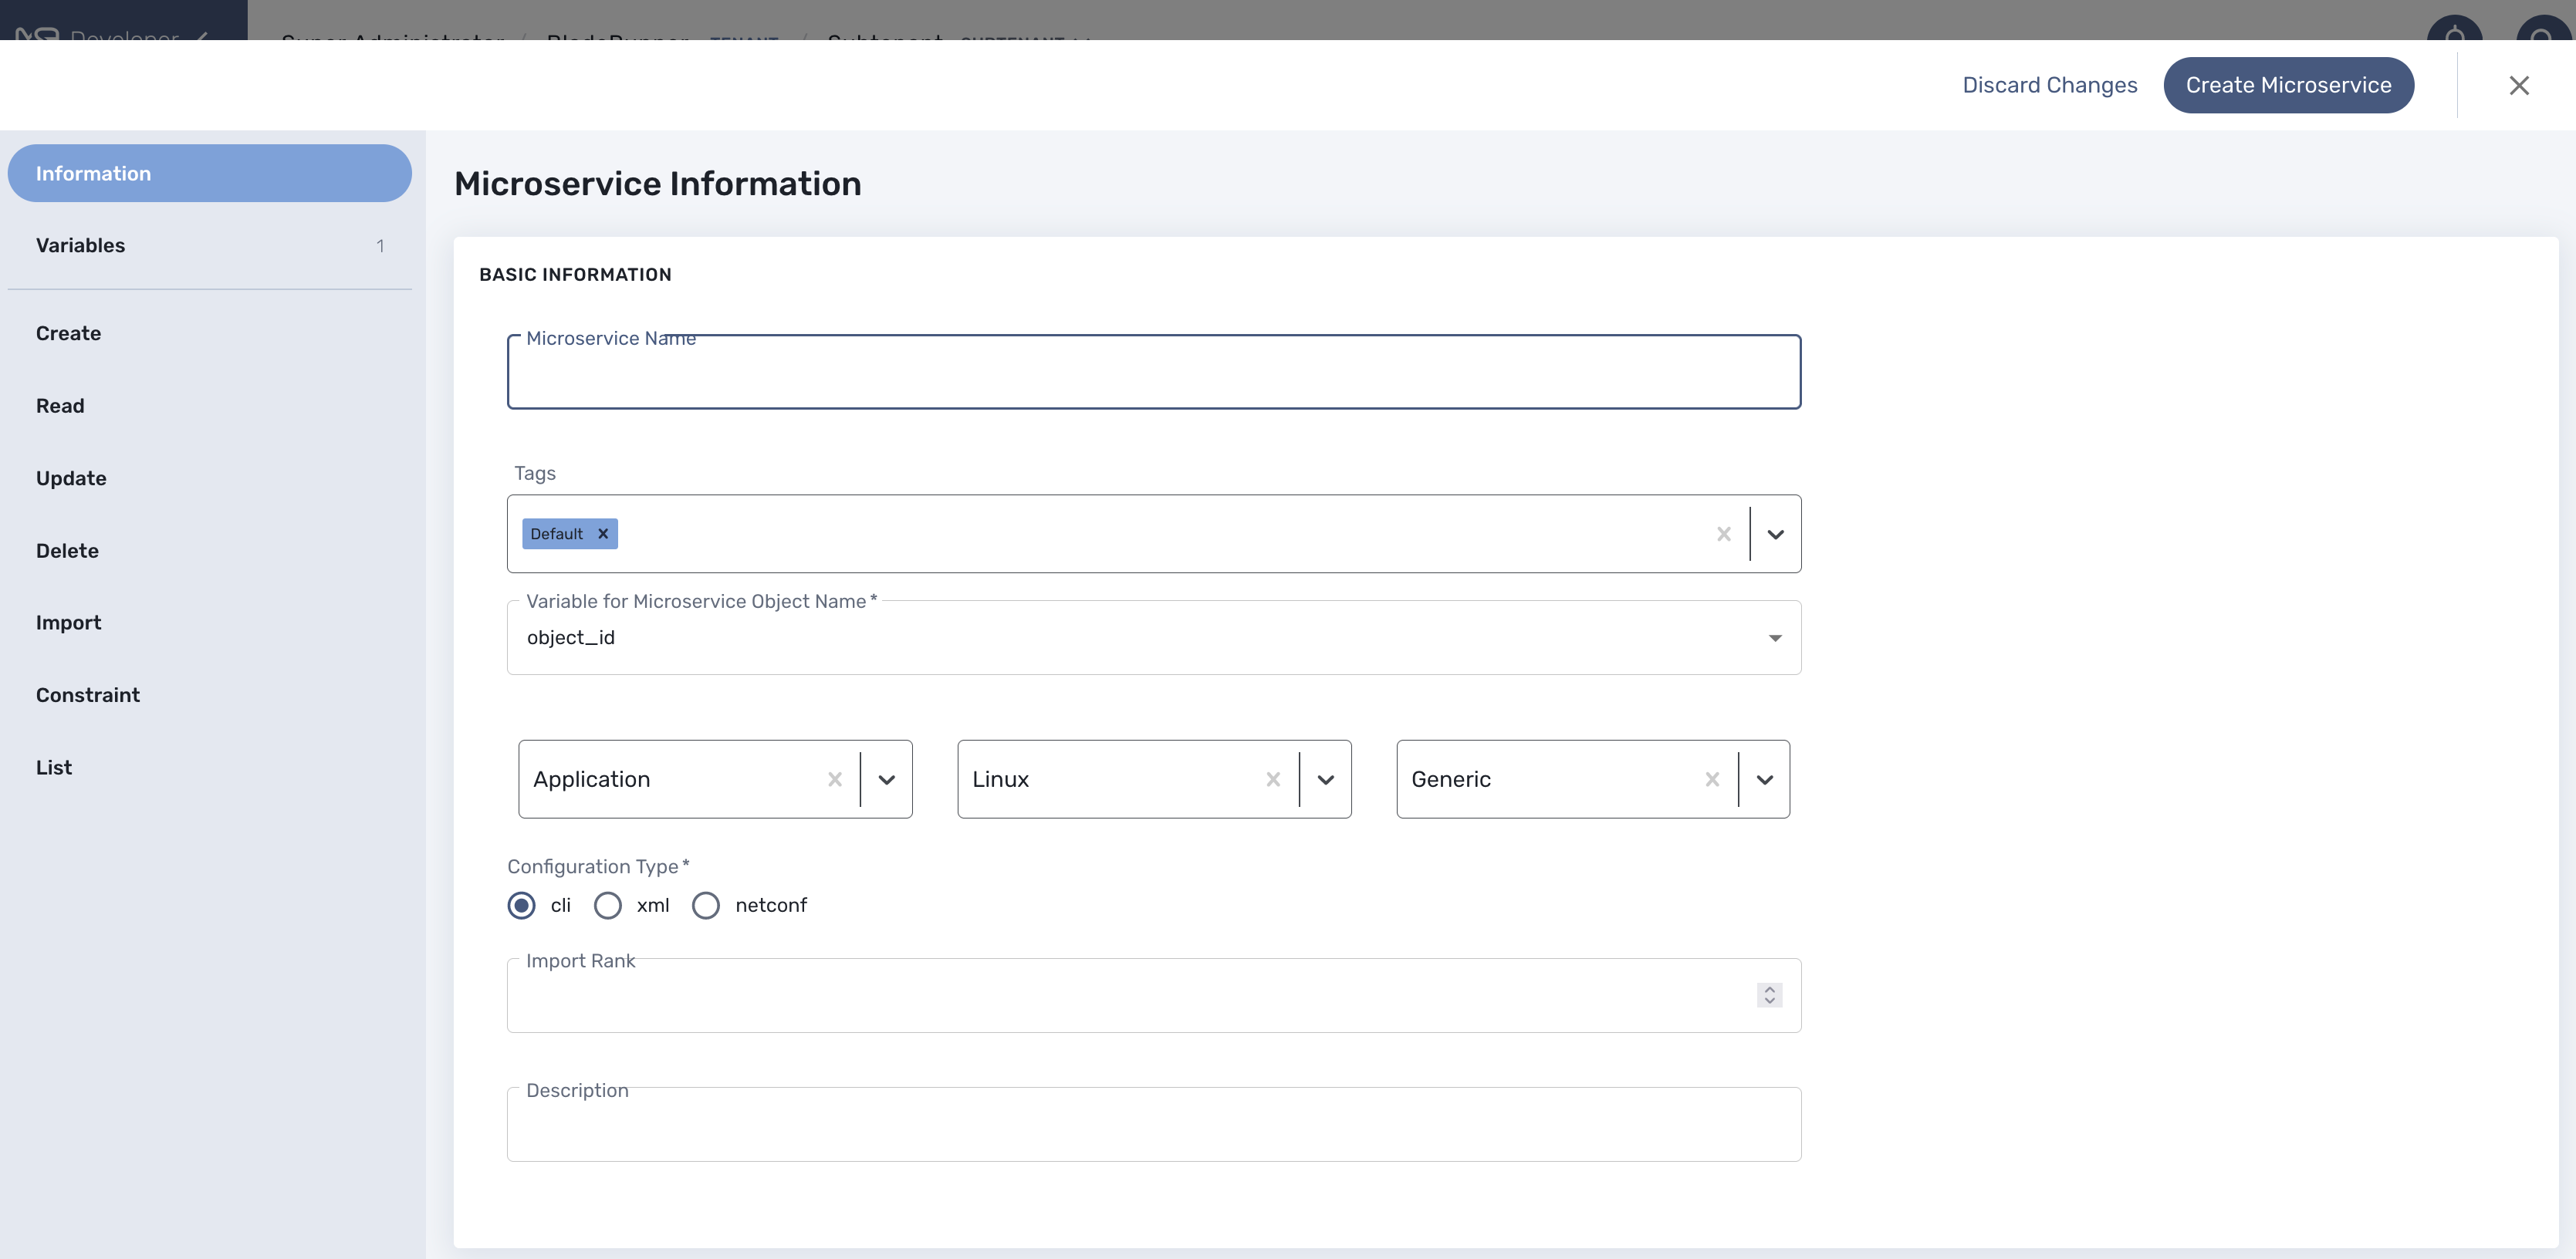
Information
Microservices are vendor specific, the implementations of the functions to create, update, delete or import a managed entity configuration will depend on the managed entity, the type of remote management interface, the format of the configuration, how it is structured,…
Vendor and model
Select the correct vendor/model information. This will be used by the deployment settings to filter the microservice that are eligible for selection.
Configuration Type
It is also important to select the proper configuration type:
-
cli: for managed entities such as Linux, Cisco IOS, Fortigate,…
-
xml: for managed entities with a REST management API (both XML and JSON API are supported)
-
netconf: for managed entities that support Netconf as the management API
The editor UI will adjust based on the configuration type and this setting cannot be changed once the microservice is created.
Import rank
The import rank is needed to control in which order the execution of the import functions of your microservices will be executed when you click on "Synchronize with Managed Entity" from the managed entity tab "configure".
Setting correct import rank is important when you have dependencies between your microservices. Microservice dependencies are created by leveraging the variable type "Microservice Reference" (see documentation about microservice variables).
Once created, you can search for your microservice in the list and attach it to a deployment setting, you can also edit it or delete it.
| The easiest way to design a microservice is to use a managed entity dedicated to testing and follow in a code-test-fix development cycle. This documentation uses the Linux Managed Entity provided by the mini lab. |
Variables
Variable are usually defined to hold the parameters to be passed to the microservice. For instance, the port and IP to block for a firewall policy. Variables can also be used to display user information that is not meant to be used for configuring the managed entity.
Setting variables is done from the section "Variables" on the microservice editor screen.
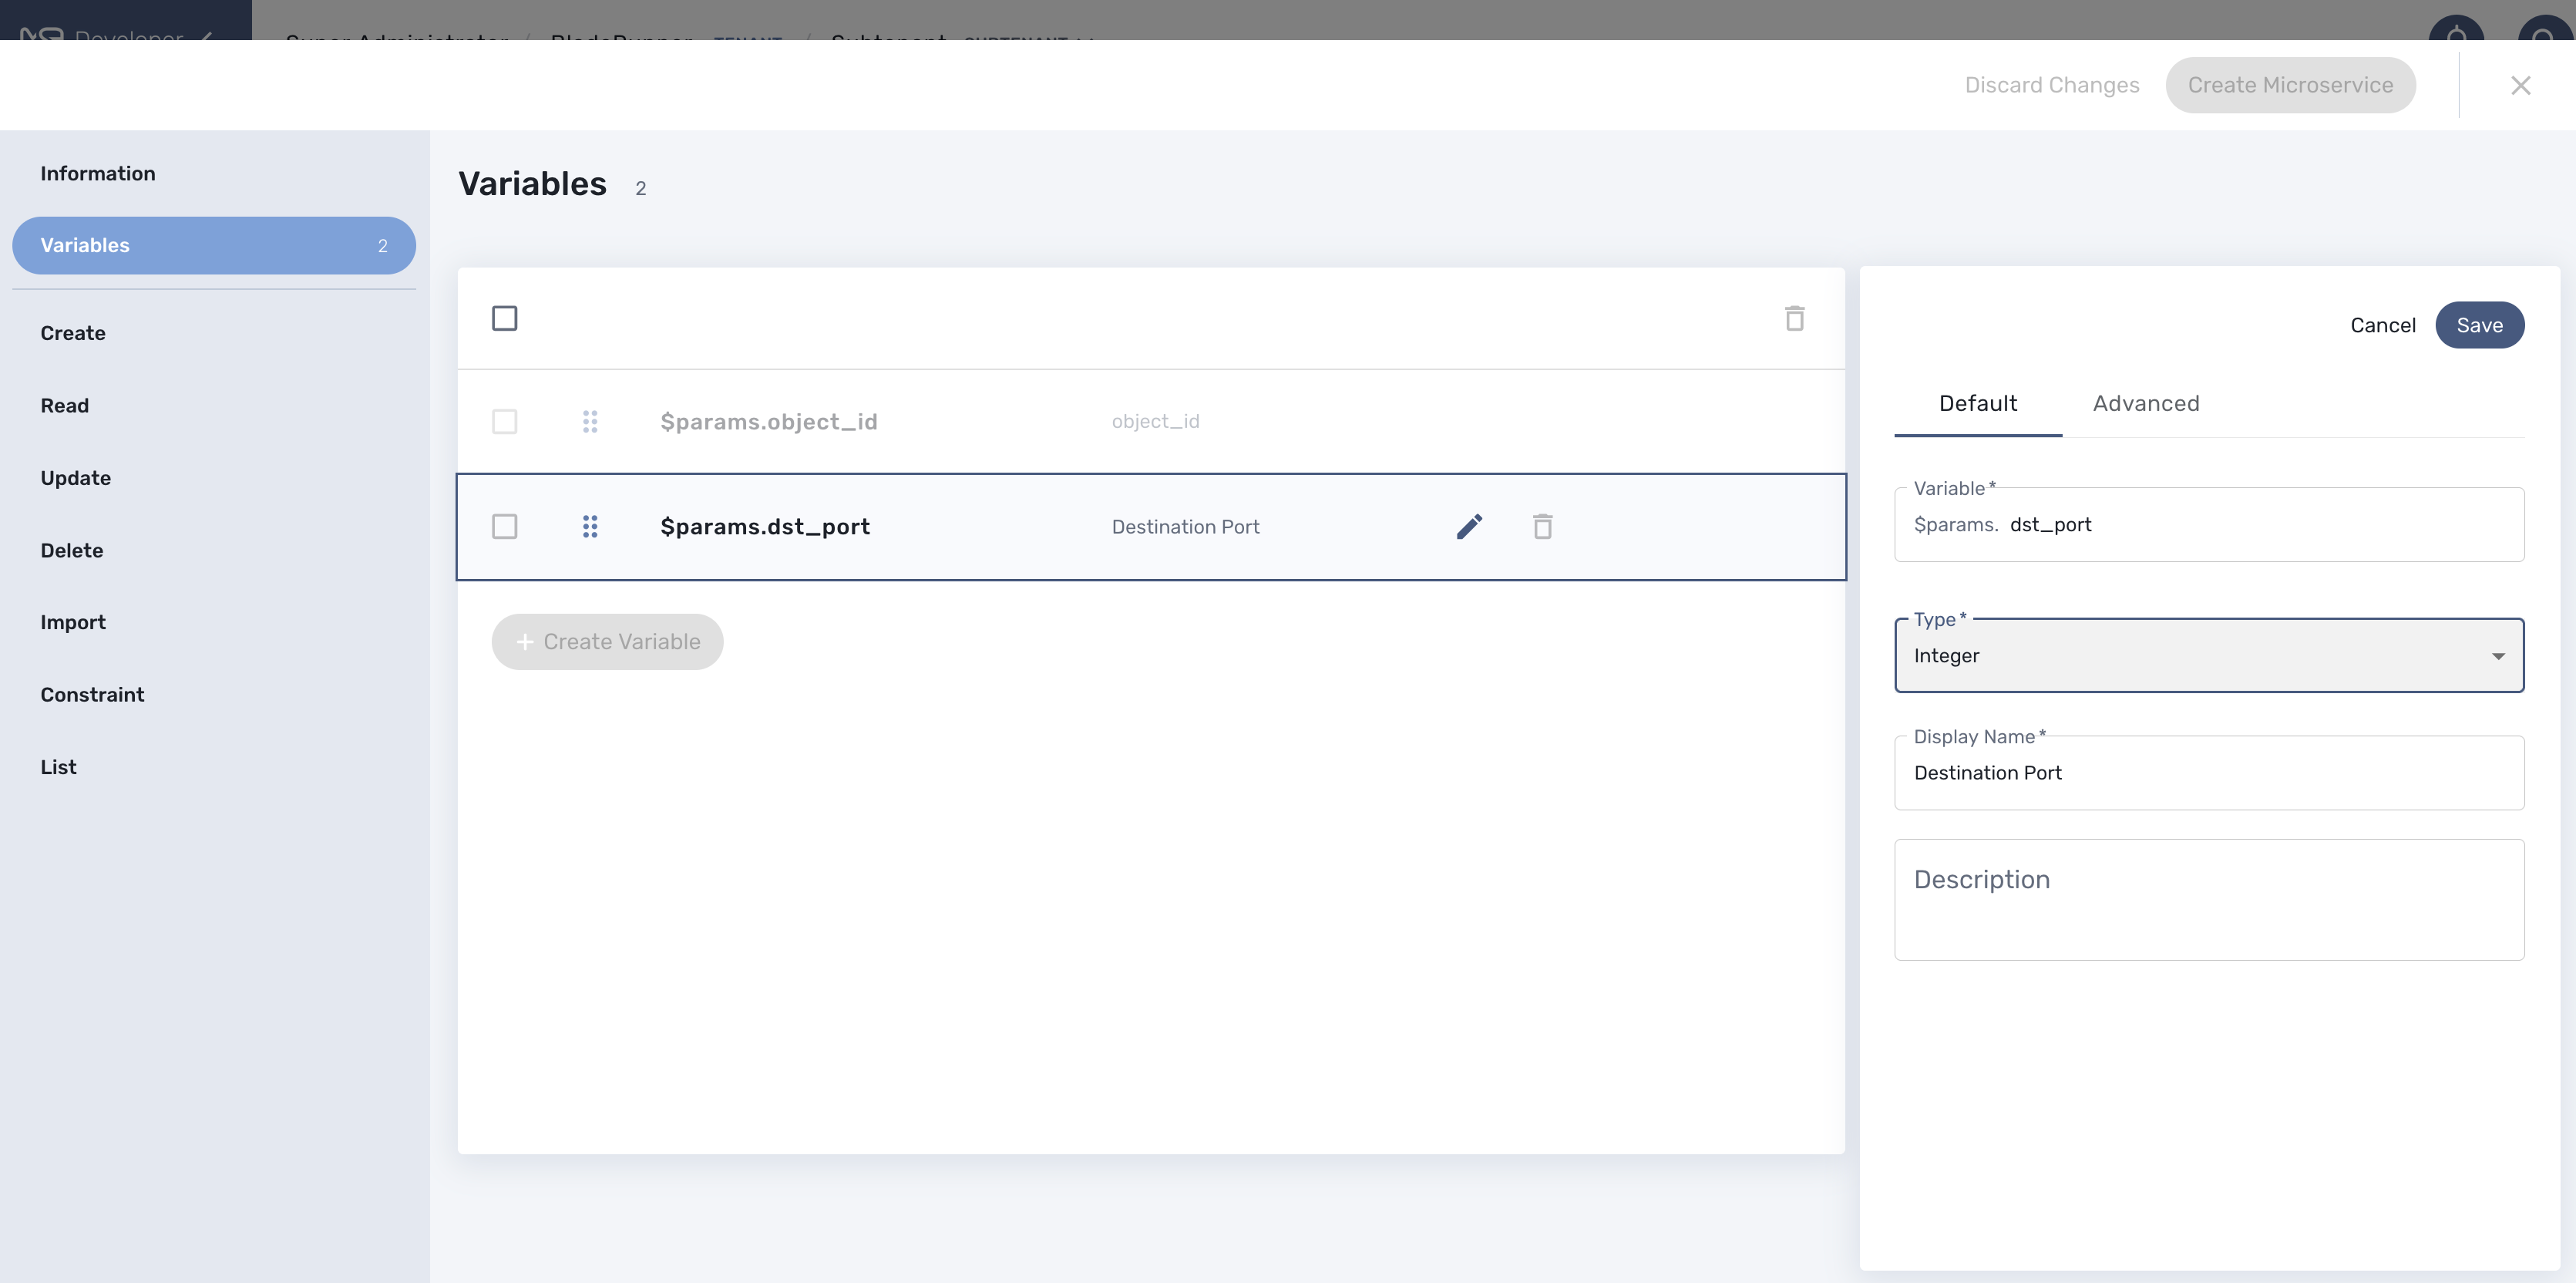
When you create a new microservice, the variable object_id, which is mandatory, will be set and cannot be deleted. It can be edited to set it’s type and other advanced properties.
All variables are referenced with the prefix $param which is automatically set in the variable editor screen and when a variable has to be referenced in one of the microservice function, you need to use the syntax {$param.your_variable} (see below for more examples)
By default the type of a variable is String but other types are supported such as Integer, Boolean, Password, IpAddress, ObjectRef,…
Usage of the {$object_id} variable
The {$object_id} is a reserved variable used to reference objects into the database and used as variable name in Smarty in the template resolution.
When the parameters are passed to the engine you give:
{"interface":{"Interface-Service-engine0/0":{"ip_address":"1.2.3.4"}}}
The variables values are:
{$object_id} => "Interface-Service-engine0/0"
{$params.ip_address} => "1.2.3.4"
Functions
From the left menu of the microservice editor there is a list of functions to implement. While none of the functions are mandatory, at least one of 'Create', 'Update', 'Delete' or 'Import' has to be implemented in oder to have a microservice that can actually do something.
In order to provide a full lifecycle management of a service on a managed entity, the 4 functions above have to be implemented.
The function 'Read', 'List' are optional and while it’s possible to implement them, you’ll have to rely on the REST API to execute them.
The function 'Constraint' allow the implementation of custom constraints to be verified before the managed entity is actually configured.
Create
The Create function takes care of configuring a new service in the managed entity. For example, a new static route if the managed entity is a router.
This functions is implemented either in PHP Smarty template language for CLI microservice (see "Microservice Template with PHP Smarty" for more details) or as a REST API call for XML microservice.
When this function is implemented, a button "+ Add Row" will appear in the tab "Configure" of the managed entity that uses this microservice.
Example
This example is a Samrty template that will take the parameters entered in the user form and generate a configuration.
config router static
edit {$params.object_id}
set dst {$params.ip_dest} {$params.mask}
set gateway {$params.gw}
set device {$params.interface}
{if empty($params.comment)}
unset comment
{else}
set comment "{$params.comment}"
{/if}
next
end
Update
The Update function takes care of updating an existing service in the managed entity.
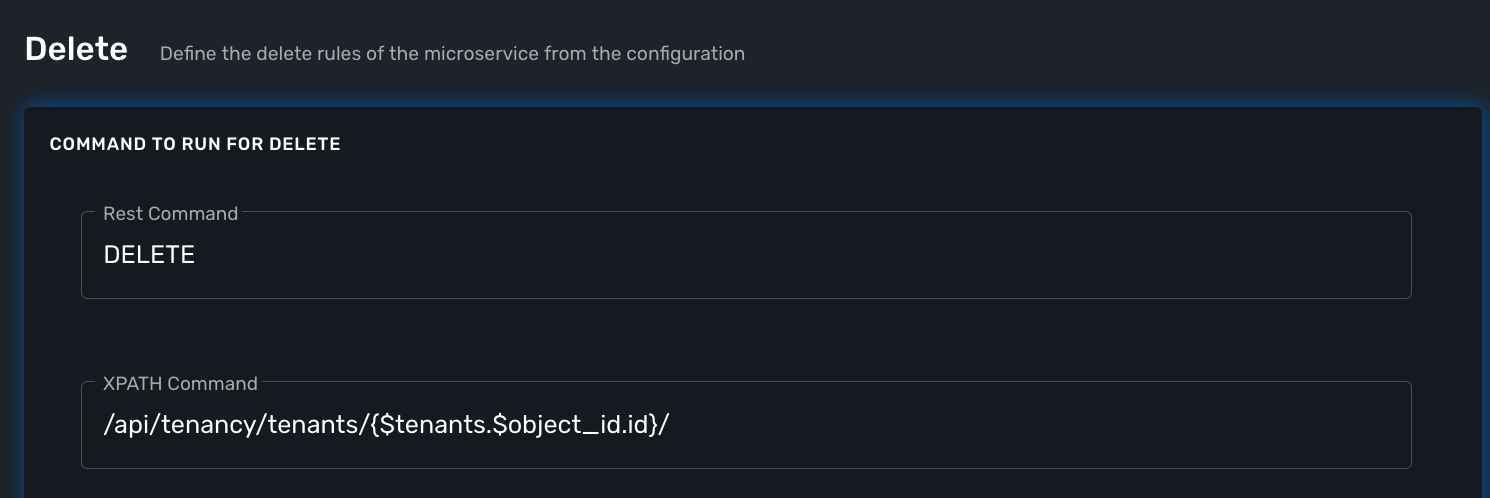
Delete
The Delete function takes care of deleting an existing service in the managed entity.
Example
This example generate a conf based on the instance parameters as store in the database.
config router static
delete "{$routing.$object_id.object_id}"
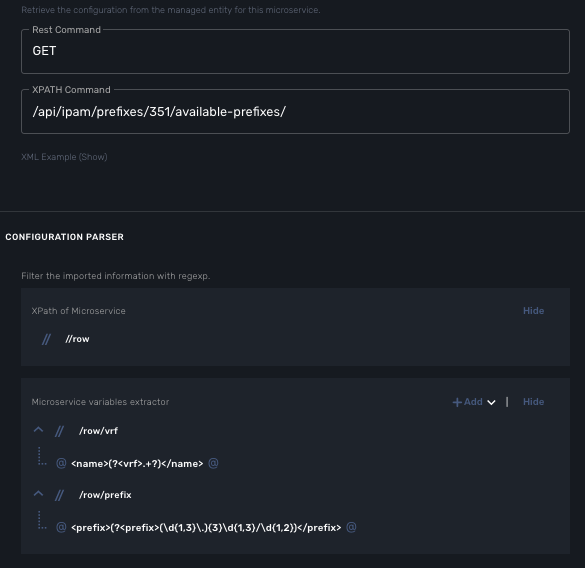
endImport
The role of the Import function is to import the actual configuration of the managed entity into the MSactivator™ database.
The implementation of the Import is either based on a set of regular expressions or a set of XPath expressions that build a parser that will extract the values of the variables.
The Import is made of 3 parts:
-
the command to run on the device for CLI command based device or the REST API to call.
-
the configuration parser, implemented with a set of regular expressions or XPath expressions. Only the microservice identifier extractor is mandatory.
-
a set of optional post import operations implemented in Smarty language (https://www.smarty.net/).
Post-import
This example shows how to use the post import section of a microservice in order to fulfill one of it’s variable with data coming from other microservice instances already imported in MSactivator™ database.
This example is based on Fortigate configuration example, more precisely on the web filtering configuration sub-part.
This first relies on the ability to define an import rank in the microservice definition. In our example the microservice Web_Filter(.xml) will need the instances of the microservice URL_Filter(.xml) to be imported first in order to have relevant information. So Web_Filter microservice as an import rand higher than URL_Filter, so that during the import import/synchronize process, URL_Filter microservice will be imported first in MSactivator™ database so they can be read during the post import of Web_Filter microservice in order to enrich the instance with detailed values/info.

Instead of displaying/proposing to enter meaningless numbers as identifier of URL filtering rules, the post import , the Web filtering microservice will display the URL filter details gathered during the post import. In order to read the MS instance, the syntax is simply based on the microservice definition file name.
In the below Web_Filter post import example, by using the foreach loop on the variable $URL_Filter, we can seek MSactivator™ microservice database instance.
{foreach $URL_Filter as $filter}
	{if isset($params.filter_id) && $params.filter_id == $filter.object_id}
		{assign_object_variable var="filter_id" value=$filter.object_id}
 		{assign_object_variable var="filter_name" value=$filter.filter_name}
		{if !empty($filter.urls)}
		  {foreach $filter.urls as  $index => $url}
			  {assign_object_variable var="urlfilter.{$index}.url_id" value=$url.url_id}
			  {assign_object_variable var="urlfilter.{$index}.url" value=$url.url}
			  {assign_object_variable var="urlfilter.{$index}.action" value=$url.action}
			  {assign_object_variable var="urlfilter.{$index}.type" value=$url.type}
    		  {/foreach}
		{/if}
		{break}
	{/if}
{/foreach}
Read
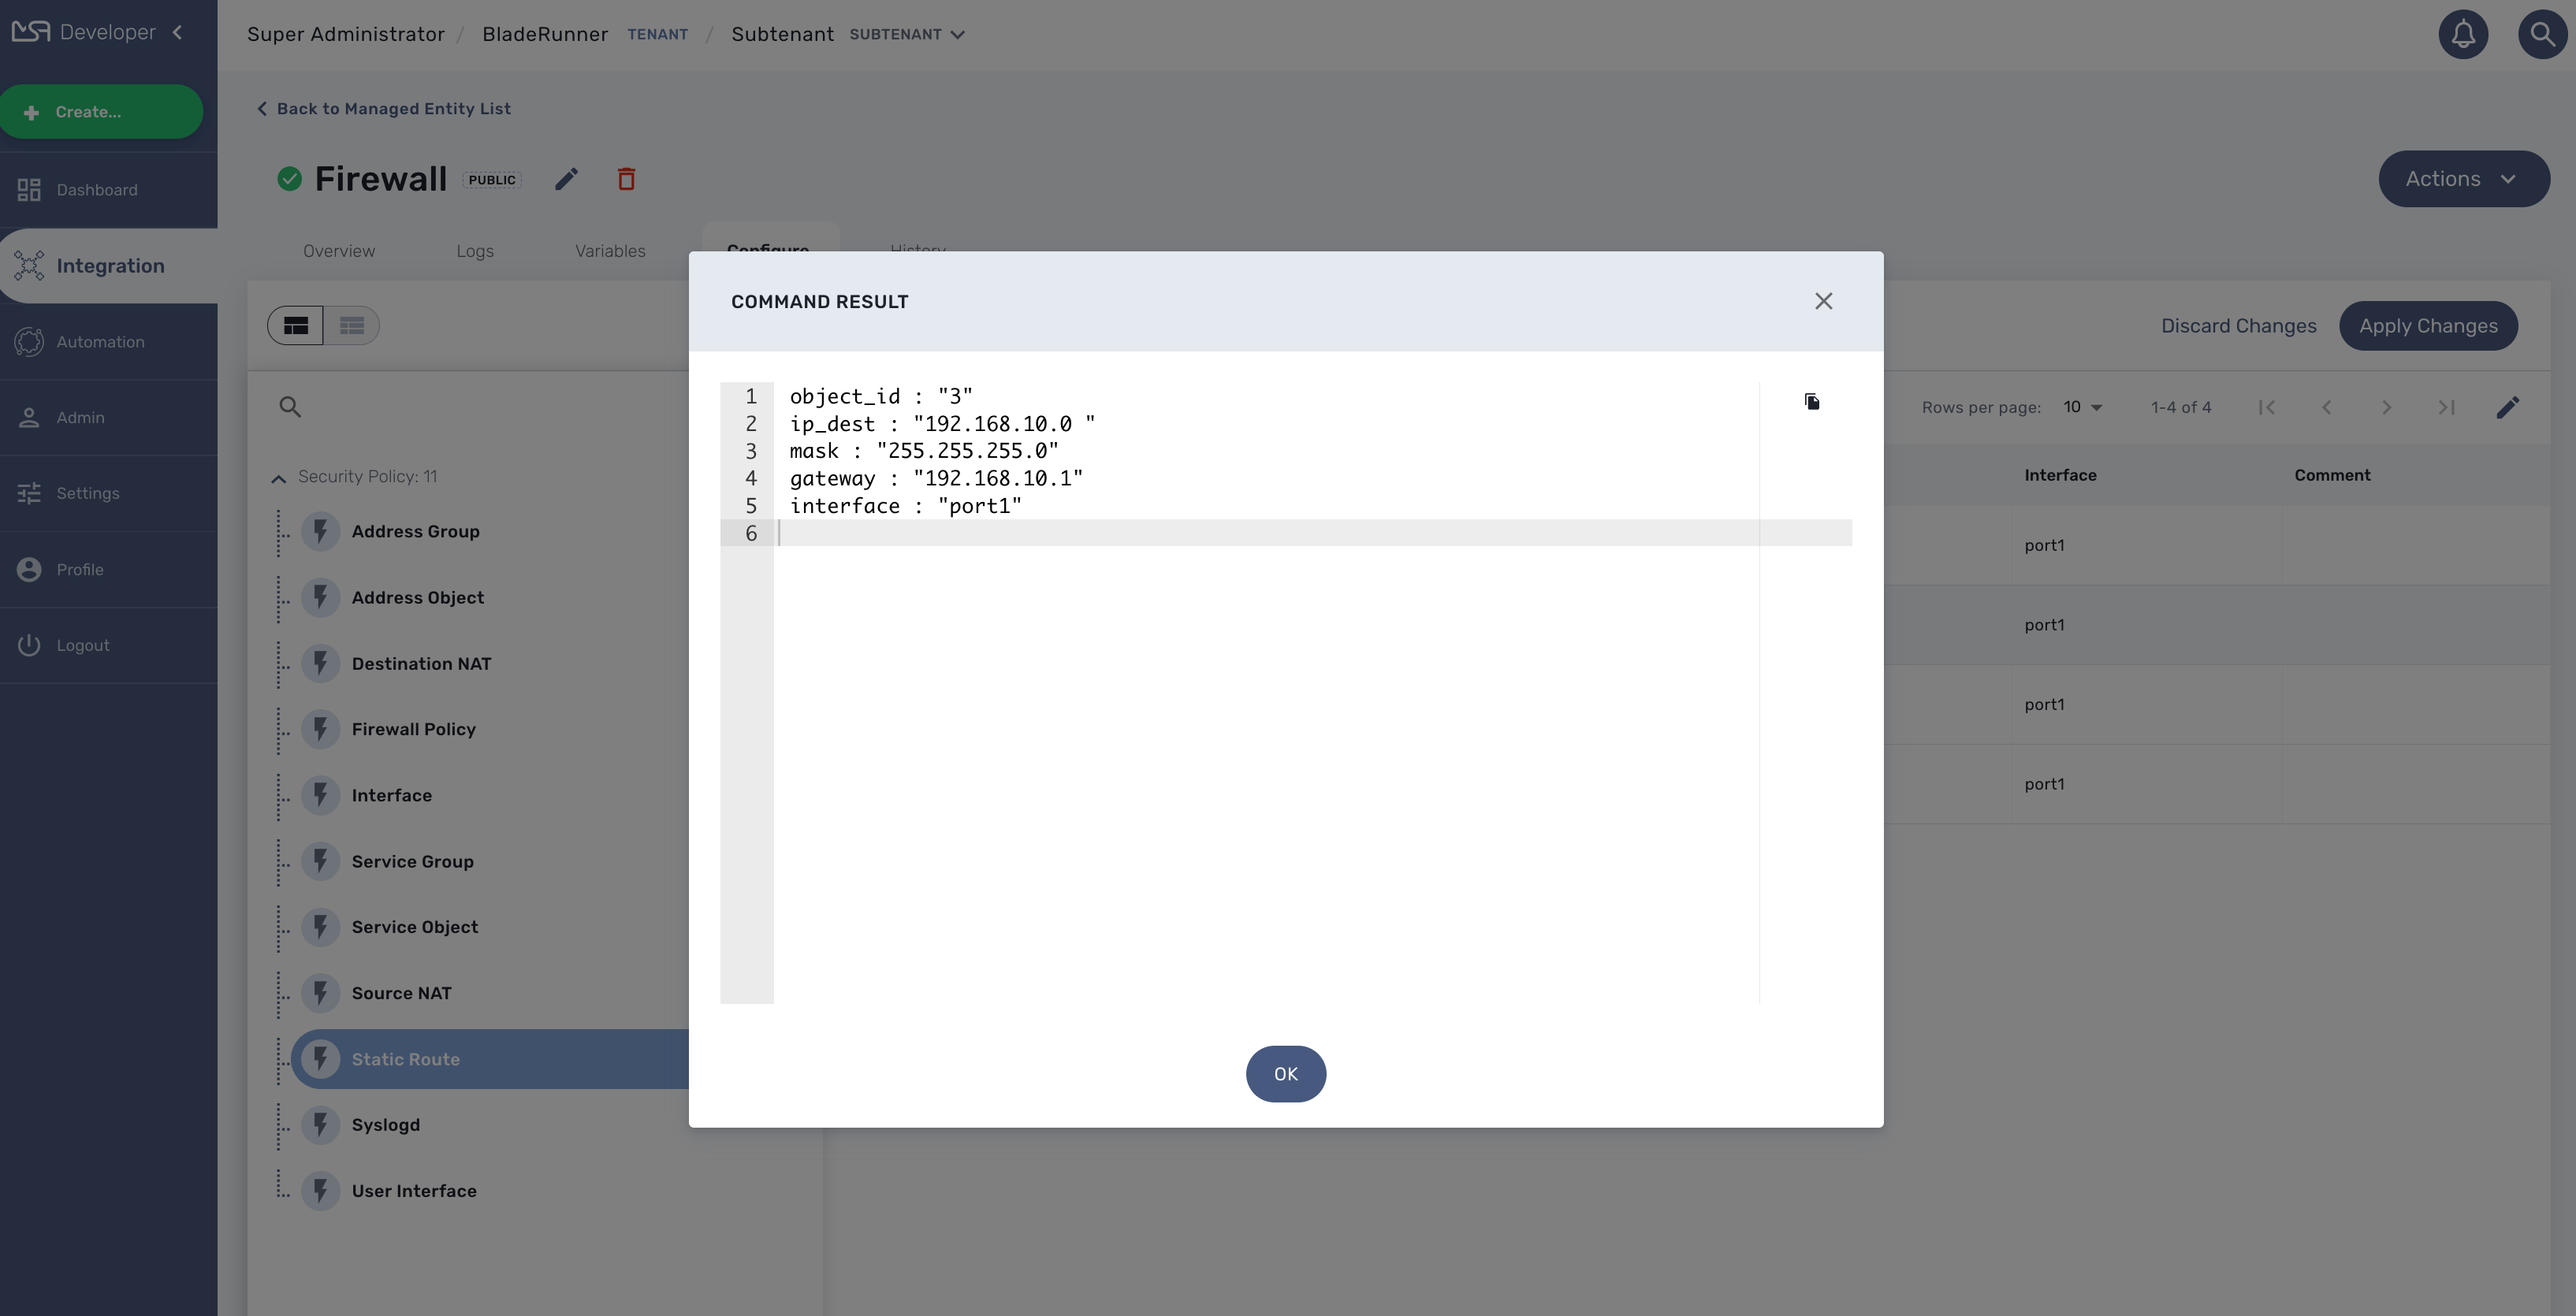
The Read function can be implemented to allow the user or the API to generate a text file based on a Smarty template and the microservice instance variables store in the database.
Example
This example generate a text based on a template and the microservice instance variables values as stored in the database
config router static
edit {$routing.$object_id.object_id}
set dst {$routing.$object_id.ip_dest} {$params.mask}
set gateway {$routing.$object_id.gw}
set device {$routing.$object_id.interface}
{if empty($routing.$object_id.comment)}
unset comment
{else}
set comment "{$routing.$object_id.comment}"
{/if}
next
end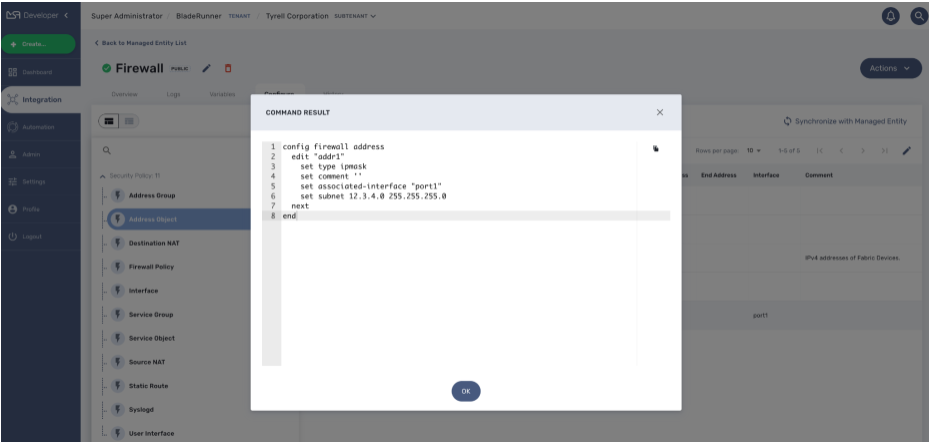
Another template could be:
 object_id : "{$routing.$object_id.object_id}"
 ip_dest : "{$routing.$object_id.ip_dest} "
 mask : "{$params.mask}"
 gateway : "{$routing.$object_id.gw}"
 interface : "{$routing.$object_id.interface}"
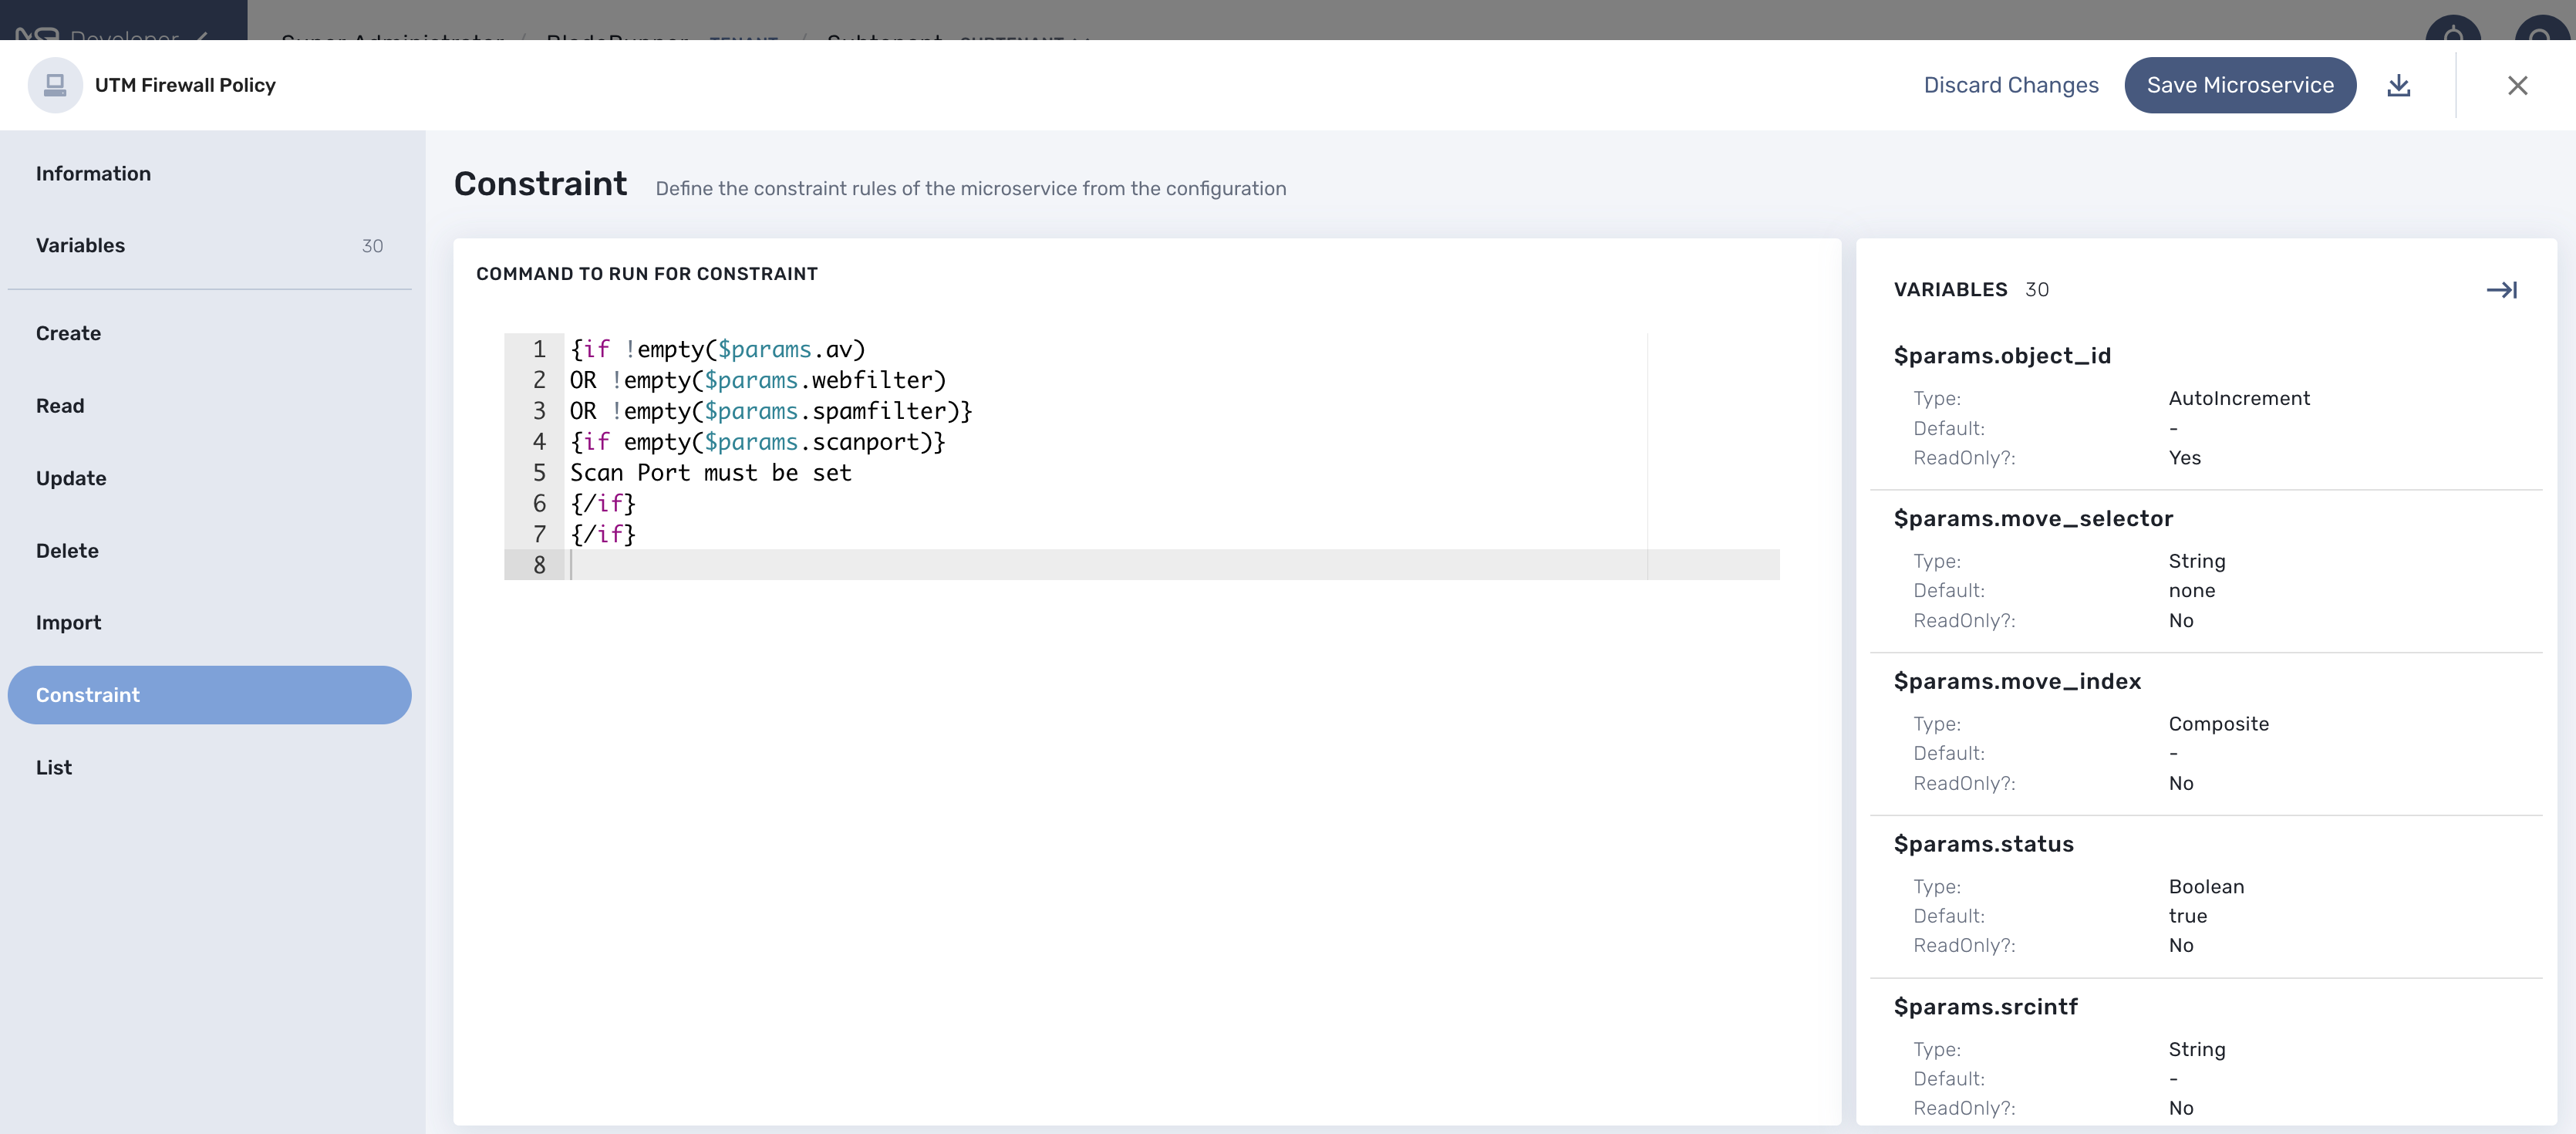
Constraint
In most cases, the constraint definition is straight forward when defining a microservice variable. Based on the type of the variable, the UI will check if the provided value is consistent with the type. For example if the type is "IP Address", the format of the value should be an IP address.
In some cases, though, the constraint is more complex and may depend on a combination of several conditions that can involve multiple variables.
For example, the 5 variables params.av, params.webfilter, params.spamfilter, params.ips, and params.scanport have the following dependencies:
-
if
params.avis set thenparams.scanportmust be set -
if
params.webfilteris set thenparams.scanportmust be set -
if
params.spamfilteris set thenparams.scanportmust be set -
if
params.ipsis set thenparams.scanportis not mandatory
To make things simpler, it is possible to add a custom constraint evaluation to the object definition.
The custom constraint is implemented as a smarty template:
{if !empty($params.av)
	OR !empty($params.webfilter)
	OR !empty($params.spamfilter)}
	{if empty($params.scanport)}
	Scan Port must be set
	{/if}
{/if}
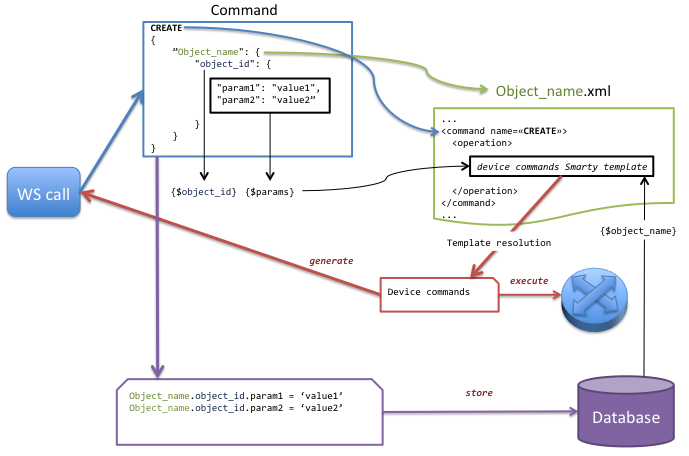
Create, Update or Delete Execution flow
The diagram below shows the flow of execution when one of the Create, Update or Delete function is executed by the REST API (directly or from the UI)
-
A command (CREATE here) is send via web service.
-
The microservice name is used to retrieve the associated XML definition file associated to the managed entity.
-
The command name is used to find the <command> section in the XML definition file.
-
The variables {$object_id} and {$params} are created to parse the template of the XML definition file.
-
Variables from the database are also created to parse the template of the XML definition file.
-
The template generates device commands used to perform the requested command on the object.
-
The device commands generated are returned to the web service call.
-
Optionally the device commands generated are applied to the managed entity.
-
Optionally the object extracted from the web service call is stored in the database.
XML Microservice Editor
Overview
XML microservice are used to manage entities that expose a REST API that return a response formatted in XML or for Adapter that are not supporting JSON microservice and JsonPath.
To create a XML microservice, you need to check XML for the configuration type when creating a new microservice
| do not try to change the configuration type of an existing microservice as this is not supported. |
The functions Create, Update and Delete
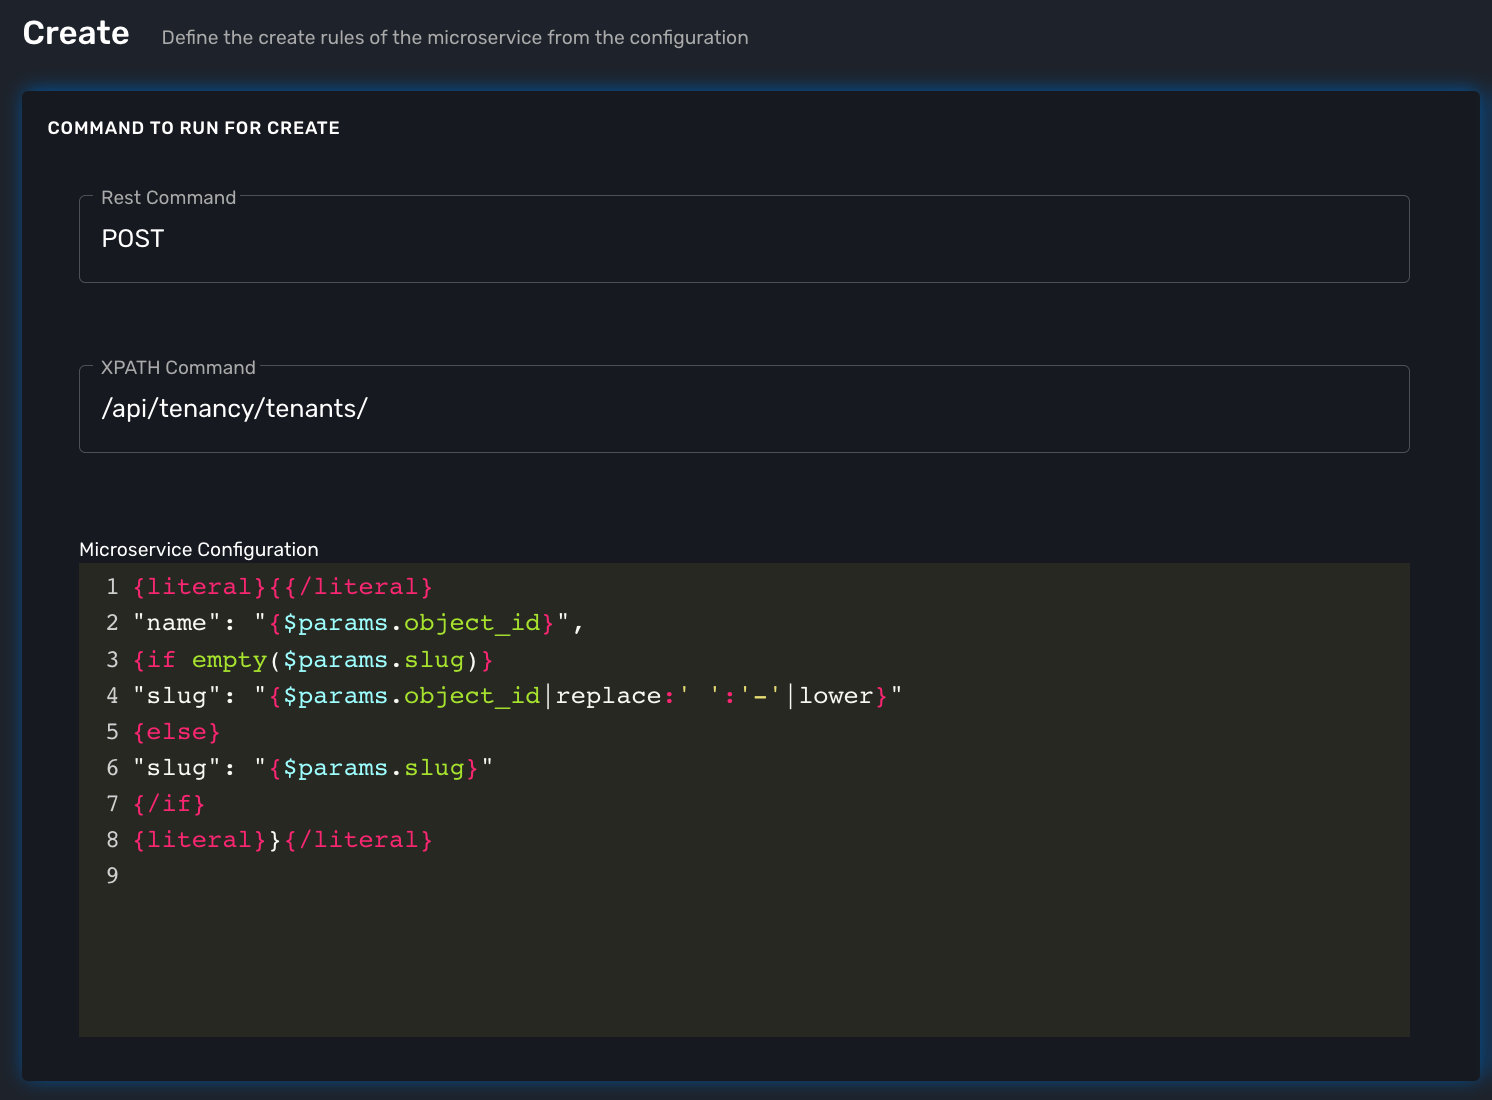
Create and Update
These functions will call the REST API design to create or update the managed entity configuration.
For instance, the REST API to create a new tenant is
HTTP Request: /operator/{$prefix}
Method: POST
| Parameter Name | Type | Description |
|---|---|---|
name |
String |
the name of the tenant |
Example:
POST /api/tenancy/tenants/In case you need to pass in a JSON payload with the parameters, the microservice Create will look like this.
Import
The main difference between the CLI and REST (Json/XML) Microservice definition is the implementation of the functions Create/Update/…
CLI Microservice definition is covered in the documentation about the CLI microservice editor.
This documentation uses the Netbox REST adapter and the Netbox REST API to illustrate the design of XML Microservice.
JSON Microservice Editor
Overview
JSON microservice are used to manage entities that expose a REST API that returns a response formatted in JSON.
To create a JSON microservice, you need to check JSON for the configuration type when creating a new microservice.
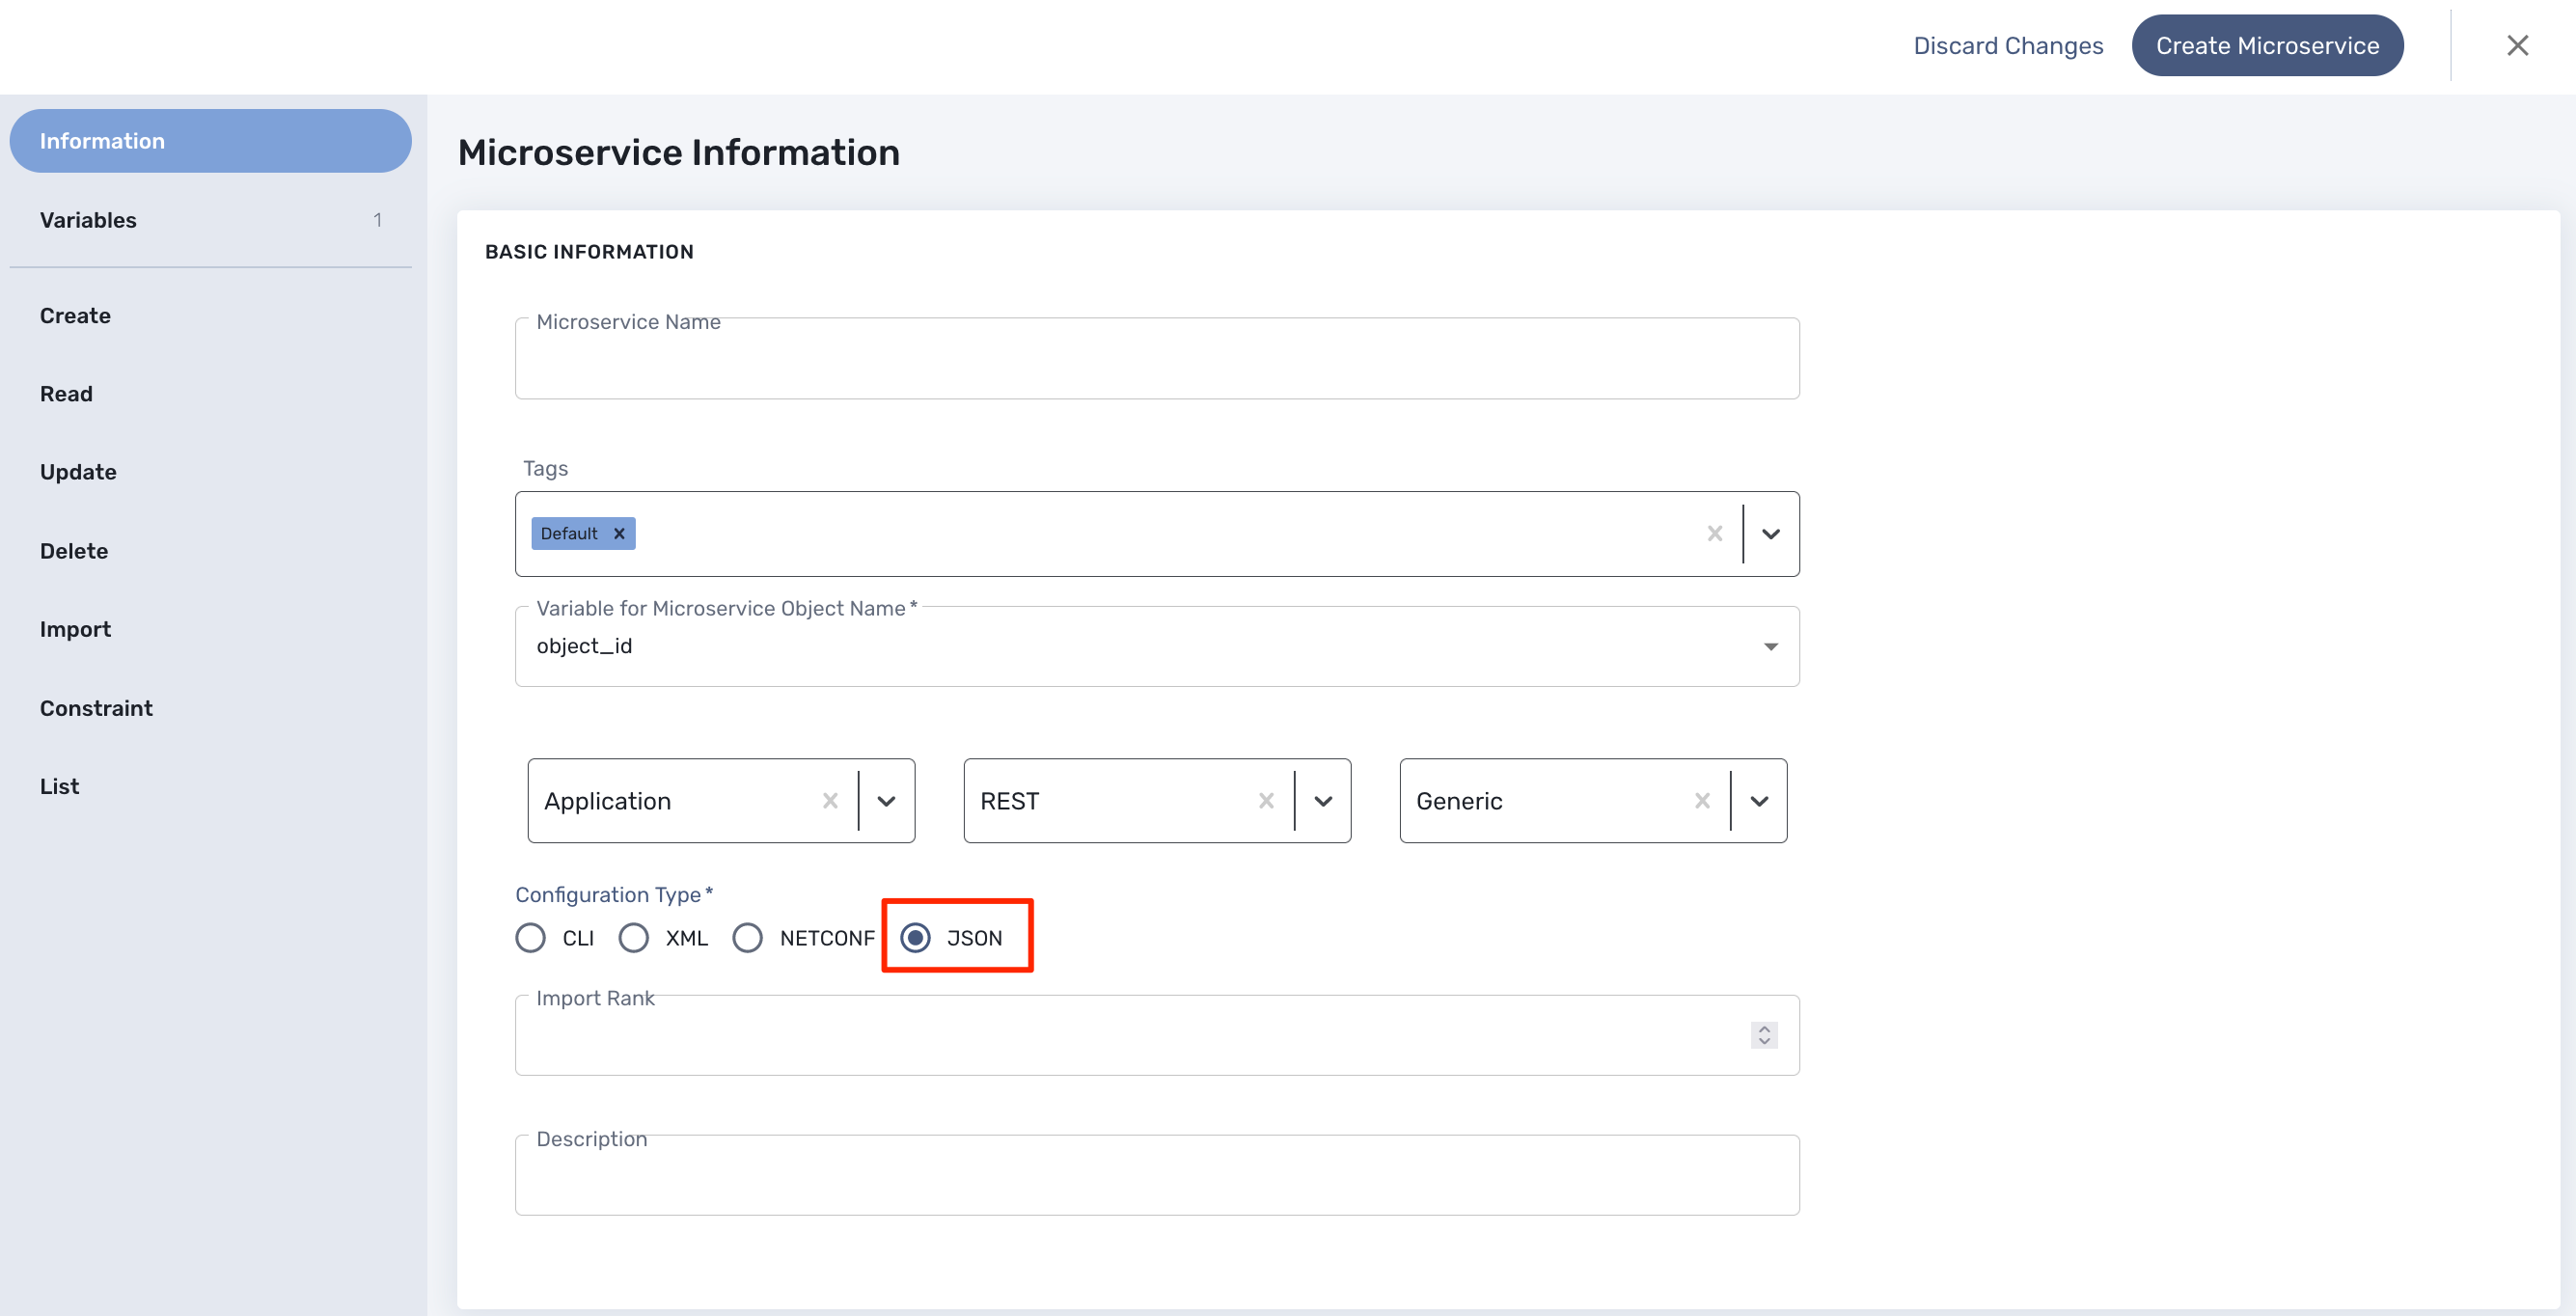
| do not try to change the configuration type of an existing microservice as this is not supported. |
The functions Create, Update and Delete
Create and Update
These functions will call the REST API design to create or update the managed entity configuration.
For instance, the REST API to create a new tenant is
HTTP Request: /operator/{$prefix}
Method: POST
| Parameter Name | Type | Description |
|---|---|---|
name |
String |
the name of the tenant |
Example:
POST /api/tenancy/tenants/In case you need to pass in a JSON payload with the parameters, the microservice Create will look like this.
Import
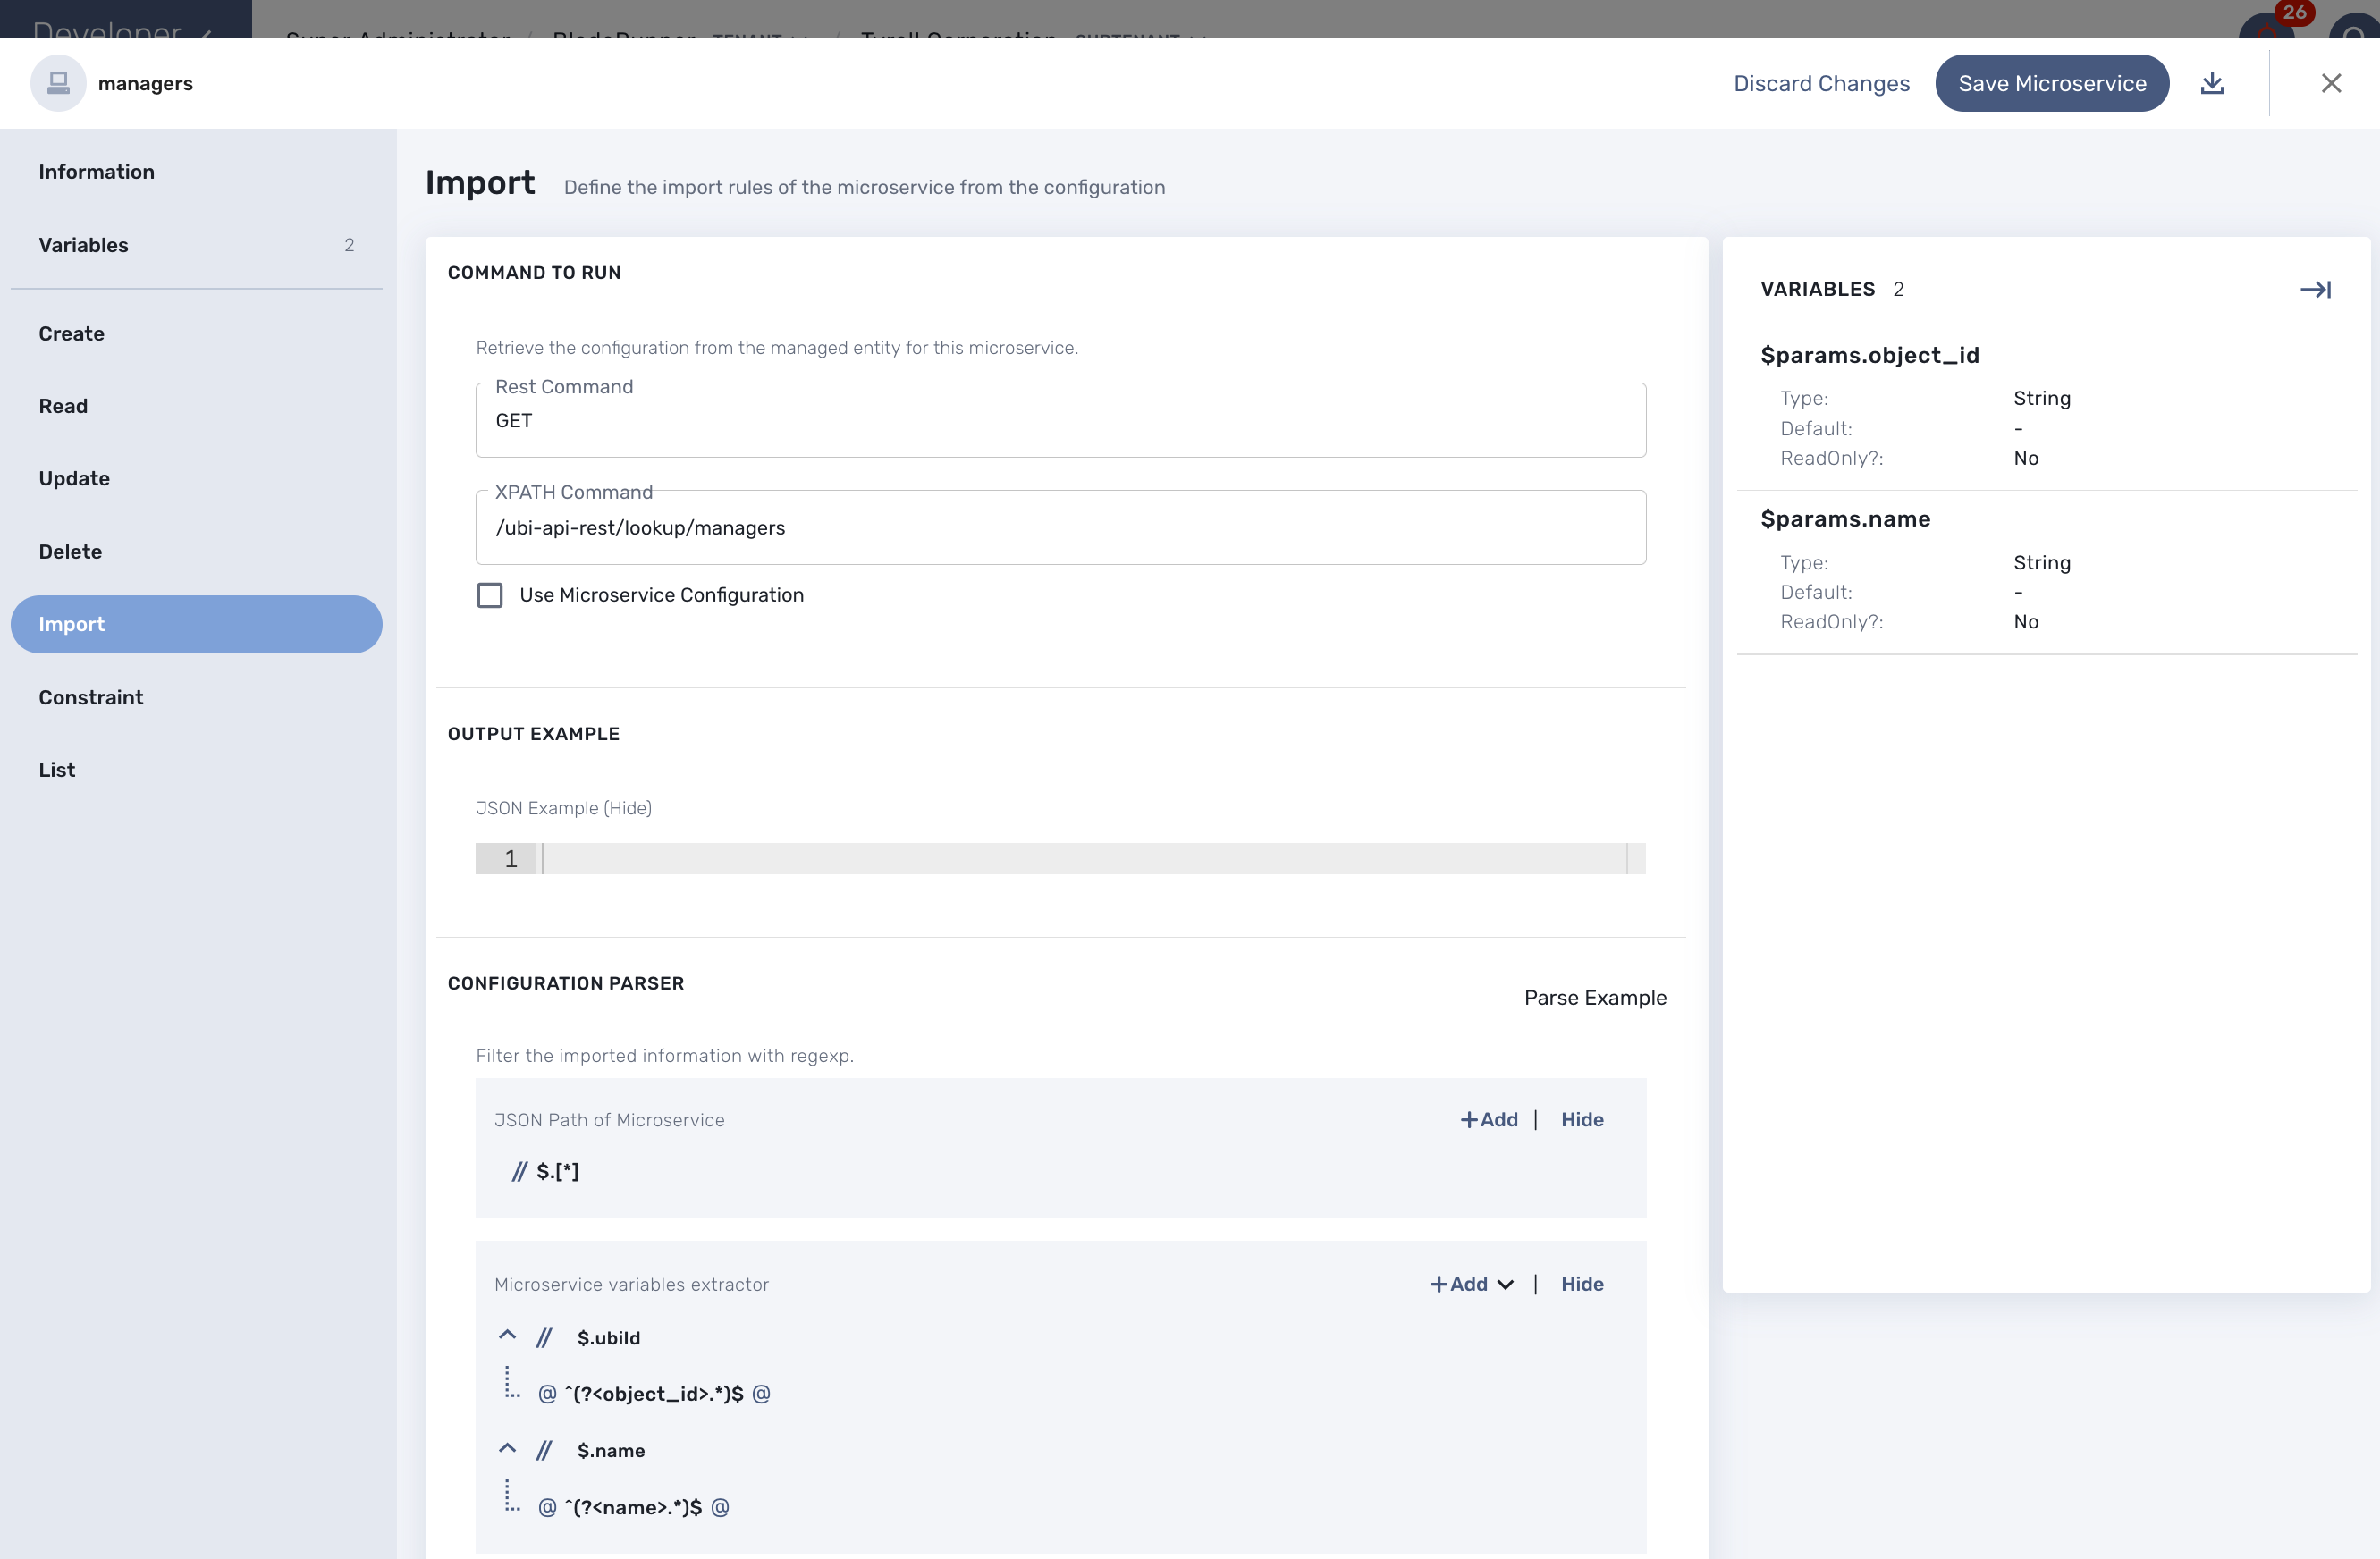
The main difference between the CLI and REST (Json/XML) Microservice definition is the implementation of the functions Create/Update/…
CLI Microservice definition is covered in the documentation about the CLI microservice editor.
This documentation uses the Netbox REST adapter and the Netbox REST API to illustrate the design of XML Microservice.
CLI Microservice Editor
You can use the the microservice editor UI to create or update a microservice.
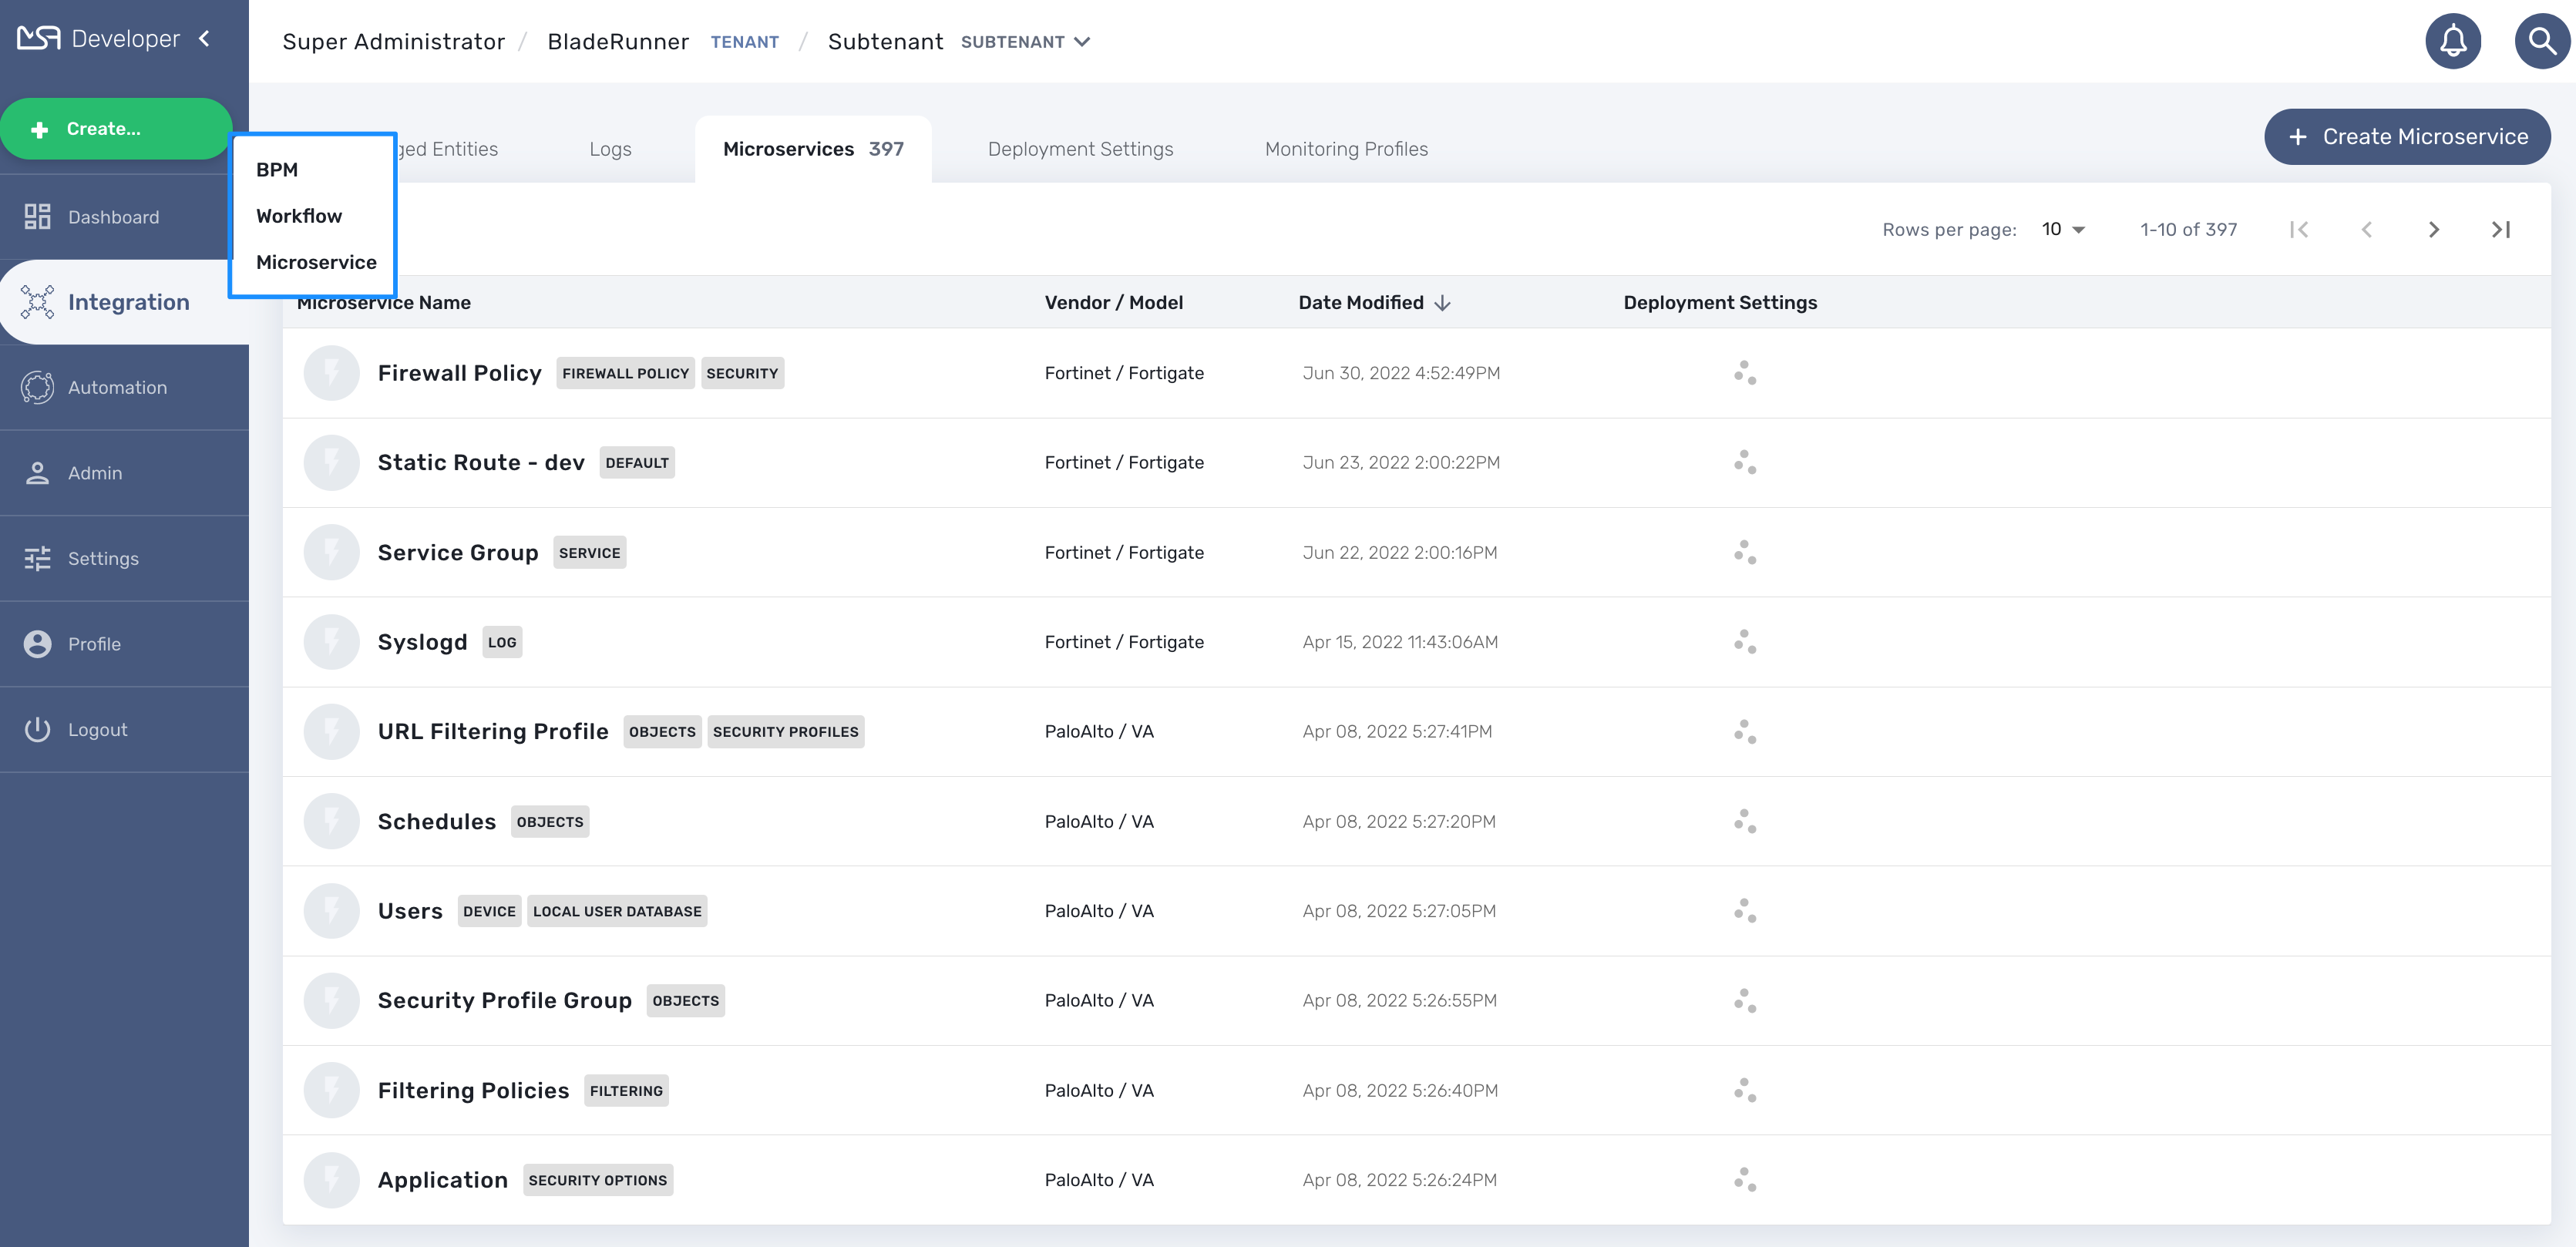
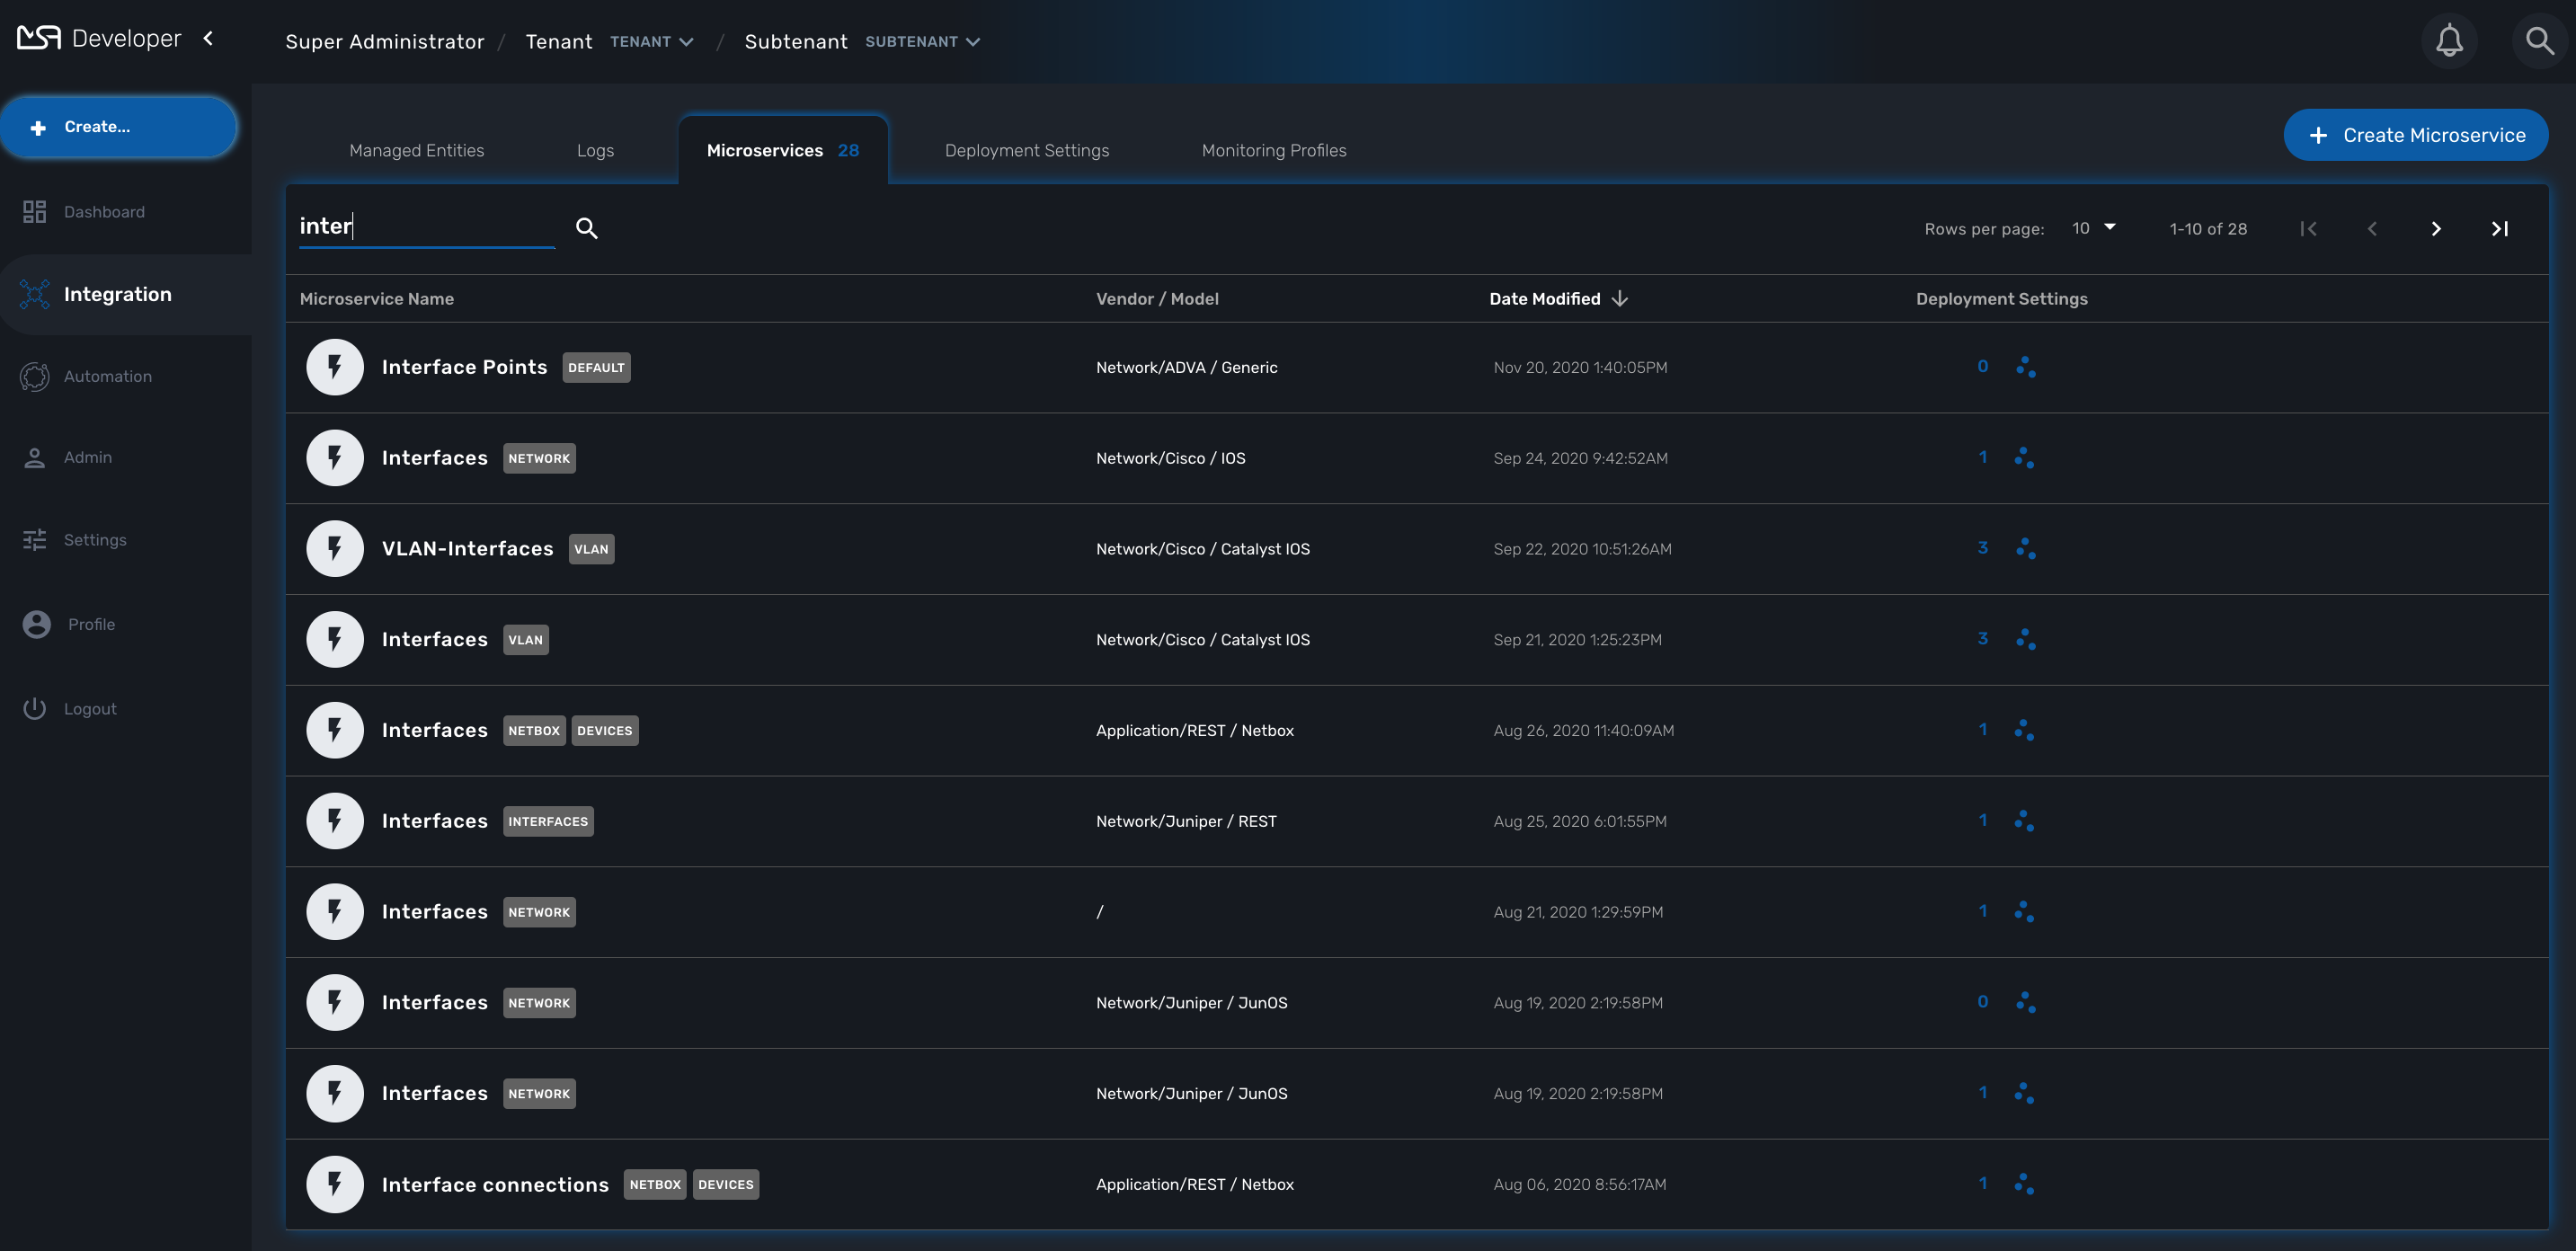
To create or edit a microservice you can go to the "Integration" section and select the Microservice tab
CLI microservice implementation
The Microservice API is made of several functions that can be implemented. It is not mandatory to implement all the functions, this will depend on your requirements and can be done incrementally.
The functions Create, Update and Delete
Create and Update
The CLI commands to create or delete an iptable rule to allow or block a port and an IP are:
sudo iptables -A INPUT -p tcp --dport <PORT TO BLOCK> -s <IP TO BLOCK> -j DROP
sudo iptables -A FORWARD -p tcp --dport <PORT TO BLOCK> -s <IP TO BLOCK> -j DROP
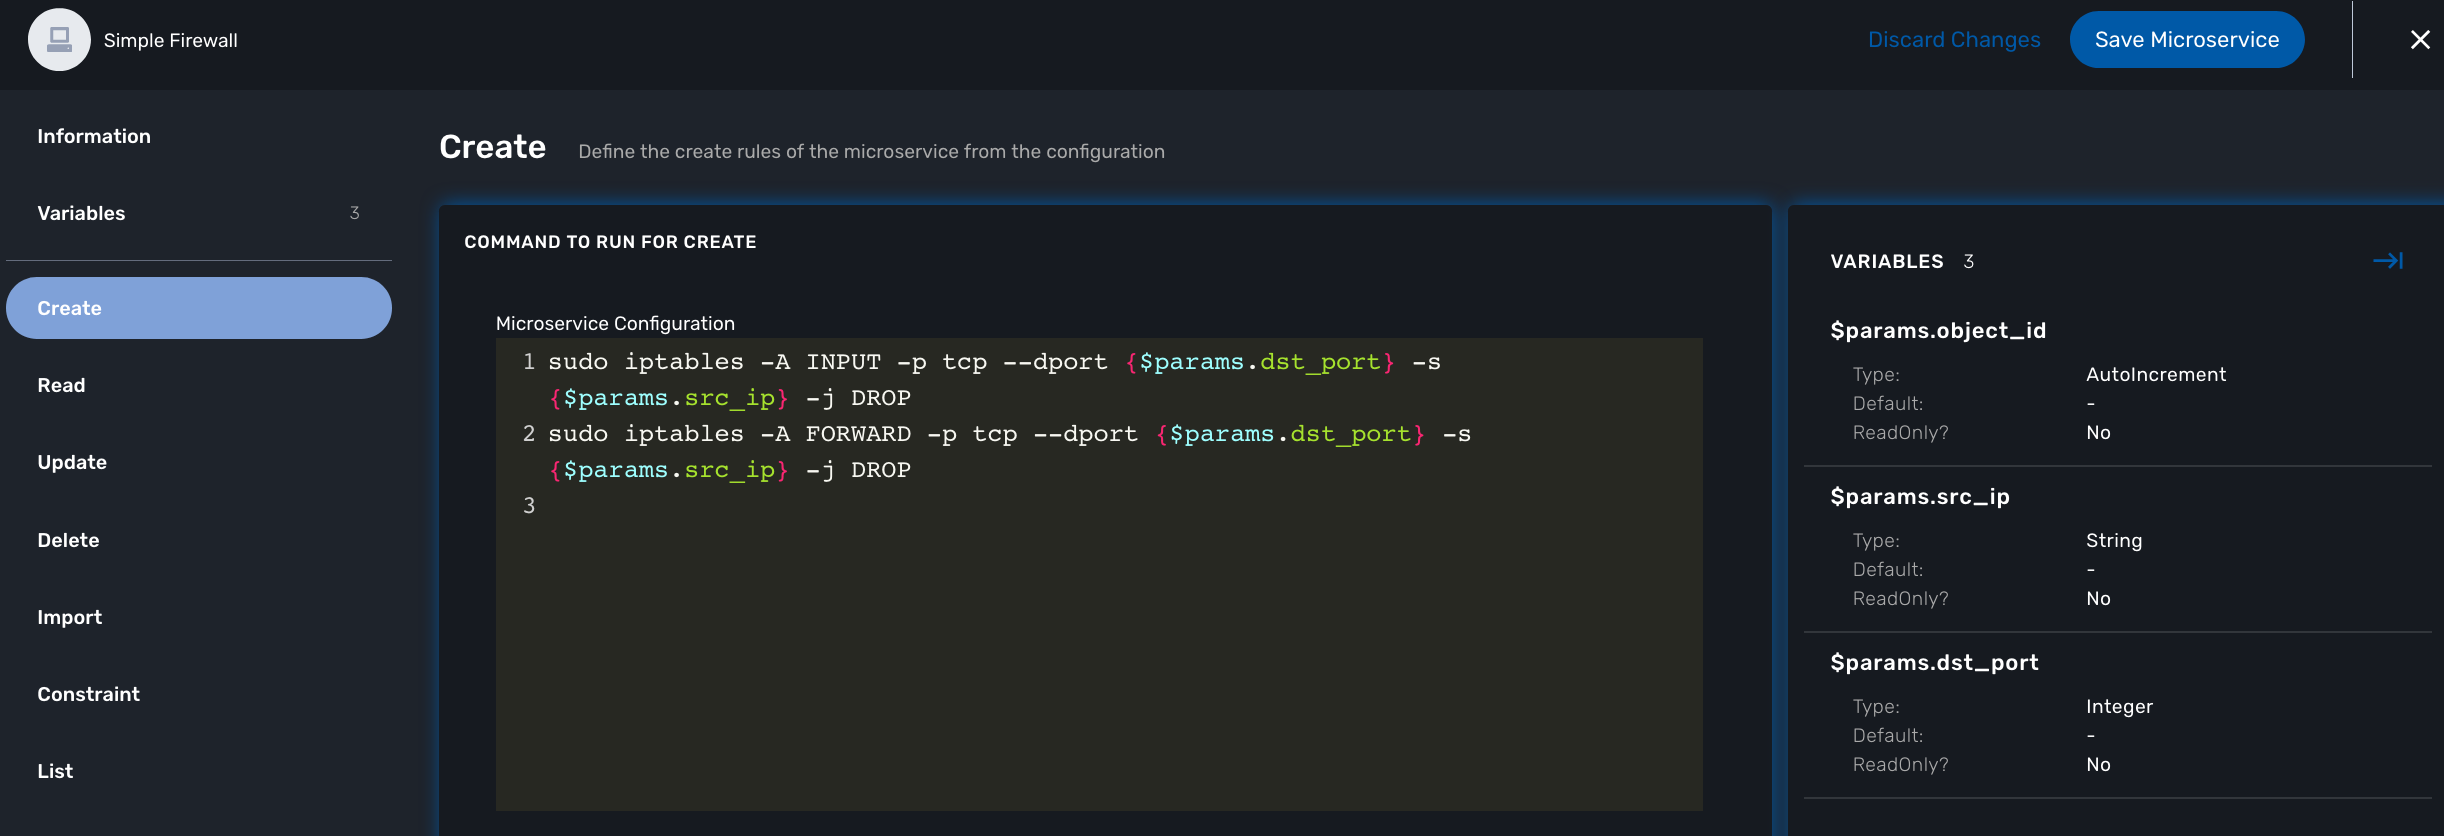
this is how it would be implemented in the Create function of the Microservice
sudo iptables -A INPUT -p tcp --dport {$params.dst_port} -s {$params.src_ip} -j DROP
sudo iptables -A FORWARD -p tcp --dport {$params.dst_port} -s {$params.src_ip}  -j DROP
As you can see the parameters are prefixed with $params. and this is the reason why the variable editor section will automatically add $params. to the variable.
The implementation of the Update will be similar and will of course depend on the CLI syntax.
Delete
The deletion of the iptables INPUT and FORWARD rules is executed with the CLI command below:
sudo iptables -D INPUT -p tcp --dport <PORT TO BLOCK>  -s <IP TO BLOCK>  -j DROP
sudo iptables -D FORWARD -p tcp --dport <PORT TO BLOCK>  -s <IP TO BLOCK>  -j DROP
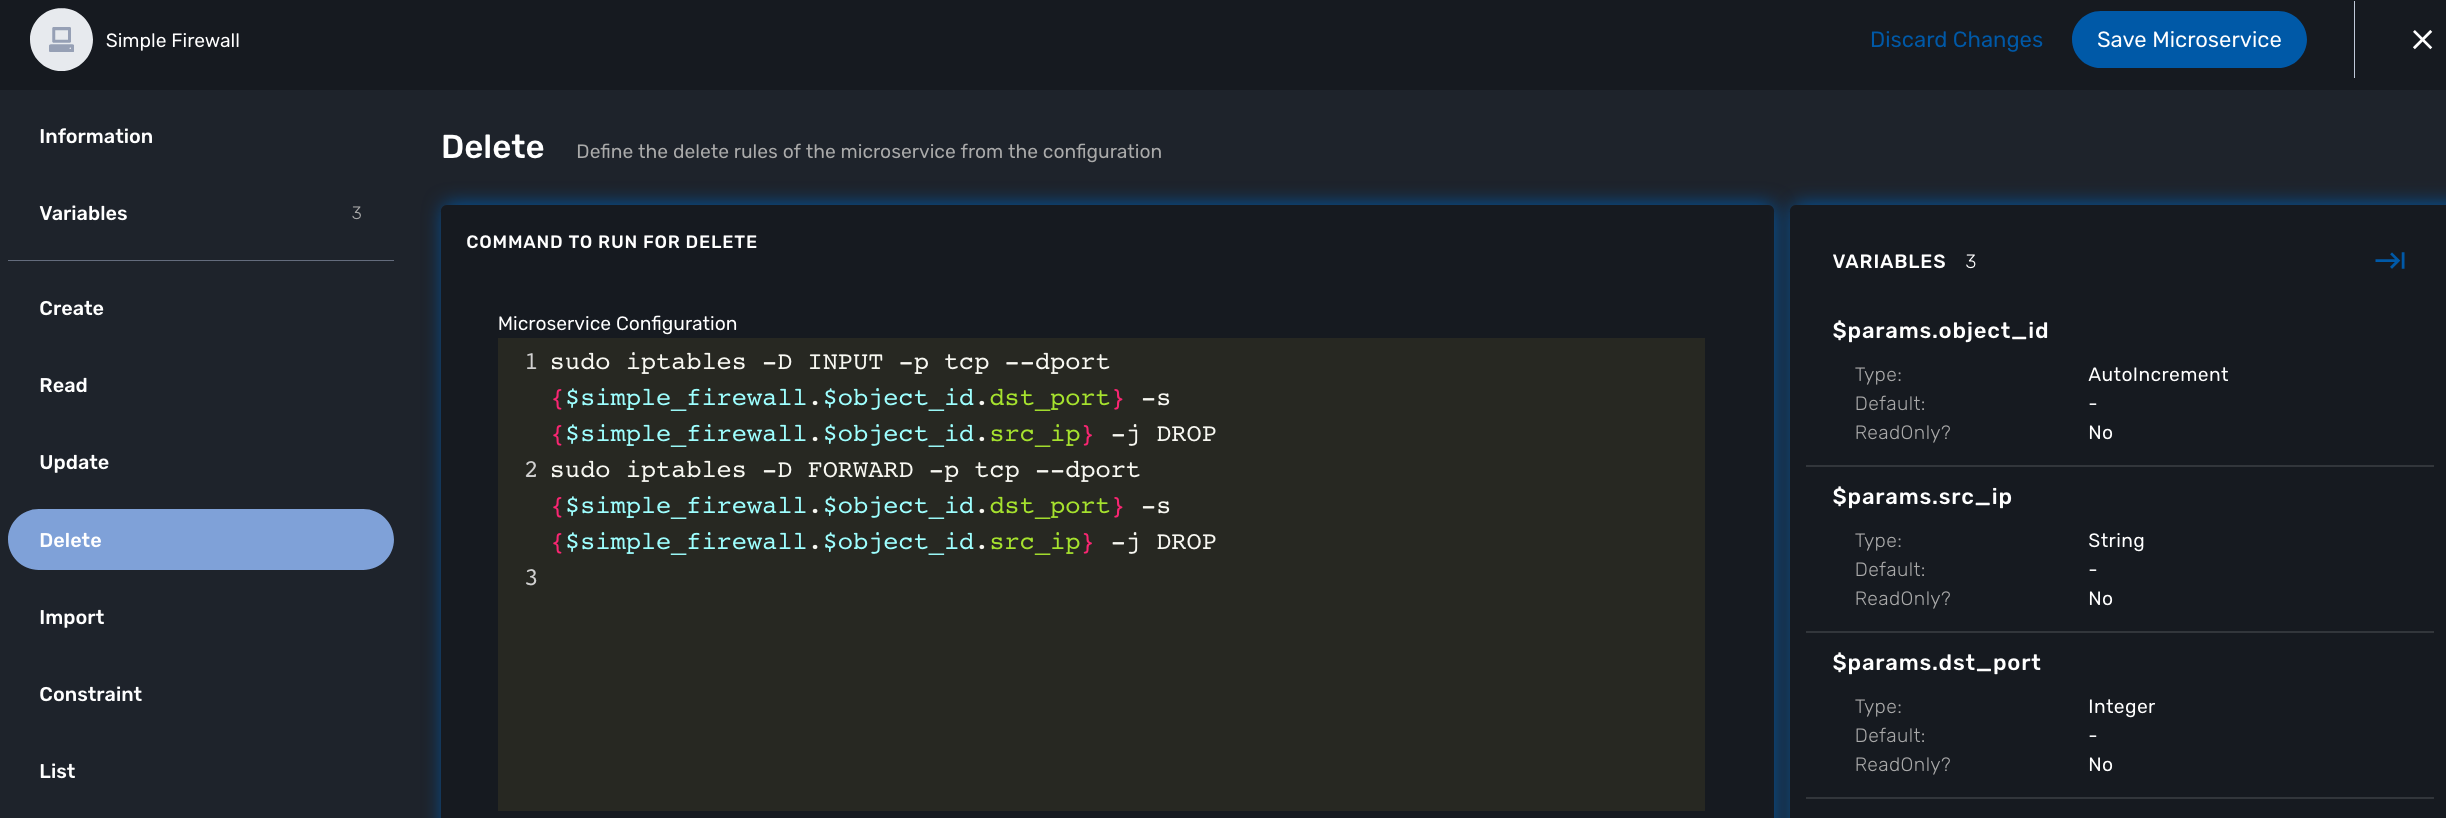
This will be implemented as:
sudo iptables -D INPUT -p tcp --dport {$simple_firewall.$object_id.dst_port} -s {$simple_firewall.$object_id.src_ip} -j DROP
sudo iptables -D FORWARD -p tcp --dport {$simple_firewall.$object_id.dst_port} -s {$simple_firewall.$object_id.src_ip} -j DROP
The syntax {$simple_firewall.$object_id.dst_port} provides a way to access the Microservice variable values in the MSactivator™ configuration database.
The convention is as follow:
{$<MICROSERVICE NAME>.$object_id.<VARIABLE NAME>}
In our case:
-
MICROSERVICE NAME ⇒ simple_firewall
-
VARIABLE NAME ⇒ dst_port
-
MICROSERVICE NAME is the name of the Microservice file without the .xml extension.
The function Import
This regex will extract the firewall parameter and store them in the database
@(?<object_id>\d+) DROP tcp -- (?<src_ip>([0-9]{1,3}\.){3}[0-9]{1,3})[^:]+:(?<dst_port>\d+)@
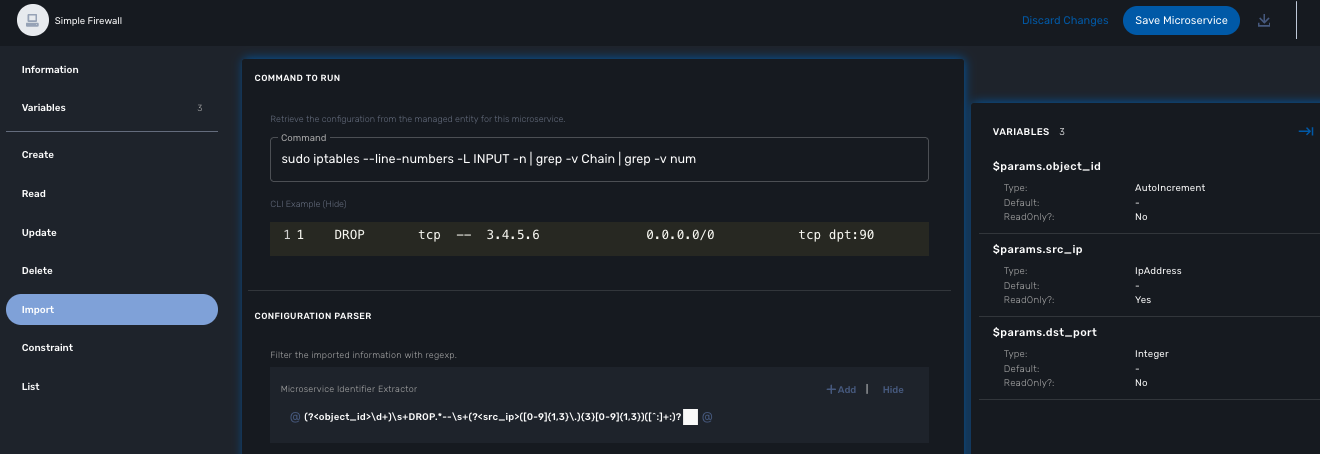
the variable object_id is a mandatory parameter and will be used to identify the Microservice instance in the database.
|
Testing the microservice
The Microservice is ready to be tested.
Make sure that you can add and delete a policy rule, that it’s reflected on the Linux firewall, and that the parameters are also properly synchronised after a call to Create or Delete.
You can also add some iptables rules manually on the Linux CLI and run a configuration synchronization to make sure that your manual changes are properly imported.
Import function: tips and examples
Below you’ll find some example of CLI based configuration and the regex that can be used to extract the variables.
These are only provided as example and you may have to modify them to match you needs.
To help with testing and validating your regular expression, there are many online tools. We, at UBiqube, usually use this one: https://regexr.com/3bhgg
Example 1 : Fortigate, get the syslogd3 config
CLI command: how full-configuration log syslogd3 setting
result:
config log syslogd3 setting
    set status enable
    set server "91.167.210.90"
    set mode udp
    set port 514
    set facility local7
    set source-ip ''
    set format default
end
Here is the Import function implementation to extract the object_id, the status, the server IP and the port.
| config | regex | instance key | value |
|---|---|---|---|
config log syslogd3 setting |
config log (?<object_id>\S+) setting |
syslogd.syslogd3.object_id |
syslogd3 |
set status enable |
\s*set status (?<syslogd3_status>\S+) |
syslogd.syslogd3.syslogd3_status |
enable |
set port 514 |
\s*set port (?<syslogd3_port>\d+) |
syslogd.syslogd3.syslogd3_port |
514 |
set server "91.167.210.90" |
\s*set server "(?<syslogd3_server_ip>[^"]+)" |
syslogd.syslogd3.syslogd3_server_ip |
91.167.210.90 |
Microservice Variables
Variables are usually defined to hold the parameters to be passed to a microservice. For instance, the port and IP address variables to block for a firewall policy. Variables can also be used to display user information that is not meant to be used for configuring the managed entity.
Setting variables is done from the section "Variables" on the microservice editor screen.
When you create a new microservice, the variable object_id, which is mandatory, will be set and cannot be deleted. It can be edited to set its type and other advanced properties.
All variables are referenced with the prefix $params which is automatically set in the variable editor screen and when a variable has to be referenced in one of the microservice functions, you need to use the syntax {$params.your_variable} (see below for more examples).
By default the type of a variable is String but other types are supported such as Integer, Boolean, Password, IpAddress, ObjectRef,…
Overview
The variables are usually defined to hold the parameters to be passed to the microservice. For instance, the port and IP address variables to block for a firewall policy. Variables can also be used to display user information that is not meant to be used for configuring the managed entity.
Setting different types for variables will affect the way the microservice end user form, for creating or updating it, will render.
For instance, the type boolean will render the variable with true/false radio buttons.
Default settings
When creating or editing a variable, there are some information that need to be provided in the "Default" section.
Variable
Name of the variable to use in the implementation of the microservice or when calling the REST API.
Type
The type of the variable should be one from the list below
String
The default type for a variable, it will accepts any value and the UI renders it as a input field without any specific validation with regards to the value set.
Boolean
Accepts a value of true or false, the UI will render it as a checkbox.
Integer
Represents a numerical value, the UI will render it as an input field restricted to integer.
Password
This data type represents a multi-character value that is hidden from plain sight (i.e. the value is represented as asterisks instead of clear text).
IP address and IP mask, IPv6 address
| not supported yet |
This data type will enforce data validation against IP address formats.
Composite
Provide the means to add control over the behavior of the microservice user form.
It can be used, for instance, to show/hide part of the form based on the value of another component of the form.
Link
Display a URL in the user form, for instance to link to some documentation on a web server.
It is usually used in read-only mode with the URL set as the default value of the variable
Auto Increment
Maintains an incremental counter within the instances of a microservice for a managed entity. This is useful for managing the object_id.
Increment |
an integer to define the increment step |
Start Increment |
the initial value for the variable |
Microservices sharing the same increment |
a list of microservices that are also using the same variable and need to share a common value. |
Device
This type is used to allow the user to select a managed entity and pass it’s identifier to the implementation of the microservice.
Index
| not supported yet |
Microservice Reference
Reference an other microservice from a microservice and use the referenced microservice variable value.
By default the value used from the referenced microservice is the object_id.
The referenced microservice should be configured in the "Advanced" section:
"Microservice Reference" field: enter the name of the microservice to reference. The form field will provide the list of possible microservice to choose from based on the the input value. It is possible to select more that one microservice in order to import values from different part of the configuration imported by the referenced microservice.
You can optionnaly controle the values that matches between the local microservice and the remote one (the one which is referenced).
This works as filtering: it searches the value for local variable and shows the rows which match to the remote.
This is useful if the values to be selected from the referenced microservices have to match the local variables.
Example:
As an example, let’s consider 2 microservices, the first one to configure addresses and the second one to configure group of addresses. The group of addresses will be referencing the addresses.
An address is composed of an IP and a mask and is associated to an interface. A group of addresses will be composed to multiple addresses but the group of address is also associated to an interface.
In this use case, when a group of address is associated to an interface, each addresses selected must be associated to the same interface.
In the screenshot below we can see that "grp1" is associated to interface "port1" and "grp2" is associated to "port2"
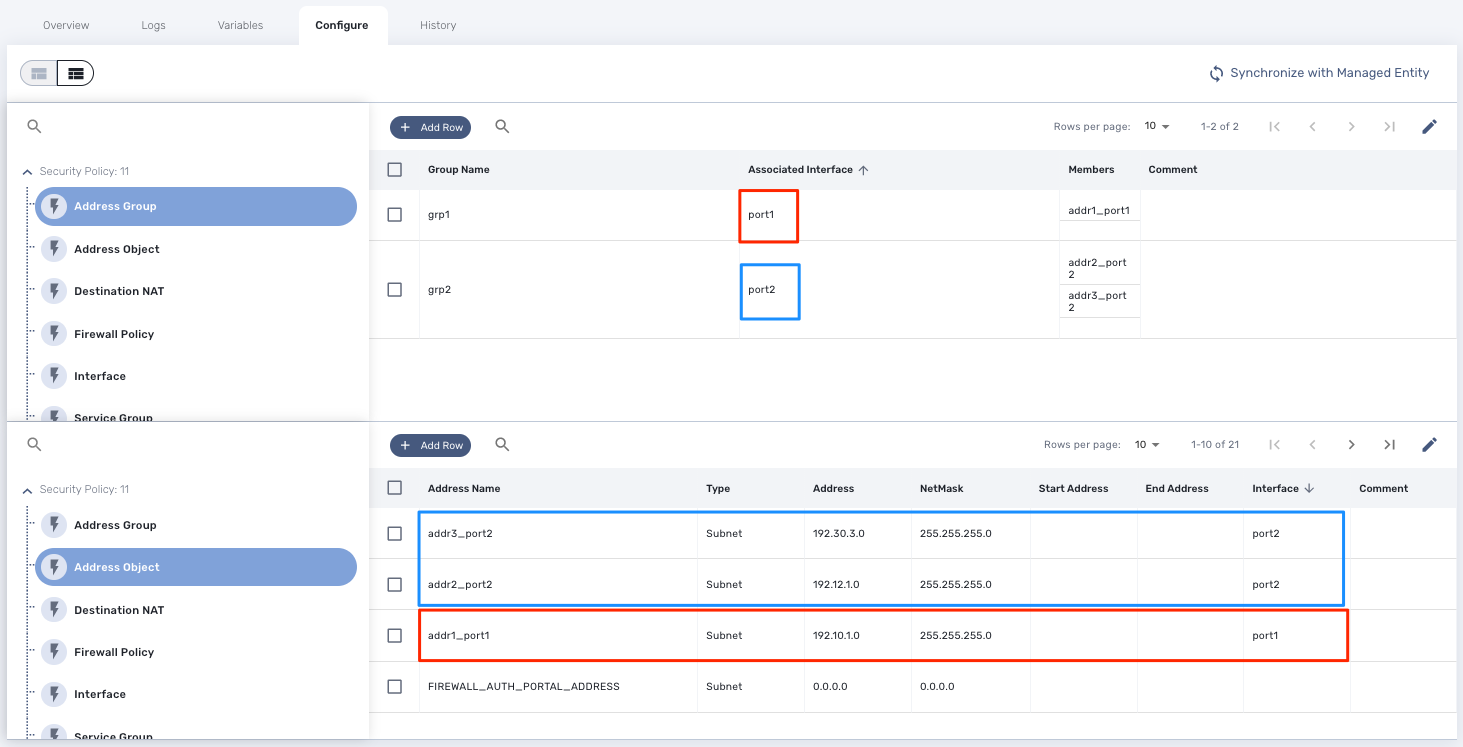
The address group microservice variable "Member" is typed as a "Microservice Reference" that points to the address microservice:
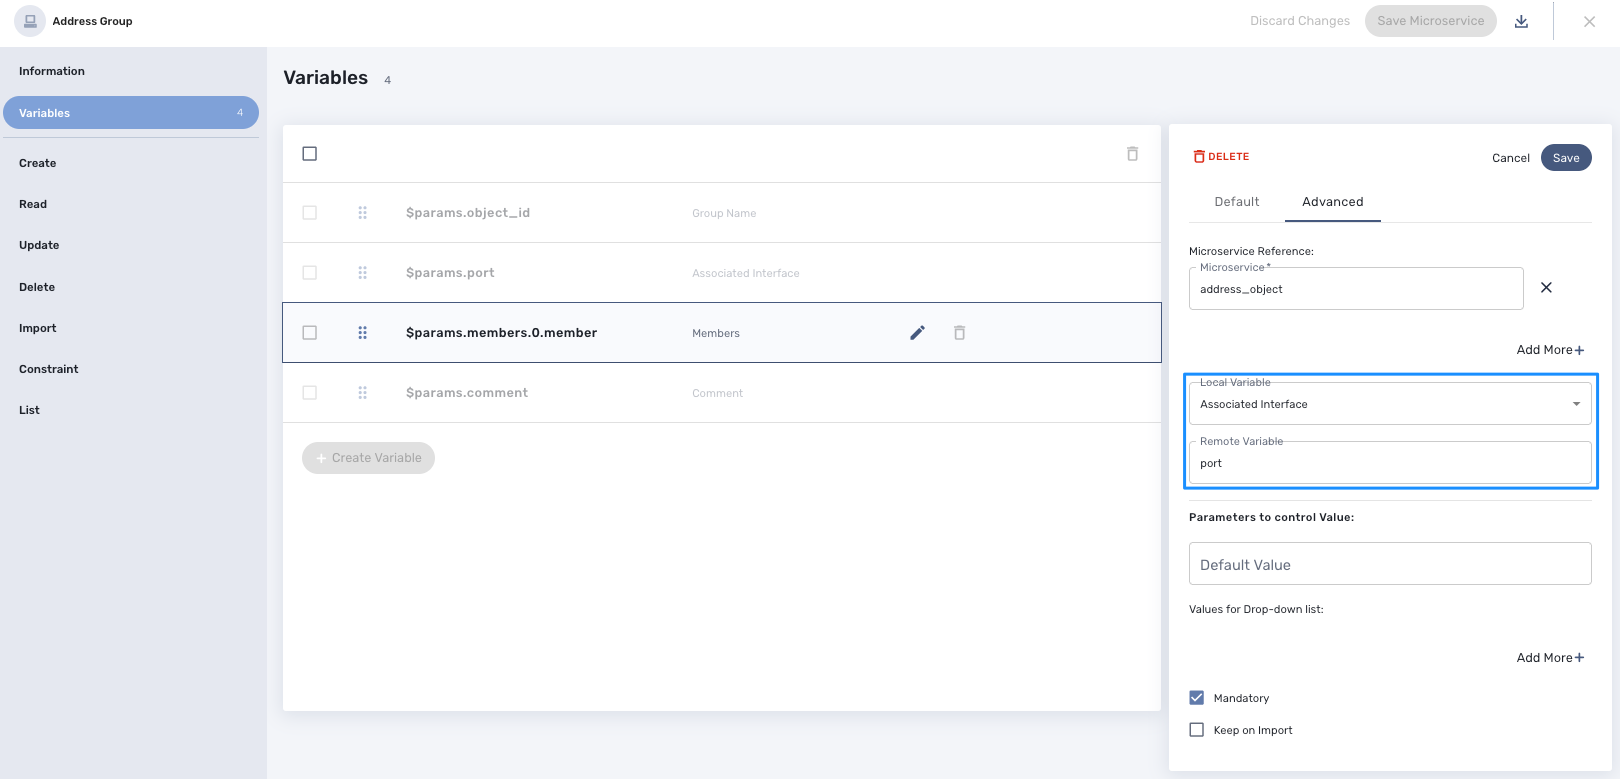
In this case, when creating an address group instance, the values available for the variable "$params.members.0.member" will be filtered so that the only one available are the ones with a match between the local variable value and the remote variable value.
If "port1" is selected for the "Associated Interface" then only "addr_port1" will be listed
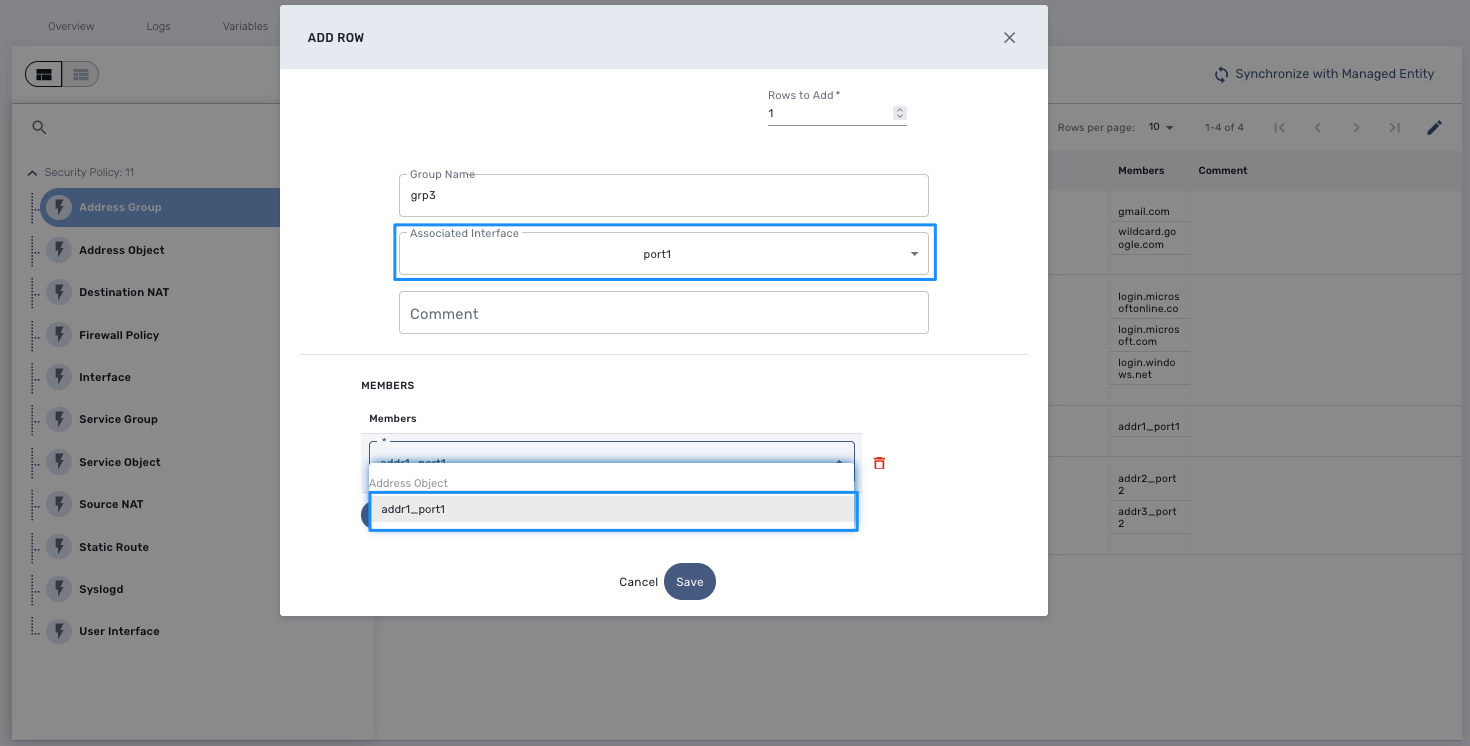
If not filtering is used (by default):
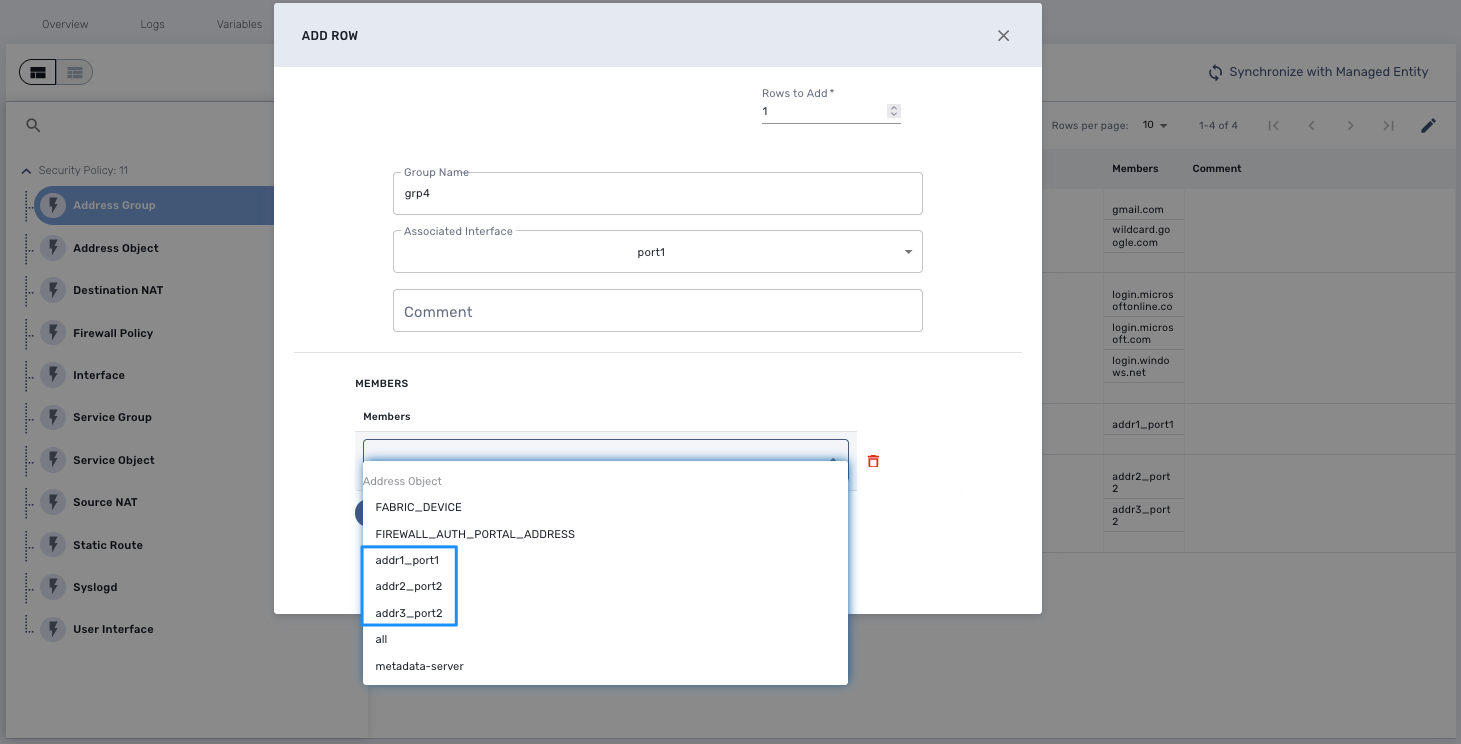
Display Name
The display value for the variable name.
Description
An optional description of this variable.
Advanced settings
Depending on the selected type, some advanced parameters may be differ.
| Setting | Description |
|---|---|
Default Value |
the default value that will be used when creating a new microservice instance |
Values for Drop-down |
a list of possible value the user can choose from |
Allow adding free value |
available if some value(s) were provided for drop-down |
Mandatory |
a value has to be provided for this variable |
Read only variable |
the value cannot be edited |
Section Header |
group some variables in the microservice console (see below) |
Group variable |
group some variables in the auto-rendered UI for creating or editing a microservice (see below |
Show only in edit view |
hide the variable from the microservice console |
Group Variables
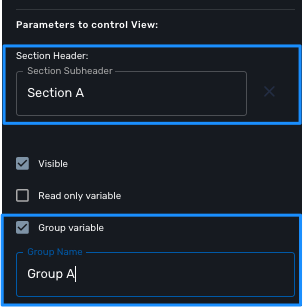
You can group the variables in the microservice console by setting a section header name. The UI will gather the columns under a common header
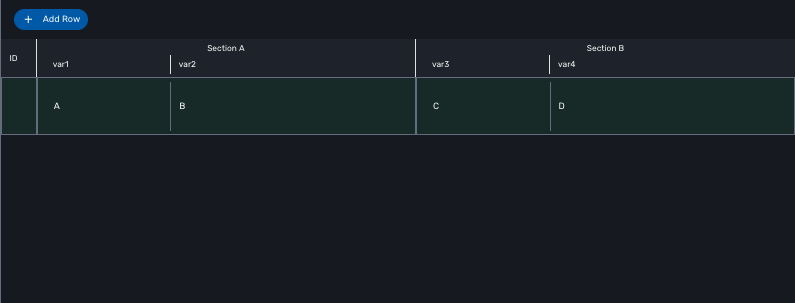
It is also possible to group variables to provide a better user experience when creating or editing a microservice and go from a flat view
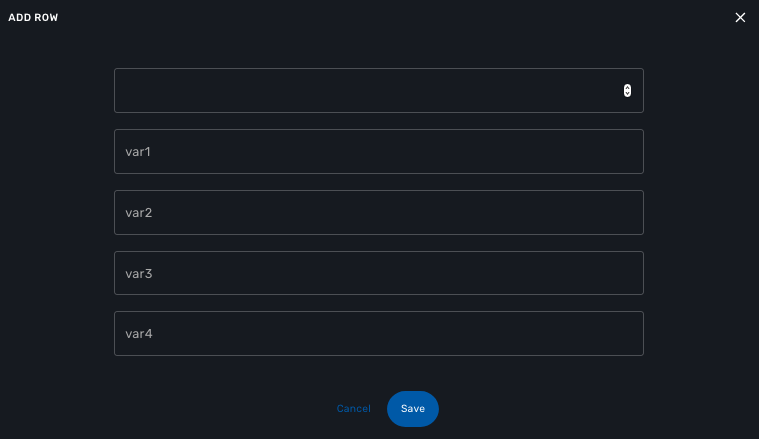
To a more organized view
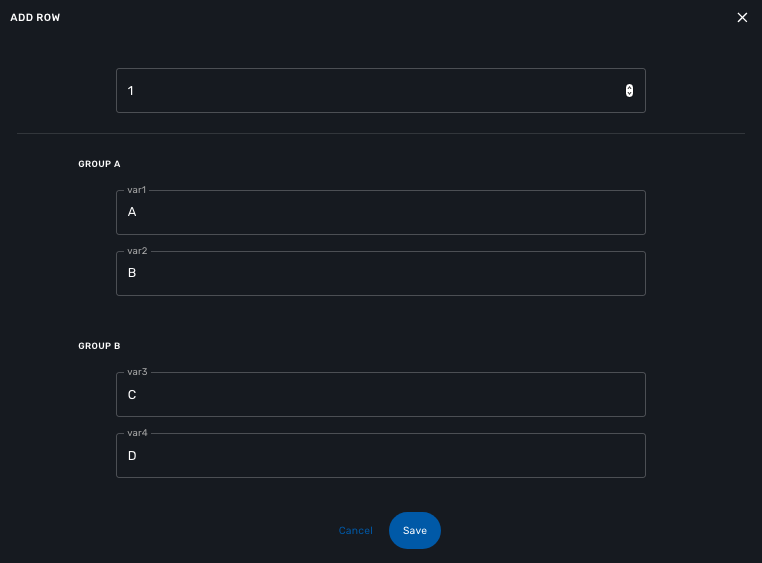
Array settings
When you are dealing with variable arrays, these options will let you control the possible actions a user can have over the array.
Variable arrays
To create a variable array, you need to follow a precise naming convention: $params.<ARRAY NAME>.0.<ELEMENT NAME>. The 0, is the separator that will allow the UI and the configuration engine that this variable is an array.
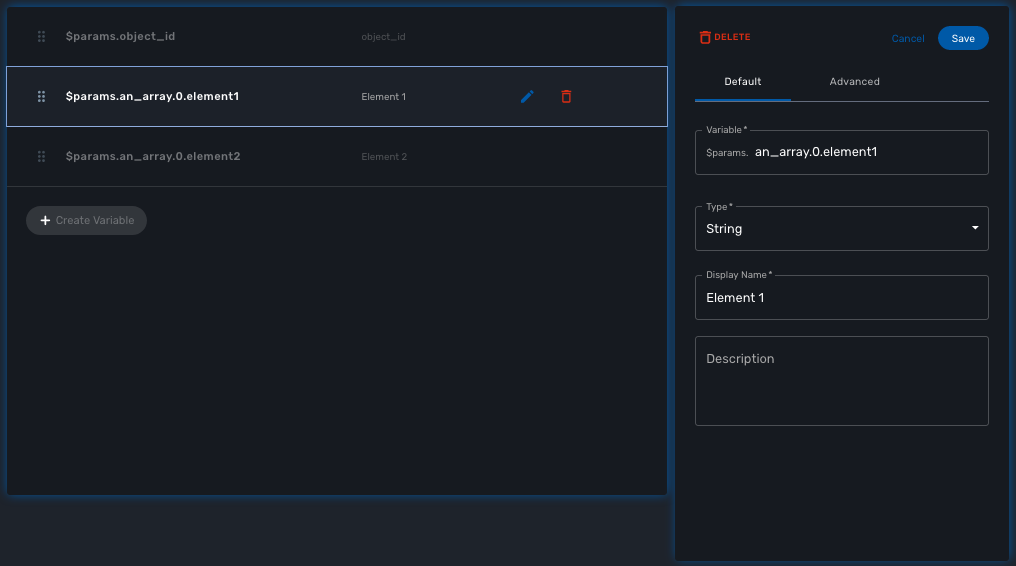
This type of variables should be used when extracting configuration with an array variable extractor in the Import function of the microservice.

Microservice Template with PHP Smarty
Smarty templates
The Smarty templates are used to generate output using variables and control structures like if/then/else conditional branches or for/each loops.
The output is used to configure the managed entities or retrieve data from the database.
Parameter substitution in microservice
Whether you are developing a CLI or and XML (REST) based microservice, the CoreEngine will rely on parameter substitution to generate the configuration or the call to the REST API.
The parameters, coming from the web UI or the REST API are passed to the template engine as a JSON payload.
For ClI microservices, the parameters, extracted from the JSON payload will be used to generate the piece of configuration to apply to the managed entity (this is the role of the adapter).
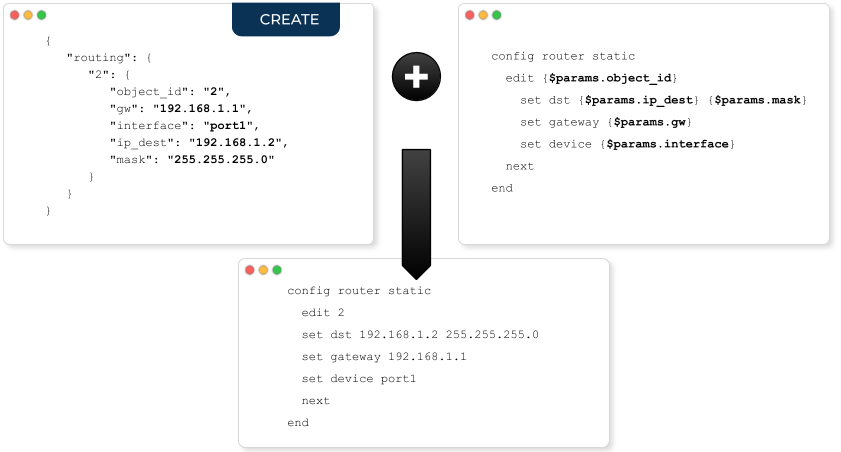
For XML/REST, the parameters are used to build the REST API call, either by updating the path and/or by updating the payload
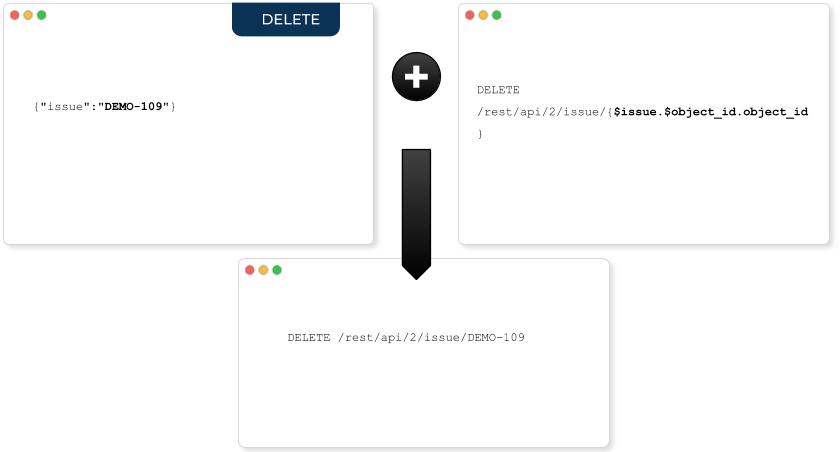
Variables
From database
For an object object_name, the instance instance_id can accessed with the syntax
{$object_name.instance_id}
Object fields can be accessed via
{$object_name.instance_id.field_name}
Array values can be accessed with the syntax
{$object_name.instance_id.array_name.array_index}
Special case of object_id
{$object_id}
can also be used. It corresponds to the object ID given in the JSON parameter object.
The {$object_id} variable can also be used to retrieve an object instance from the database.
{$object_name[$object_id|object_id]}
is the instance of object_name corresponding to the object ID given in parameters.
Smarty has a specific meaning for the '.' dot character, so it is not allowed in $object_id variable. In order to solve this issue, it is better to use {$params.object_id} instead of {$object_id} when generating the configuration.
In order to reference the value of another object, the Smarty modifier '|object_id' can be use.
Example:
v2.0/subnets/{$subnets[$params.object_id|object_id].uuid}
will fetch the uuid parameter of the 'subnets' object having $params.object_id id.
Control Structures
Control structures are used to generate output using complex data, like list of objects, or optional parts.
Conditionals
{if},{elseif},{else}
{if} statements in Smarty have much the same flexibility as PHP if statements, with a few added features for the template engine. Every {if} must be paired with a matching {/if}. {else} and {elseif} are also permitted. All PHP conditionals and functions are recognized, such as ||, or, &&, and, is_array(), etc.
The following is a list of recognized qualifiers, which must be separated from surrounding elements by spaces. Note that items listed in [brackets] are optional. PHP equivalents are shown where applicable.
| Qualifier | Alternates | Syntax Example | Meaning | PHP Equivalent |
|---|---|---|---|---|
== |
eq |
$a eq $b |
equals |
== |
!= |
ne, neq |
$a neq $b |
not equals |
!= |
> |
gt |
$a gt $b |
greater than |
> |
< |
lt |
$a lt $b l |
less than |
< |
>= |
gte, ge |
$a ge $b |
greater than or equal |
>= |
⇐ |
lte, le |
$a le $b |
less than or equal |
⇐ |
=== |
$a === 0 |
check for identity |
=== |
|
! |
not |
not $a |
negation (unary) |
! |
% |
mod |
$a mod $b |
modulous |
% |
is [not] div by |
$a is not div by 4 |
divisible by |
$a % $b == 0 |
|
is [not] even |
$a is not even |
[not] an even number (unary) |
$a % 2 == 0 |
|
is [not] even by |
$a is not even by $b |
grouping level [not] even |
($a / $b) % 2 == 0 |
|
is [not] odd |
$a is not odd |
[not] an odd number (unary) |
$a % 2 != 0 |
|
is [not] odd by |
$a is not odd by $b |
[not] an odd grouping |
($a / $b) % 2 != 0 |
telephony-service
{if isset($params.ntp_server_ip_address) && $params.ntp_server_ip_address != ''}
 ntp-server {$params.ntp_server_ip_address}
{/if}
{if isset($params.maximum_ephones) && $params.maximum_ephones != ''}
 max-ephones {$params.maximum_ephones}
{/if}
{if isset($params.maximum_dial_numbers) && $params.maximum_dial_numbers != ''}
 max-dn {$params.maximum_dial_numbers}
{/if}
{if isset($params.source_ip_address) && $params.source_ip_address != ''}
 ip source-address {$params.source_ip_address} port {$params.source_port} {if isset($params.secondary_ip_address) && $params.secondary_ip_address != ''} secondary {$params.secondary_ip_address} {/if}
{/if}
Loops
{foreach},{foreachelse}
{foreach} is used to loop over an associative array as well a numerically-indexed array, unlike {section} which is for looping over numerically-indexed arrays only.
The syntax for {foreach} is much easier than {section}, but as a trade off it can only be used for a single array. Every {foreach} tag must be paired with a closing {/foreach} tag.
Attribute Name |
Type |
Required |
Default |
Description |
from |
array |
Yes |
n/a |
The array you are looping through |
item |
string |
Yes |
n/a |
The name of the variable that is the current element |
key |
string |
No |
n/a |
The name of the variable that is the current key |
-
Required attributes are from and item.
-
{foreach} loops can be nested.
-
The from attribute, usually an array of values, determines the number of times {foreach} will loop.
-
{foreachelse} is executed when there are no values in the from variable.
telephony-service
{foreach from=$params.tftp_load item=tftp}
 load {$tftp.phone_type} {$tftp.firmware_file_name}
{/foreach}Use the smarty function 'sortby_typed' to sort arrays by key.
'sortby_typed' take a list of comma separated keys with a type (int or string) for each one.
{foreach $params.access_list|@sortby_typed:"acl_seq_number:int" as $acl}    (1)
    {$acl.acl_seq_number} {$acl.acl_rule} {$acl.acl_protocol} {$acl.acl_src}
{/foreach}| 1 | sort by the key 'acl_seq_number' and convert the key values to integer |
Variable assignment
Under certain circumstances it is necessary to use a local temporary variable to generate the output.
{assign}
{assign} is used for assigning template variables during the execution of a template.
Attribute Name |
Type |
Required |
Default |
Description |
var |
string |
Yes |
n/a |
The name of the variable being assigned |
value |
string |
Yes |
n/a |
The value being assigned |
!
{assign var='sdid' value=$SD->SDID}
{foreach from=$VOIP_PROFILE->SD_list.$sdid->MAIL_BOX_list item=mbox}
!
voicemail mailbox owner {$mbox->MBOX_USERNAME}
login pinless any-phone-number
end mailbox
{/foreach}
!It is also possible to assign a value to a microservice variable.
This is only possible in the post-import section.
{if isset($params.syslogd_server_ip) && $params.syslogd_server_ip != ""}
      {assign_object_variable var="_syslogd_server_ip" value="{$params.syslogd_server_ip}"}  (1)
{/if}| 1 | assign the value of $params.syslogd_server_ip to $params._syslogd_server_ip |
Common problems
The templates are extracted from the XML definition files, and evaluated with Smarty. Some behavior must be known prior to developing templates.
XML non supported characters
Templates within XML definition files must not contain characters like < or >. You’ll get an error:
Bad format for local file due to XML parsing error.
<command name="CREATE">
    <operation>
you can't "write" if ({$foo} < 1) in your templates
    </operation>
</command>
Templates must be embedded into a <[CDATA[ ]]> tag to avoid most of the problems of non-supported characters.
<command name="CREATE">
    <operation><[CDATA[
    you can "write" if ({$foo} < 1) in your templates
]]></operation>
</command>
Extra line break and space characters
The templates reflects what is written within the <operation> and </operation> tags, that’s why it is recommended to write
 When a Smarty command like {if} {foreach}, or also an ending tag like {/if} {/foreach}, is immediately followed by a line break, then this line break is REMOVED by Smarty.
This does NOT apply to variables.
When a Smarty command like {if} {foreach}, or also an ending tag like {/if} {/foreach}, is immediately followed by a line break, then this line break is REMOVED by Smarty.
This does NOT apply to variables.
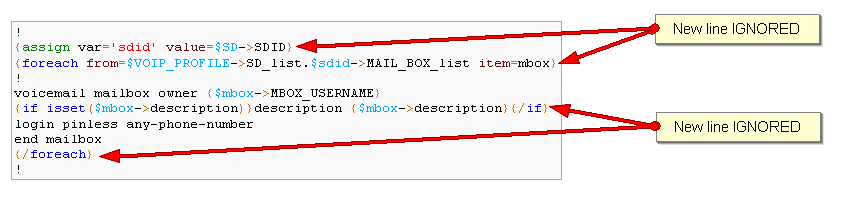
In this case the
{if} ... {/if}
The line should have been split.
!
{assign var='sdid' value=$SD->SDID}
{foreach from=$VOIP_PROFILE->SD_list.$sdid->MAIL_BOX_list item=mbox}
!
{if isset($mbox->description)}
 description {$mbox->description}
{/if}
voicemail mailbox owner {$mbox->MBOX_USERNAME}
login pinless any-phone-number
end mailbox
{/foreach}
!
Sometimes the line cannot be split, the solution is to either add a space character at the end of the line, if it remains correct for the configuration, or add an extra new line (one line left blank).

Syntax errors
The Smarty syntax is very strict, for example an error in the template
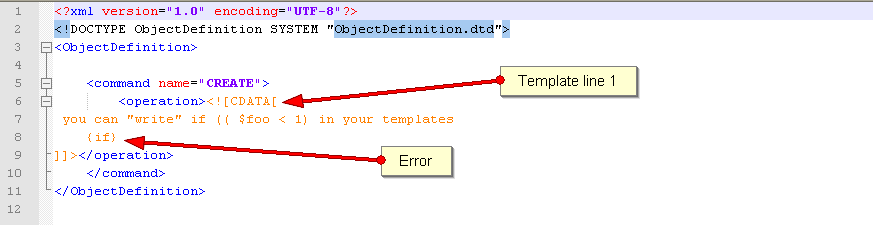
will return
Operation Failed
Currently, the only way to find the root cause is to check the file
/opt/sms/logs/smsd.log
An example of an error found in the log
2011/08/12:12:28:42:(D):smsd:ZTD66206:JSCALLCOMMAND:: Managing object test
2011/08/12:12:28:42:(D):smsd:ZTD66206:JSCALLCOMMAND:: compute file /opt/fmc_repository/CommandDefinition/CISCO/MyTemplates/test.xml for key test
2011/08/12:12:28:42:(D):smsd:ZTD66206:JSCALLCOMMAND:: ELEMENT CREATE found
2011/08/12:12:28:42:(E):smsd:ZTD66206:JSCALLCOMMAND:: PHPERROR: [256] Smarty error: [in var:2313098ec4aae945b1a201eb153cf778 line 3]: syntax error: 'if' statement requires arguments (Smarty_Compiler.class.php, line 1270) error on line 1093 in file /opt/sms/bin/php/smarty/Smarty.class.php
This indicates that in the file
CommandDefinition/CISCO/MyTemplates/test.xml
for the command
CREATE
an error occured in the 3rd line of the template
syntax error: 'if' statement requires arguments
Usage of the {$object_id} variable
The {$object_id} variable is used to reference objects into the database and is used as a variable name in Smarty in the template resolution.
When the parameters are passed to the engine the JSON payload is:
{"interface":{"Interface-Service-engine0/0":{"ip_address":"1.2.3.4"}}}
The variables values are:
-
{$object_id}⇒ "Interface-Service-engine0/0" -
{$params.ip_address}⇒ "1.2.3.4"
When writing a template {$object_id} can be used in expressions like {$interface.$object_id.ip_address} to retrieve database values.
The CREATE template looks like:
<command name="CREATE">
    <operation>
    <![CDATA[
interface {$object_id}
{if isset($params.dot1qtrunk) && $params.dot1qtrunk == 'Yes'}
 switchport trunk encapsulation dot1q
 switchport mode trunk
{/if}
{if isset($params.vlan_id) && $params.vlan_id != ''}
 encapsulation dot1Q {$params.vlan_id}
{/if}
{if isset($params.ip_address) && $params.ip_address != ''}
 ip address {$params.ip_address} {$params.subnet_mask}
{/if}
{if $object_id|stristr:"Ethernet" && !$object_id|stristr:"."}
{if isset($params.enable_nbar) && $params.enable_nbar != '' && $params.enable_nbar == 'Yes'}
 ip nbar protocol-discovery
{/if}
{if isset($params.enable_media_type) && $params.enable_media_type != '' && $params.enable_media_type == 'Yes'}
 max-reserved-bandwidth 100
 media-type sfp
{/if}
{if isset($params.description) && $params.description != ''}
 description {$params.description}
{/if}
...
no shutdown
!]]>
    </operation>
</command>
Skip the parsing of the {$ } structure
Normally, the {$ } structure is used in the microservices template to specify the variables to be parsed by the Smarty templating engine (ex: {$parms.my_variable}) but in some case, you might need this structure to be ignored by the parser because it is part of the actual configuration to build for the managed entity.
This is where you need to use the keywords ldelim (left delimiter )and rdelim (right delimiter).
For example consider the following pattern in the "Microservice Configuration" section of the REST based Microservice definitions:
"subUnit": "{$v_vni-0-0_WAN-1__unit}"
Here we want to use the '{' and '}' characters in their literal values and have to specify not to be parsed. We can do this by replacing '{' with '{ldelim}' and replacing '}' with '{rdelim}' and hence for the line mentioned above we have to change it as shown below:
"subUnit": "{ldelim}$v_vni-0-0_WAN-1__unit{rdelim}"
Getting Started with Microservices Design
Overview
This tutorial explores the design and development of a Microservice.
Microservices can be used to manage a wide variety of services on numerous types of devices, such as:
-
network equipment (routers, switches, UTM, etc.)
-
virtualization infrastructure managers (VMWare, AWS, Openstack, etc.)
-
Linux servers
Lab setup
The first step in Microservice design and development is to have a device to manage.
This tutorial assumes you have a properly configured, running MSactivator™.
If you have followed the quickstart guide you should have a running MSactivator™ with a Linux managed entity, created and activated.
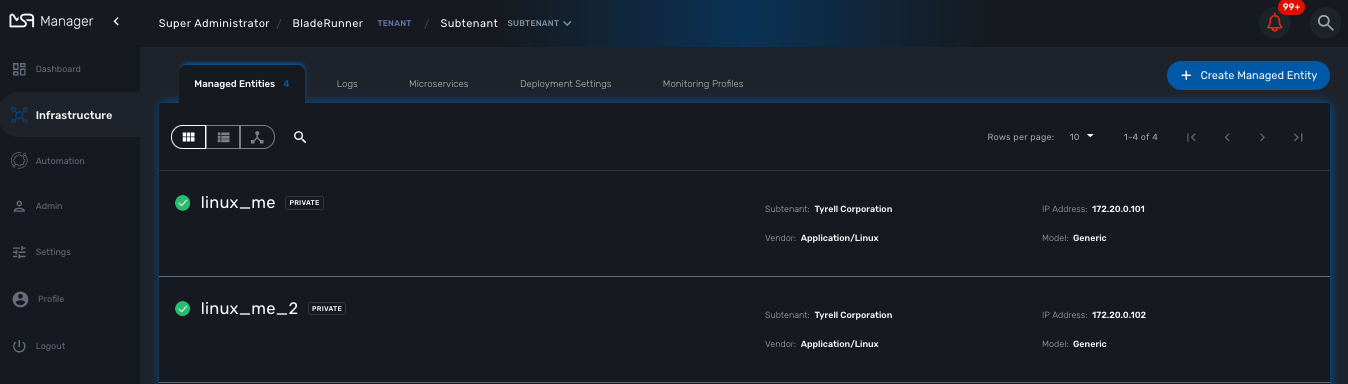
Microservice design
As a first example of Microservices, we will start with managing this Linux Managed Entity.
On Linux, the CLI command to list the users is:
cat /etc/passwd.
To create a new user use the command:
useradd
and to delete a user use the command:
userdel.
[root@managed-linux ~]# cat /etc/passwd
root:x:0:0:root:/root:/bin/bash
bin:x:1:1:bin:/bin:/sbin/nologin
...
sshd:x:74:74:Privilege-separated SSH:/var/empty/sshd:/sbin/nologin
oprofile:x:16:16:Special user account to be used by OProfile:/home/oprofile:/sbin/nologin
tcpdump:x:72:72::/:/sbin/nologin
The list of users in /etc/passwd contains the system users that we want to exclude from the scope of the Microservice. We will cover this later in this tutorial.
Create a new microservice
Click on the "Integration" from the left menu, select the tab "Microservices" and click on "Create Microservice"
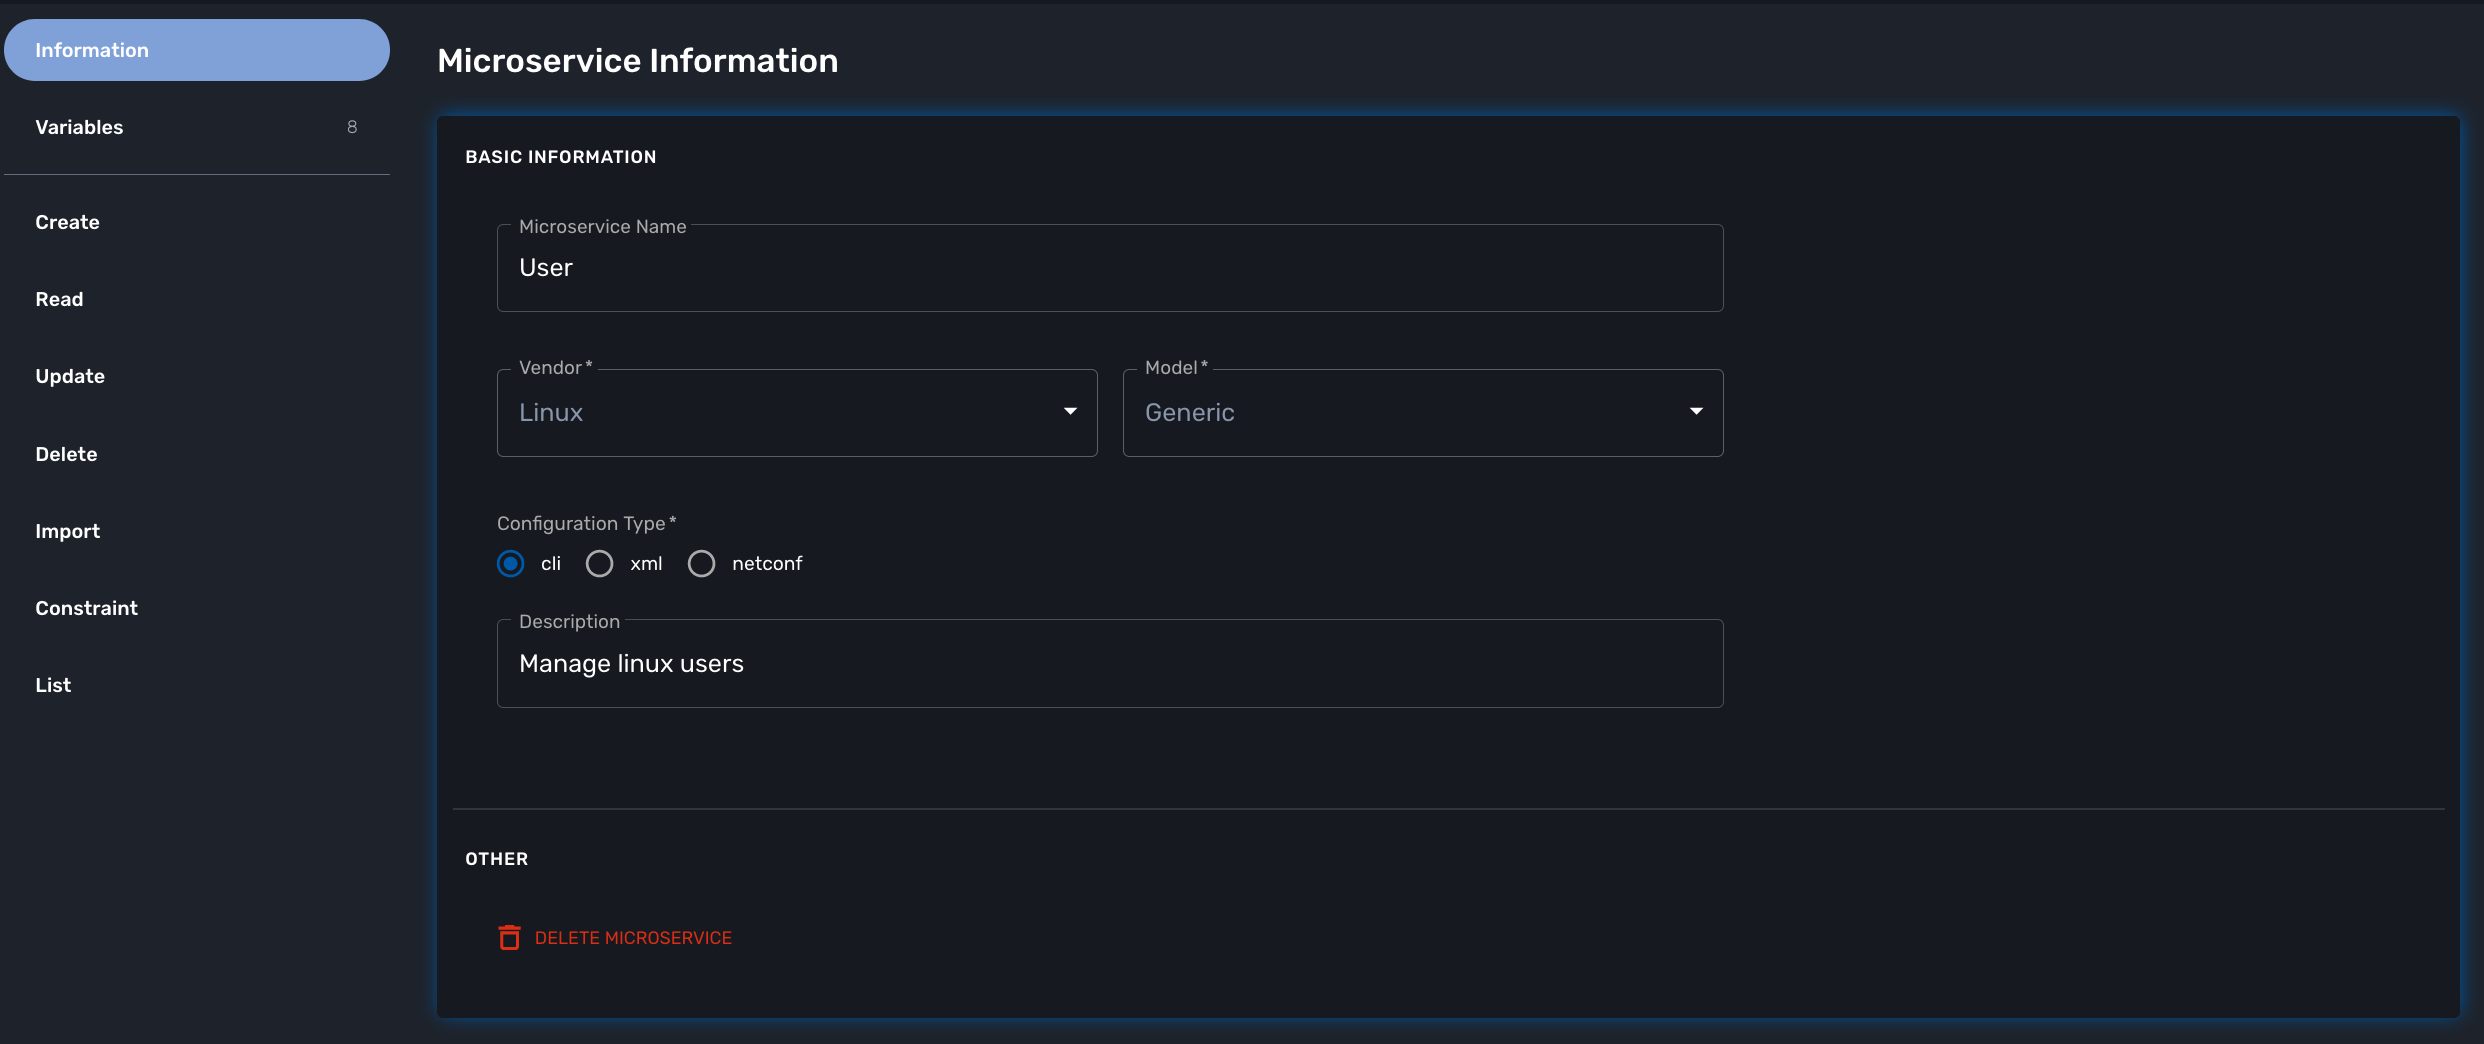
Import the users with the IMPORT function
The result of the CLI command cat /etc/passwd is composed of a line with the format:
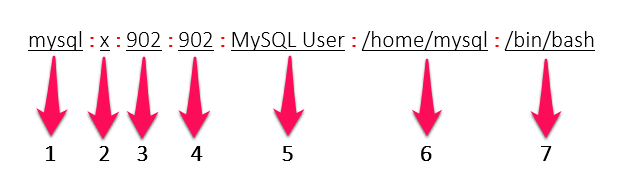
-
Username: Used when user logs in. It should be between 1 and 32 characters in length.
-
Password: An "x" character indicates that an encrypted password is stored in /etc/shadow file. Please note that you need to use the passwd command to compute the hash of a password typed at the CLI, or to store/update the hash of the password in /etc/shadow file.
-
User ID (UID): Each user must be assigned a user ID (UID). UID 0 (zero) is reserved for root. UIDs 1-99 are reserved for other predefined accounts. UIDs 100-999 are reserved by the system for administrative and system accounts/groups.
-
Group ID (GID): The primary group ID (stored in /etc/group file)
-
User ID Info: The comment field. This allows you to add extra information about the users, such as user’s full name, phone number etc. This field is used by finger command.
-
Home Directory: The absolute path to the directory the user will be in when they log in. If this directory does not exists then users directory becomes /.
-
Command/Shell: The absolute path of a command or shell (/bin/bash). Typically, this is a shell. Please note that it does not have to be a shell.
Now let’s build the IMPORT function with the parsers to extract the information listed above.
Firstly, we have to decide how the Microservice ID (the mandatory variable name "object_id") will be extracted. In this case, since the username is unique on Linux, the obvious choice is to use the username field as the object_id.
The regular expression to extract the fields from the result of cat /etc/passwd is:
@(?<object_id>[^:]+):(?<password>[^:]+):(?<user_id>[^:]+):(?<group_id>[^:]+):(?<comment>[^:]*):(?<home_dir>[^:]+):(?<shell>[^:]+)@| it may be useful to use an online regular expression tester when developing and testing regular expressions. One such online tester can be found here: http://lumadis.be/regex/test_regex.php (see reference below) |
Once validated, this regular expression can be used in the field "Micro service identifier extractor" of the IMPORT function builder:
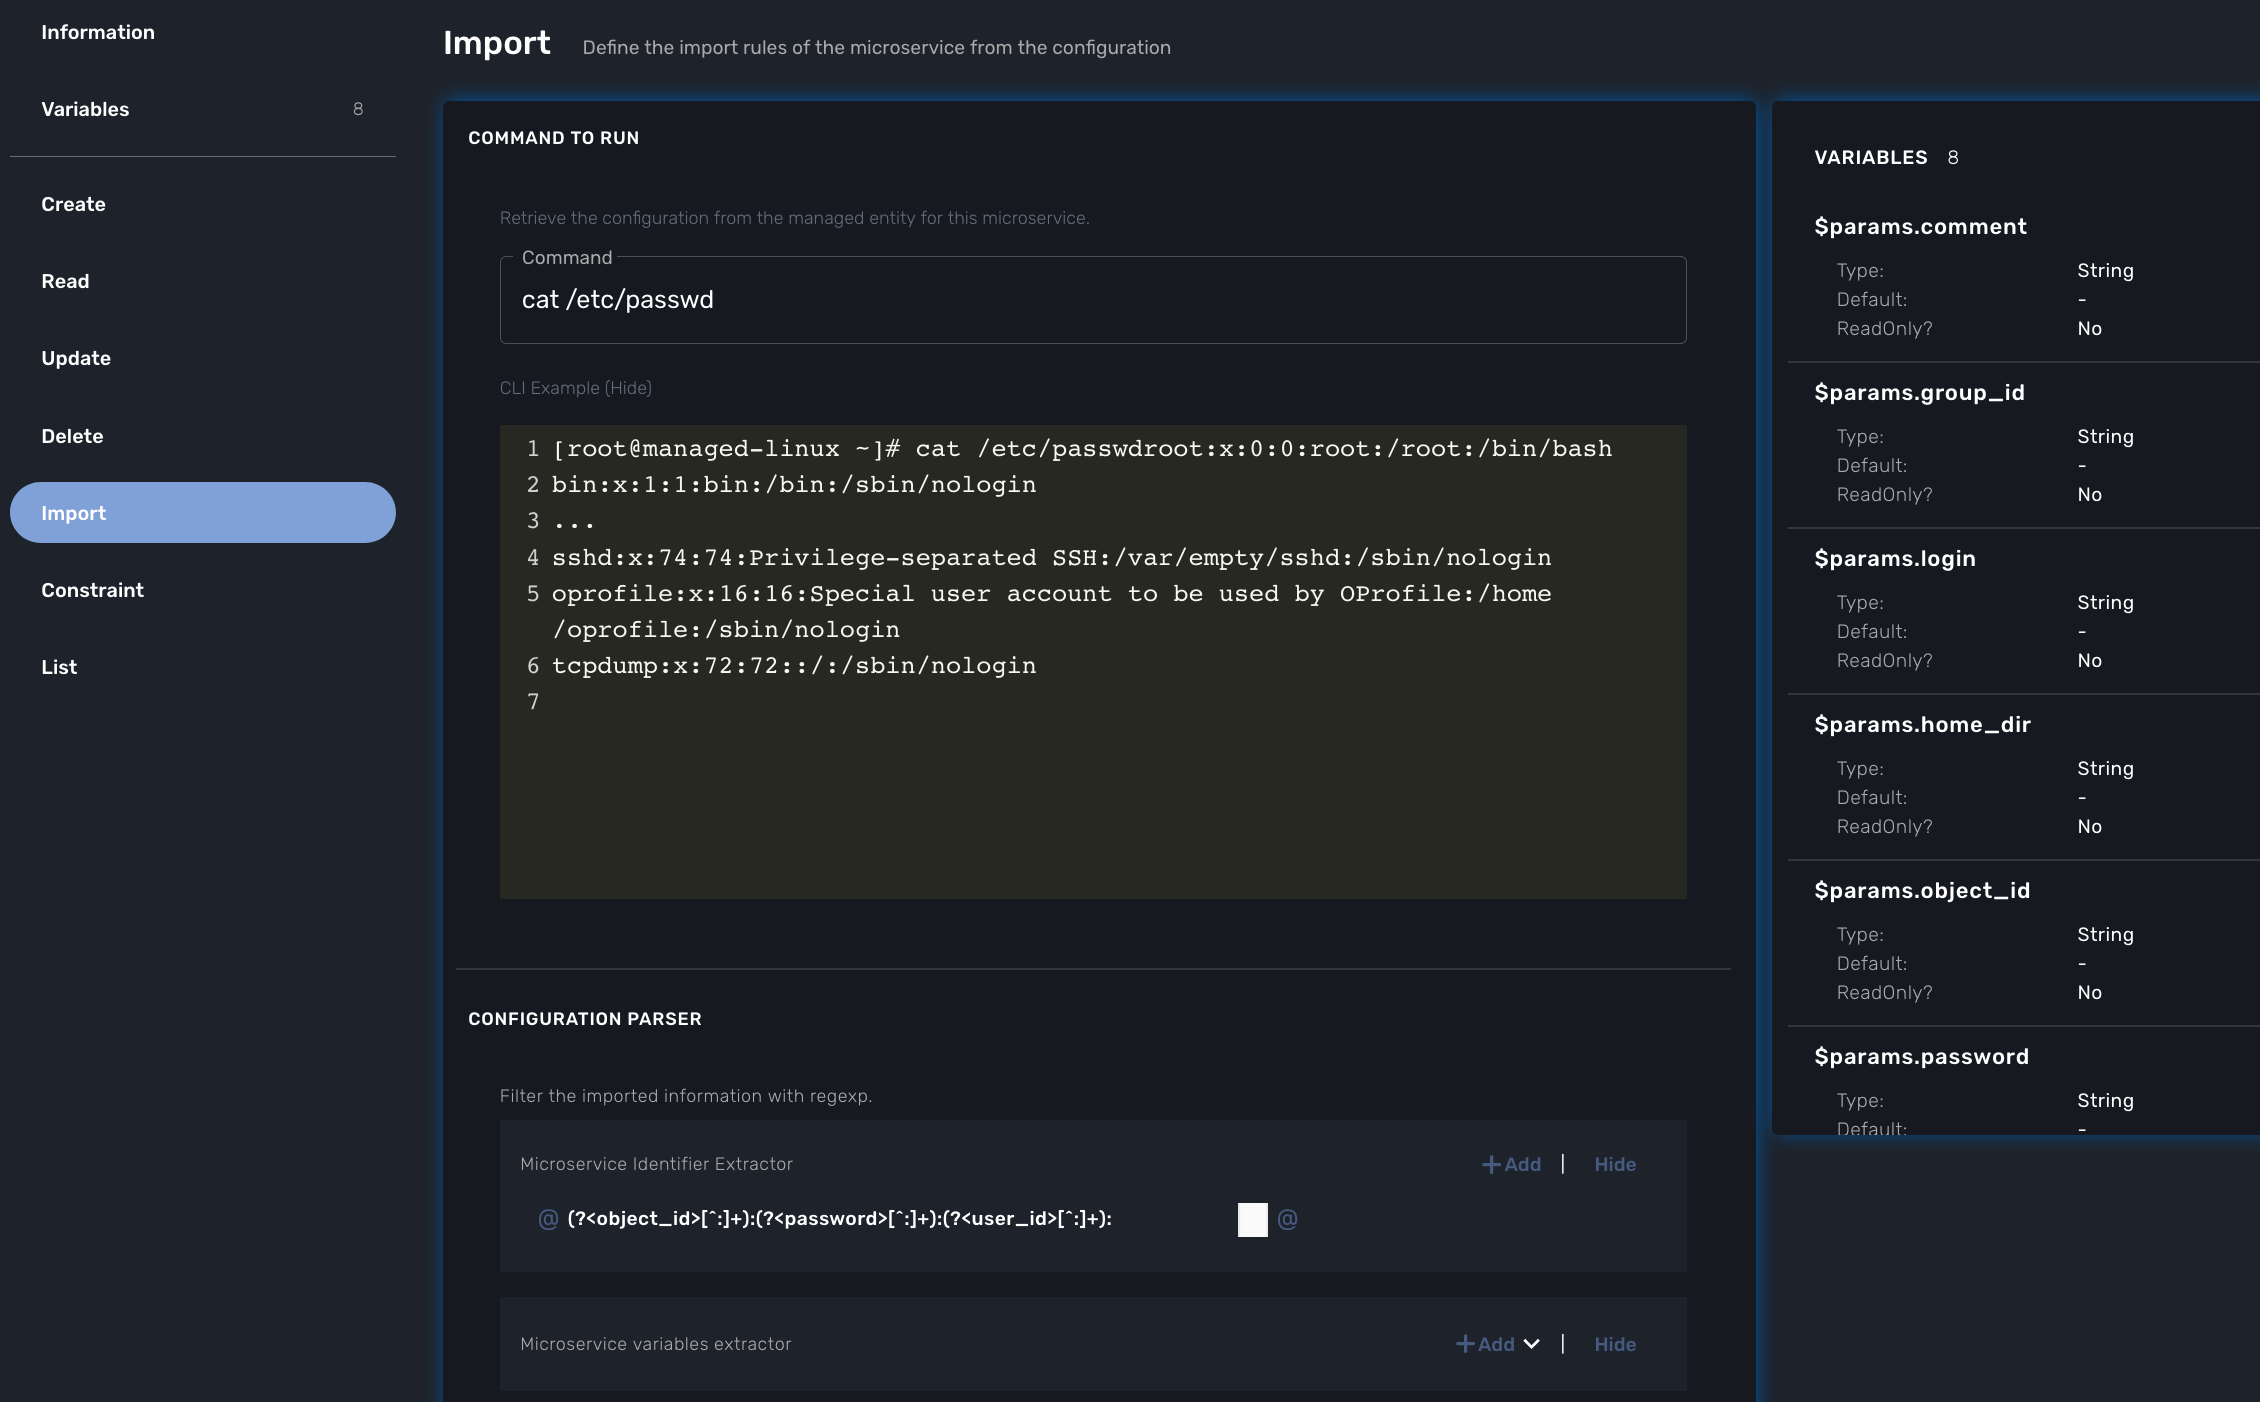
| the variables such as object_id, password, have to be created in the variable section of the Microservice. |
Variable creation
Variable are user to store the Microservice instance state in the database.
To create a variable, you need to go to the "Variables" section in the left menu and click "Create Variable".
When refering to a variable in the Create/Update or Delete functions, you will always have to prefix them by $params. (see below).
This is why the UI to create the variable is showing the string "$params."
|
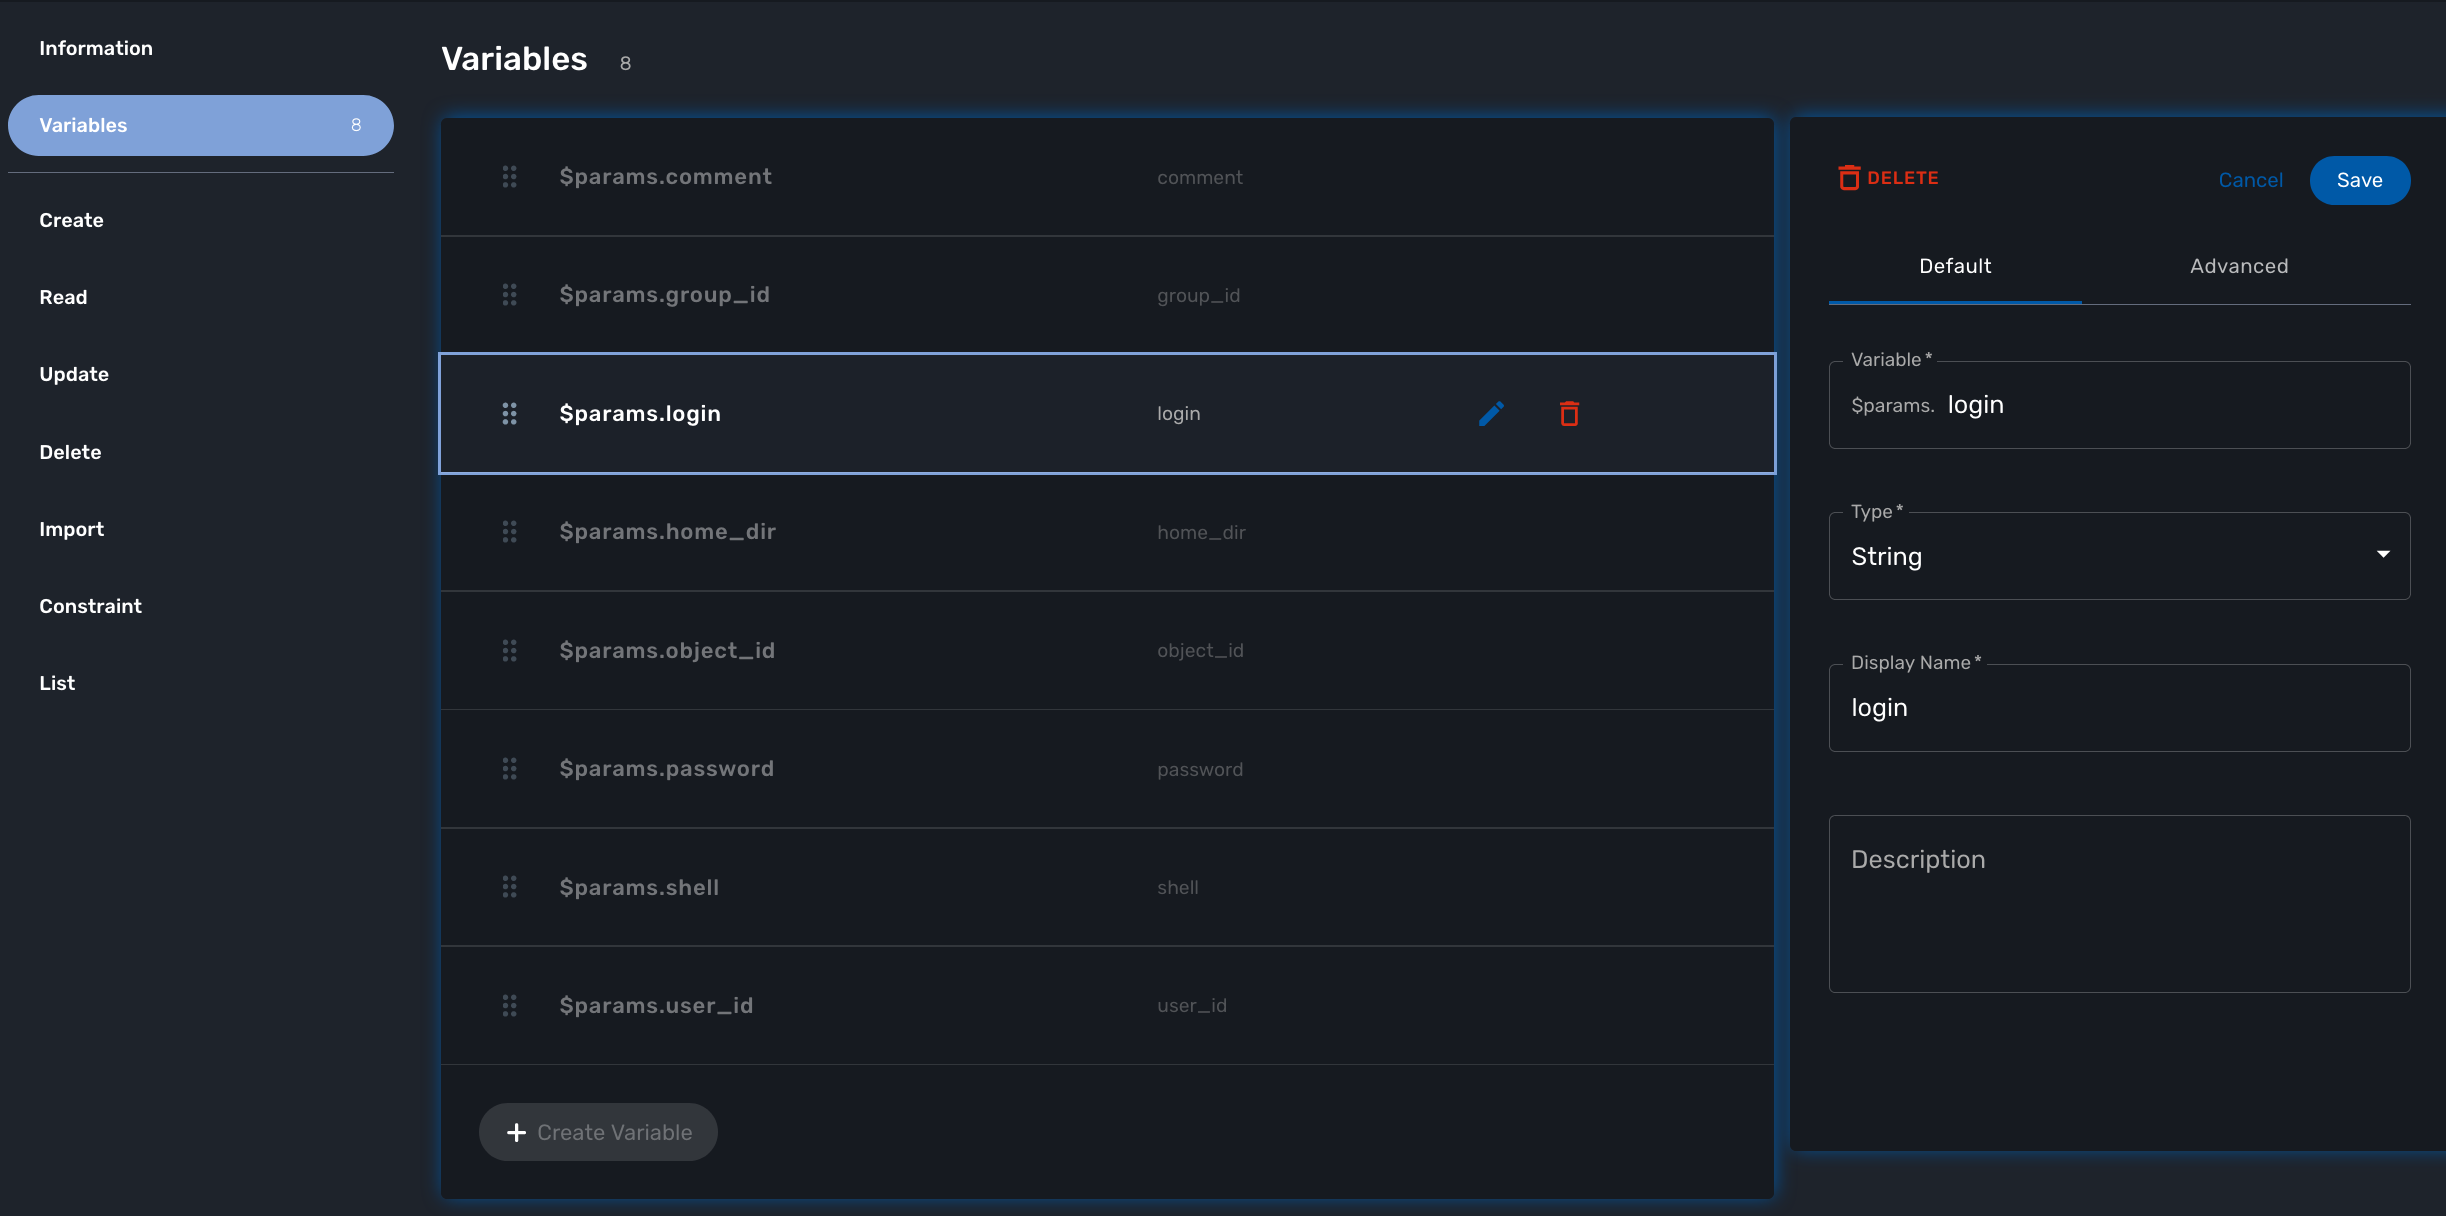
For more detail on Microservice variables and type, you can go to the documentation about the microservice editor
Run the first test
In order to use your microservice, you need to associate it to a managed entity with a deployment setting and use the synchronization button from the microservice console under the tab "Configure".
Save your work, run the synchronization, and view at the result.
Add and remove users with the CREATE and DELETE functions
On Linux, the CLI command to add a user is:
useradd -m -d HOME_DIR -c COMMENT -p PASSWORD LOGINand to delete a user is:
userdel -f -r LOGINSince it is possible to set the password as a parameter of the user creation, you need to modify the definition of the variable "password" and make it visible and mandatory (but only in the edit view).
You are now ready to implement the CREATE:
useradd -m -d {$params.home_dir} -c "{$params.comment}" -p {$params.password} {$params.object_id}
and the DELETE:
userdel -f -r {$users.$object_id.object_id}| the use of the syntax {$users.$object_id.object_id} in the implementation of the DELETE. |
$users is the name of the Microservice definition file as created in the repository: users.xml. This syntax is used to get values from the MSactivator™ database, where Microservice instances are stored. The syntax has to be used when implementing a DELETE because the DELETE must delete the entry from the database AND remove the configuration from the device (in this case we want to delete a user).
Going further
With this simple implementation you can manage users on a Linux system, but there are some additional use cases that you may want to address:
-
Is it possible to ignore the system users when importing (for example: bin, daemon, adm,…)?
-
What if no comment is provided?
-
What if no home dir is provided?
How to ignore the system users
In order to ignore system users during the import, you have to find criteria to help differentiate system users from the users created by the system admin. You can chose to ignore all users that do not have the home directory under /home. The regular expression would then look like:
@(?[^:]+):(?[^:]+):(?[^:]+):(?[^:]+):(?[^:]*):(?/home/.+):(?[^:]+)@This regular expression will exclude all users that do not have a home directory under /home, but the system users below will still be imported:
oprofile:x:16:16:Special user account used by OProfile: /home/oprofile:/sbin/nologin
Since the shell is not part of the parameters that we have exposed in the creation form, you can decide to import the user that have /bin/bash as shell:
@(?[^:]+):(?[^:]+):(?[^:]+):(?[^:]+):(?[^:]*):(?/home/.+):/bin/bash@In this case, the variable shell is no longer needed, so you can remove it from the list of the variables. You also have to update the CREATE function to make sure that the home dir will always be under /home, and you have to make sure that the variable home_dir is read only.
useradd -m -d /home/{$params.object_id} -c "{$params.comment}" -p {$params.password} {$params.object_id}How to handle optional empty variables
The comment is an optional parameter, so you need to make sure that the execution of the CLI command useradd will not fail if no comment is passed as a parameter.
This can be achieved with a bit of scripting in the CREATE function:
{if empty($params.comment)}
useradd -m -d /home/{$params.object_id} -p {$params.password} {$params.object_id}
{else}
useradd -m -d /home/{$params.object_id} -c "{$params.comment}" -p {$params.password} {$params.object_id}
{/if}Microservice Order Command REST API
Type of Execution
Generate Configuration
This execution type is used to preview the configuration to be generated, before storing it in the database or applying it to the device.
The configuration generated by the command is returned to the caller, no other action is performed.
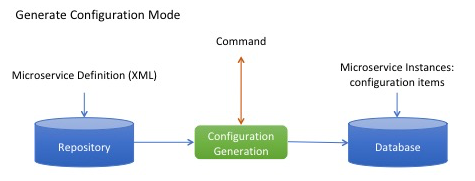
REST API syntax
POST /ordercommand/get/configuration/{deviceId}/{commandName}
body : microservice parameters formatted as JSON-
deviceId is the ID (long) of the device to manage.
-
commandName is the command to apply to the device.
-
objectParameters are the JSON formatted list of objects and attributes.
The call below is using the Microservice vlan.xml to do simple VLAN management on a Cisco Catalyst IOS
curl -u ncroot:NCROOT_PWD  -XPOST http://MSA_IP/ubi-api-rest/ordercommand/get/configuration/311/UPDATE -d '{
	"vlan": {
		"4001": {
			"name": "MyVlan4001",
			"ports": "Fa0\/11",
			"object_id": "4001",
			"status": "active"
		}
	}
}'
Where:
MSA_IP is the IP address of MSactivator™.
This will return:
{
	"commandId": 0,
	"message": "vlan 4002\nname MyVlan4002\n",
	"status": "OK"
}
Store Configuration
This execution type is used to store the configuration objects in the database.
The configuration generated by the command is returned to the caller, and the generated objects are stored in the database.
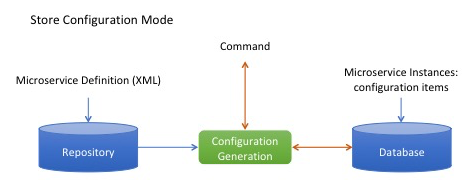
Web service syntax:
PUT /ordercommand/store/configuration/{deviceId}/{commandName}
body : microservice parameters formatted as JSON-
deviceId is the ID (long) of the device to manage
-
commandName is the command to apply to the device
-
objectParameters are the JSON formatted list of objects and attributes.
The call below is using the Microservice vlan.xml to do simple VLAN management on a Cisco Catalyst IOS
curl -u ncroot:NCROOT_PWD  -XPUT http://MSA_IP/ubi-api-rest/ordercommand/store/configuration/311/CREATE -d '{
	"vlan": {
		"4020": {
			"name": "MyVlan4020",
			"ports": "Fa0\/11",
			"object_id": "4020",
			"status": "active"
		}
	}
}'
Where:
NCROOT_PWD is the password to the MSactivator™.
It will return:
{
	"commandId": 0,
	"message": "vlan 4020\nname MyVlan4020\n",
	"status": "OK"
}
Execute Command
This execution type is used to store the configuration in the database and apply it to the device.
The configuration generated by the command is returned to the caller, the actions are also performed in the database and on the device.
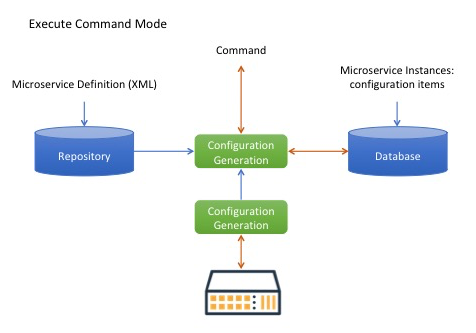
Executing Commands
Use the following method to trigger OrderCommand (Microservices) methods present at the following URL:
http://MSA_IP/ubi-api-rest/ordercommand/execute/{deviceId}/{commandName}-
{deviceId}: is the device sequence number or the numeric part of the MSactivator™ Device ID
-
{commandName}: can take one of the following values: — UPDATE — IMPORT — CREATE — DELETE
curl -u ncroot:NCROOT_PWD  -XPUT http://MSA_IP/ubi-api-rest/ordercommand/execute/311/CREATE -d '{
	"vlan": {
		"4020": {
			"name": "MyVlan4020",
			"ports": "Fa0\/11",
			"object_id": "4020",
			"status": "active"
		}
	}
}'
As shown above, the http body contains what’s called "object parameters" in general.
Root Element
The root element of the JSON body is the Microservice definition identifier. Here, the first JSON element refers to the Microservice definition name.
In the example above it is syslogd. This is the same string that is used when creating a Microservice definition in the Microservices builder. Hence, in the above case the Microservice was named: syslogd.xml.
Microservice Instance JSON Object
The JSON element at the next level is the object_id of the Microservice instance, in the above case it is: SyslogConf.
| the object_id is also passed as an instance variable. |
Microservice Instance Variables
The third level of JSON elements is the instance variables, represented in a standard name-value pair.
In this case the value of the variable {commandName} is IMPORT (import operation of Microservice) and the http response body will contain the list of Microservice instances.
As an example, let’s say we have three instances of syslogd Microservices on the device, with instance names:
-
SyslogConf
-
MSASyslogConf
-
NMSSyslogconf
The response of the import will be the following JSON object, that will be part of the http response:
{
	"syslogd": {
		"SyslogConf": {
			"object_id": "SyslogConf",
			"syslogd3_status": "enable",
			"syslogd3_port": "514",
			"syslogd3_server_ip": "1.2.2.3"
		},
		"MSASyslogConf": {
			"object_id": "MSASyslogConf",
			"syslogd3_status": "enable",
			"syslogd3_port": "514",
			"syslogd3_server_ip": "2.3.4.5"
		},
		"NMSSyslogconf": {
			"object_id": "NMSSyslogconf",
			"syslogd3_status": "disable",
			"syslogd3_port": "514",
			"syslogd3_server_ip": "7.6.5.4"
		}
	}
}Microservice Order Stack Management API
Overview
This documentation describes the order stack management API.
This REST API is also used internally by the MSactivator™ portal.
Each API is described below with the REST call, a textual description, the parameters and a section 'detail'. The 'detail' section provides some insight into the inner workings of the API. For instance, what is the database table impacted or what CoreEngine API command is being used.
The detail on the CoreEngine API command is very important because it is directly related to the adaptor implementation for a specific vendor.
API description
Add an order to the Stack
curl --location -s -k -H "Authorization: Bearer TOKEN“ -XPUT http://MSA_IP/ubi-api-rest/orderstack/command/{deviceId}/{commandName} -d {objectParameters}Adds a command in the stack and returns the ID of the order in the stack.
-
deviceId: the database identifier of the managed device, for example: 123.
-
commandName: possible values are CREATE UPDATE IMPORT DELETE
-
objectParameters: in JSON format, for example:
'{
"interface" : {
   "port2" : {
       "ip" : "1.2.4.5",
       "object_id" : "port2",
       "mask" : "255.255.255.0"
         }
     }
}'Write into database (redsms.sd_crud_object).
Generate the configuration from the stack
curl --location -s -k -H "Authorization: Bearer TOKEN“ -XGET http://MSA_IP/ubi-api-rest/orderstack/configuration/{deviceId}Generates the configuration based on the stacked orders for a device.
-
deviceId: the database identifier of the managed device, for example: 123.
loop on commands in the stack call SMS verb end loop
The SMS verb is equivalent to the following CLI command command:
sms -e JSCALLCOMMAND -i 'deviceId commandName 0' -c 'objectParameters'| with the CLI command above the parameter 0 is used along with commands such as CREATE, UPDATE or DELETE and generate configuration without access to the database or the device |
Generates the configuration and store the configuration from the stack
curl --location -s -k -H "Authorization: Bearer TOKEN“ -XPUT http://MSA_IP/ubi-api-rest/orderstack/configuration/{deviceId}Generates the configuration based on the stacked orders for a device and stores the configuration items in the database.
-
deviceId: the database identifier of the managed device, for example: 123.
loop on commands in the stack
  call SMS verb
  write in database (redsms.sd_crud_object)
end loop
The SMS verb is equivalent to the following command: sms -e JSCALLCOMMAND -i 'deviceId commandName 1' -c 'objectParameters'
| In the CLI command above the parameter 1 is used along with commands such as CREATE, UPDATE or DELETE and generate the configuration and stores the configuration items in the database. |
The device configuration is not impacted.
Generate the configuration from the stack and apply to the device
curl --location -s -k -H "Authorization: Bearer TOKEN“ -XPOST http://MSA_IP/ubi-api-rest/orderstack/execute/{deviceId}Generates the configuration based on the stacked orders for a device and stores the configuration items in the database and executes all the commands on the device.
-
deviceId: the database identifier of the managed device, for example: 123.
loop on commands in the stack
  call SMS verb
  write in database (table redsms.sd_crud_object)
  execute command on the device
end loop
The SMS verb is equivalent to the following command: sms -e JSCALLCOMMAND -i 'deviceId commandName 2' -c 'objectParameters'
| with the CLI command above, the parameter 2 is used along with commands such as CREATE, UPDATE or DELETE which will generate the configuration, store the configuration items in the database and apply the configuration to the device. |
List the orders in the stack
curl --location -s -k -H "Authorization: Bearer TOKEN“ -XGET http://MSA_IP/ubi-api-rest/orderstack/{deviceId}Lists the stacked orders for a device.
-
deviceId: the database identifier of the managed device, for example: 123.
Read from the database (table redsms.sd_crud_object).
Get the detail of a stack command
curl --location -s -k -H "Authorization: Bearer TOKEN“ -XGET http://MSA_IP/ubi-api-rest/orderstack/command/{deviceId}/{commandId}Gets the detail of a stack command based on its identifier in the stack.
-
deviceId: the database identifier of the managed device, for example: 123.
-
commandId: the identifier of the command in the stack.
Read in database (redsms.sd_crud_object).
Clear the stack
curl --location -s -k -H "Authorization: Bearer TOKEN“ -XDELETE http://MSA_IP/ubi-api-rest/orderstack/{deviceId}Clears the stack for a device.
-
deviceId: the database identifier of the managed device, for example: 123.
Remove in database (redsms.sd_crud_object)
Delete a command from the stack
curl --location -s -k -H "Authorization: Bearer TOKEN“ -XDELETE http://MSA_IP/ubi-api-rest/orderstack/command/{deviceId}/{commandId}Deletes a command from the stack based on the command ID.
-
deviceId: the database identifier of the managed device, for example: 123.
-
commandId: the identifier of the command in the stack.
Remove in database (redsms.sd_crud_object).
Apply the configuration for a device
curl --location -s -k -H "Authorization: Bearer TOKEN“ -XPUT http://MSA_IP/ubi-api-rest/device/push_configuration/{deviceId} -d {configuration}Perform a push configuration for a device.
-
deviceId: the database identifier of the managed device, for example: 123.
-
configuration: the configuration in JSON format.
{
    "configuration": "config system interface\nedit port1\nset ip 192.168.1.10 255.255.255.0\nend"
}Applies the configuration to the device.
Get the status of the API push_configuration
curl --location -s -k -H "Authorization: Bearer TOKEN“ -X GET http://MSA_IP/ubi-api-rest/device/push_configuration/status/{deviceId}Gets the status of the push configuration from the device.
deviceId: the database identifier of the managed device, for example: 123.
Read the status from the database.
Adapter Development
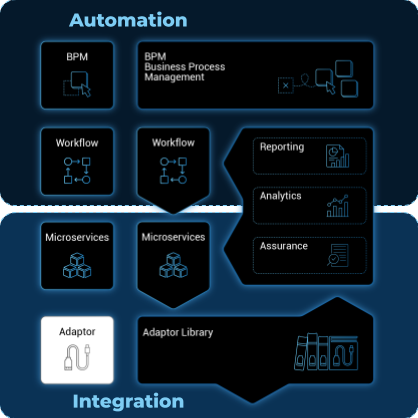
The adapters are the "drivers" that allow the main MSactivator™'s engine to seamlessly communicate with the Managed Entities for configuration assurance, event collection, et cetera.
Overview
The adapters are designed per vendor because they need to address the specifics of each vendor especially when the Managed Entitie does not provide a REST management API.
The MSactivator™ provides a library of device adaptors ready to use.
The libraries are implemented in PHP which makes extension and customization easy.
How to find, install, activate the adapters
The Adapters are packaged in the MSactivator™, in the "msa_dev" container, under /opt/devops/Openmsa_Adapters which is a git repository configured to point to github.
$ sudo docker-compose exec msa-dev bashMany other Adapters are available on the Adapters Github repository
The installation of an Adapter is covered in this documentation: How to install an Adapter
REST Generic adapter
The REST Generic adapter, available on Github will allow you to integrate most vendors that exposes a REST management interface API.
This adapter is included in the mini lab.
If you need to create a new vendor based on the REST Generic adapter, you can follow this guide in the next section
How to create a new vendor based on an existing adapter
Overview
Some adapters were designed to be generic in order to have little dependencies with a specific vendor.
This is the case for the REST and the Linux adapters.
-
The REST Generic adapter will let you quickly integrate a new managed entity with a REST based management API
-
The Linux Generic can be used for any Linux distribution or vendor model based on Linux
but you may want to also have the vendor name and entity model both appear in the list of supported vendor instead of REST/Generic or Linux/Generic.
Doing so will allow you to filter the microservice and deployment setting based on the vendor name and model name.
This will ease the organization of your integration files.
How to do it
Let’s assume that you want to add vendorA / modelX to the list of supported vendors.
You will need an access to the MSactivator™ CLI of the msa_dev container.
sudo docker-compose exec msa-dev bash
use msa_dev for MSactivator™ version 2.6 or older.
|
Create the new model in the Adapters github repository
If you followed the quickstart guide to install your instance of MSactivator™ the image msa_dev contains a clone of github.com/openmsa/Adapters
We are going to create the new model in this local repository. Using a git repository has several advantages such as using a working branch to track your changes and revert them if needed or contributing to the community by creating a pull request to submit your code.
Go to the repository
cd /opt/devops/OpenMSA_Adapters/
Go to the adapter definition directory and create a new folder for your new vendor model. By convention the folder name should be defined as <vendor name>\_<model name>
cd adapters
mkdir -p vendorA_modelX/conf
cd vendorA_modelX/conf
You need to create 2 configuration files to define this new model:
-
device.properties : define the adapter properties for UI display (msa-ui)
-
sms_router.conf : define the adapter config for the Core Engine (msa-sms)
| In the github repository you will find lot of doc and example about these files |
# VendorA / ModelX              (1)
manufacturer.id = 18082020      (2)
manufacturer.name = VendorA
model.id = 18082020             (3)
model.name = ModelX

obsolete = false
| 1 | any comment you find useful. |
| 2 | select a unique, numeric ID. Your current date it a good choice. |
| 3 | same as above. |
| the model ID and the manufacturer ID don’t have to be identical and you can have several models for the same vendor by using different model ID |
# VendorA / ModelX                  (1)
model       18082020:18082020       (2)
path        rest_generic            (3)
| 1 | any comment you find useful. |
| 2 | format: <manufacturer.id>:<model.id>. |
| 3 | the path to an existing adapter code (example: rest_generic or linux_generics). |
Update file owner
chown -R ncuser.ncuser /opt/devops/OpenMSA_Adapters/adapters/vendorA_modelX
Install and activate the new vendor
Exit the docker container msa-dev and restart the API container and the CoreEngine service
$ sudo docker-compose restart msa-api
$ sudo docker-compose restart msa-sms
Verify your new vendor is available
Once the services have restart, you can connect to the UI to check that a new vendor/model is listed when you create a new managed entity.

First, verify that you can create a new managed entity and try to activate it.
During the activation, you can monitor the logs of smsd daemon from the Core Engine and check that the adapter code being used is the one from rest_generic (or any other you may have set in sms_router.conf above)
Login to the CoreEngine container
$docker-compose exec msa-sms bash
Set the configuration log level to DEBUG
# tstsms SETLOGLEVEL 255 255
Monitor the logs with tail
# tail -F /opt/sms/logs/smsd.log
It should output something similar to that. You can verify that the managed entity activation is relying on the adapter code specified in sms_router.conf
2020/08/18:14:39:09:(I):smsd:BLR129:JSAPROVISIONING:: analysing verb JSAPROVISIONING arg BLR129
2020/08/18:14:39:09:(D):smsd:BLR129:JSAPROVISIONING::   arg: 1.2.3.4 aa aa
2020/08/18:14:39:09:(D):smsd:BLR129:JSAPROVISIONING:: SMSSQL_GetSD current node name is msa, sdid = BLR129
2020/08/18:14:39:09:(D):smsd:BLR129:JSAPROVISIONING:: Alloc SDINFO for BLR129
2020/08/18:14:39:09:(D):smsd:BLR129:JSAPROVISIONING:: RUN script /opt/sms/bin/php/rest_generic/do_provisioning.php
2020/08/18:14:39:09:(D):smsd:BLR129:JSAPROVISIONING:: LOAD_ONCE /opt/sms/bin/php/rest_generic/adaptor.php
2020/08/18:14:39:09:(D):smsd:BLR129:JSAPROVISIONING:: LOAD_ONCE /opt/sms/bin/php/rest_generic/rest_generic_connect.php
2020/08/18:14:39:09:(D):smsd:BLR129:JSAPROVISIONING:: LOAD_ONCE /opt/sms/bin/php/rest_generic/rest_generic_apply_conf.php
2020/08/18:14:39:09:(D):smsd:BLR129:JSAPROVISIONING:: LOAD_ONCE /opt/sms/bin/php/rest_generic/rest_generic_connect.php
2020/08/18:14:39:09:(D):smsd:BLR129:JSAPROVISIONING:: LOAD_ONCE /opt/sms/bin/php/rest_generic/provisioning_stages.php

...

2020/08/18:14:39:09:(D):smsd:BLR129:JSAPROVISIONING:: script /opt/sms/bin/php/rest_generic/do_provisioning.php executed in 0.105652 seconds
2020/08/18:14:39:09:(D):smsd:BLR129:JSAPROVISIONING:: free SDINFO for BLR129
2020/08/18:14:39:09:(I):smsd:BLR129:JSAPROVISIONING:: ends OK
Adapter SDK
The Adapter SDK is composed of a set of PHP scripts that implement an API This API exposes functions such as:
-
Asset management
-
Status polling
-
SshConnection
-
Provisioning
-
Update conf
-
Backup conf
-
Microservice commands (CREATE, READ, UPDATE, DELETE, IMPORT)
-
…
Custom commands
It is possible to implement new custom commands that will be callable from the MSactivator™ API (verb JSACMD MY_COMMAND).
Status polling
The MSactivator™ CoreEngine daemon in charge of polling the device for availability is polld.
Logs: /opt/sms/logs/sms_polld.log
By default, polling is using ping, and for scalability and performance reasons the polling mechanism is implemented in the C programming language.
This allows the MSactivator™ to poll several hundreds of managed entities per minute.
For the devices that don’t support ping, or in case the polling has to be customized, it is possible to implement a custom polling in a php script:
/opt/sms/bin/polld/<model>_polld.php
On Stormshield the connection to the device is tested as shown below
try
{
  global $sms_sd_ctx;
  netasq_connect();
  netasq_disconnect();
}
catch (Exception $e)
{
  netasq_disconnect();
  return $e->getCode();
}
return SMS_OK;
Asset management
The MSactivator™ CoreEngine can connect on a managed entity to fetch a set of predefined assets such as:
-
Firmware
-
Memory
-
CPU
-
…
The specific model script retrieves information (via CLI, snmp, REST calls…) into an array. The array is then passed to a specific callback in order to store the information in the database.
sms_polld_set_asset_in_sd($sd_poll_elt, $asset);It is also possible to extract custom assets. They will be stored in the database as a list of key values.
The asset mngt module uses regular expressions to extract the asset from the configuration.
These values are stored in a database that keeps the asset history.
The asset script is device specific and is located in:
/opt/sms/bin/polld/<model>_mgmt.php
Regexp:
$get_system_status_asset_patterns = array(
    'firmware'    => '@Version:\s+(?<firmware>.*)@',
    'av_version'  => '@Virus-DB:\s+(?<av_version>.*)@',
    'ips_version' => '@IPS-DB:\s+(?<ips_version>.*)@',
    'serial'      => '@Serial-Number:\s+(?<serial>.*)@',
    'license'     => '@License Status: (?<license>.*)@',
);
The regexp is executed against the result of the CLI : get system status.
Regexp:
$show_ver_asset_patterns = array(
  'serial' => '@Processor board ID (?<serial>\S*)@',
  'license' => '@oftware \((?<license>[^\)]*)\)@',
  'firmware' => '@\), Version (?<firmware>[^,]*),@',
  'model' => '@^(?<model>[^(]*) \(.*with \d+K/\d+K bytes of memory@',
  'cpu' => '@^.* \((?<cpu>[^\)]*)\) processor@',
  'memory' => '@with (?<memory>\d*K/\d*K bytes) of memory@',
  );
The regexp is executed against the result of the CLI show version.
Configuration management
Dialog with the managed entity
The following PHP scripts have to be created in the /opt/sms/bin/php/<model>/ directory.
This set of PHP scripts manages the dialog between the {produt_name} and the managed entity.
Provides access to the device for device connection and configuration update.
Manages the connection to the device (SSH, or REST, for example).
Microservice based configuration
PHP scripts to configure a device using objects:
Manages the OBMF specificities for the device.
Manages the main configuration methods for the managed entity (only update_conf() is used for objects).
Template based configuration
PHP scripts to configure a device using templates:
Generates and applies a configuration.
This task is also called automatically when the router configuration changes.
update_conf() should be enhanced to support configuration templates.
Provisioning
PHP scripts to do the initial provisioning of the device:
Generates and applies the initial configuration on the device. This is an asynchronous task, so a script must be provided to give an update on progress.
Describes all the provisioning stages. This is used to store the provisioning status into the database.
Provisioning action to lock the database for this device during the provisioning.
This is the initial connection test.
Add the device to the MSA local DNS.
Provisioning action to unlock the database for this device during the provisioning.
Other Features
Called by GUI (menu Monitoring → Get the running configuration).
Generate the staging configuration for the device (menu General → Staging).
Generate a backup of the device configuration.
Restore a configuration backup on the device.
Update the firmware of a device.
If a script is not present, the corresponding operation on the MSactivator™ will give the "Function not supported by the device" error.
Connectivity to the Devices
For the managed entities that expose a remote CLI based management interface the adapter API requires the implementation of a class that extends SshConnection.
SshConnection connection is defined in /opt/sms/bin/php/smsd/ssh_connection.php
SshConnection extends GenericConnection defined in /opt/sms/bin/php/smsd/generic_connection.php
SshConnection extends GenericConnection defined in /opt/sms/bin/php/smsd/generic_connection.php
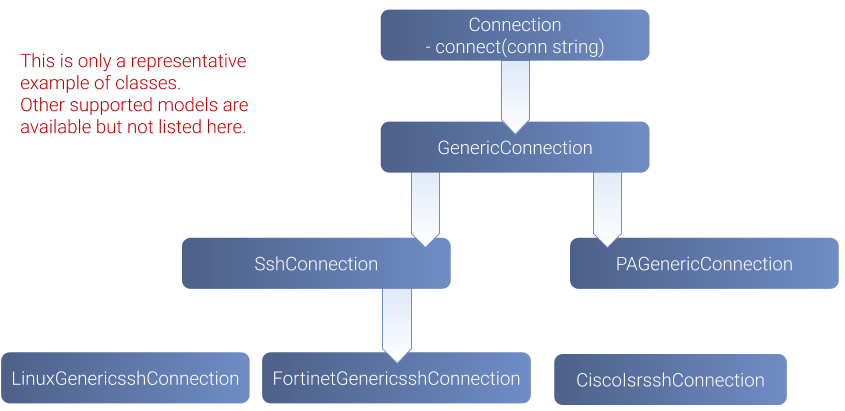
The class Connection
This class is always overridden by a generic connection. It defines functions such as the "get" and "set" attributes such as the prompt, the device IP (sd_ip_config) …
The function connect
It defines the main connect functions public function connect($connectString).
This function uses the PHP function proc_open to execute the connect command and opens file pointers for IO.
The disconnect closes the IO file pointers and leaves a clean state.
sendexpectone for sending a command to a device and getting the result back.
public function sendexpectone($origin, $cmd, $prompt='lire dans sdctx', $delay = EXPECT_DELAY, $display_error = true)Example (in Fortinet adaptor)
$buffer = sendexpectone(__FILE__ . ':' . __LINE__, $this, 'get system status', '\#');The class GenericConnection
This class implements a constructor that initiates a class attribute.
Device information is read by calling the function get_network_profile().
get_network_profile is defined for each device in a PHP file located in:
/opt/sms/spool/php_db_data/<device_id>.php
This PHP file is an “image” of the device configuration as stored in the database.
This design allows a quick and easy access to device configurations such as IP, credentials, interface name, SNMP community, customer ID …
The class SshConnection
It implements the function do_connect() that uses the function connect() from the class Connection:
parent::connect("ssh –p 22 -o StrictHostKeyChecking=no…It uses the function expect() to check that SSH connectivity is OK (by checking that the result contains “Permanently added”).
The class SshKeyConnection
Allows public/private keys via SSH authentication with the device.
Fortiweb WAF on AWS requires this kind of authentication.
Other examples
/opt/sms/bin/php/linux_generic/linux_generic_connect.php
Used in do_update_conf.php
$ret = linux_generic_connect();Implementation of ‘Update Configuration’
Base operation for implementing:
-
The initial provisioning
-
The template-based configuration
-
The Microservice CREATE/UPDATE/DELETE operation
Implemented by do_update_conf.php
Can be called directly by the MSactivator™ CoreEngine API, it is an asynchronous process, its status can be monitored.
Managed entity activation (initial provisioning)
The MSactivator™ executes a set of steps to activate the device.
The steps can be customized to do additional operations.
Defined in provisioning_stages.php
$provisioning_stages = array(
0 => array('name' => 'Lock Provisioning',     'prog' => 'prov_lock'),
1 => array('name' => 'Initial Connection',    'prog' => 'prov_init_conn'),
2 => array('name' => 'Initial Configuration', 'prog' => 'prov_init_conf'),
3 => array('name' => 'DNS Update',            'prog' => 'prov_dns_update'),
4 => array('name' => 'Unlock Provisioning',   'prog' => 'prov_unlock'),
5 => array('name' => 'Save Configuration',    'prog' => 'prov_save_conf'),
)
Configuration backup/restore
Based on the verb GETSDCONF (see save_router_conf.sh) which is implemented by do_get_sd_conf.php for each device.
The implementation will vary depending on the vendor.
Fortinet uses TFTP and CLI execute restore config tftp. Cisco ISR first tries to SCP to flash and to TFTP and then reboots.
Connectivity fallback mechanism
By default, the device adaptor uses secure protocols to communicate with the devices (SSH or TFTP).
When these protocols fail (the device doesn’t support them or firewall restrictions – which might be unlikely), there is a fallback mechanism to protocols such as Telnet or TFTP.
in cisco_isr_connect.php
Microservice implementation
The implementation of the functions CREATE/READ/UPDATE/DELETE/IMPORT is specific to the vendor.
| this is especially true for the IMPORT. |
CREATE/READ/UPDATE/DELETE are using the functions to apply conf, this is similar to the configuration update.
IMPORT needs to be aware of the device configuration structure.
It is necessary to provide a unified GUI to build the import but with devices that have different data models.
| for REST based managed entities, the IMPORT is usually generic since the response is formatted in XML or JSON (cf. rest_generic) |
The MSactivator™ CoreEngine API
As well as named verbs, these commands can be used to interact directly with the MSactivator™ CoreEngine from the CLI.
The can also be executed with a REST API:
HTTP Request: /sms/verb/{verb}/{deviceId}
Method: POST
| Parameter Name | Type | Description |
|---|---|---|
verb |
String |
the command (JSAPROVISIONING, JSCHECKPROVISIONING, JSAUPDATECONF,…) |
deviceId |
String |
the database ID of the managed entity |
| COMMAND | |
|---|---|
JSAPROVISIONING |
Initial provisioning |
JSCHECKPROVISIONING |
Check initial provisioning status |
JSAUPDATECONF |
Update configuration |
JSSTAGING |
Staging |
JSGETSDCONF |
Get router running configuration |
JSGETCONF |
Get router generated |
The verbs are associated to specific PHP do_<verb>.php:
tstsms JSGETSDCONF UBI132
This will retrieve the running configuration of the device and use the implementation of do_get_running_conf.php.
Operation status feedback
During operations done by the MSactivator™ CoreEngine, especially the asynchronous ones, the status of the ongoing operation can be set for the user by the PHP scripts. How to update the status depends on the operation.
Set provisioning status for a provisioning stage.
sms_bd_set_provstatus($sms_csp, $sms_sd_info, $stage, $status, $ret, $next_status, $additionalmsg)Set the update status of the configuration update of an equipment.
sms_set_status_update($sms_csp, $sdid, $error_code, $status, $e->getMessage())This has covered various aspects of Adapter development. If you have further questions, please contact info@ubiqube.com for more information.
Import / Export Librairies
Overview
MSactivator™ provide the possibility to use git version control system to handle the libraries (BPM, workflows and microservices) stored in the local libraries repositories under /opt/fmc_repository in the container msa_dev.
Local libraries repositories overview
The libraries are stored in the location below
-
BPM: /opt/fmc_repository/Bpmn/bpmns
-
Workflow: /opt/fmc_repository/Process/workflows
-
Microservice: /opt/fmc_repository/CommandDefinition/microservices
Configuration
By default the MSactivator™ doesn’t have any git repository configured.
To configure the git repositories, log into the Developer portal and click on "Settings" in the left menu.
Use the "IMPORT / EXPORT" form to configure the repositories. You can choose which type of libraries (BPM, workflow or microservice) you want to be managed by a remote git repository.
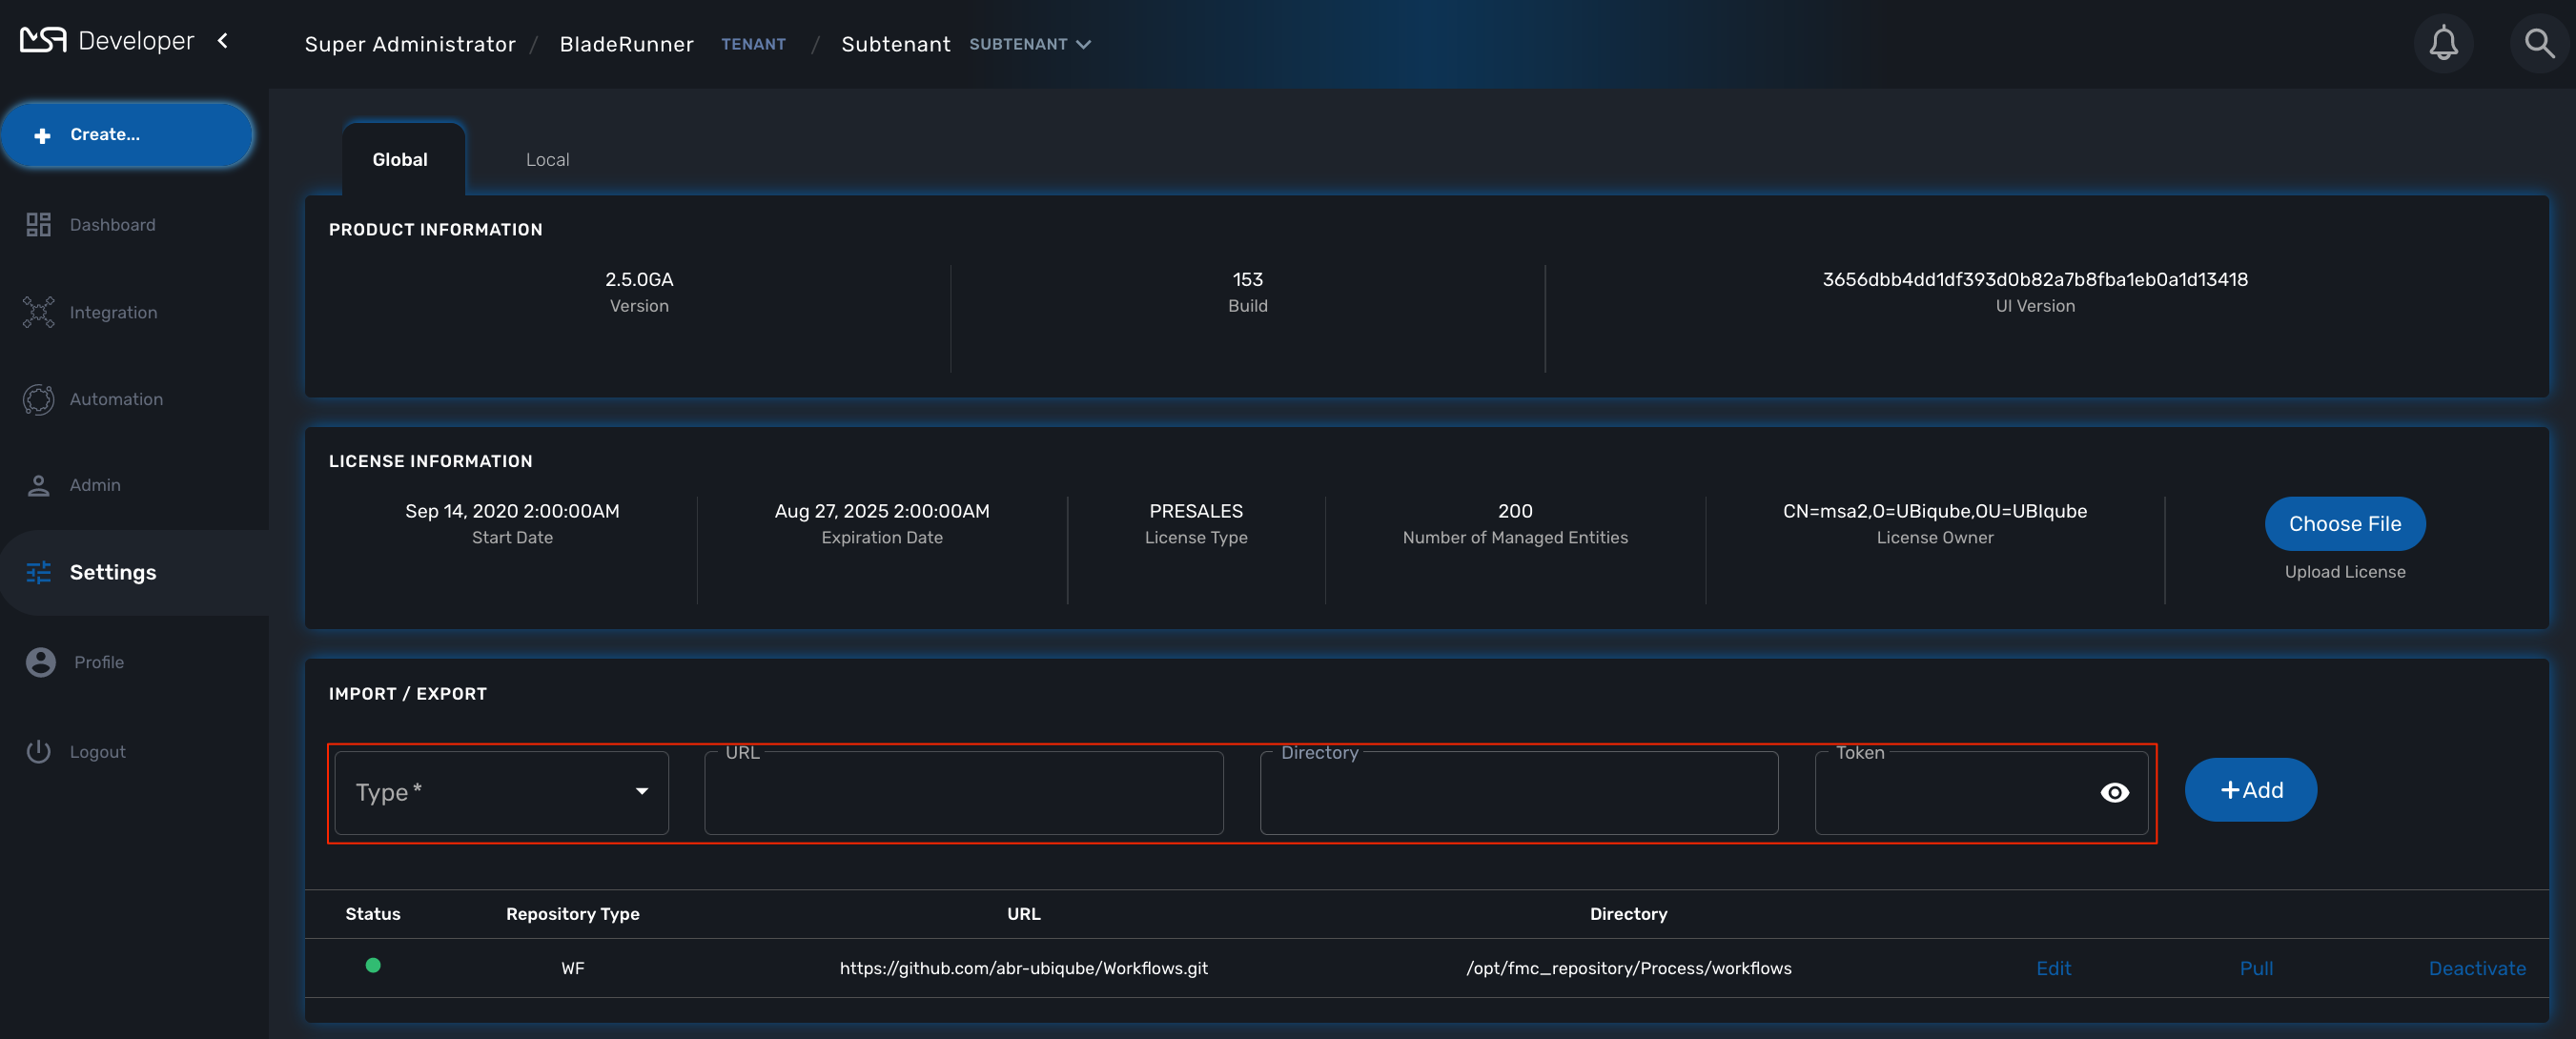
Prerequisites
The remote gite repository must exist and accessible with SSH, the default branch must be set to master
Add a repository
MSactivator™ supports one repository per type of libraries. Select the type of repository and provide the git remote URL (only SSH is supported), the git username and password and click "+Add".
The MSactivator™ will clone the repository under one of the locations described above and set the status to green.
How it works
The CLI commands extracts below are taken from the container msa_dev, under /opt/fmc_repository/CommandDefinition/microservices.
To connect to the container msa_dev, use docker-compose exec msa-dev bash from where the docker-compose file is located.
|
[root@msa_dev microservices]# ls -la
total 4
drwxr-xr-x 3 ncuser ncuser   18 Dec 15 11:59 .
drwxr-xr-x 3 ncuser ncuser 4096 Dec 15 13:49 ..
drwxr-xr-x 7 ncuser ncuser  135 Dec 15 15:17 .git

[root@msa_dev microservices]# git status
On branch master
nothing to commit, working tree clean

[root@msa_dev microservices]# git remote -v
[root@msa_dev microservices]#
| you need at least one file in the git repository before you can configure it in the UI. We recommend that you add an empty file like README.md. On github you have the option to do that automatically when you create a new repository |
[root@msa_dev microservices]# git status
On branch master
Your branch is up to date with 'origin/master'.

nothing to commit, working tree clean

[root@msa_dev microservices]# git remote -v
origin	https://github.com/abr-ubiqube/my-microservice.git (fetch)
origin https://github.com/abr-ubiqube/my-microservice.git (push)[root@msa_dev microservices]# git status
On branch master
Your branch is up to date with 'origin/master'.
nothing to commit, working tree clean
[root@msa_dev microservices]# git lg
* 750f29a - 15-12-2020 15:46:10 - Updating microservice on - ncroot <jboss> (18 hours ago)
* 7cc1d81 - 15-12-2020 15:43:39 - Updating microservice on - ncroot <jboss> (18 hours ago)
* e73a455 - 15-12-2020 15:41:10 - Updating microservice on - ncroot <jboss> (18 hours ago)
* 5290a81 - Initial commit with existing files <jboss> (18 hours ago)Every updates on the libraries are committed and pushed to the remote upstream.
You can use git CLI commands to view the differences between 2 commits (git diff) and also to revert your changes (git reset)
Git repository management rules
-
Files already exists in local repo
-
No files exists upstream
-
There won’t be any conflict and git should be configured successfully.
-
Local files should now be available in upstream.
-
-
-
Some files exists upstream
-
It will synchronize files with the remote.
-
If no conflict, then local files will be pushed upstream. Also, upstream files will be available locally.
-
If there is a conflict, error message will be thrown and git will not be configured. And sync will not happen.
-
-
-
No files exists in the local repo
-
No files exists upstream
-
No conflict, git should be configured successfully.PASSED
-
-
Some files exists upstream
-
There will be no conflict, and upstream files will be available locally and git will be configured successfully.
-
-
REST API
Enabling REST API support
The API is enabled by default. No additional configuration is required.
Authentication
With version 2.9.x
Starting with MSactivator™ version 2.9.1, the authentication is managed by Keycloak which is included in the product.
When making requests to MSactivator™ using the REST API, you will need:
-
A valid admin username and password (so that a token can be generated and an authenticated session can be established).
-
Appropriate access permissions for the requested resource (controlled by admin profile)
Using curl, you may save the authentication information as a HTTP header to allow subsequent requests to be accepted automatically.
curl -k -H 'Content-Type: application/x-www-form-urlencoded' \
  -XPOST https://<MSA IP or FQDN>/auth/realms/main/protocol/openid-connect/token \
  -d 'username=<USERNAME>&password=<PASSWORD>&grant_type=password&client_id=utilisateurs'
{
    "access_token": "eyJhbGciOiJSUzI1NiIsInR5cCIgOiAiSldUIiwia2lkIiA6ICJ2LW5uQnJkY3NOY1dmVUxDZ2RzUVhQcnptMkFhQzRDbjJPaEhHaFR5VlowIn0.eyJleHAiOjE3MjU1MjA4NjEsImlhdCI6MTcyNTUyMDU2MSwianRpIjoiYTY1Mjk2YjAtYTc0MC00ZjgwLWFlYzItM2Q3YWYzZjU4YTZjIiwiaXNzIjoiaHR0cHM6Ly8xMC4zMS4xLjIyOS9hdXRoL3JlYWxtcy9tYWluIiwiYXVkIjoiYWNjb3VudCIsInN1YiI6ImY6MDY5MjMwYjctY2ZkZi00OGQ5LWFhMTQtZDMyNmRlMjAwNDRiOjEiLCJ0eXAiOiJCZWFyZXIiLCJhenAiOiJ1dGlsaXNhdGV1cnMiLCJzZXNzaW9uX3N0YXRlIjoiYmI4NjMyMGYtM2FiNC00ZWYwLTgwNTktYWM2ZWU1ZWZjNTBhIiwiYWNyIjoiMSIsImFsbG93ZWQtb3JpZ2lucyI6WyIke2F1dGhCYXNlVXJsfSJdLCJyZWFsbV9hY2Nlc3MiOnsicm9sZXMiOlsib2ZmbGluZV9hY2Nlc3MiLCJ1bWFfYXV0aG9yaXphdGlvbiJdfSwicmVzb3VyY2VfYWNjZXNzIjp7ImFjY291bnQiOnsicm9sZXMiOlsibWFuYWdlLWFjY291bnQiLCJtYW5hZ2UtYWNjb3VudC1saW5rcyIsInZpZXctcHJvZmlsZSJdfX0sInNjb3BlIjoicHJvZmlsZSB1YmlSb2xlIGVtYWlsIiwic2lkIjoiYmI4NjMyMGYtM2FiNC00ZWYwLTgwNTktYWM2ZWU1ZWZjNTBhIiwicm9sZSI6IlN1cGVyIEFkbWluaXN0cmF0ZXVyIiwiZW1haWxfdmVyaWZpZWQiOmZhbHNlLCJyb2xlX2lkIjoiMSIsIm5hbWUiOiJuY3Jvb3QiLCJhY3Rvcl9pZCI6IjEiLCJ1c2VybmFtZSI6Im5jcm9vdCJ9.Weu9xq82rjA5r-3GQtBU0liNpoyUuj4tDvHlvlWG8gC1iHQo9aV5exfBm3fRlsFyNwR_XBUnOIcg4U8rwF35D58fF3bvC5D3meM1X9WaXx6RYH0qDgoVNfIyqmR0xmj4SWn_gr4C4N3RE8JVUYbnWGwcbbLCI9gP8O9q6POtGPaCT51gSE6bmpYFHU1hpVoPnw99GBFutWi5iNUl4kkKbcBXDwZzbQPN5DE44a_YupGxqsCH7t38duUwilx0gOuVjPRD9itbdNI_wZxyIHB_couxg3RZuSIIJrH100GIcK4Nc6CO8IsZRSZBdsBnuNutuVJAhAzsFahRkvRhFt7LUw",
    "expires_in": 300,
    "refresh_expires_in": 1800,
    "refresh_token": "eyJhbGciOiJIUzUxMiIsInR5cCIgOiAiSldUIiwia2lkIiA6ICJiYTMwNGY4MS1jMDFkLTRiZDEtYjM2Mi0wOTM0MTExNjhkMTMifQ.eyJleHAiOjE3MjU1MjIzNjEsImlhdCI6MTcyNTUyMDU2MSwianRpIjoiMmQyZjE3YjMtNGRjZi00M2M4LWE3N2ItMTQzYzYzY2U3N2E4IiwiaXNzIjoiaHR0cHM6Ly8xMC4zMS4xLjIyOS9hdXRoL3JlYWxtcy9tYWluIiwiYXVkIjoiaHR0cHM6Ly8xMC4zMS4xLjIyOS9hdXRoL3JlYWxtcy9tYWluIiwic3ViIjoiZjowNjkyMzBiNy1jZmRmLTQ4ZDktYWExNC1kMzI2ZGUyMDA0NGI6MSIsInR5cCI6IlJlZnJlc2giLCJhenAiOiJ1dGlsaXNhdGV1cnMiLCJzZXNzaW9uX3N0YXRlIjoiYmI4NjMyMGYtM2FiNC00ZWYwLTgwNTktYWM2ZWU1ZWZjNTBhIiwic2NvcGUiOiJwcm9maWxlIHViaVJvbGUgZW1haWwiLCJzaWQiOiJiYjg2MzIwZi0zYWI0LTRlZjAtODA1OS1hYzZlZTVlZmM1MGEifQ.dHxEnX8Y4mLTASwVuhSbfg1oyr2lzeaVMNiRo0-IYPXq8JAYxzl5V0S5qk9UgEsh6VzksONjjXSgGAEn_pBlmQ",
    "token_type": "Bearer",
    "not-before-policy": 0,
    "session_state": "bb86320f-3ab4-4ef0-8059-ac6ee5efc50a",
    "scope": "profile ubiRole email"
}
With version 2.8.13 and previous
When making requests to MSactivator™ using the REST API, you will need:
-
A valid admin username and password (so that a token can be generated and an authenticated session can be established).
-
Appropriate access permissions for the requested resource (controlled by admin profile)
Using curl, you may save the authentication information as a HTTP header to allow subsequent requests to be accepted automatically.
curl  -k -H 'Content-Type: application/json' \
  -XPOST https://<MSA IP or FQDN>/ubi-api-rest/auth/token \
  -d '{"username":"username", "password":"user password"}'
{
	"token": "eyJhbGciOiJIUzUxMiJ9.eyJzdWIiOiJuY3Jvb3QiLCJpYXQiOjE2NTUxOTQ3MzMsImx2bCI6IjEiLCJleHAiOjE2NTUxOTgzMzN9.kVl5XuqbSnGI59k0dlHmhB9xmPsixS3X24yQ4oWD-S9GgcBWw7X-DAb_S5oqwd0h3R64i_Custn8GeFt34Yzow",  (1)
	"message": "authenticated",
	"authenticated": "true",
	"userDetails": {
		"id": 1,
		"baseRole": {
			"id": 1,
			"name": "Super Administrateur"
		},
		"externalReference": "NCLG1",
		"login": "ncroot",
		"operator": {
			"id": 1,
			"abonnes": [],
			"baseUrl": null,
			"isPartner": false,
			"name": "UBIqube",
			"prefix": "NCL",
			"address": {
				"city": "",
				"country": "",
				"fax": "",
				"mail": "",
				"phone": "",
				"streetName1": "",
				"streetName2": "",
				"streetName3": "",
				"zipCode": ""
			},
			"customersCount": 0,
			"adminsCount": 0,
			"managersCount": 0,
			"externalReference": ""
		},
		"acteurId": 1,
		"address": {
			"city": "",
			"country": "",
			"fax": null,
			"mail": "ncroot@msactivator.com",
			"phone": "",
			"streetName1": "",
			"streetName2": "",
			"streetName3": "",
			"zipCode": ""
		},
		"delegationProfileId": 0,
		"userType": 2,
		"delegations": null,
		"delegationsPerCustomer": {},
		"netceloId": {
			"ubiID": "NCLG1",
			"thePrefix": "NCL",
			"id": 1,
			"customerPrefix": "NCL"
		},
		"isExternalAuth": false,
		"activationKey": "",
		"ccla": false,
		"isActive": true,
		"passwordUpdateDate": "",
		"attachedCustomerIds": null,
		"firstname": "",
		"attachedOperatorIds": null,
		"manageAllUsers": true,
		"name": "ncroot",
		"sort": "NAME",
		"ldapAuthentication": false,
		"delegationProfilePerCustomer": {}
	}
}| 1 | auth TOKEN |
Use the token from the auth response in the Authorization Bearer header to call the MSactivator™ REST API.
curl -H 'Accept: application/json' -H "Authorization: Bearer TOKEN" -XGET 'http://<MSA IP or FQDN>/ubi-api-rest/user/customer-by-manager-id/1
Format
MSactivator™ API uses the JSON format.
Example API commands
For the full list of available commands, see the MSactivator™ API guide on your MSactivator™ instance: http://<MSA IP or FQDN>/swagger
User login
HTTP Request: /ubi-api-rest/auth/token
Method: POST
| Parameter Name | Type | Description |
|---|---|---|
username |
String |
User name |
password |
String |
Password |
Example:
{
	"username": "test",
	"password": "test1234567890"
}
Response:
{
	"token": "<TOKEN>",		(1)
	"message": "authenticated",
	"authenticated": "true",
	"userDetails": {
		"id": 18,

		... (2)

		"externalReference": "UBIG18",
		"login": "test",
		"firstname": "",
		"manageAllUsers": true,
		"name": "test",
		"sort": "NAME",
		"ldapAuthentication": false,
		"delegationProfilePerCustomer": {}
	}
}| 1 | the authentication token to use in the HTTP header of the REST API calls |
| 2 | the JSON response has been shortened for this documentation |
Ping an IP address from the CoreEngine
HTTP Request: /ubi-api-rest/device/ping/{$ip_address}
Method: GET
| Parameter Name | Type | Description |
|---|---|---|
ip_address |
String |
The IP address to ping |
Example:
/ubi-api-rest/device/ping/127.0.0.1Response:
{
	"status": "OK",
	"rawJSONResult": "{\"sms_status\":\"OK\",\"sms_code\":\"\",\"sms_message\":\"--- 127.0.0.1 ping statistics ---\\n5 packets transmitted, 5 received, 0% packet loss, time 3999ms\\nrtt min/avg/max/mdev = 0.031/0.036/0.043/0.006 ms\"}",
	"message": "--- 127.0.0.1 ping statistics ---\n5 packets transmitted, 5 received, 0% packet loss, time 3999ms\nrtt min/avg/max/mdev = 0.031/0.036/0.043/0.006 ms"
}
Call microservice functions
HTTP Request: /ubi-api-rest/ordercommand/execute/{device_id}/{command_name}
Method: POST
| Parameter Name | Type | Description |
|---|---|---|
device_id |
Long |
The database identifier of the Managed Entity |
command_name |
String |
One of CREATE, UPDATE, DELETE |
body |
String |
the payload with the microservice parameters |
Example:
/ubi-api-rest/ordercommand/execute/156/CREATE{
"simple_firewall": {
"789": {
"object_id": "789",
"src_ip": "7.8.3.0",
"src_mask": "255.255.255.0",
"dst_ip": "8.8.3.0",
"dst_mask": "255.255.255.0",
"service": "http",
"action": "deny"
}
}
}Response:
{
	"commandId": 0,
	"status": "OK",
	"message": "access-list 789 extended deny object http 7.8.3.0 255.255.255.0 8.8.3.0 255.255.255.0 log\n"
}
Configuration variables
HTTP Request: /variables/{deviceId}/{name}
Method: GET
| Parameter Name | Type | Description |
|---|---|---|
deviceId |
Long |
Id of device (Number format) has to be higher than 0, Example = 3453 |
name |
String |
Name of the variable, Example = var1 |
Configuration
HTTP Request: /system-admin/v1/msa_vars
Method: POST
Body:
[
  {
    "name": "string",
    "lastUpdate": "string",
    "comment": "string",
    "value": "string"
  }
]
Workflow
HTTP Request: orchestration/service/execute/{ubiqubeId}
Method: POST
| Parameter Name | Type | Description |
|---|---|---|
ubiqubeId |
String |
Id of the subtenant. A combination of the tenant prefix and the subtenant database ID. Example UBI123. |
serviceName |
String |
Relative path of the workflow |
processName |
String |
Relative path of the process |
Body:
the payload JSON contains the parameter to pass to the process thus depends on the variables of the workflow
[
  {
    "name": "string",
    "lastUpdate": "string",
    "comment": "string",
    "value": "string"
  }
]
Example: call the process "Create Instance" of the worklflow "Helloworld"
This workflow is part of the MSActivator mini-lab and maintained in a github repository.
POST

/ubi-api-rest/orchestration/service/execute/BLRA7?serviceName=Process/Tutorials/Helloworld/Helloworld&processName=Process/Helloworld/Process_create_instance

{"name":"jack"}
Dashboard design
Overview
To visualize the events stored in Elasticsearch, you can use some of the dashaboard that are packaged in the MSactivator™, but you can also design your own dashboards.
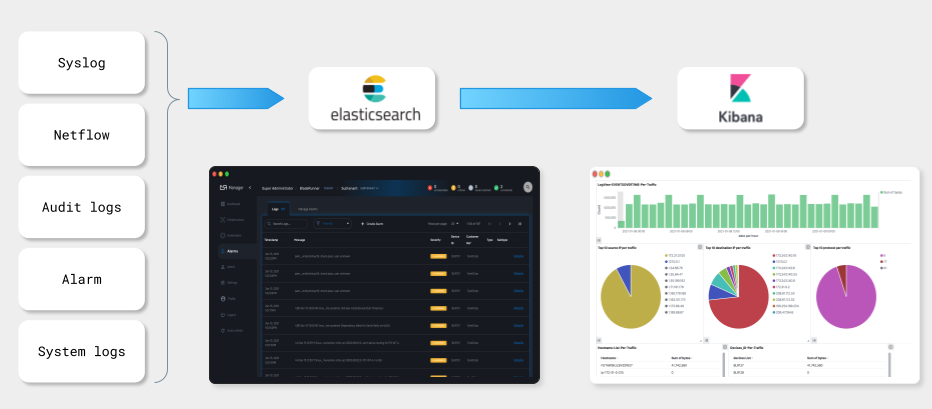
Create a dashboard
To create a dashboard, you can either reuse on of the existing visualization provided in the MSactivator™ or you can create your own.
Let’s create a simple visualization to show in a histogram the number of events collected and indexed in ubilogs-* in Elasticsearch.
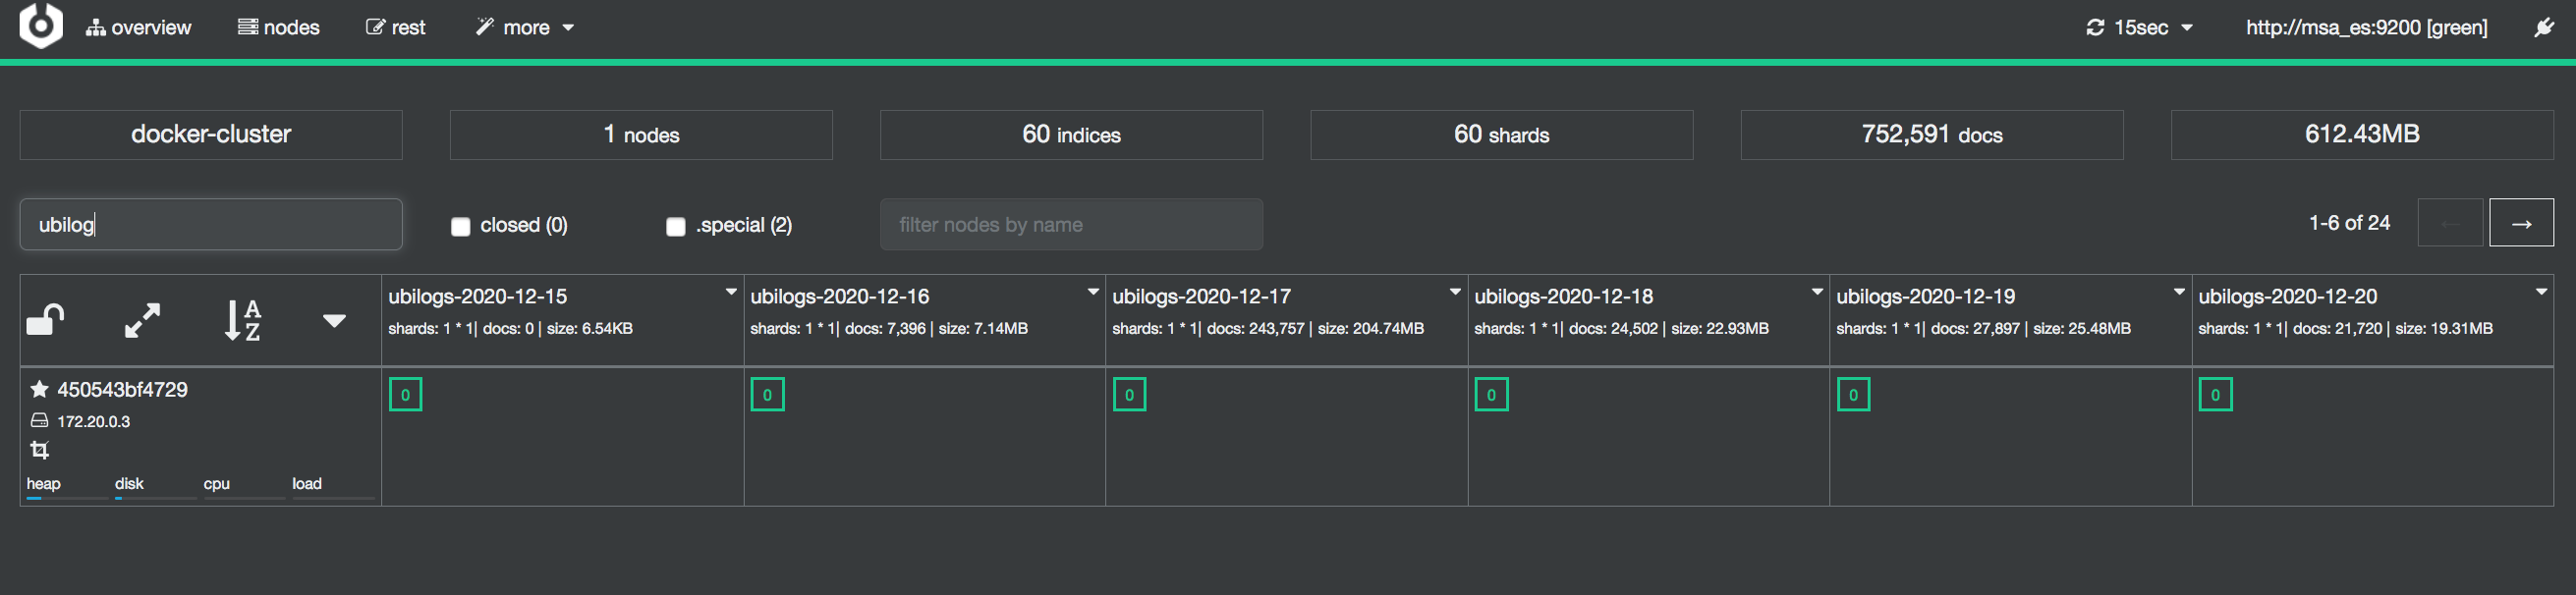
Create a visualization
Open Kibana on http://MSA_IP:5601 and select "Visualize" on the left menu.
Click on "+ Create new visualization", select "Vertical Bar" and choose ubilogs-* as the source.
In the configuration panel, select "X-Axis" as the bucket type and "Date Histogram" for the aggregation. The field for aggregation should be automatically set to "Date".
Click on the button "Apply Change" on the top right of the panel.
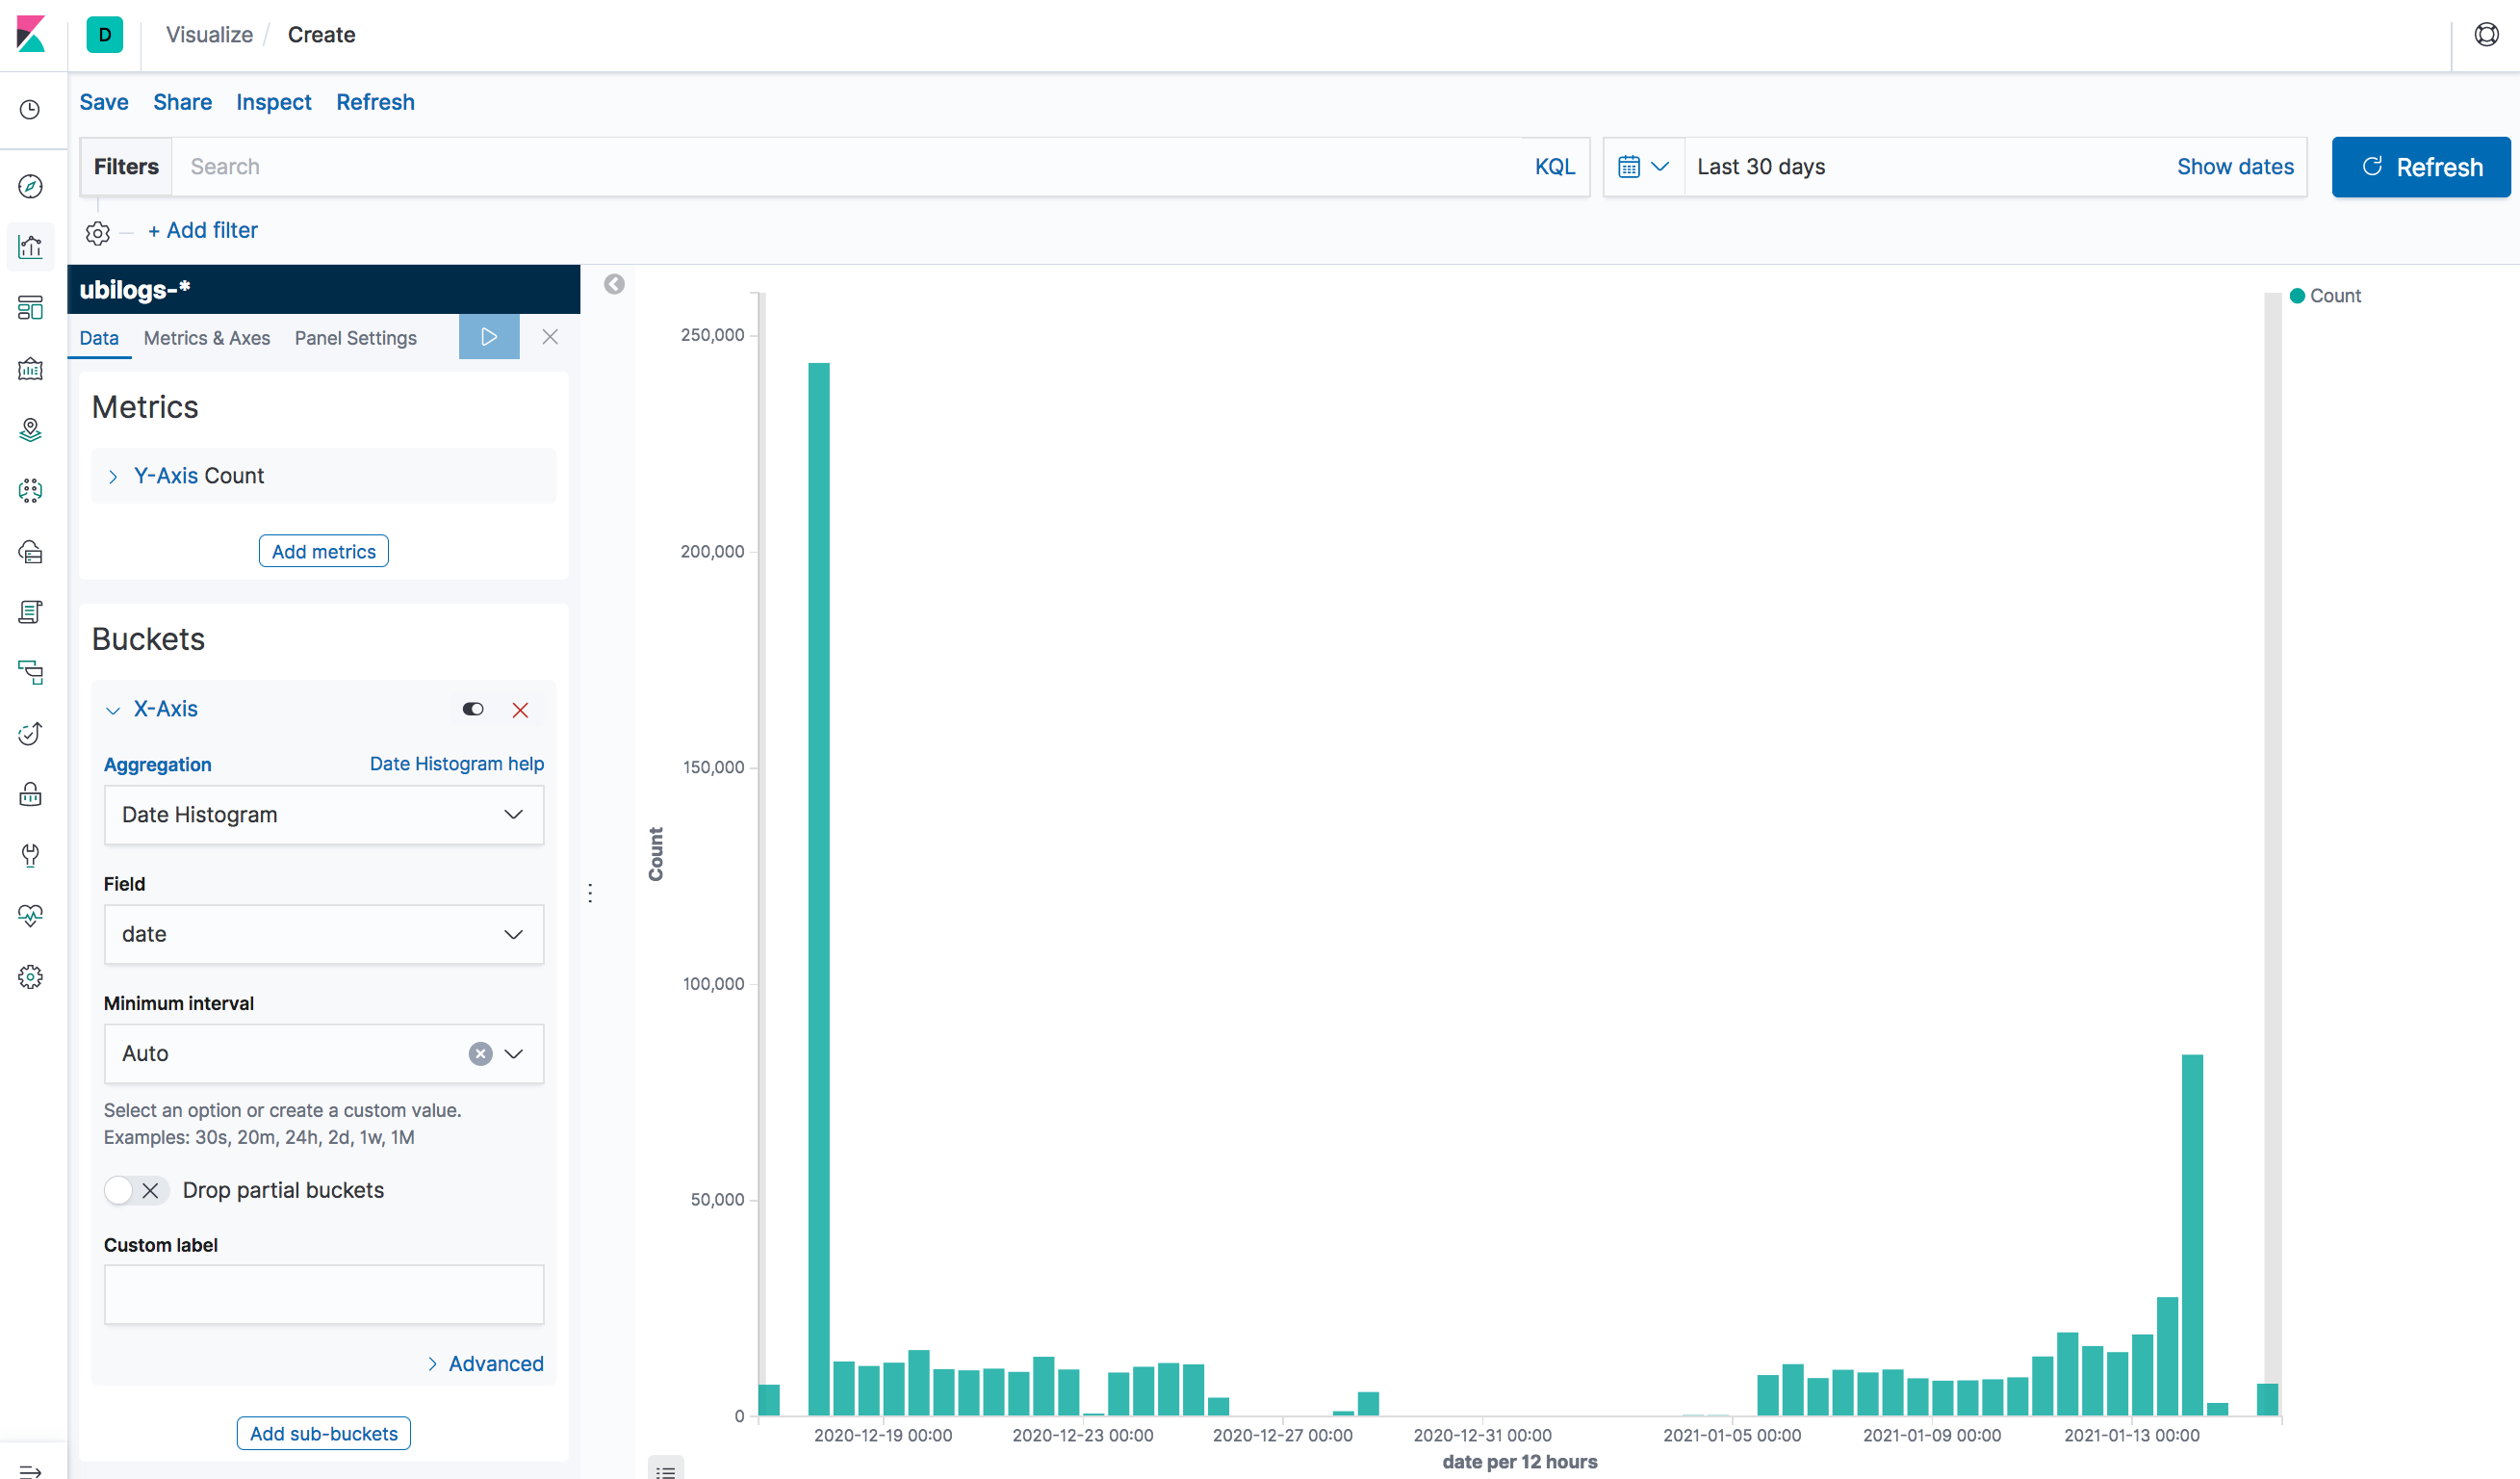
Save the visualization and browse to the dashboards
Create a dashboard
Click on "+ Create new dashboard" to create a new dashboard and click "Add" to list the visualizations and select yours.
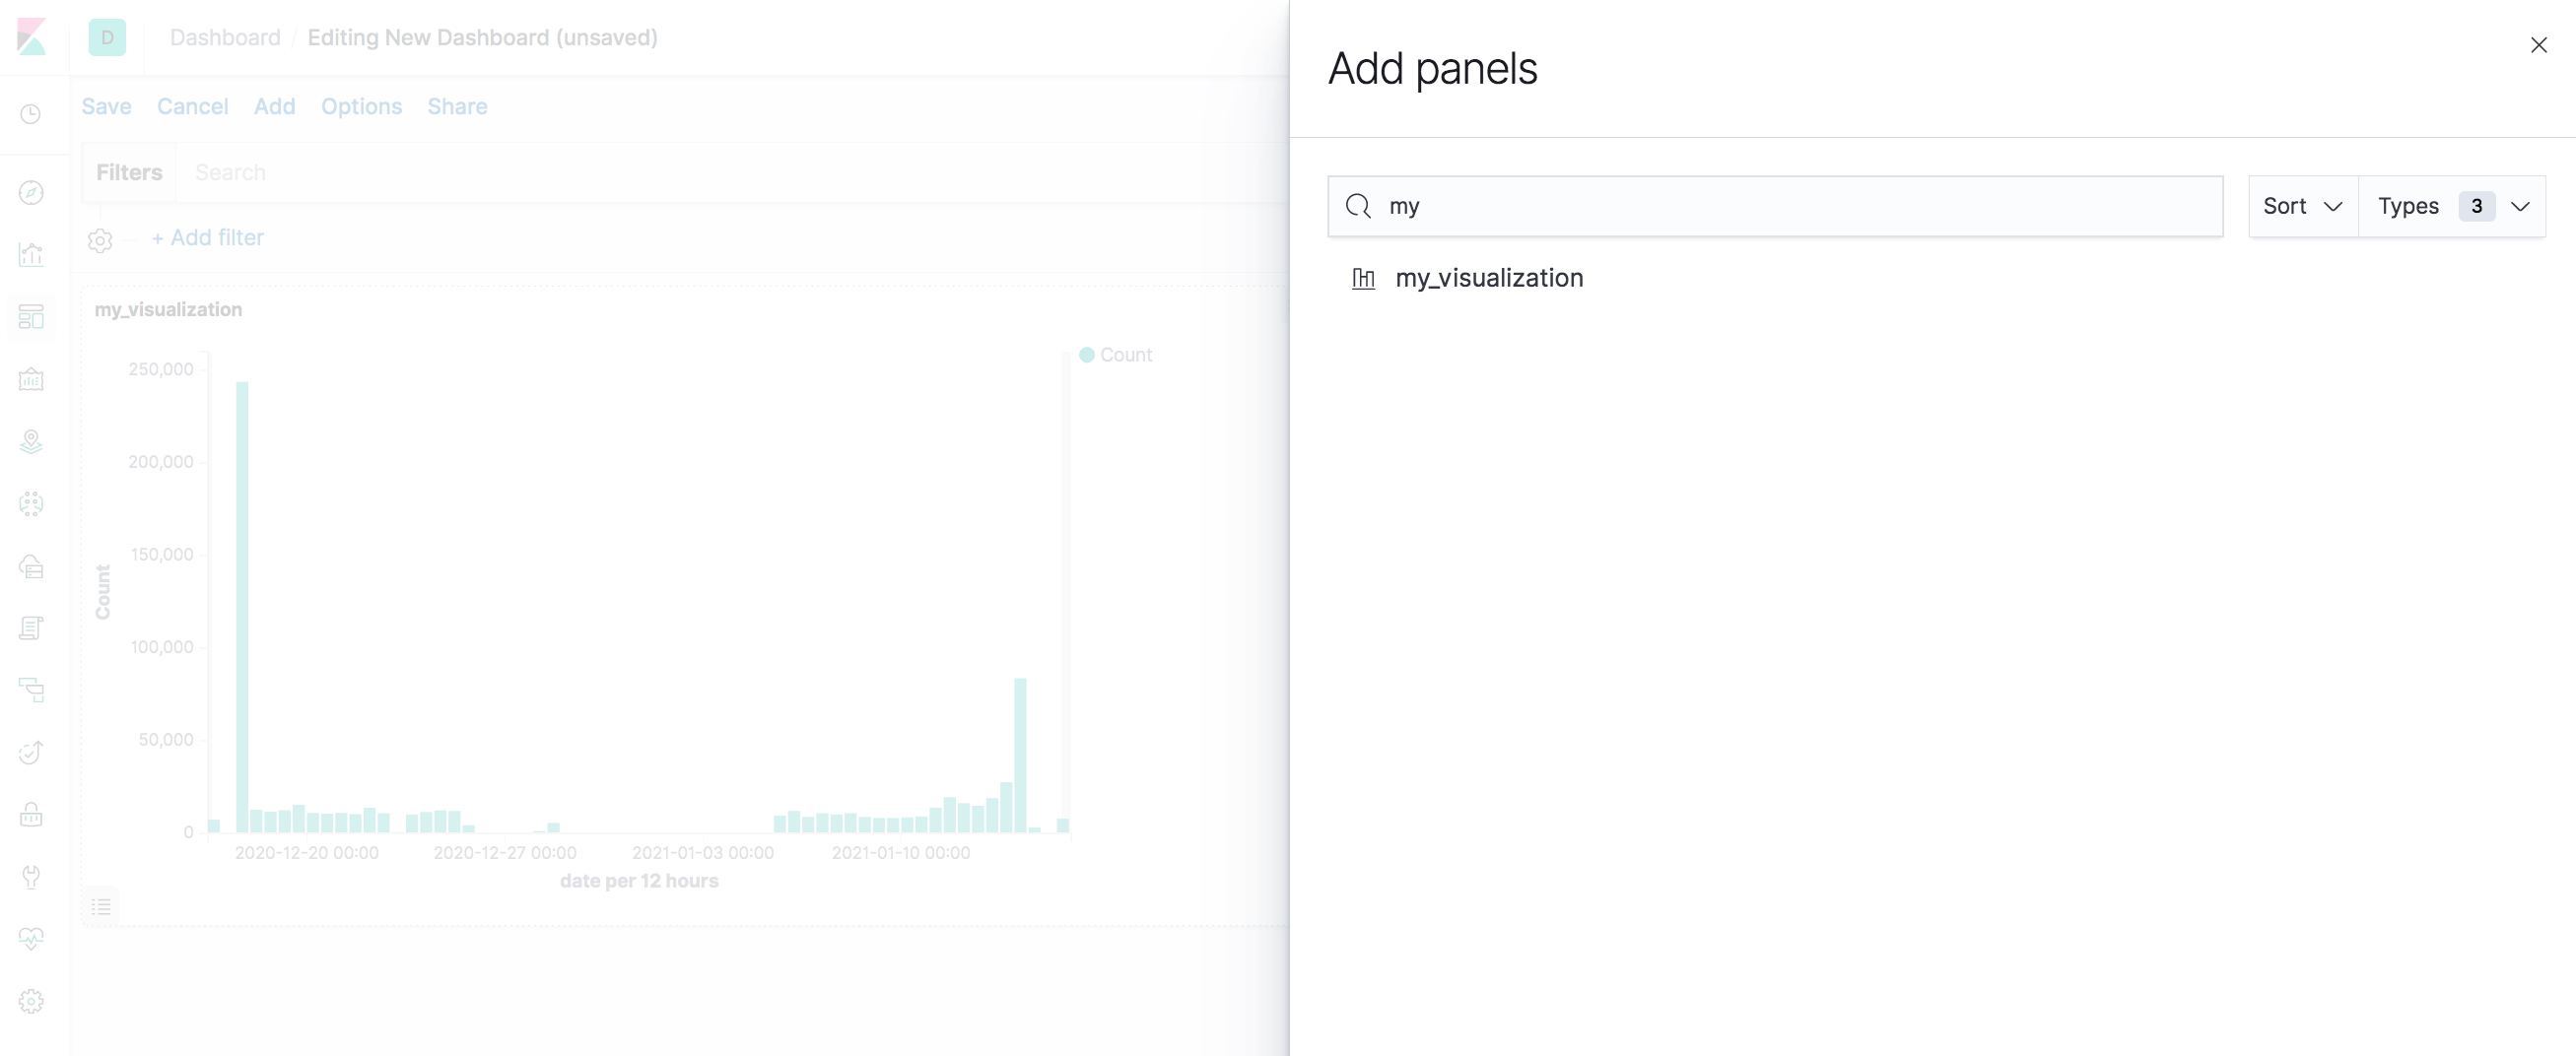
On the same dashboard, add another predefined visualization named "timeFilter". This will add a simple time range selector widget to your dashboard.
Set the subtenant filter
The dashboard is meant to be deployed for a subtenant by the workflow "Deploy Dashboard", the workflow will inject the subtenant ID in the dashboard. For this to happen you have to add a filter "customer_id:0" to your dashboard.

Save the dashboard
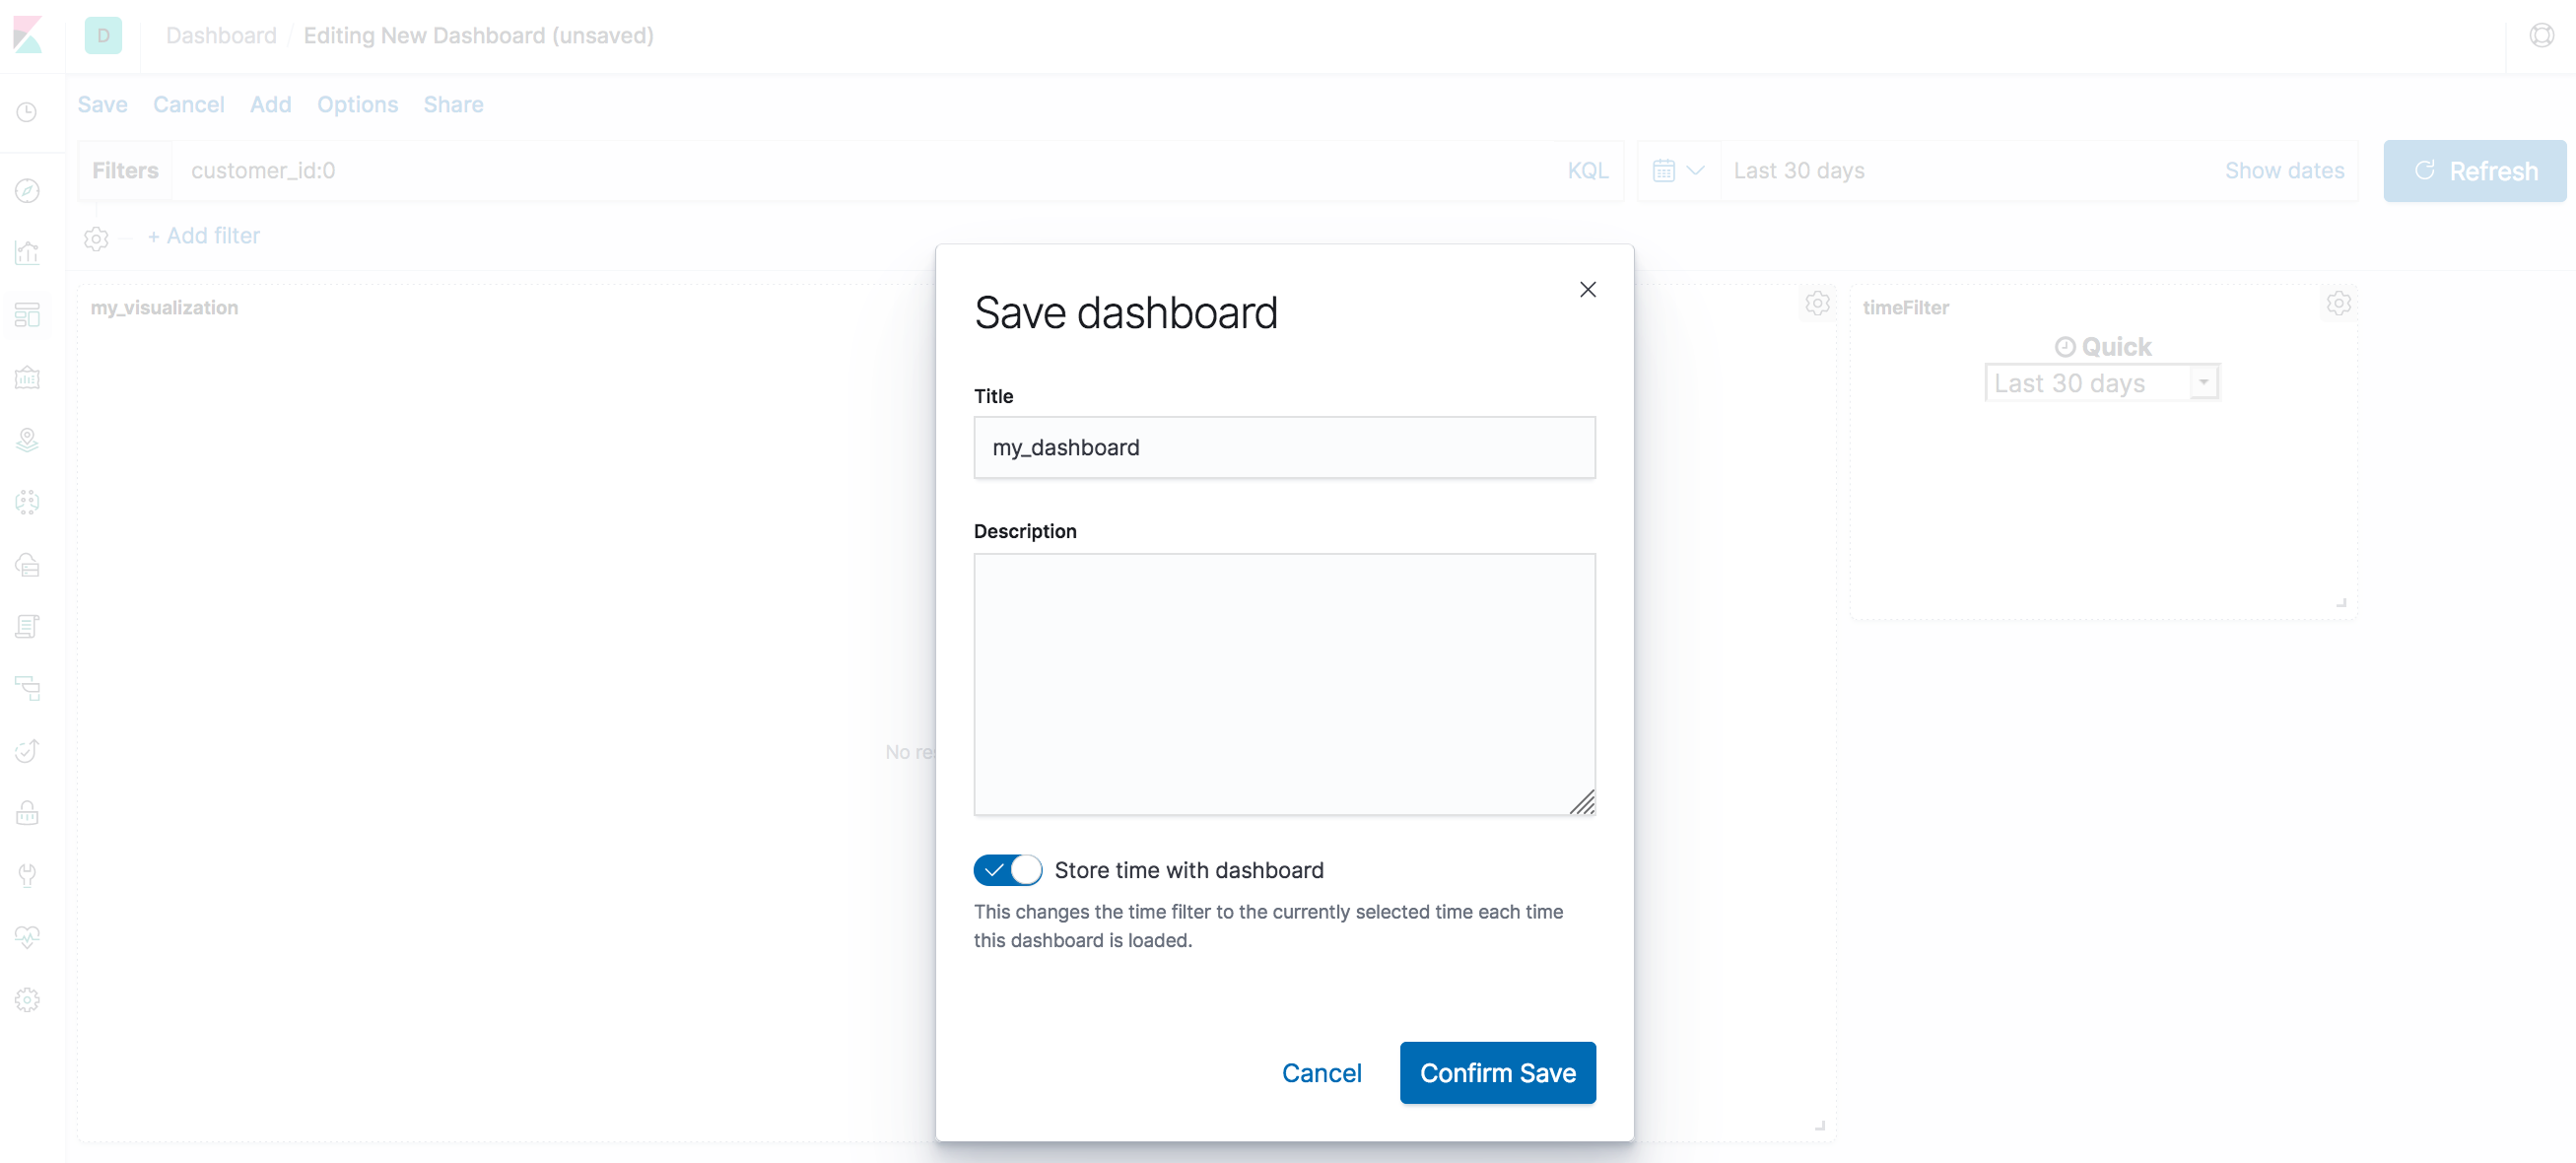
Update the reference and name of the dashboard
By default Kibana saves the dashboard with a UID to identify it but here is how to update your dashbaord and give it a human readable name that you can use in the deployment workflow.
Step 1: export the dashboard
From Kibana management, go to "Saved Objects" and select your dashboard, export is as an ndjson file. Leave the option "Include related object" off.
Step 2: edit the ndjson file
With your favorite text editor, edit the file and update the properties "title" and "id". Both properties should be set to the same value starting with "template_".
"id":"template_my_dashboard"
"title":"template_my_dashboard"
Step 3: import the dashboard
Step 4: deploy the dashboard with the selected name
On the MSactivator™ UI, select your subtenant, make sure the workflow "Deploy Dashboard" is attached and click "+ Create Dashboard".
Set the template name to name you used in the ndjson file and provide a name of your choice for the Dashboard.
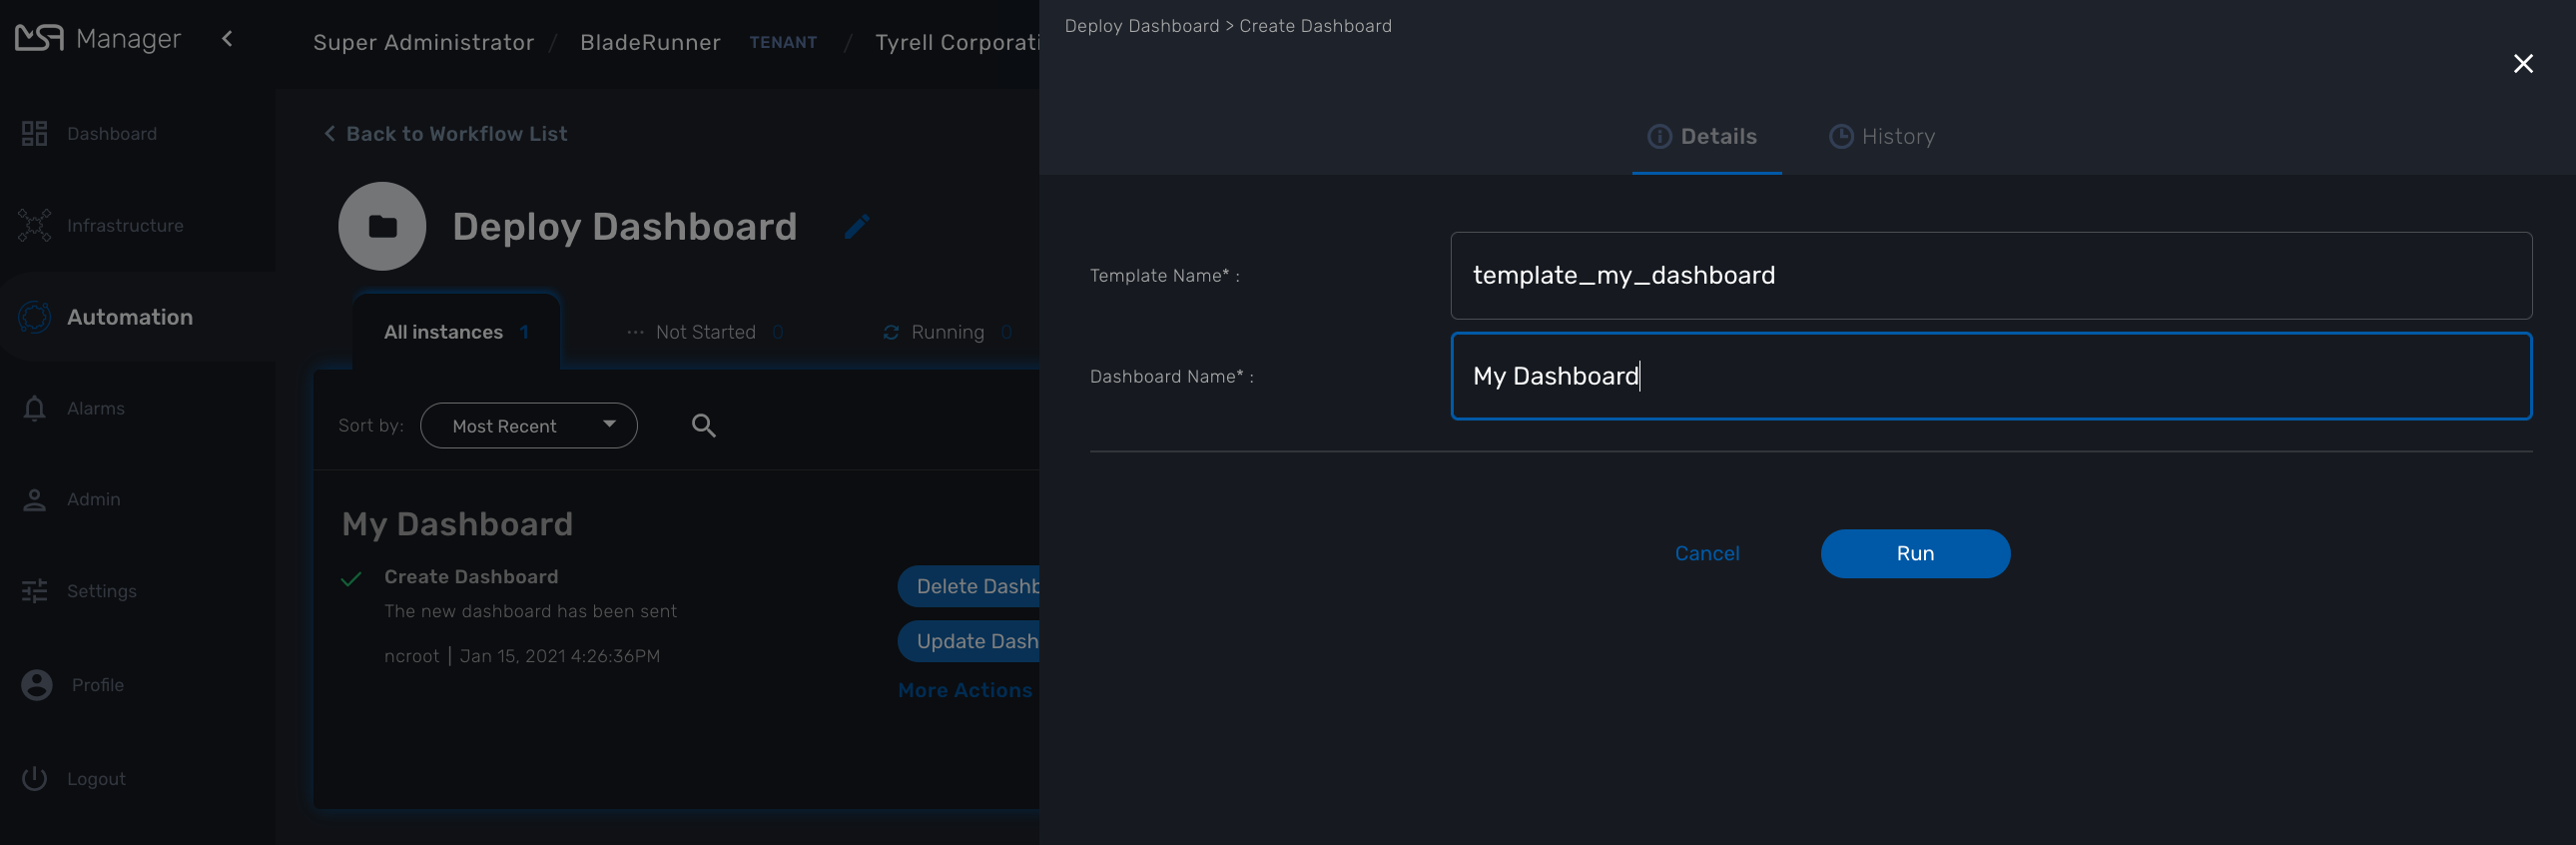
Execute the process and use the URL provided in the process execution status to open your custom dashboard.
| you need to edit the URL to use the proper IP address of your MSactivator™ |
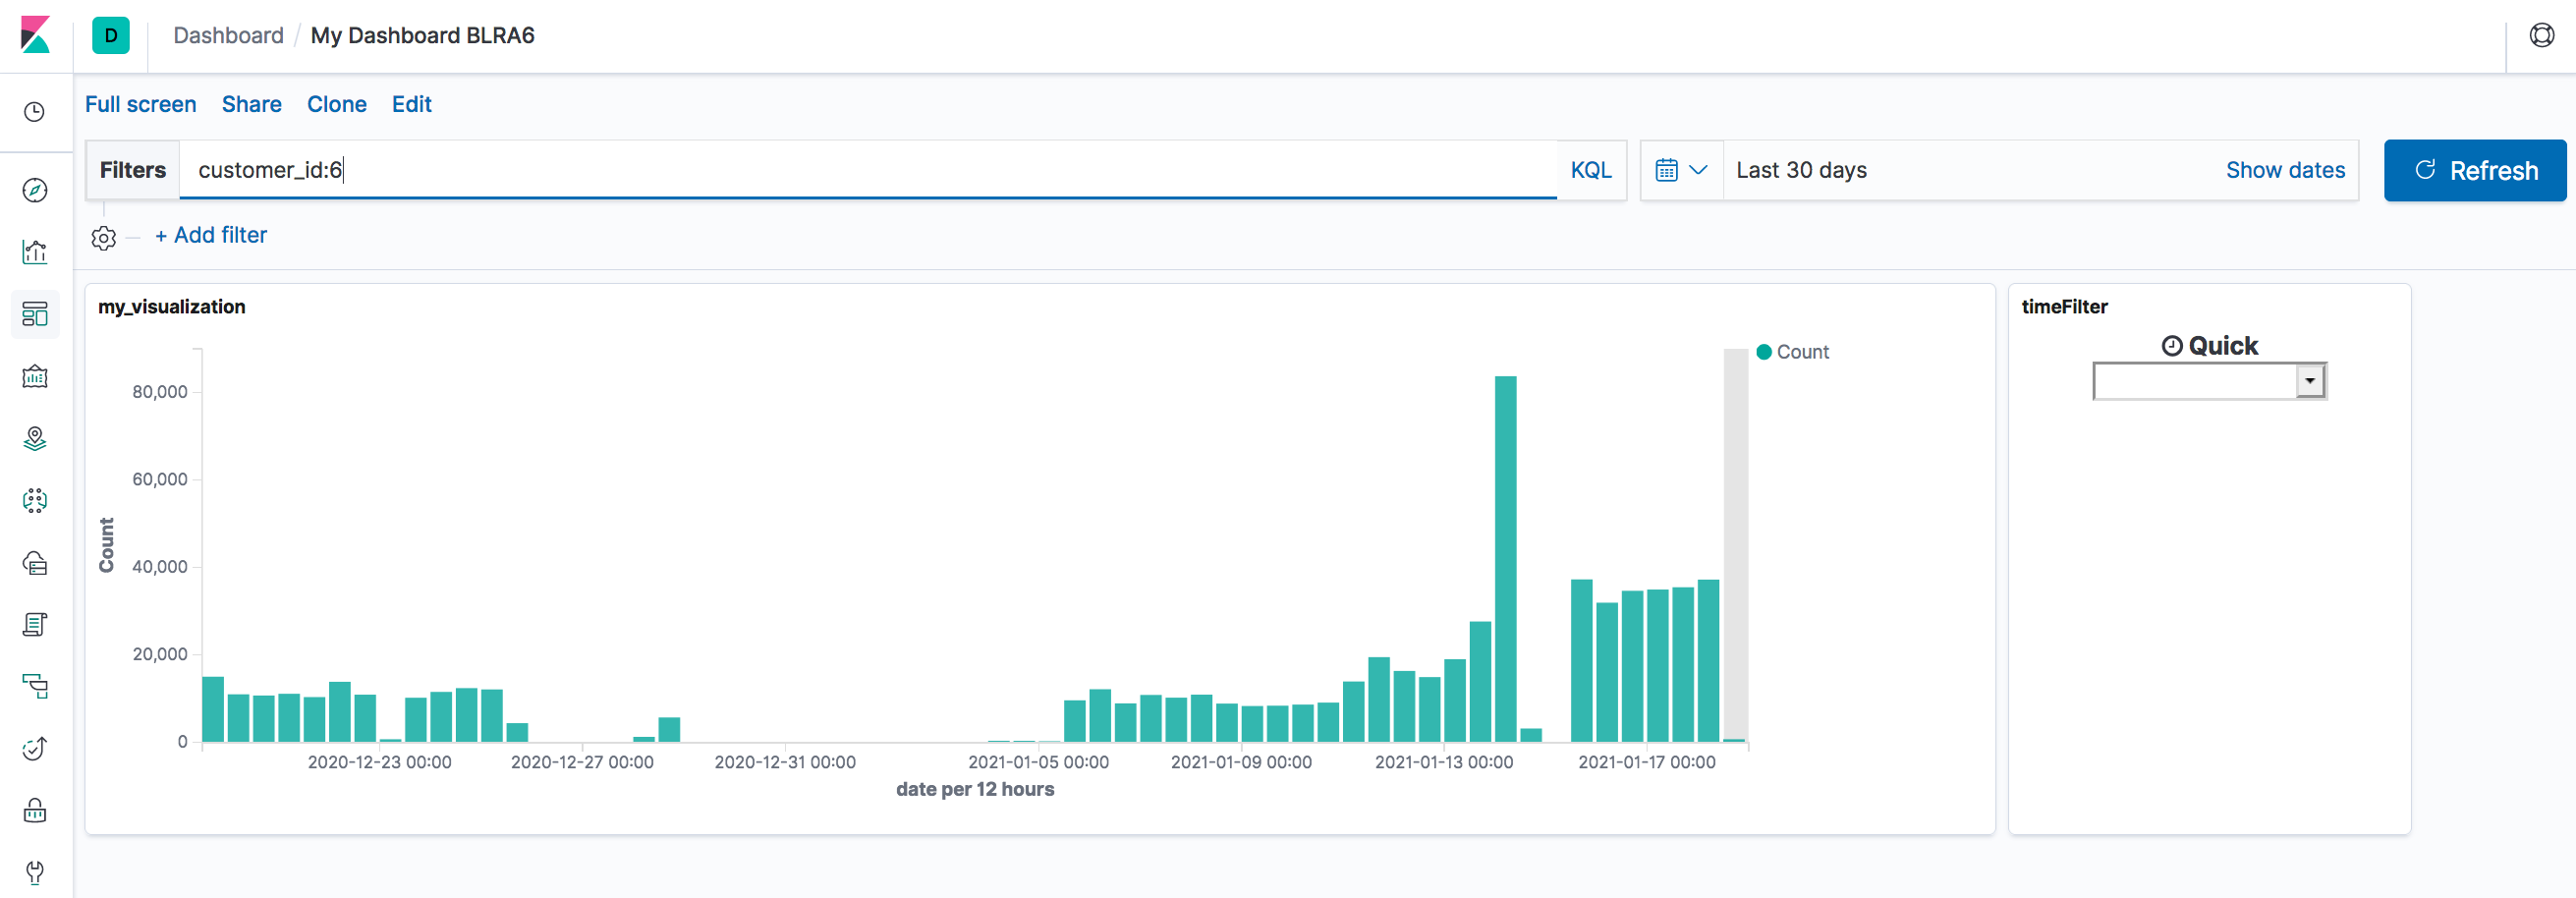
DevOps best practice guide
The MSactivator™ is a platform for designing and developing network and security automation applications.
The community applications (Microservices, Workflows and Adaptors) are available on GitHub
These applications are located in dedicated GitHub repositories and can be forked and/or cloned from GitHub to your MSactivator™ development platform.
This page explains in detail how to do this and the associated best practices.
How to install the microservices and the workflows
Overview
As a DevOps engineer, the first step to getting familiar with the MSactivator™ community code is to:
-
Retrieve the code from GitHub
-
Install the code on the OpenMSA platform
-
Utilize the microservices and the workflows
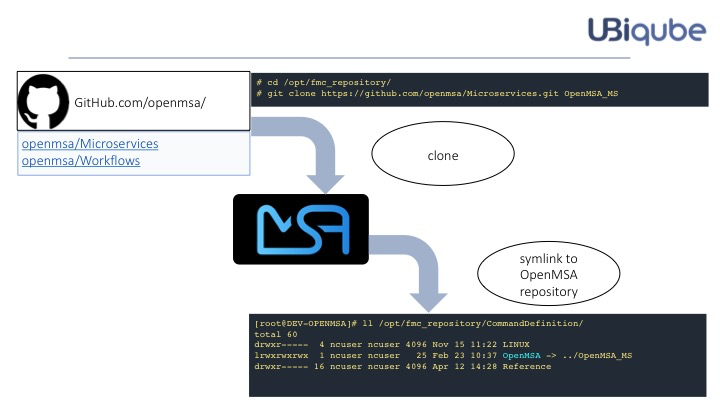
How to design/develop and contribute to the community
As a microservice or workflow designer you’ll have the opportunity to contribute to the community source code.
The easiest way is to utilize MSactivator™ as the design tool. This is the most typical and recommended method.
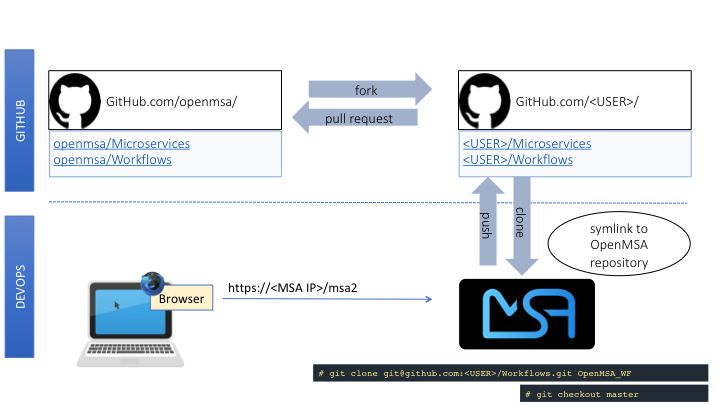
-
Fork the OpenMSA repository into your GitHub account.
-
Clone the repository from your personal GitHub account to your OpenMSA DevOps platform.
-
Utilize your favorite browser to use/design/test/update Workflows and Microservices.
-
Push the changes to your GitHub account.
-
Contribute by submitting pull requests to the OpenMSA community.
-
It is possible to use your favorite IDE to ease development of Workflow tasks or Device Adaptors that are in PHP language.
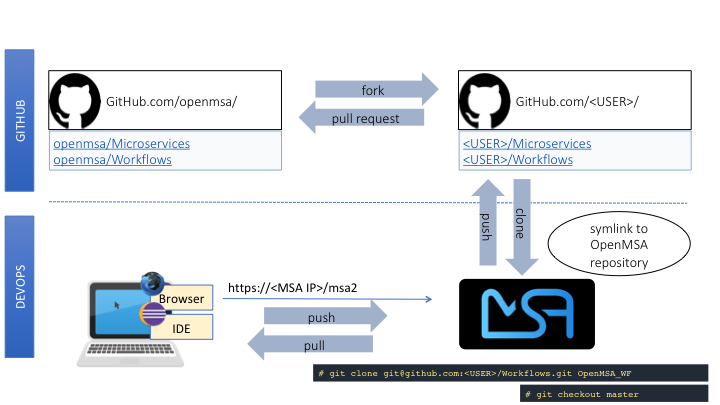
This procedure adds a set of push/pull steps to sync the code from your PC with your MSactivator™ DevOps platform.
Design or edit code on your PC and IDE, such as Eclipse or a simple editor with PHP syntax highlighting, then push to the MSactivator™ platform to use it live.
Default installation for the libraries.
When you install the MSactivator™ with the quickstart a selected list of libraries (microservices, workflows and adapters) are installed by default.
The installation is done by the script install_libraries.sh installed in the docker container msa_dev.
Standard libraries installation
Next, we’ll see where the adapters, microservices and workflows are installed, and some of the specific facts about this installation that you need to be aware of when installing your own libraries.
Adapters
The Github repository for the adapters is located under /opt/devops/OpenMSA_Adapters.
By default, the git remote is
# git remote -v
origin	https://github.com/openmsa/Adapters.git (fetch)
origin	https://github.com/openmsa/Adapters.git (push)
and the branch points to master
# git branch
* master
If you are planning to add your adapter or update an existing one, you need to add a remote to point to your own fork of the Github repository and create a dedicated branch.
When you are ready with you development, you can commit and push your changes to your remote with the new remote and use the branch as the upstream branch. You will then be able to create a pull request on OpenMSA repository and start contributing to the community code.
Learning about creating and installing new adapters is addressed in the adapter development documentation.
Microservices
The Github repository for the microservices is located under /opt/fmc_repository/OpenMSA_MS.
In a similar way to the adapters above, the remote is set to https://github.com/openmsa/Microservices.git and the default branch is master.
You can add your own remote and push your working branch to your fork.
The installation of the microservices is done under /opt/fmc_repository/CommandDefinition/ and is based on symbolic links to the git repo.
# ls -la | grep LINUX
lrwxrwxrwx  1 ncuser ncuser   25 Sep 24 09:02 .meta_LINUX -> ../OpenMSA_MS/.meta_LINUX  (1) (2)
lrwxrwxrwx 1 ncuser ncuser 19 Sep 24 09:02 LINUX -> ../OpenMSA_MS/LINUX (2)| 1 | A symlink as to be created to the meta file |
| 2 | you need to set ncuser as the user and group for all the files under /opt/fmc_repository/CommandDefinition/ otherwise the microservices won’t be listed or editable on the UI. |
Workflows
The Github repository for the workflows is located under /opt/fmc_repository/OpenMSA_MS.
In a similar way to the microservices above, the remote is set to https://github.com/openmsa/Workflows.git and the default branch is master.
The installation of the microservices is done under /opt/fmc_repository/Process/ and is based on symbolic links to the git repo.
# ls -la | grep Topology
lrwxrwxrwx  1 ncuser ncuser   28 Sep 24 09:02 .meta_Topology -> ../OpenMSA_WF/.meta_Topology
lrwxrwxrwx 1 ncuser ncuser 22 Sep 24 09:02 Topology -> ../OpenMSA_WF/Topology| when creating the symlinks to the workflow, you need to make sure to keep the consistency with the paths defined in the workflow definition file. |